Warranty Claims

Home / SAP / SM / Archive by category "Warranty Claims" (Page 2)

Warranty Claims – Copy Control – Define Copy Procedures

Well, with all the preparation for the SAP SCM and Logistics conference, it’s been a long time since I’ve had the opportunity to do some warranty claims stuff.  I had some time on the airplane, so what better time to give you something SAP related again.  Don’t worry, I’ll be giving you the low down on the conference soon, just as soon as I have time to figure it all out myself 🙂

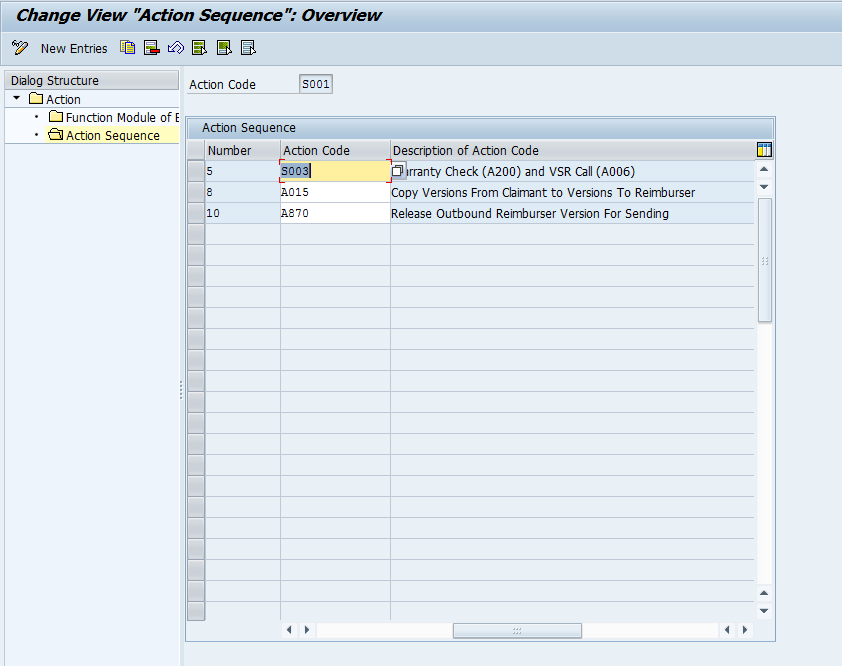
Today I wanted to talk about the warranty claims, and this time around I’m going to talk about the Copying control.  Today I’ll cover the Define Copy Procedure (tomorrow I’ll do the assignment).

blog02-01

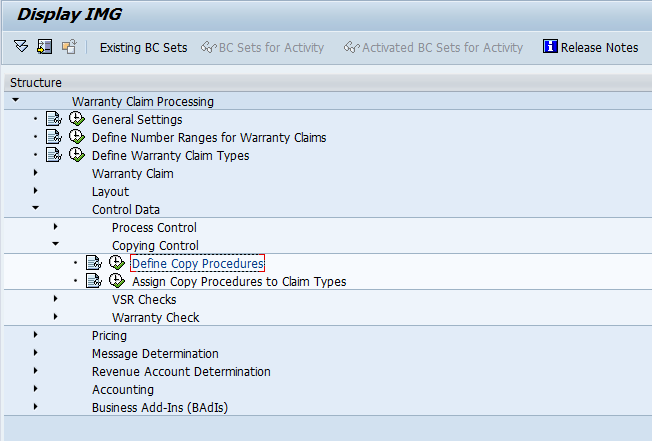
Now, as always, I like to show you where to find this.  So go to OWTY, and here you can find the menu to get here.

blog02-02

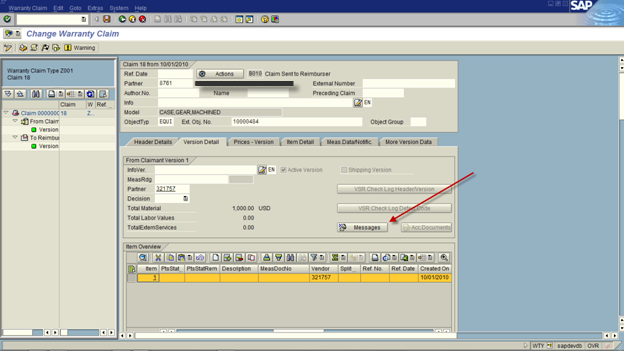
Now, we get to the screen.  The important thing to recognize is that everything is copied except for what you define here.  Being the purest that I am, I always think you should create your own version.  For today, I’ll just show you C1.

The check boxes on the initial screen work as follows:

  • NotCopyLTH = Do not Copy Long Text in Warranty Claim Header
  • NotCopyLTV = Do not Copy Long text of Warranty Claim Version
  • NotCopyLTI = Do not Copy Long Text of Warranty Claim Item

Beyond that, not much here.  Next we drill down to the fields not to be copied.

blog02-03

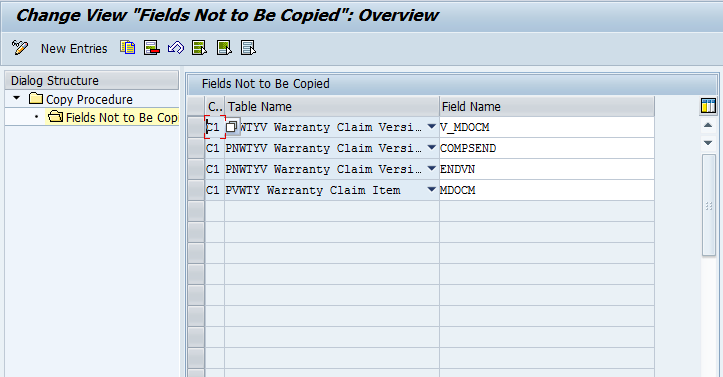
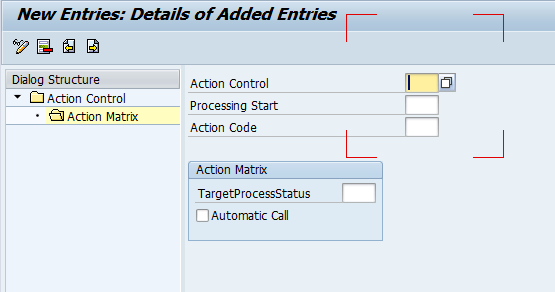
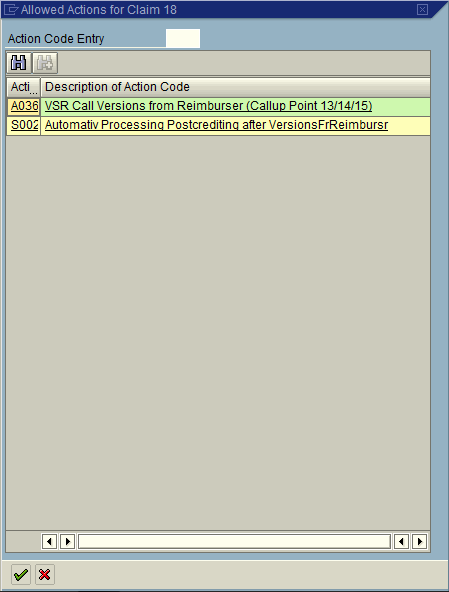
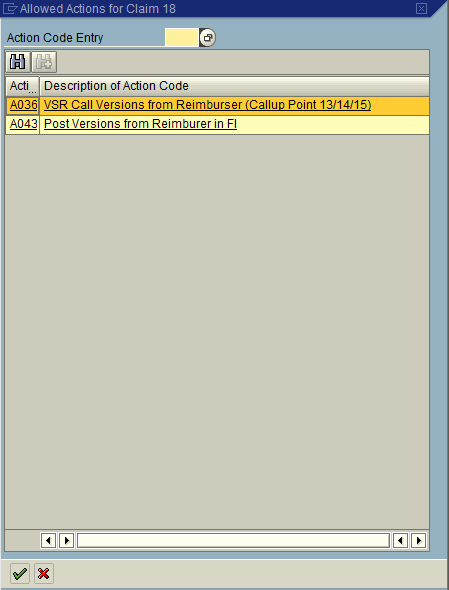
In this section, you will need one line for each field to exclude.  Notice that first you must select the table:

blog02-05

Then you can select your field.

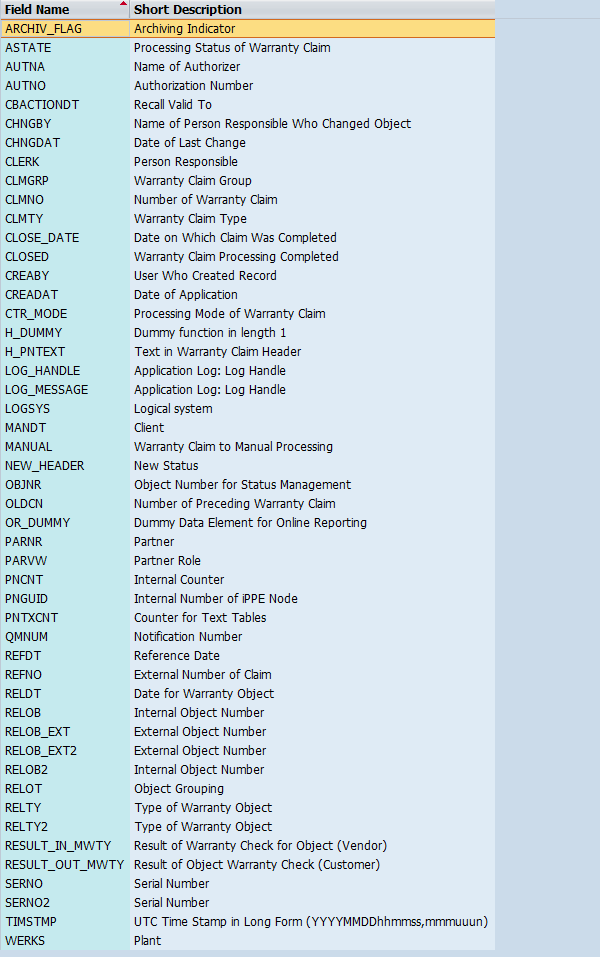
For Claim Header you get all the following fields available:

blog02-07
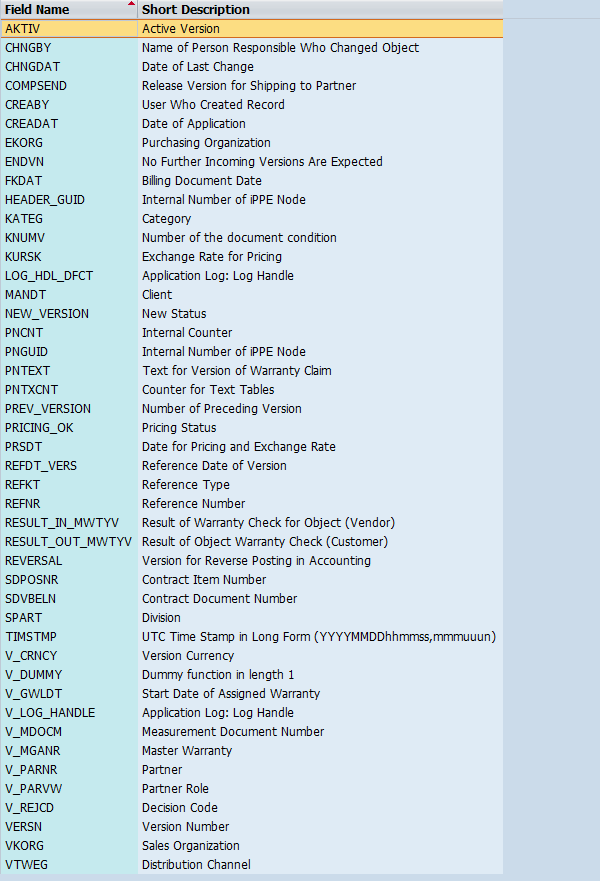
For the Claim Version you these fields:

blog02-04

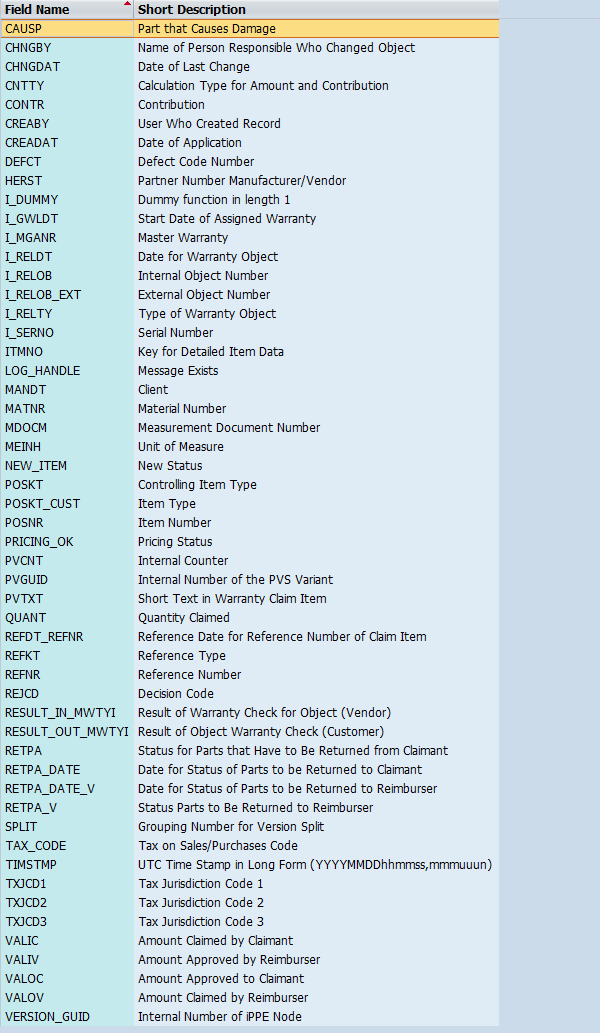
For Claim Item you get these fields:
blog02-06

Simply keep adding new entries until you have excluded everything you want from the copy function.  That’s it.
Thanks for reading,

Warranty Claims – Check Action Profile

Since I’ve been talking about warranty claims, and in particular the process control, I figured I better talk about all of it 🙂  This latest installment is a little piece called the Check Action Profile.  Now, I hadn’t used this feature a whole lot in the past, but it’s more functional than I originally gave it credit for.  Let me show what it can do.

wty01-01

First off, head to OWTY, and you can navigate to this particular step by following the above screenshot.

wty01-02

Next, you’ll see this screen that allows you select a single action profile.  I picked the post crediting profile, since it’s the one I use the most often.

wty01-03

Now, as soon as you execute, you’ll notice a huge grid, that gives you the road map of the entire process control you have setup.  You can see at a glance what Processes can call what actions, what is automatic, etc…  Now, the piece that I liked the best was the check.

wty01-04

so if you press the button that looks like a syntax check, it will either come back with nothing, or you will see the little error button.  If you press this, you’ll see what is inconsistent in the profile.

wty01-05

It’s hard not to laugh a little, since this is the untouched process that SAP provides to you, and it has things missing.  The important thing is that you can quickly identify where you missed something or where you should revisit to close the gaps.

It’s all pretty easy, but very helpful.  Thanks for reading,

Warranty Claims – Assign Function Codes to Action Codes

Well, since I’ve been hitting the warranty claims stuff pretty hard lately, I figured I might as well through another easy one out there.  This piece of configuration is really pretty straightforward, and likely something you will never touch.  But in my own quest for knowledge, and since I may put together an e-book in the future about warranty claims configuration, I decided to find out what this configuration was all about.  As it turns out, in 99% of the cases, the function code is equal to the action code.  About the only time it might be different is if you add some custom buttons.  Regardless, if you need it, here is how you do it.

wty01-01

Go to OWTY to find this menu path.

wty02-02

Beyond that, like you can see, there are 2 columns, and in most instances, they are identical.  There are a few instances where a different function code exists, but all in all, a pretty mundane, and rarely used piece of configuration.

Thanks for reading,

Warranty Claims – Define Actions

Now, getting back to warranty claims.  Today I’m going to talk about the define actions step.  This is another piece connected to my last 2 warranty claim posts.  Defining an action is the piece that does the work.  Last post we walked through creating/changing a status.  Today we talk about the action, so after all of this, the process control will make sense 🙂

wty01-01

Start at OWTY to get to the configuration.

wty01-03

Now, the first thing you’ll notice is that there are a LOT of actions available.  There are 4 types of actions:
Elementary Action Displayed in Action Box
Elementary Action Hidden in Action Box
Interlinking Action Displayed in Action Box
Interlinking Action Hidden in Action Box

Elementary Actions are exactly what they sound like.  They perform exactly 1 function.

wty01-02

Now, I picked the A005 to show you the action details.  Notice you can set the action type & the description.  In addition, you can check Display Mode, which means the action can be called, even in display mode.  Finally, Log Action check box allows you to include this action in the log for the claim (in my opinion, all actions should be logged… of course, I’m a big fan of seeing what’s happened in the past).

Now, if we move onto Function Module of the Elementary.
wty01-05

This time around, I selected action A103, and you can see the function module that gets called .

Now, if we look at an interlinking action.

wty01-04

Notice, now you can chain together several elementary functions.  Doesn’t matter if it’s hidden or displayed.  This is fun functionality, since you can pull together multiple steps at once, so the user doesn’t need to perform multiple actions to accomplish a task.

So, that’s the define actions step.  Thanks for reading,

Warranty Claims – Define Processing Status

I’m finally getting back to some of the warranty claims stuff again.  Today we’ll talk about a smaller piece of the configuration, but it connects directly to my last post on warranty claims.  This post is also within the Process Control portion of the claim.  The define processing status step allows you to create your own statuses within the claim and give it any description you want.  When you combine it with the define action controls you can connect your processing status with any action you want.  Here’s how you go about creating your own status.

wty01-01

Going back to OWTY, you can find this step in configuration.

wty01-02

Now, this is just a sampling, but you can easily create your own set of statuses.  I’ll get to more in depth claims configuration soon.

Thanks for reading,

Warranty Claims – Define Action Controls

Sorry, it’s been a while since I talked about the Warranty Claims configuration.  Time is always working against me, so finding the time is often challenging 🙂  So, on with the show…  This post is going to jump ahead a little bit from where we left off.  The reason being, to me, the sequence of configuration doesn’t really flow with the way you’d set the system up.  So it’s my blog, I can do it my way.  Defining the process is one of the most important pieces of the claims process, in my opinion at least, so I wanted to start with the action controls.

wty01-01

First, go to OWTY, and you this is where you find the configuration.

wty01-02

First, pick your claim type.  You can will often be using a custom claim type, but for simplicity, I’ll start with the AP01, post crediting claims.

wty01-03

Now, here’s the where things get heavy.  The first column, is our chosen claim type.  The next 4 columns are where the power comes from.  Now, in the start processing, this is the current status your claim is at.  Column 3 is the actions that are allowed to happen at that status, and column 4 is the status that the claim will move to if that action is taken.  Let’s look at an example
when the status is B001 is Warranty Claim New.  When the claim is at this status, you have the following actions you can take:

S001: Automatic Processing Postcrediting after VersionsFrClaimant
S003: Warranty Check (A200) and VSR Call (A006)
T*:  this is all the T actions…  however, you won’t see the TXXX actions in the list (because they are “hidden” actions).  But things like T060, complete claim are available by pressing other buttons, so you want to make sure they are available.

Now, if we pick S001, it will set the claim status to B010: Claim Sent to Reimburser, along with the back end actions that go along with it (we’ll talk more about that later).

wty01-04

If you want, you have the option to create your own options or change the existing ones.  Once you understand this concept, you can more easily build the “road map” to the process you ultimately need to create.

Thanks for reading,

Service Management – Warranty Claims example – OC

This is the final piece of the post crediting process.  Last time we covered the IV or inbound from the vendor.  This last piece is the OC or outbound to the claimant/customer.  We left off at the B025 status.

Press the action button.  Now you will create the claim version 4, to be sent to the claimant.

blog03-01

Select Action A013: Copy Versions from Reimburser to Versions To Claimant.

*** Note: you could reverse the posting by selection A052: Reversal Version from Reimburser in FI

Status is set to B028: Claimant Outbound (Reply) Created

blog03-02

Version Detail: Be sure to set the partner to be the claimant (customer number).

blog03-03

Be sure to verify the pricing on Item Detail.

After verifying the data, Press the Action Button:

blog03-04

Select Action: A860: Release Outbound Claimant Version for Sending

Status: B030 Claimant Outbound (reply) Sent

Press the Action Button again:

blog03-05

Selection A041: Post Versions to Claimant in FI

this will post the money to the customer account.

Status: B031:Claimant Version Posted

Finally Press the Checkered Flag to mark the claim as complete.

Status: B060: Claim Closed

*** Note, if the claim is rejected you would press the checkered flag as well.

So that’s the entire post crediting process in warranty claims.  I hope this helps shed some light on the full process and some of the things you can do with warranty claims.

Thanks for reading,

Service Management – Warranty Claims example – IV

Last time we talked about the OV or outbound to the vendor.  Now we cover what happens when we get a response from the vendor, or the IV.  We left off at status B010.

When the Vendor approves or rejects the claim, you can hit the action button to create the 3rd version of the claim.

blog02-01

Select A019 to create the 3rd version of the Claim.

The status is now set to B020: Reimburser Inbound (Reply) Received

Be sure to update the Item Detail tab with the amount that the vendor will reimburse.

blog02-02

Be sure to update the Version Detail tab with the Decision (Approve or Reject).

blog02-03

Press the Actions Button:

blog02-04

Select Action A036: VSR Call Version from Reimburser (Callup Point 13/14/15)

Status is now set to B022: Claimant/Reimburser Version checked

When the money is received, press the Action Button:

blog02-05

Select A043: Post Versions from Reimburser in FI

This will set the status: B025: Reimburser Version Posted

blog02-06

Press Save.

To see the accounting docs that were generated, press the document flow button.

blog02-07

Click on the accounting document.

blog02-08

Green arrow back to the claim, and press the action button.

Now, at this point, you’ve received the money from the vendor.  Next time around, we’ll talk about the OC or outbound to the claimant/customer, the end of the warranty claims cycle.

Thanks for reading,

Service Management – Warranty Claims Example OV

This post is the second part of my example in warranty claims.  In my first post, I talked about the IC or the inbound from the claimant/customer.  This next piece is what happen next in the post crediting process, that is sending the information to the vendor.  When we last left off, we set the status to B003, which means the claim has been checked.

Press the Action Button Again:

blog01-01

Select A015:  This will create Version 2 of the claim

blog01-02

If you look on the left side of the screen, you’ll see that a new version was created.  The reason is becomes very important is that each version can have completely different pricing and partners.  Think of it this way, your customer may ask for $100.  You may ask the vendor for $125.  The vendor may give you $75, and ultimately you give the customer $90.  Who knows?  it all depends on your agreements with your customer and your vendor.  Regardless, warranty claims gives you the freedom to do what you need.

Note:  the version 2 of the claim will need a Vendor as it’s partner (this is the partner that will pay the claim).

Verify the pricing on the Item Detail Screen.  Then Press the Action Button again:

blog01-03

Select A870 to release the claim to be sent to the vendor.

The Status is now set to B010: Claim Sent to Reimburser

This next section is optional, but it gives you the opportunity to print or send output.  Depending on your process, this could be IDOC, printed or emailed.

blog01-04

Press the Messages button to print out

blog01-05

This will work just like any other output determination.  One of the biggest things to keep in mind is that there are no printed forms out of the box for warranty claim.  There some IDOCS (I believe), but nothing that you could print or email.  That means, if you need it you will have to design it from scratch.

Next time I’ll talk about the IV or inbound from the vendor.

Thanks for reading,

Service Management – Warranty Claims IC example

Now that I’ve given you a taste of configuring warranty claims, I thought it might help to start with an example.  I’m going to walk through a Post Crediting example.  So today I’m going to talk about the first step in the post crediting processing, the Warranty Claims IC or inbound from the the claimant.

Now, everything starts with transaction WTY, so we head over there to create our sample claim.

blog01-01

Set the Claim Type: Z001

Press Create

blog01-02

Now, everything is configurable, so these screen shots show exactly one possible setup.  So the information I suggest entering is one possible set of data that can be collected.  In this claim, it is based on an equipment record.  This example is a claim from a customer, and will be serviced by a vendor.

Header Information:
Enter in the Partner (claimant customer)
Object Type: EQUI (this is the header equipment)
Ext Obj. No: Equipment Number

Version Detail Tab
Partner: (Claimant Customer Number)

blog01-03

Header Detail Tab:

Person Resp: optional
Plant: will come in automatically
Claim Group (should be whomever will be the reimburser)
Partner Table Control: Add an entry for the Vendor (VN and vendor number)blog01-04

Item Detail Tab – this is the area where you enter in the material to repair or return:

Item Type: MAT
Material: The material that is being repaired/returned
Quantity:  1.000
Amount: this is the proposed amount of the claim.

blog01-05

This next section gives you the opportunity to create a service notification connected to the claim. This is especially valuable if you use the return and repair process.
Notification Type:  ZW

Create Notification Button (this will replace IW51 or you can enter in an existing notification number)  If the header level equipment has a measuring point, you can enter in the measuring document.

blog01-06

Enter in the remaining information, and green arrow back.  (don’t create the repair sales order.  this is will be a separate step).

Next up, we get to revisit the VERSION DETAIL.
VERSION DETAIL Tab.

For each item that is under warranty: enter in the vendor number.

blog01-07

Save after entering in all of this information.

Now the notification can be processed as it normally it would.  After the part has been received and analyzed, you can continue processing the claim.

Update the amount to be claimed for the item (item detail tab).

Currently the Claim will be at Status B002: claim being processed

blog01-08

Now, when you are ready to move to the next step of the claim, you need to move to the next status.
Uncheck the manual Processing check box.

Press the Actions button:

blog01-09

Select ZS03 and hit the green check.

If the top level equipment has a master warranty associated with it, then this screen will appear showing if the part is still under warranty/contract or not.

The notification will now be at B003: Claim Checked.

This bumps the status and allows you to create the next version of the claim, but we will save that for another post.
Thanks for reading,

Uncheck the manual Processing check box.

Press the Actions button: