VC

Home / SAP / Archive by category "VC" (Page 3)

Variant Configuration – Creating the Knowledgebase

Well, now that you know how to get the database setup for the SCE UI, you need to work on creating the knowledgebase.  This is pretty straightforward exercise, but it does require a few transactions to perform the whole process.  Let’s walk through what you need to do.

blog04-01

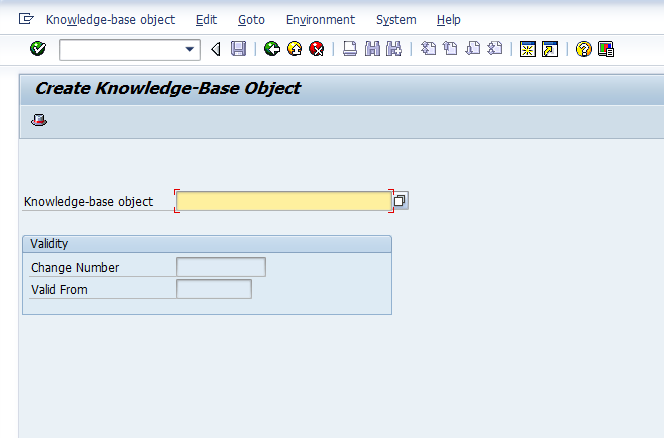
We start with Transaction: CU31 to create the KB object.

blog04-02

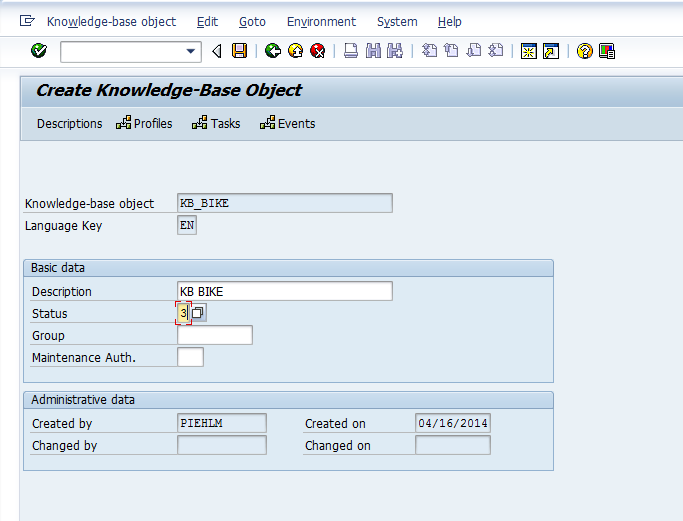
Much of the information is just descriptive, so set the status and give it a description.  THen press the profiles button.

blog04-03

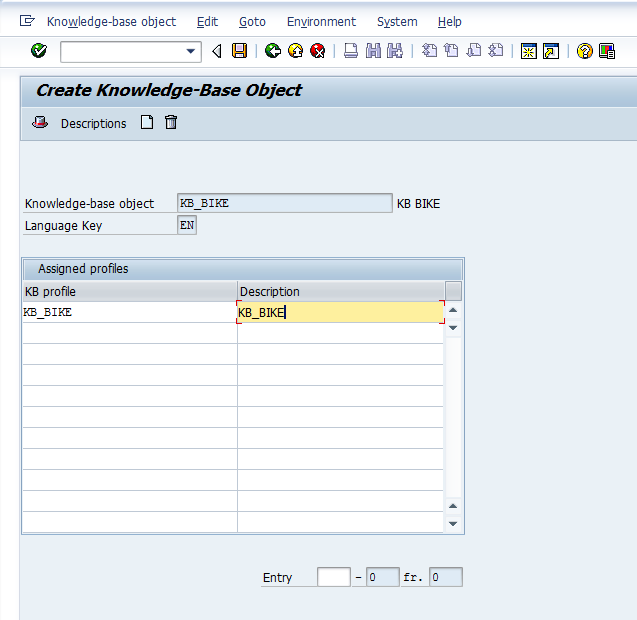
Again, these are just names, so name the Profile and give it a description.  Then press enter.

blog04-04

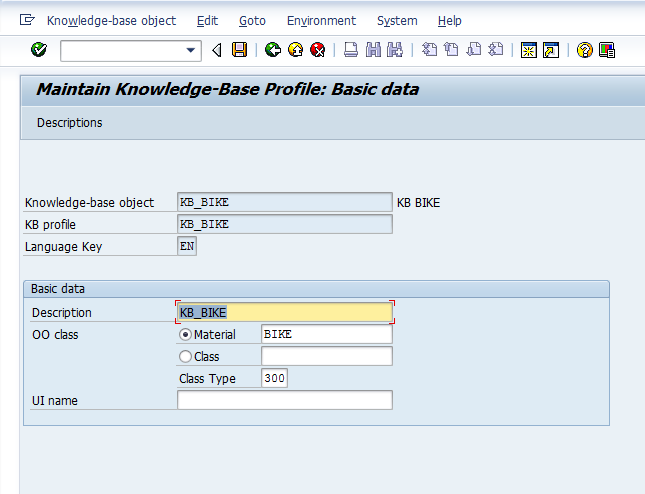
Now, we finally get to some real data.  I typically enter in the KMAT material, but you could do it by class and class type.  Add a description and then save.

blog04-05

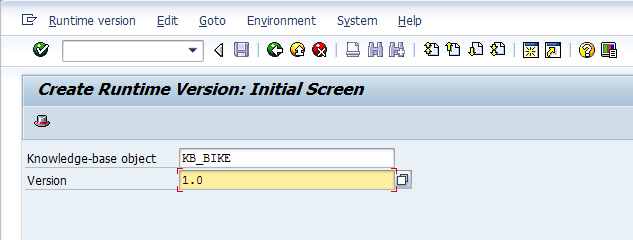
Now that you have a knowledge base, you can create the runtime version (RTV).  Go to transaction CU34.

blog04-06

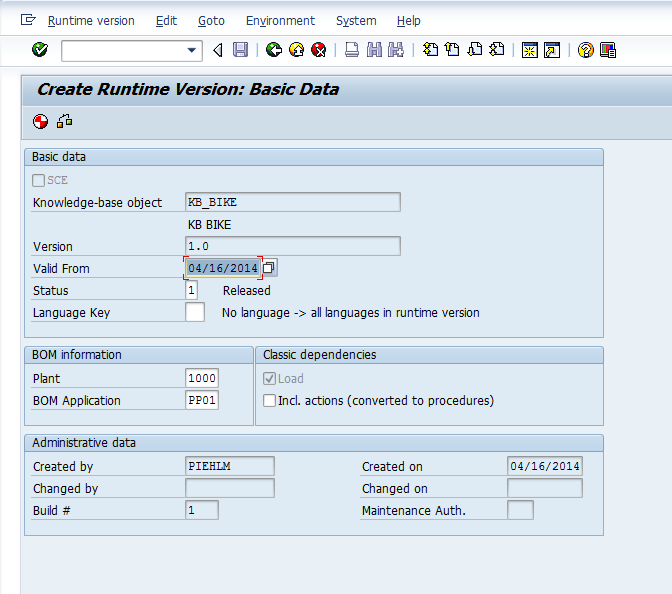
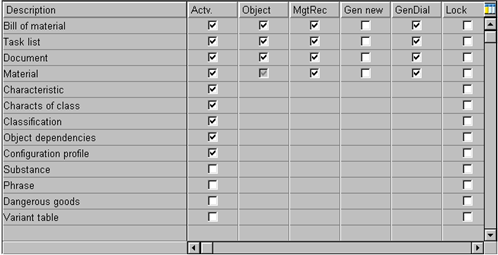
IN this screen, we set up all the vital stuff, including what plant the BOM should be looking at, if it’s a production BOM or Sales BOM, etc… Also, a very important field is the valid from date.  Remember, that KB’s and RTV’s have no concept of engineering change.  This means that the valid from date is VERY important for your process going forward.

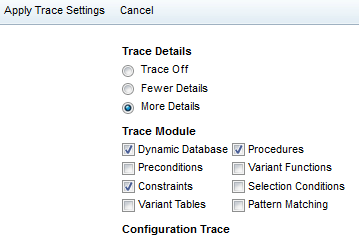
After you enter in the info, I encourage you to check.  Press the syntax check button, and you will receive a report of your model.

blog04-07

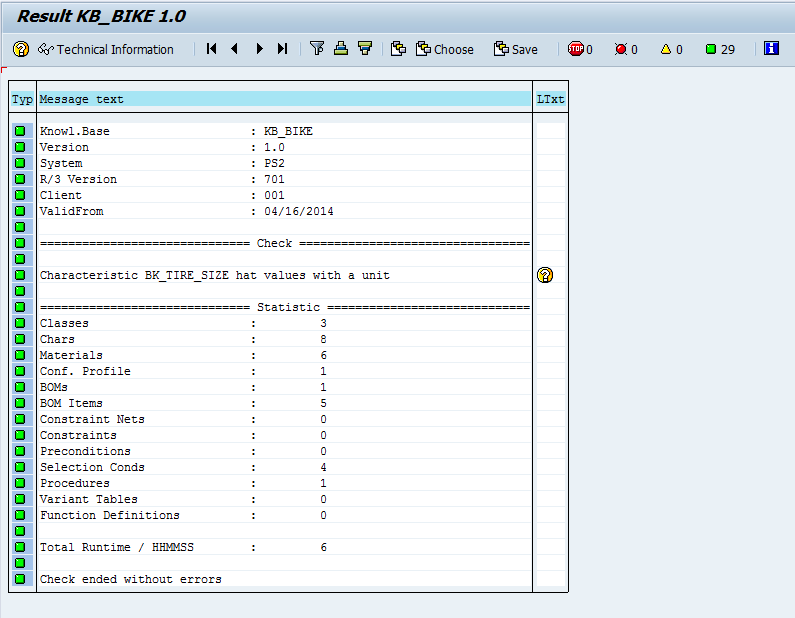
My model is very simple, so everything is green.  If anything is yellow, be sure to pay close attention.  This could cause you issues within the SCE/IPC.  The question mark to the right often has good information.

Finally, green arrow back, press generate, and you have your RTV.

The last step is just to download the flat files.

Use transaction CU36

Enter in your KB and version, then press the export button.

blog04-09

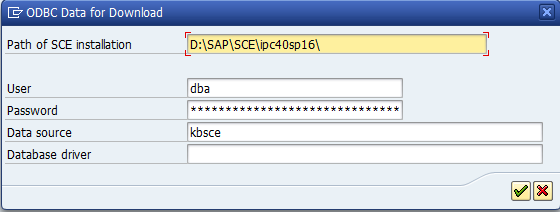
The only field you need to be concerned with here is the Path.  the rest only applies if you are using R/3 or CRM as the your SCE installation.  For my purposes, I’m focusing on the offline database only.

Hit the green check and you’re ready,  Next post I’ll talk about uploading the flat files into the SCE.

Thanks for reading,

Variant Configuration – Installing the SCE UI in a Local Database

Now, I struggled with this one for a while.  I was able to get the IPC 4.0 files that include the stand alone version of the SCE UI.  I recently learned that in all the versions after 4.0, this option is no longer available.  So, to me, 4.0 is still a premium, just to be able to do the offline testing of a model (especially for someone that periodically travels on airplane.  ha ha ha).  Anyway, after some digging, I was finally able to figure out how to get this installed.  If you’ve read my previous posts on the SSC installation, you’ll remember that you need SQL Server on your local machine in order to make this work.   Please refer back to this post if you are having issues connecting.

Now, the first thing you need before you can do anything is set the system variable for JAVA_HOME.  If you aren’t familiar with this, following the next couple of steps.
Right click on my computer, and select properties.  If you are in windows 7, click the advanced system settings, and press the environment variable button.

blog01-01

blog01-02

blog01-03

The variable name needs to be: JAVA_HOME

the value is the path on your hard drive to get there.

Now, once you have this, you can move on to the harder pieces.

The next thing you need to do is locate the files for the ipc, and go to the /bin directory.  This will have a bunch of batch files.  The first file you need to execute is:  admin.bat

blog01-04

The first screen, you can leave this defaulted as it is.  This would be more important if you wanted to connect directly to R/3 or CRM.  Go ahead and press Next. and then Next again, since you don’t need to worry about security on your local machine 🙂

blog01-05

this screen is where all the work comes in.  Press add to add a new connection

blog01-06

Now, all of these values will come from the SQL Database you created.  See SSC installation for more details.  Be sure to create a new database, I called mine IPC.  Then populate all the other values.  The Port you can accept the default, for Client, you can just use 000 since it’s local.

Finally, make sure to highlight the new DB you added, and press the Create Tables button.  Then press save.

I’ll take more about this soon, including how to upload a model into the stand alone database.

Thanks for reading,

Variant Configuration – Material Variants Visible in Sales Orders

I just discovered something interesting that I never noticed before.  During some testing for an upcoming go-live, one of the people in our team noticed that in an plant that uses the material variant, but doesn’t produce it, you can see the configuration within the sales order.  The configuration is completely grayed out, so no changes can occur, but still behavior I didn’t realize.

This little tidbit has some interesting side effects and possible benefits.  The first and most obvious is that your order entry person can easily see the configuration of a material variant if they want to see what options are select.  Now, one of the key things to keep in mind, if you want this behavior, you now need to maintain the characteristics and values in all plants.  This is always a mixed bag in my opinion.  Typically, I encourage clients to only maintain the material variants in plants that produce the material.  The reason is that for any changes to VC logic that impacts the characteristics and values needs to be updated in every material variant/plant combination.  This can quickly become a big data nightmare if you have many plants and variants.  If the number is manageable, it’s not such a big deal, but it is an extra piece of data to maintain.  It also means that you need to be careful if you need to have any plant specific logic incorporated within your materials (again, you hope to avoid this whenever possible in the model).

The short story, it could be a mixed blessing to have Material Variant information available within the sales order.  Potentially valuable, with master data maintenance repercussions 🙂

Thanks, for reading,

Variant Configuration – Implementing ECM

Best approach for implementing ECM on a VC model for the initial push to production.

  1. Create ECM in production client
  2. ALE from Production Client to Dev client
  3. ALE all components from Dev to Production Client using ECM.
  4. Do not maintain any components with ECM in the Dev client.
  5. Maintain all models in production using the change number, or create new change numbers for each change.

Let me go into more details.  For step 1, the ECN must exist in the target system before any ALE is processed.  This allows every object to be instantly placed under engineering change management.  The only exception will be table structures and function structures (they don’t have the option of ECM).  In addition, routings, reference operation sets, etc do not need to be placed under engineering change management, but it is highly encouraged.  This will be based on your business rules and what is commonly done in your organization.

In order to perform certain ALE steps, the change number must exist in the source system.  It does not need to be assigned to any objects, but for the ALE transaction (like BD91 or BD92) you will need to have the change number exist in both the target and the source.

vc01

Now, to demonstrate, I used a test system to create a characteristic without ECM.  Then I’m going to make a change to the cstic and place it under ECM.  I created TEST_CSTIC and gave it values 001, 002, 003

Then I created the change number: 500000000000

Went back to TEST_CSTIC and added 004.

I then created 2 dependencies to reference this characteristic.  The first one under ECM at creation, and the second created without ECM, and then placed under ECM.  I was still able delete a value from the characteristic despite the dependency existing at 00/00/0000.  Keep in mind, the system is far more likely to give you grief when you don’t have everything under ECM control at initial creation.  There are OSS notes to be found that talk about cleaning up items without ECM, but if you can avoid the hassles, I strongly encourage it J  Happily, as of EHP4, it seems that SAP has cleaned up the integration with change numbers if they are applied after the fact, but this could quickly change once it’s connected to multiple items with mix and match ECM.

Here is something to be aware of when doing a drop down search.  You will see this behavior in searching in some transactions, like object dependencies.

vc02

Look closely at ECM_TEST_2.  It’s the same dependency, but it shows once without the change number that has the 00/00/0000 date, and again after the change number was applied.  Based on the date you enter in CU03, you can see both versions.  In previous version of SAP, this could cause issues trying to remove or delete items that existed in the 00/00/0000 date from, but from my testing in the EHP4 system, these issues appear to be resolved.

Regardless, it is still advisable to initially create all objects with ECM.  If you don’t do this with the ALE, you will need to manually make a change to every object with a change number in order to lock it down and prevent changes from occurring without ECM.

I have had to do this before and I typically use Gui Scripting to make a minor description change or add a comment.  It’s not pretty, but it can be done.


Variant Configuration – Adding Values to a Multiple Value Characteristic in use

Now, this is an obscure, so no idea if anyone else has had to do this, but I just had a situation where a multiple value characteristic started off as free text only and the client needed to change it to define the values.  I thought this would be a simple exercise, however I quickly found out a few things.  If your characteristic is in use and you choose not to check the additional values box, then it’s all or nothing before you can save.  That means you need to track down every value that was entered for you multiple value characteristic and give it a value in CT04.
Now, I went through the where used and thought I found every value that I had used.  Well, I was wrong.  So, after spending a little time in debug, I found the following trick.  If you place a breakpoint in the following area, you

Program: SAPLCTMV
Include: LCTMVF2I
Form: CHECK_DEL_OF_VALUE

Function: CTCH_CHECK_CLASSIFICATION

If you place a breakpoint here, and look right after this function, you’ll see a couple of error lines.  If you look at the value of  sy-msgv1, you’ll see the value that is missing in your characteristic.  Now, this is probably an iterative process to get everything, but this will help to prevent you from wasting too much time looking for one specific value to add to your characteristic.

Thanks for reading,

Variant Configuration – Setting up Sales Order Costing

When you use variant configuration, one of the things you often need or want to do is setup sales order costing for your configuration.  Surprisingly to me, sales order costing is NOT setup automatically for the TAC item category.  So let me walk you through how to set this up (at least as far as I can take you).  Like so many things, you’ll need some input from your FICO expert to make sure all the settings are proper for their world 🙂

blog01-04

Now, I’m going to start at the beginning, so you might be able to skip this step, but I’m going to assume you don’t know the requirements class you need to update.

So, use this path to the IMG in order to find your requirements class based on your item category.

blog01-05

I’m going to show the standard Item Category, TAC for a configurable material.  You can simply substitute your item category in here.

blog01-06

Now, it’s nice because you can see your requirements class at the bottom portion of this screen without backtracking to the requirements type screen.

blog01-01

We can get to the real work.  We have to go to a little bit different spot in configuration to adjust these settings.

blog01-02

Now, using the requirements class we located earlier, we can go to the details.

blog01-03

Now, all the work happens on this screen.  Originally, this screen was completely blank in standard SAP.  What I’ve populated is the most standard configuration I’ve used in the past.

Costing:  Setting this to X makes it required for sales order costing.
Costing ID: determines if you want automatic sales order costing (A) or automatic with marking (B).
Costing Method: (1) Product Costing, (2) unit costing
Costing Variant: PPC4 for sales order costing

CndTypLinItm: this is something optional, but it tells you where you can put the value within pricing  if you wish to use it for margin or cost plus calculations
Acct Assignment Cat: M for Ind Cust wo KD-CO
Valuation: M Separate valuation with reference to Sales Document/Project.

Settlement Profile: SD1 – Sales Order Make to Order Production

The one field I skipped is the Settlement Profile.  This one I always defer to my FICO person.  I don’t even pretend to know which one of these to select.

Once you set this stuff, you should be good to.

Thanks for reading,

Variant Configuration – ESTO issue

Well, of course, I talk about something one day, and then find a rather large “gotcha” the next.  Not quite Murphy’s Law…  but it’s similar.  ha ha ha.  Yesterday I talked about the cool new ESTO process, and today I found out something that kind of sucks.  In order for the ESTO process to properly handle sales order costing, you must recreate your variant BOM in the originating plant.

Let me explain further.  Let’s say that Plant A takes the order, and points to plant B to create the production order, fulfill the demand and then send it over to plant A to finally go back to the customer.  This part works just fine, but sales order costing is NOT smart enough to look at the cost of the part in plant B.  It looks at plant A, and uses that cost.

As a modeler, that means that now the configurable BOM in Plant B, must be replicated in plant A (with the exception of setting the materials in the BOM to be costing relevant only).  This then allows sales order costing to explode the VC BOM in plant A, to come up with the cost that will be incurred in plant B.  While this isn’t the end of the world, it does increase your maintenance.  What I’m not sure about is if the routing must also be replicated (I’m assuming it would).

If anyone can comment on this, I’d love to hear about it.  If not…  be aware of this when you start to implement ESTO.

Thanks for reading,


Variant Configuration – the new ESTO process

Now, the current project I’m on is my first exposure to this process, so maybe I’m just behind the curve, but if you happen to know more about this, please let me know.  The process I’m talking about is ESTO.  Now, this is very similar to the original STO (Stock Transfer Order) which is a process for moving stock between facilities.  It can work similar to a purchase order between plants, with a lot less paperwork.  Now, ESTO is a way that you can do with a configurable material.

So, envision this.  Your facility in Europe takes an order for a variant configuration material.  Through the magic of special procurement keys, you can now send that planned/product order demand to any other plant of your choosing.  Now, I’ve been doing this a while, so this functionality is pretty cool.  I’ve always had to tell customers if you want to do something like this, you have to use material variants.

The magic with ESTO is that it will transfer your configuration to the building plant, so that it can use it’s configurable BOM’s and routing to produce the machine, and then allow it to be shipped to the plant that originated the demand.

While I haven’t been closely involved in the testing of this process it does have me curious.  Again.  if you have any feedback on this process, or things to consider, I’d love to hear them.

As always, thanks for reading.

Variant Configuration – IPC Tracing using Engine Tracing

This next method is yet another option for IPC Tracing.  This time we talk about the Engine Tracing.  First things first, you have to turn it on.

Activating engine traces

In transaction SM53, select Log Configuration:

blog01-01

Activate log level “Debug” for:

  • com.sap.spc.document.rfc.engineTrace
  • com.sap.sxe.trc.imp

blog01-02

From now on, engine traces will be logged and you can use IPC also from VA01.

For seeing these traces, go back to SM53, Display Log and navigate to com.sap.sxe.trc.imp.

blog01-03

This will bring up the engine traces.

Now in comparison, this eliminates the issue of seeing the configuration initialize.  However, it comes with a price.  You MUST Always turn back the log level to error after you are done. VMC logging is very rudimentary and traces produce a lot of data. Complete instances can be brought down by consuming all harddisk space  with log files!  So unless you want to crash your IPC, do NOT leave this on.

thanks for reading,


Variant Configuration – IPC Tracing using IPC UI

As I mentioned in a previous post, there are 3 main ways to debug or trace in the IPC.  This second method is probably the easiest method, but comes with limitations (doesn’t everything 🙂 ).  IPC Tracing using IPC UI is very useful and very simple to see what’s happening within your configuration.

Step one is to activate the tracing functionality.

The IPC UI has a built in functionality to display engine traces. In order to active these engine traces, you have to turn on the following switch in the XCM Administrator:

blog01-01

Select or create a specific component configuration for Behavior.

blog01-02

The option behavior.enabletrace is by default off (“F”) and has to be turned on (“T”).

Once traces have been activated, there is a new option in the menu “Trace UI”.

blog01-03

The trace settings can be specified on the following screen:

blog01-04

The modules are the same as in SCE, see Table 1 “traceable engine modules” .

Activate the traces by clicking “Apply Trace Settings” in the top menu.

This brings you back to the configuration UI, now click on Trace UI again and you will see a trace similar what was shown in the COM_CFG_SUPPORT.

Now, I mentioned a downside to this approach.  That downside is that it’s impossible to ever see the initialization of your characteristics and values.  You can see what happens when things change, but not the values that get set upon entering the configuration, like reference cstics.  For any development environment, I still highly encourage this setting to be turned on.

thanks for reading,