SAP

Home / Archive by category "SAP" (Page 21)

Variant Configuration – Installing the SCE UI in a Local Database

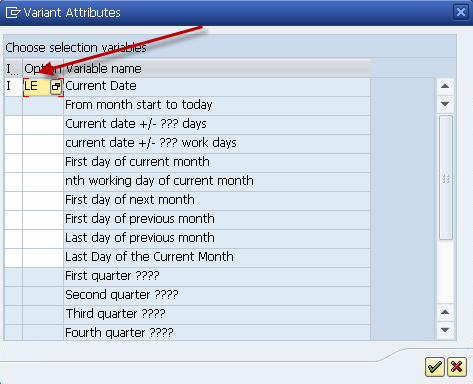
Now, I struggled with this one for a while.  I was able to get the IPC 4.0 files that include the stand alone version of the SCE UI.  I recently learned that in all the versions after 4.0, this option is no longer available.  So, to me, 4.0 is still a premium, just to be able to do the offline testing of a model (especially for someone that periodically travels on airplane.  ha ha ha).  Anyway, after some digging, I was finally able to figure out how to get this installed.  If you’ve read my previous posts on the SSC installation, you’ll remember that you need SQL Server on your local machine in order to make this work.   Please refer back to this post if you are having issues connecting.

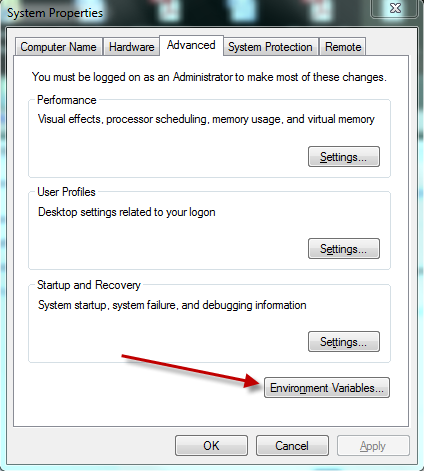
Now, the first thing you need before you can do anything is set the system variable for JAVA_HOME.  If you aren’t familiar with this, following the next couple of steps.
Right click on my computer, and select properties.  If you are in windows 7, click the advanced system settings, and press the environment variable button.

blog01-01

blog01-02

blog01-03

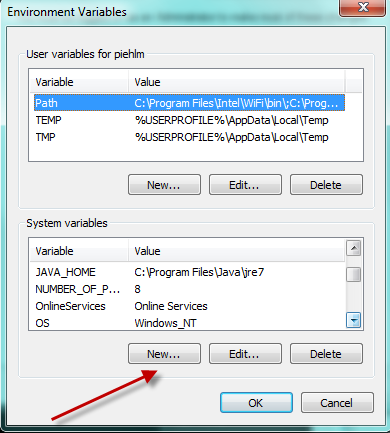
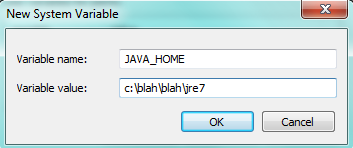
The variable name needs to be: JAVA_HOME

the value is the path on your hard drive to get there.

Now, once you have this, you can move on to the harder pieces.

The next thing you need to do is locate the files for the ipc, and go to the /bin directory.  This will have a bunch of batch files.  The first file you need to execute is:  admin.bat

blog01-04

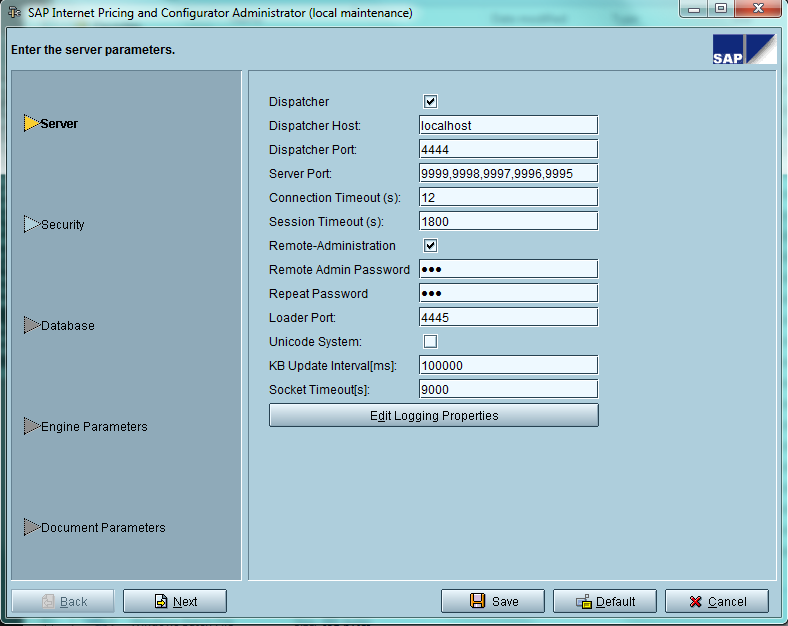
The first screen, you can leave this defaulted as it is.  This would be more important if you wanted to connect directly to R/3 or CRM.  Go ahead and press Next. and then Next again, since you don’t need to worry about security on your local machine 🙂

blog01-05

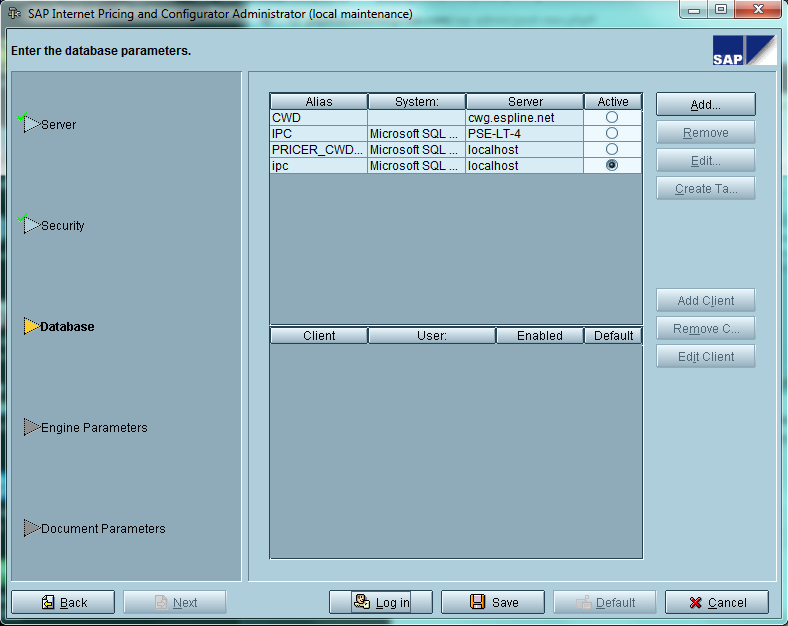
this screen is where all the work comes in.  Press add to add a new connection

blog01-06

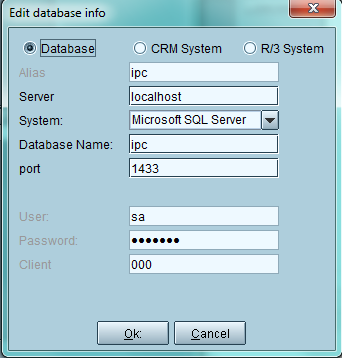
Now, all of these values will come from the SQL Database you created.  See SSC installation for more details.  Be sure to create a new database, I called mine IPC.  Then populate all the other values.  The Port you can accept the default, for Client, you can just use 000 since it’s local.

Finally, make sure to highlight the new DB you added, and press the Create Tables button.  Then press save.

I’ll take more about this soon, including how to upload a model into the stand alone database.

Thanks for reading,

Variant Configuration – Material Variants Visible in Sales Orders

I just discovered something interesting that I never noticed before.  During some testing for an upcoming go-live, one of the people in our team noticed that in an plant that uses the material variant, but doesn’t produce it, you can see the configuration within the sales order.  The configuration is completely grayed out, so no changes can occur, but still behavior I didn’t realize.

This little tidbit has some interesting side effects and possible benefits.  The first and most obvious is that your order entry person can easily see the configuration of a material variant if they want to see what options are select.  Now, one of the key things to keep in mind, if you want this behavior, you now need to maintain the characteristics and values in all plants.  This is always a mixed bag in my opinion.  Typically, I encourage clients to only maintain the material variants in plants that produce the material.  The reason is that for any changes to VC logic that impacts the characteristics and values needs to be updated in every material variant/plant combination.  This can quickly become a big data nightmare if you have many plants and variants.  If the number is manageable, it’s not such a big deal, but it is an extra piece of data to maintain.  It also means that you need to be careful if you need to have any plant specific logic incorporated within your materials (again, you hope to avoid this whenever possible in the model).

The short story, it could be a mixed blessing to have Material Variant information available within the sales order.  Potentially valuable, with master data maintenance repercussions 🙂

Thanks, for reading,

Variant Configuration – Implementing ECM

Best approach for implementing ECM on a VC model for the initial push to production.

  1. Create ECM in production client
  2. ALE from Production Client to Dev client
  3. ALE all components from Dev to Production Client using ECM.
  4. Do not maintain any components with ECM in the Dev client.
  5. Maintain all models in production using the change number, or create new change numbers for each change.

Let me go into more details.  For step 1, the ECN must exist in the target system before any ALE is processed.  This allows every object to be instantly placed under engineering change management.  The only exception will be table structures and function structures (they don’t have the option of ECM).  In addition, routings, reference operation sets, etc do not need to be placed under engineering change management, but it is highly encouraged.  This will be based on your business rules and what is commonly done in your organization.

In order to perform certain ALE steps, the change number must exist in the source system.  It does not need to be assigned to any objects, but for the ALE transaction (like BD91 or BD92) you will need to have the change number exist in both the target and the source.

vc01

Now, to demonstrate, I used a test system to create a characteristic without ECM.  Then I’m going to make a change to the cstic and place it under ECM.  I created TEST_CSTIC and gave it values 001, 002, 003

Then I created the change number: 500000000000

Went back to TEST_CSTIC and added 004.

I then created 2 dependencies to reference this characteristic.  The first one under ECM at creation, and the second created without ECM, and then placed under ECM.  I was still able delete a value from the characteristic despite the dependency existing at 00/00/0000.  Keep in mind, the system is far more likely to give you grief when you don’t have everything under ECM control at initial creation.  There are OSS notes to be found that talk about cleaning up items without ECM, but if you can avoid the hassles, I strongly encourage it J  Happily, as of EHP4, it seems that SAP has cleaned up the integration with change numbers if they are applied after the fact, but this could quickly change once it’s connected to multiple items with mix and match ECM.

Here is something to be aware of when doing a drop down search.  You will see this behavior in searching in some transactions, like object dependencies.

vc02

Look closely at ECM_TEST_2.  It’s the same dependency, but it shows once without the change number that has the 00/00/0000 date, and again after the change number was applied.  Based on the date you enter in CU03, you can see both versions.  In previous version of SAP, this could cause issues trying to remove or delete items that existed in the 00/00/0000 date from, but from my testing in the EHP4 system, these issues appear to be resolved.

Regardless, it is still advisable to initially create all objects with ECM.  If you don’t do this with the ALE, you will need to manually make a change to every object with a change number in order to lock it down and prevent changes from occurring without ECM.

I have had to do this before and I typically use Gui Scripting to make a minor description change or add a comment.  It’s not pretty, but it can be done.


Warranty Claims – Copy Control – Assign Copy Procedures to Claim Type

Figured I better finish off these section of configuration before I get sidetracked again J  So today we’re still talking about Warranty Claims, Copying control.  Today we will go over the Assign Copy Procedures to Claim Types.

blog02-01

Again, go to OWTY to find this configuration, and you’ll see where to get to this menu.

blog04-02

Beyond this, it’s pretty straightforward.  For each claim type and vervion type, you can select the copy procedure you want to use.  In addition, there are a few extra check marks:

COpyPriceMAT
CopyPriceFR
CopyPriceSUBL

You can control copying prices separately for the item types MAT, FR and SUBL.  We will talk more about these in a future post when we start talking about items.  For now, just know that you can control what prices should be copied.

That’s it, nice and easy.
Thanks for reading,

Warranty Claims – Copy Control – Define Copy Procedures

Well, with all the preparation for the SAP SCM and Logistics conference, it’s been a long time since I’ve had the opportunity to do some warranty claims stuff.  I had some time on the airplane, so what better time to give you something SAP related again.  Don’t worry, I’ll be giving you the low down on the conference soon, just as soon as I have time to figure it all out myself 🙂

Today I wanted to talk about the warranty claims, and this time around I’m going to talk about the Copying control.  Today I’ll cover the Define Copy Procedure (tomorrow I’ll do the assignment).

blog02-01

Now, as always, I like to show you where to find this.  So go to OWTY, and here you can find the menu to get here.

blog02-02

Now, we get to the screen.  The important thing to recognize is that everything is copied except for what you define here.  Being the purest that I am, I always think you should create your own version.  For today, I’ll just show you C1.

The check boxes on the initial screen work as follows:

  • NotCopyLTH = Do not Copy Long Text in Warranty Claim Header
  • NotCopyLTV = Do not Copy Long text of Warranty Claim Version
  • NotCopyLTI = Do not Copy Long Text of Warranty Claim Item

Beyond that, not much here.  Next we drill down to the fields not to be copied.

blog02-03

In this section, you will need one line for each field to exclude.  Notice that first you must select the table:

blog02-05

Then you can select your field.

For Claim Header you get all the following fields available:

blog02-07
For the Claim Version you these fields:

blog02-04

For Claim Item you get these fields:
blog02-06

Simply keep adding new entries until you have excluded everything you want from the copy function.  That’s it.
Thanks for reading,

Networking – A new trick

Well, I just learned new trick connecting my virtual server to the internet.  It’s crazy, because I’ve been struggling with this for months, and randomly I tried something new.  If you’ve ready my previous post about connecting your virtual server to the outside world, you know the steps I started with.  Well, I’ve had one system that no matter what I tried, I just couldn’t connect.  Well, it turns out that inside of my virtual server, the firewall was blocking my attempts at connecting to SAP.

Well, if you go into your network adapter (keep in mind, my screenshots are using Windows 2003 Server), but you’ll get the idea.

blog02-01

Go to the advanced tab for your network properties.

blog02-02

Press the settings button.

blog02-03

Go to the exceptions tab (please note, if you get a message after pressing the setting button, you don’t have the firewall active, so this isn’t your problem.
Press the add program button.
Enter in the description for the GUI port and HTTP port that you wish to allow access to your SAP system.

now, head outside of your virtual machine and attempt to connect to your web gui, or standard gui.  If you did all the steps from my other post, you should be able to connect to your system 🙂
Thanks for reading,

SAP Process Not Running?

Well, I recently ran into something I hadn’t discovered before.  I was trying to add a support pack to one of my SAP Add On applications.  Normally, this is a pretty quick process.  But when it ran for several hours with no progress, I began to get suspicious.  Well, eventually, I stumbled upon the good old transaction SM50, which shows all the running processes.

It turns out, all the background processes got bogged down, and weren’t finishing, so my job was also stuck in limbo.

blog03-01

Now, the important thing to notice is the processes of type BGD.  These are a finite number of processes, and when they are all in use, the other background jobs have to sit around and wait till one is available.  You can manually kill job the going up to the menu and selecting cancel (with or without core).  This will “usually” kill off the job shortly.  Anyway, wanted to share this with you….

Thanks for reading,

ABAP – Creating a Dynamic Variant

Recently I started doing a lot of testing on my dashboard while I added some new functionality.  It reminded me of the options within variant creation that allow you to dynamically set the date of your variant, so you don’t have to change it every time.  I thought I’d walk through the creation of a dynamic variant today.

blog02-01

Let’s start with a typical reporting screen.  As usual, press save to begin the variant creation process.

blog02-02

This will bring us to our standard variant creation screen.  The Enter Date range will be our example for today.


blog02-03

If you scroll to the right, you’ll find the selection variable screen.  Press F4 or do the pull down.

blog02-04

Select D for Dynamic date calculation.  (T is another option, but that’s for another day)

blog02-05

Next move to the Name of Variable.  Do the pull down and it will give you the options available.

blog02-06

I just wanted the date to always be less than or equal to today’s date. So I used the current date, and set the option of LE.

blog02-07

When you’re done, it should look like this.

Hope you found this little tidbit useful.  Thanks for reading,

Basis – More Memory Increases Connectivity

Well, if you know me, you know I’m no basis guru.  I’ve learned just enough to keep my systems up and running, and have built enough redundancy in my backups that I can also restart the clock if something becomes non-salvageable 🙂  But, with the addition of my server, I’ve found that the increased memory in the box makes it more reliable and easier to connect to.  I can explain why, I just know that it’s running on the same internet that my other systems run on.

As an example, often when trying to connect to my old system it might 3 or more attempts before it finally connects.  With the new server, it usually connects on the first try (sometimes it takes 2).  This is a nice feature.  In my world, it’s not a show stopper, but sure is nice not to have to keep clicking the logon pad waiting till it finally connects to SAP.

Anyway, thought I’d share this…  and if you happen to be a basis guru, maybe you could explain what the hell is happening =)  Thanks for reading,

ABAP – Finding Icon Codes

I just picked up a new little trick.  Often when I’m programming, I like to pull in the standard SAP icons.  The problem is that it is always a hassle to find the 4 digit code that corresponds to the icon I want to use.  So I found this little trick online to simplify the process.

1. Go to transaction ICON to find the icon you wish to use.  It will have a full description, like ICON_ORDER for example.

2. Go to SE11, enter ICON into the Type Group.  Press Display

3.  Scroll through the list (or use Control-F) to find the icon code associated with the ICON_ORDER.

Pretty slick,  Thanks for reading,