Basis

Home / SAP / Archive by category "Basis"

Setting up your SAP System with Google Wi-Fi

So, in my never ending quest to improve my network, and still keep my good old ECC system running, I installed Google Wi-Fi in my house. The idea seemed simple, 1 set of points, this really cool “mesh”, and my whole house would have a single wi-fi system no matter where I was.

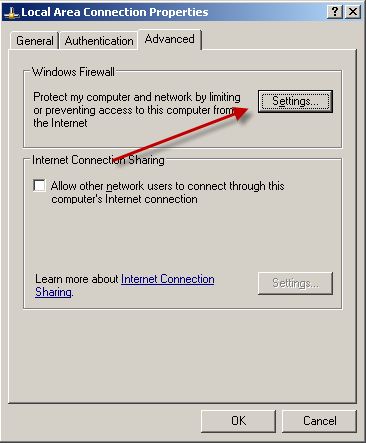
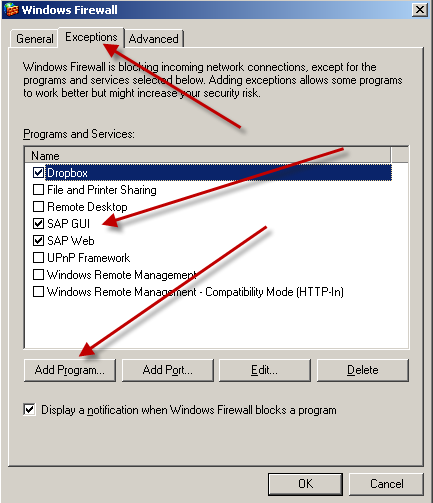
My original system included the ATT Uverse wi-fi, plus some range extenders (some wi-fi, some even running through the power lines), and all of them kinda worked and kinda helped. But it was not cohesive. There were multiple hoops to jump through, multiple different network names, and you never quite knew how well it was working. Since I put in Google Wi-Fi I’ve had great luck, and good signal. and if anything goes wrong, one thing to reboot 🙂 However, I couldn’t get my SAP systems to come through the firewall. Before the Google Wi-Fi, no problem, I setup port forwarding exceptions in my Uverse box that went directly from the specific IP address of my SAP system. Google Wi-Fi forced me to change this slightly. so if you have your own system, and want to use google Wi-Fi. here’s what you need to do.

  1. I’m going to use Uverse, since it is what I know, but you should be able to find similar settings in your service.
  2. First, need to go into google wi-fi, select wifi points, select settings, select primary wifi point, and find the WAN IP.
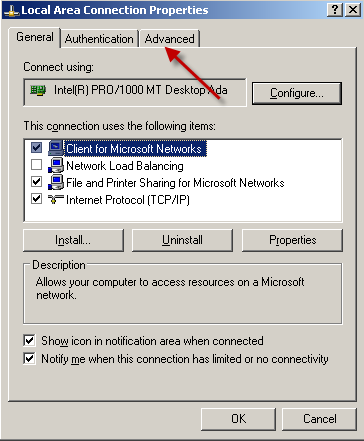
  3. Now go into the network application and add a network port forwarding. Click Firewall, NAT/Gaming.
  4. Under Manage Custom Services, click Custom Services
  5. Create 3 entries for each SAP system. 80XX, 32XX, 33XX where XX is the instance number. 80 is for web, 32 & 33 are for the GUI.
  6. Click return to NAT/Gaming
  7. Now, select each of the services you created in step 5, and assign them to the WAN IP you found in step 2.
  8. Now head to your Google WI-FI app.
  9. Head to the “Map” and click the bottom circle that shows devices
  10. Scroll through the list until you find the device for your SAP system. Click on it.
  11. Select Details
  12. Click on Settings (…)
  13. Select Setup port forwarding
  14. Enter in the port 80XX, select TCP and press Done
  15. Repeat steps 12-14 for the 32XX and 33XX

Now, test you SAP system on your local desktop. It should pop right up. Hope this is helpful for you.

thanks for reading,

SAP ST03N – Finding everything a user did

Now, I recently ran into a situation where I was trying to figure out a background program that was causing me issues.  I knew the user, but my normal methods were not helping me figure out.  so I found a post that put me on the right track.  So, here’s the quick and dirty version:

If your screen doesn’t look like this to start with:

blog-01

Click above and select expert mode:

Next, double click on business transaction analysis:

blog-02

Next, update the defaults:

blog-03

User:

Start date

Start time:  00:00:00

Read time:  23:59:59


Hit the green check.  This will give me everything that your selected user did yesterday.

Thanks for reading,

Networking – A new trick

Well, I just learned new trick connecting my virtual server to the internet.  It’s crazy, because I’ve been struggling with this for months, and randomly I tried something new.  If you’ve ready my previous post about connecting your virtual server to the outside world, you know the steps I started with.  Well, I’ve had one system that no matter what I tried, I just couldn’t connect.  Well, it turns out that inside of my virtual server, the firewall was blocking my attempts at connecting to SAP.

Well, if you go into your network adapter (keep in mind, my screenshots are using Windows 2003 Server), but you’ll get the idea.

blog02-01

Go to the advanced tab for your network properties.

blog02-02

Press the settings button.

blog02-03

Go to the exceptions tab (please note, if you get a message after pressing the setting button, you don’t have the firewall active, so this isn’t your problem.
Press the add program button.
Enter in the description for the GUI port and HTTP port that you wish to allow access to your SAP system.

now, head outside of your virtual machine and attempt to connect to your web gui, or standard gui.  If you did all the steps from my other post, you should be able to connect to your system 🙂
Thanks for reading,

Basis – More Memory Increases Connectivity

Well, if you know me, you know I’m no basis guru.  I’ve learned just enough to keep my systems up and running, and have built enough redundancy in my backups that I can also restart the clock if something becomes non-salvageable 🙂  But, with the addition of my server, I’ve found that the increased memory in the box makes it more reliable and easier to connect to.  I can explain why, I just know that it’s running on the same internet that my other systems run on.

As an example, often when trying to connect to my old system it might 3 or more attempts before it finally connects.  With the new server, it usually connects on the first try (sometimes it takes 2).  This is a nice feature.  In my world, it’s not a show stopper, but sure is nice not to have to keep clicking the logon pad waiting till it finally connects to SAP.

Anyway, thought I’d share this…  and if you happen to be a basis guru, maybe you could explain what the hell is happening =)  Thanks for reading,

Basis – Using SGEN

One of my old colleagues recently pinged me, and asked if I could talk about the SGEN.  For anyone not familiar with SGEN, this is nice built in tool from SAP that regenerates all the program in certain areas.  Now the most important time to execute this transaction is anytime you update a kernel, apply some support packs, etc…  This is typically when I execute it.  So I’ll walk you through the basics of what I know.

sgen01

When you first execute SGEN, this is what you’ll see.  The descriptions are pretty easy to interpret. I typically use the first option, because I’m not sure how to get the second option to work.  I’ve applied support packs, but there must be some step I’m missing because it always gives me an error that say I can’t use this.  I’m going to show you the first option, because it will work no matter what.

sgen02

Now, once you get here, you have a huge list of SAP components that you can choose to regenerate.  Now keep in mind, this is a very process intensive transaction, so be careful what you choose (and when you choose to do it).  Of course, if everything is compiling anyway, what do you have to lose.  ha ha ha.  I’ve highlighted the most common areas that apply to everyone.  Just a word from experience, you will still encounter some compiling even after you run this.  (unless you choose to regenerate every component, which will likely take some time.).  So, choose the components with care.  It’s often better to get 90%, and save 2 days of processing =)

sgen03

Once you pick your components you can choose what servers will do the regeneration.  Mine is a small system, so I only get one choice, but most corporate environments will have multiple servers to execute against.  Once you’re done, press continue.  Often, this can run for a while.  This step finds everything to regenerate, and strips out includes and stuff.  depending on the processing power of your system, it can take a few minutes, up to a couple hours.  (trust me, I’ve experienced both.  ha ha ha)

sgen04

Now, once you get this far, you’re ready to go.  You can either select Start Job directly (fancy way of saying, execute now).  Or you can schedule it for an off time, like you’d schedule any other job.  Once the first 100 items have been executed, it will give you an estimated time of completion.

That’s what I have for today.  As always, thanks for reading,

Basis – Upgrading the Kernel from 700 to 720

Well, I’m trying to venture into the mobile world, but as always, there are technical challenges I just never quite expect.  🙂  Today’s challenge is that the NetWeaver Gateway won’t work with the 700 Kernel.  So I had to look into upgrading kernel from 700 to 720.  I owe all of my success to someone I found on SDN.

http://scn.sap.com/community/netweaver-administrator/blog/2013/05/22/upgrading-sap-kernel-from-release-700-to-sap-kernel-720rel-720ext

As expected, it’s a little more complicated than just installing a new kernel, so check this post out if need help doing this.  I now have a system to the latest 720 kernel.  But be warned, it takes a lot longer to boot the system up with the new kernel.  I’m hoping that may only be the first time.  Guess I’ll see the next time I need to take the system down.

Thanks for reading,


Basis – Running Standard Jobs through SM36

Well, one of my systems was suddenly experiencing some strange behavior, so like normal, I just rolled it back, and implemented my transports.  But it occurred to me, it’s likely there are some simple things I can do to prevent this from happening in the first place.  So here’s what I found, and I hope this will help 🙂

1.  If you run SM36, then press the standard jobs, and then press press default scheduling, it will schedule a whole bunch of standard reorg jobs, that probably would be helpful for me 🙂

2.  Deleting the Short dumps out of ST22, can be helpful too.  simply go to ST22, and use the menu goto->reorganize.  Then just accept the selections.

So enjoy these little tricks, and if i find anymore, you know I’ll post them out here 🙂

Thanks for reading,

Basis – Cancel a Transport Request that is hanging

Well, of course I was in the middle of importing a transport request, and my system crashed.  never failed.  Well, it gave me the chance to find this latest tidbit that I can pass onto you.

If you have a hanging transport, go into STMS, find the transport, then using the menu GOTO->Import Monitor.

You should see some folders, and on them will have a truck with some text.  Go to that, right click and select delete.

magically, you can begin reimporting your transport.  I hope that things still come in cleanly.

thanks for reading,

Basis – Installing the Netweaver Gateway – Step 1

Well, I’m trying to move into the mobile world.  I recently had a meeting with our friend Paul at Lithium Labs.  He’s our app expert.  So he pretty much gave us the low down on what we need to do to get started.  While there are several different ways to get into the mobile app arena, the easiest method also fits best with our business model.  Using the Netweaver Gateway is the way to go.  In essence, it is a simple way to connect apps with your SAP system without any extra hardware, and just a simple installation (SAINT) .  Obviously, SAP has more complex and high end solutions based on all the technologies they have recently been acquiring, but Netweaver Gateway is our plan.

So, Paul said the best place to start is to get it installed.  Well, I got in installed and tried it on all of my systems.  Of course, my first piece of bad news.  I’m not running a support pack level high enough to install the gateway.  So it turns out, step one is to get the basics of my system up to SP 20 (at least for my 6.0 SR3 system).  There is a Gateway 2.0, but it requires a basis level of 7.02.  Even my EHP4 system is only running 7.01, so it seems that 1.9 is my way to do things.  I guess it fits really well with my philosophy of design in the lowest possible version so it’s always upward compatible.

So, round one goes to the gateway.  I have to get a bunch of support packs installed, starting as soon as I can get them all downloaded, I’ll attempt round two.

thanks for reading,

Basis – Setting up SAPConnect

Well, yet again, I’m off in Basis land.  While I haven’t been able to get this completely working, but setting up SAPConnect is certainly required if you want SAP to send you any emails.  Part of my issue may with my own mail provider, but I’m still playing, so expect another post when I finally figure it out =).

In the meantime, here’s what you need to do:

Setup SAPConnect

1. In transaction SAPconnect: Administration (SCOT) choose View -> System status.
2. Choose Settings -> Default Domain.
3. Specify your default domain and confirm. For example, “mydomain.com”.
4. In the Administration screen, double-click the SMTP node.
5. Check the box “node in use”.
6. Specify the mail host for SMTP. For example, “mail.mydomain.com”.
7. Specify a mail port. The default port is 25.
8. Choose “Set” (for “Internet”).
9. Enter an asterisk (*) for “address area”.
10. Choose Continue.

These steps are the hardcore necessary steps.  The following steps are nice add-ons and don’t hurt to do anyway.

Schedule the periodic background job to send queued e-mails

11. Call transaction SCOT.
12. Choose View – Jobs.

The SAPconnect Job Administration screen is displayed.

13. Choose Job – Create.

A dialog box is displayed.

14. Specify a job name.
15. Confirm.
16. In the next window, select the variant SAP&CONNECTALL.
17. Choose Schedule job.
18. Choose Schedule Periodically.

A dialog box is displayed.

19. Specify a time period.

For example, 10 minutes.

20. Choose Create.

Nothing too difficult, but certainly valuable =)
Thanks for reading