SAP

Home / Archive by category "SAP" (Page 22)

Warranty Claims – Check Action Profile

Since I’ve been talking about warranty claims, and in particular the process control, I figured I better talk about all of it 🙂  This latest installment is a little piece called the Check Action Profile.  Now, I hadn’t used this feature a whole lot in the past, but it’s more functional than I originally gave it credit for.  Let me show what it can do.

wty01-01

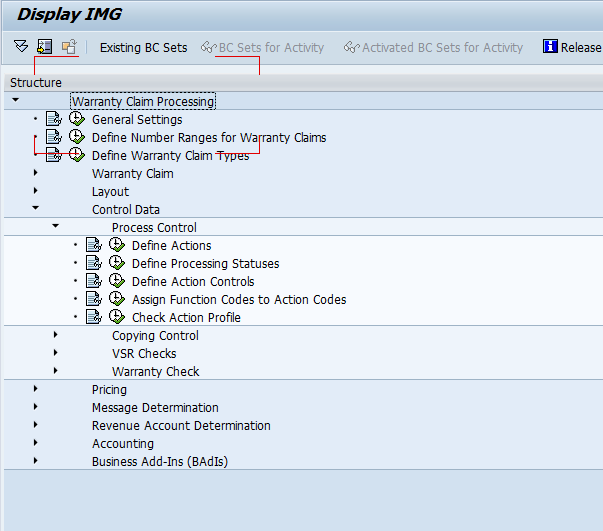
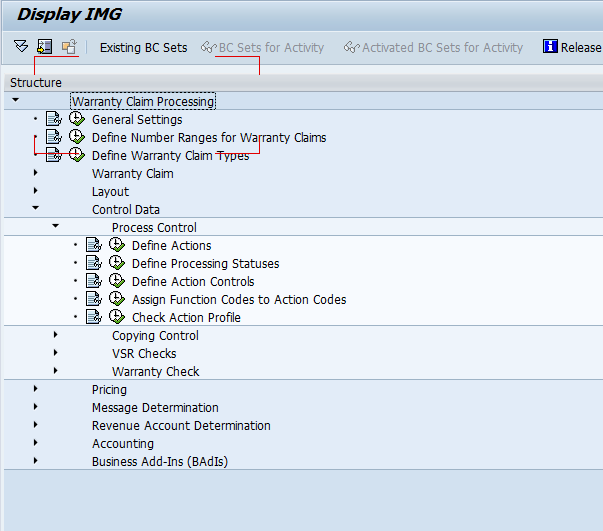
First off, head to OWTY, and you can navigate to this particular step by following the above screenshot.

wty01-02

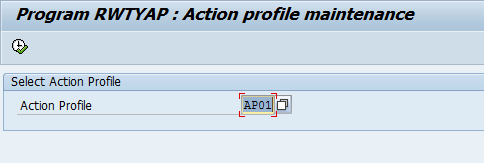
Next, you’ll see this screen that allows you select a single action profile.  I picked the post crediting profile, since it’s the one I use the most often.

wty01-03

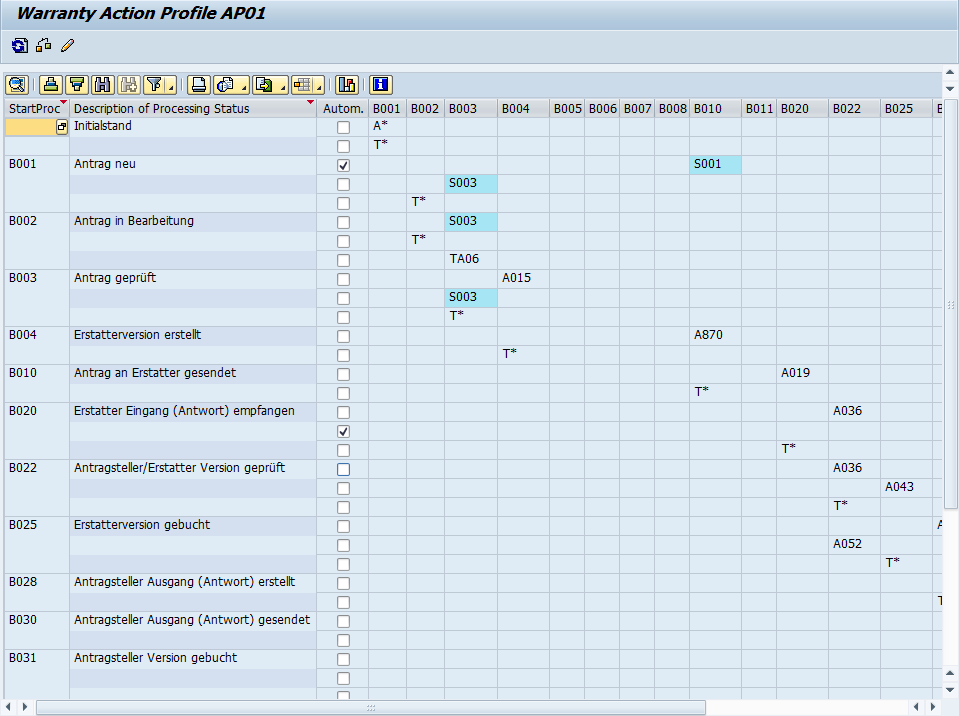
Now, as soon as you execute, you’ll notice a huge grid, that gives you the road map of the entire process control you have setup.  You can see at a glance what Processes can call what actions, what is automatic, etc…  Now, the piece that I liked the best was the check.

wty01-04

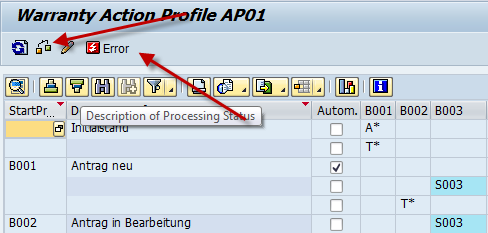
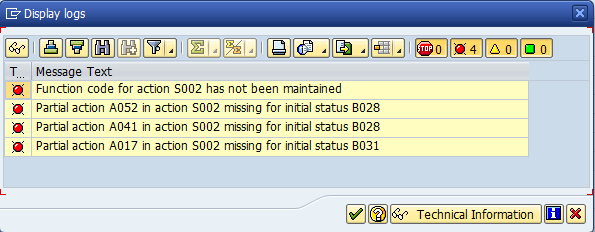
so if you press the button that looks like a syntax check, it will either come back with nothing, or you will see the little error button.  If you press this, you’ll see what is inconsistent in the profile.

wty01-05

It’s hard not to laugh a little, since this is the untouched process that SAP provides to you, and it has things missing.  The important thing is that you can quickly identify where you missed something or where you should revisit to close the gaps.

It’s all pretty easy, but very helpful.  Thanks for reading,
ABAP – Changing SAP Data Type Descriptions

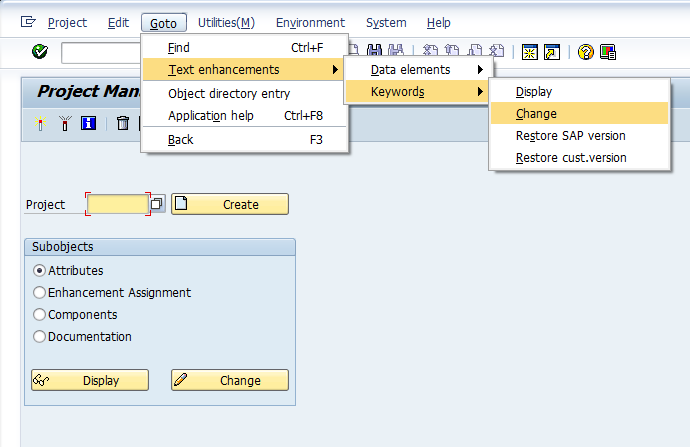
Well, completely by accident, a friend of mine taught me a cool new trick.  There is a standard way to change data type descriptions of standard SAP fields without doing any sort of core mods.  It’s all built right into transaction CMOD, and I never knew it was available.  I truly learn something new about SAP all the time.  So, here goes…  go to transaction CMOD, then use the following menu path:
Goto–>Text Enhancements–>Keywords–>Change

blog02-01

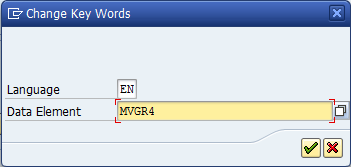
Next, select the data element you want to change the description.

blog02-02

I picked MVGR4 for an example.

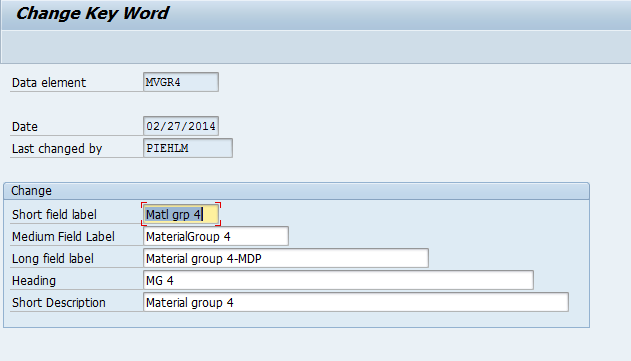
blog02-03

Now update any descriptions you want to change.  Save it, and attach it to a transport.  You’re done.

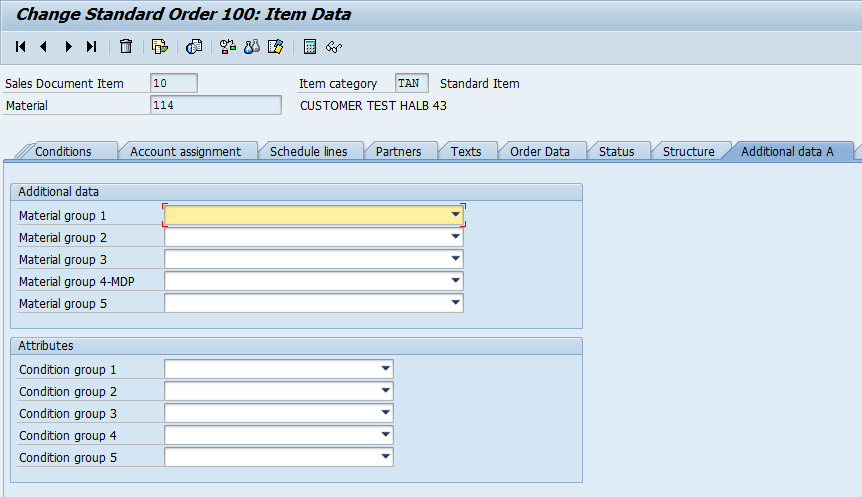
Take a look at what happens in VA02 for this field now:

blog02-09

Pretty cool, and pretty easy.

Thanks for reading,
Netweaver Gateway – Service Implementation

I’m finally getting back to the Netweaver Gateway stuff.  This piece is the most powerful, and also the most complicated.  I struggled with this for a while, so it’s a good idea for me to explain it and make sure I don’t forget myself 🙂  I’m going to focus on the query implementation, but all of the options work the same way.

segw01-01

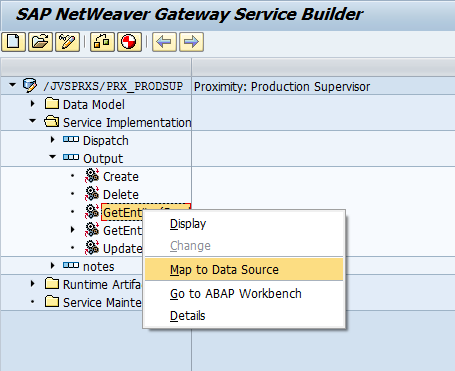
Open up the Service Implementation folder, then open the entity set you wish to map.

Create – Use this to create a new entry.
Delete – Use this to delete an entry
GetEntitySet(read) – use this to read back a single entry
GetEntitySet(query) – use this to read back an entire table.
Update – use this to update an existing entry.

Now, one of the things I’ve found is that for most of these entries, it really all does depend on your RFC that is being called.  For example, you could likely call Create or Update using the same RFC and it would work, as long as your RFC code was properly defined.

segw01-02

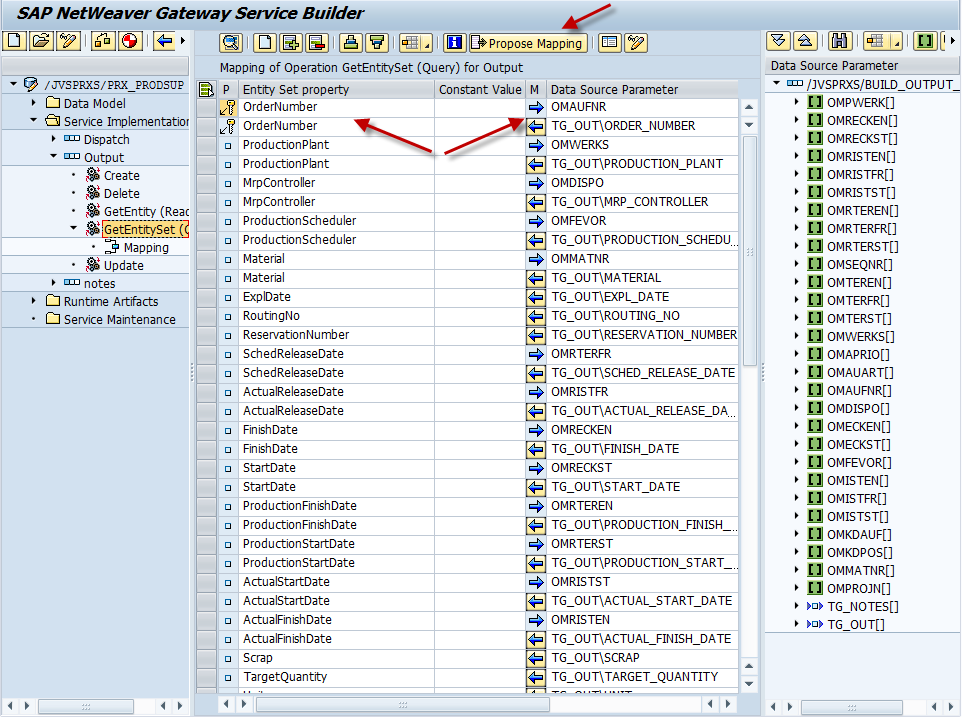
Now this screen shows you a completed mapping for the query operation.  Depending on your RFC and how you defined things previously, you can use the Propose Mapping button to fill in all of the fields for you.  Or, you can drag and drop from the right hand window.  Now, one of the things that I originally had issues with supplying the inputs for my RFC.  What I discovered, is that in Netweaver Gateway, you can have the same parameter show up multiple times, once as an input and once as an output.  All you need to do is point it to the correct field.  If you look above at the OrderNumber field, you’ll notice that it’s listed twice, once with an arrow pointing left (output) and one with an arrow pointing right (input).  If you look in the mapping field, you’ll notice that the input and output point to different fields.

Like everything, you must know your RFC to do this correctly.  Then, if you need to use the same field again, you must use the insert, select the field from the list, press the arrow until it points to the right, and finally select the mapping field from the RFC that should be the import.

At this point, if you have the gateway configured, you are ready to test and connect it to your mobile app 🙂

Thanks for reading,
Warranty Claims – Assign Function Codes to Action Codes

Well, since I’ve been hitting the warranty claims stuff pretty hard lately, I figured I might as well through another easy one out there.  This piece of configuration is really pretty straightforward, and likely something you will never touch.  But in my own quest for knowledge, and since I may put together an e-book in the future about warranty claims configuration, I decided to find out what this configuration was all about.  As it turns out, in 99% of the cases, the function code is equal to the action code.  About the only time it might be different is if you add some custom buttons.  Regardless, if you need it, here is how you do it.

wty01-01

Go to OWTY to find this menu path.

wty02-02

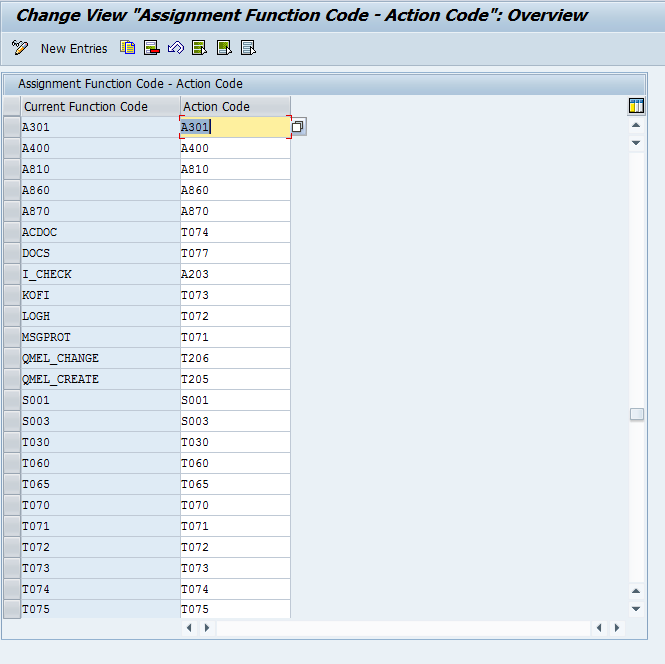
Beyond that, like you can see, there are 2 columns, and in most instances, they are identical.  There are a few instances where a different function code exists, but all in all, a pretty mundane, and rarely used piece of configuration.

Thanks for reading,
Warranty Claims – Define Actions

Now, getting back to warranty claims.  Today I’m going to talk about the define actions step.  This is another piece connected to my last 2 warranty claim posts.  Defining an action is the piece that does the work.  Last post we walked through creating/changing a status.  Today we talk about the action, so after all of this, the process control will make sense 🙂

wty01-01

Start at OWTY to get to the configuration.

wty01-03

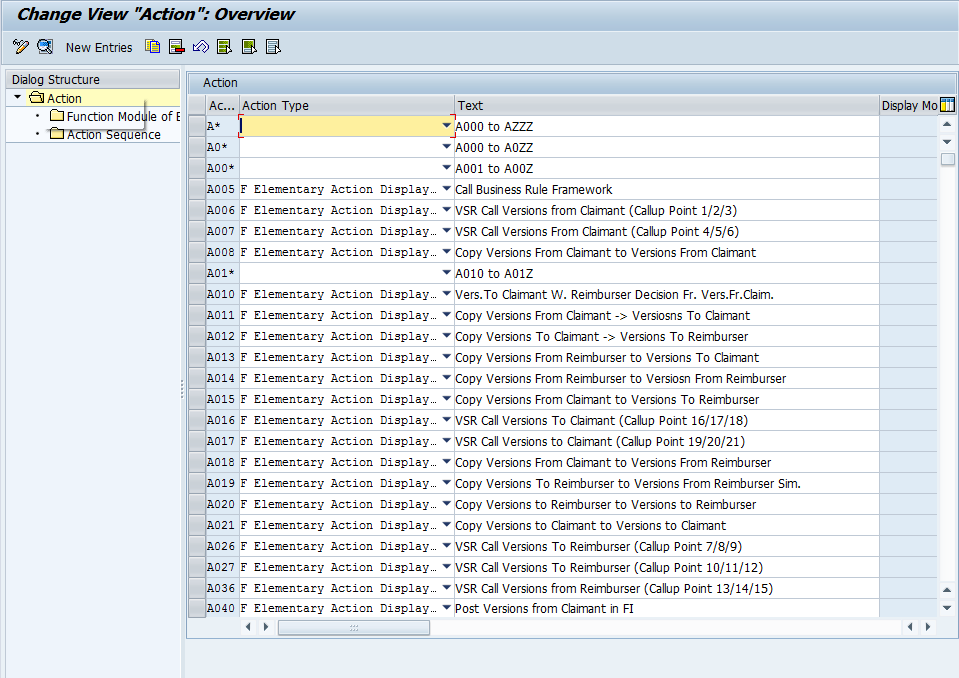
Now, the first thing you’ll notice is that there are a LOT of actions available.  There are 4 types of actions:
Elementary Action Displayed in Action Box
Elementary Action Hidden in Action Box
Interlinking Action Displayed in Action Box
Interlinking Action Hidden in Action Box

Elementary Actions are exactly what they sound like.  They perform exactly 1 function.

wty01-02

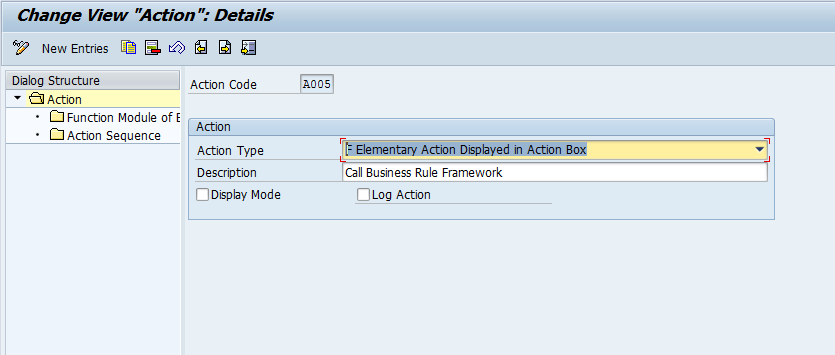
Now, I picked the A005 to show you the action details.  Notice you can set the action type & the description.  In addition, you can check Display Mode, which means the action can be called, even in display mode.  Finally, Log Action check box allows you to include this action in the log for the claim (in my opinion, all actions should be logged… of course, I’m a big fan of seeing what’s happened in the past).

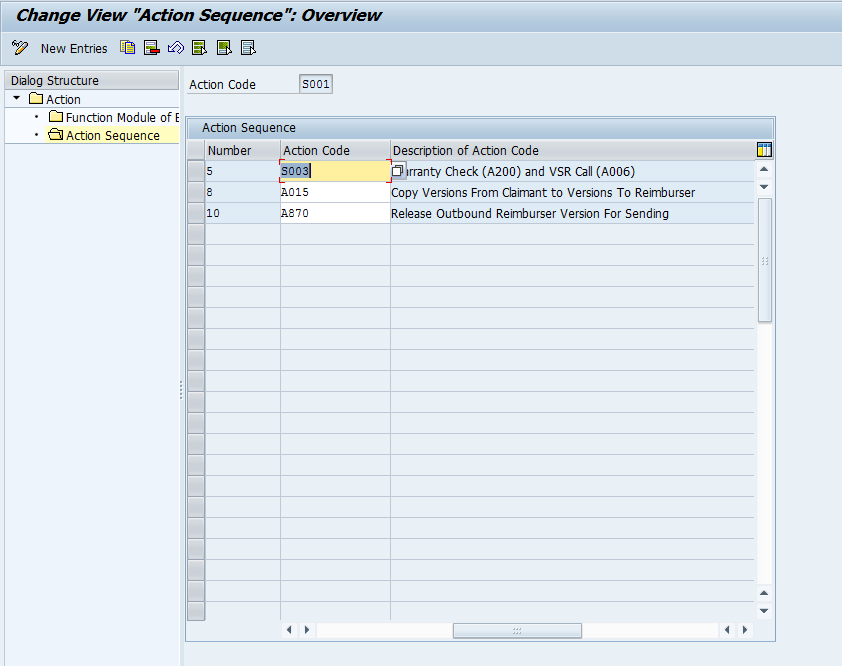
Now, if we move onto Function Module of the Elementary.
wty01-05

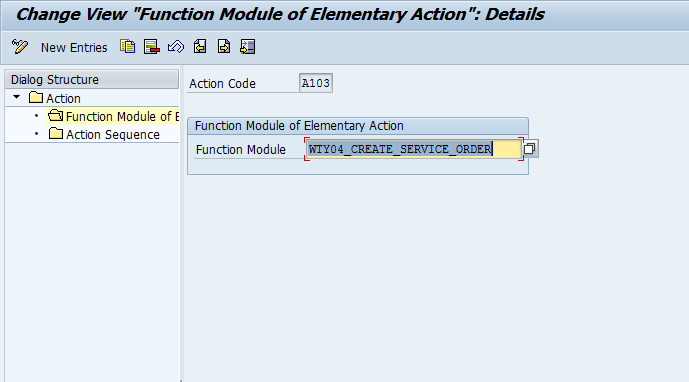
This time around, I selected action A103, and you can see the function module that gets called .

Now, if we look at an interlinking action.

wty01-04

Notice, now you can chain together several elementary functions.  Doesn’t matter if it’s hidden or displayed.  This is fun functionality, since you can pull together multiple steps at once, so the user doesn’t need to perform multiple actions to accomplish a task.

So, that’s the define actions step.  Thanks for reading,
Warranty Claims – Define Processing Status

I’m finally getting back to some of the warranty claims stuff again.  Today we’ll talk about a smaller piece of the configuration, but it connects directly to my last post on warranty claims.  This post is also within the Process Control portion of the claim.  The define processing status step allows you to create your own statuses within the claim and give it any description you want.  When you combine it with the define action controls you can connect your processing status with any action you want.  Here’s how you go about creating your own status.

wty01-01

Going back to OWTY, you can find this step in configuration.

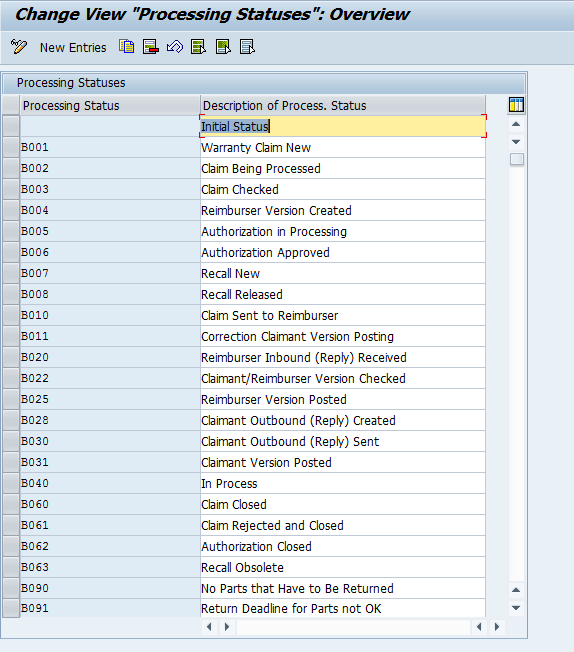
wty01-02

Now, this is just a sampling, but you can easily create your own set of statuses.  I’ll get to more in depth claims configuration soon.

Thanks for reading,

Web Dynpro – Activating Services

It occurred to me, this might be rudimentary to most anyone that’s been doing BSP’s or Web Dynpro, for the newbies out there, this might not be obvious.  Since I just put a new Web Dynpro App into my test system, I thought this would be a great chance to document the process and share it with y’all 🙂

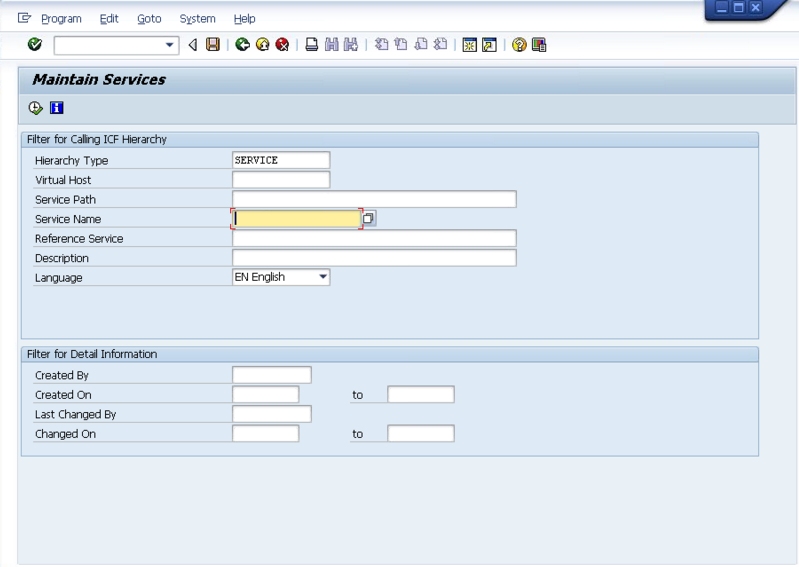
First off, go to transaction SICF.  Depending on your version of SAP this might look a little different (this is ERP 6.0).  But you’ll be able to see what I’m talking about.

blog02-01

Normally, when you go to use Web Dynpro for the first time, there are a bunch of services that need to be activated.  Your web browser will tell you exactly what they are.  You either navigate the menus manually, or if you enter in the Service Name, SAP will take you directly to the one you want to activate (I like option 2).

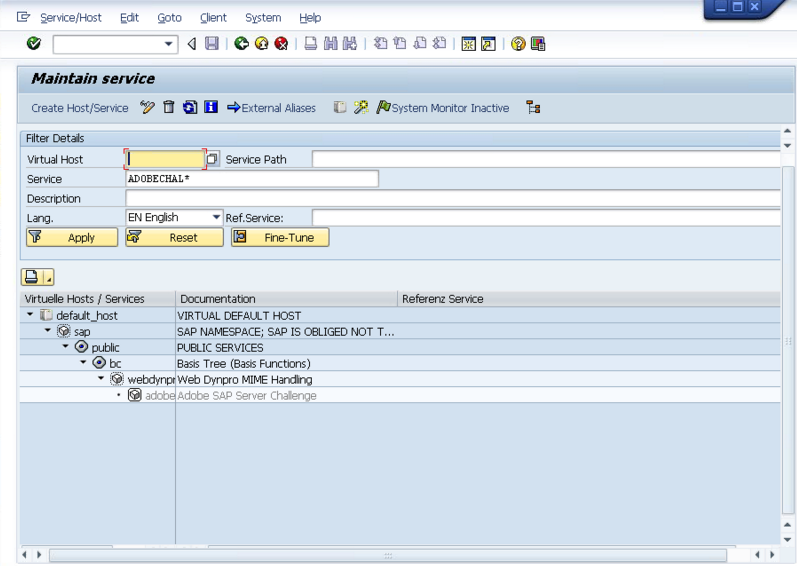
blog02-02

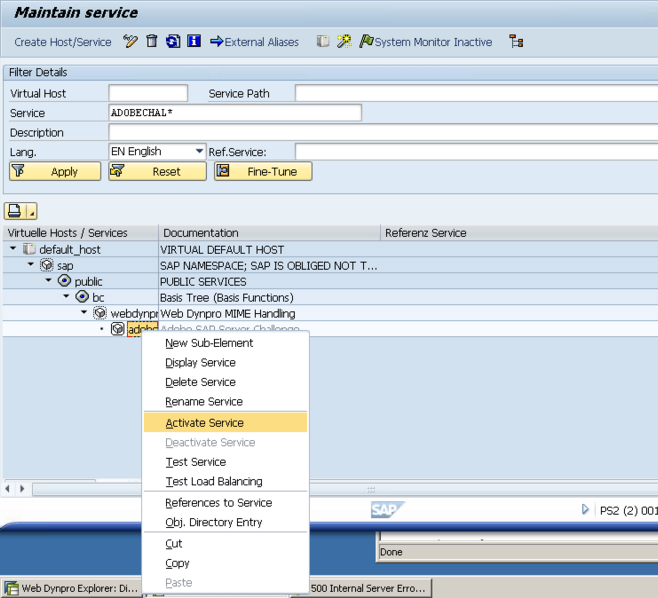
Here’s an example service.  You’ll notice that it’s grayed out when it is inactive.  So go ahead and right click on the service.

blog02-03

Select the Activate Service.

blog02-04ow

Now, depending on what you select to activate, if there are other services below the one you selected, you can choose Yes with the hierarchy to activate the service and everything below it.  Or you if select Yes, it will just activate that one service.

That’s it.  Now, keep in mind, there are a lot of other things within the service itself that can be updated, but for now, this is my little tidbit.

Thanks for reading,
Netweaver Gateway – Creating the Entityset

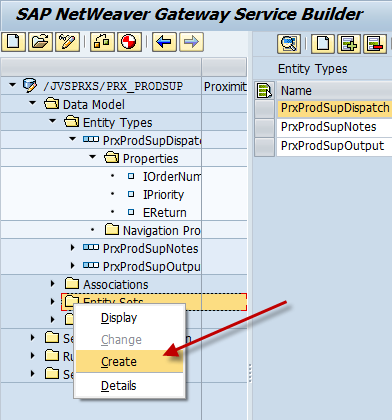
In the last post, we created the entity for our service.  One of the next pieces is the entityset.  This is a really easy piece, but still required in order to complete the service.  We go back to SEGW.

segw2-01

next…

segw2-02

Name your entityset, and pick the entity you want to link to…  Now you’re ready for the next step…  we’ll get there in a future post.

Thanks for reading,

Netweaver Gateway – Creating a Service from RFC

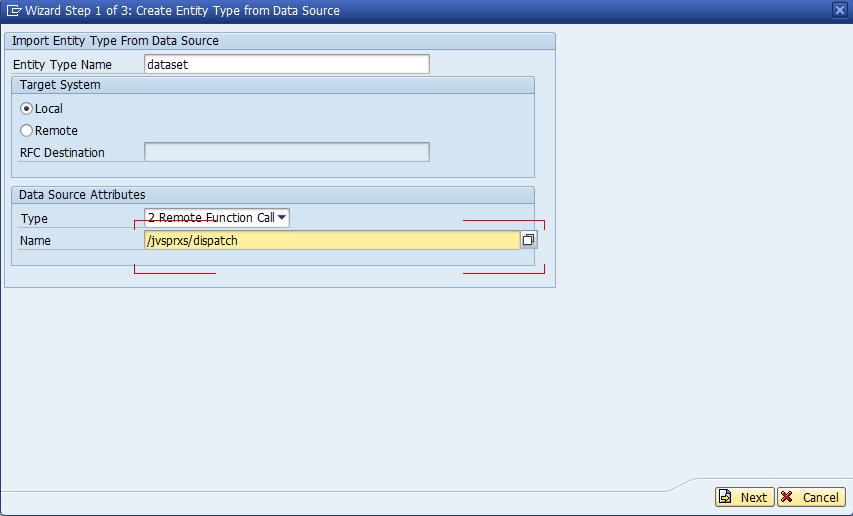
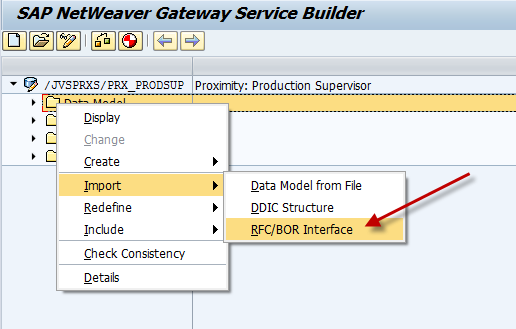
Well, picking up where we left off on Netweaver Gateway.  Last time we created the project, now it’s time to actually create the service.  In my example, I have already created an RFC to feed the information I need to the service.  So, here’s how to do it.  Return to transaction SEGW.

segw03

next…

segw04

Here, you need to give it an entity name.  This is what you’ll be using going forward.  Select the type as Remote function call, and then list the name of the function.

segw05

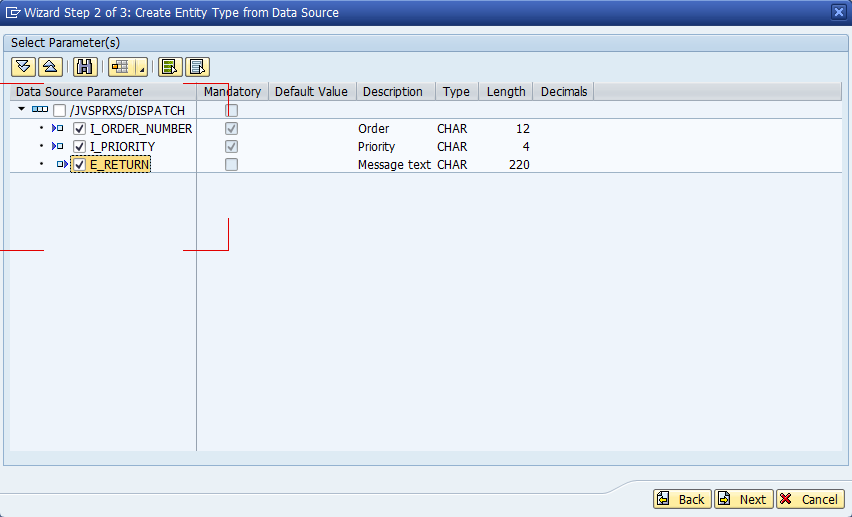
Now we get to the magic.  The RFC has now pulled in all the inputs and outputs from the function.  Now, you check the fields you want to make part of your “entity”.  The entity will contain the fields that you plan to extract or feed into your service.

segw06

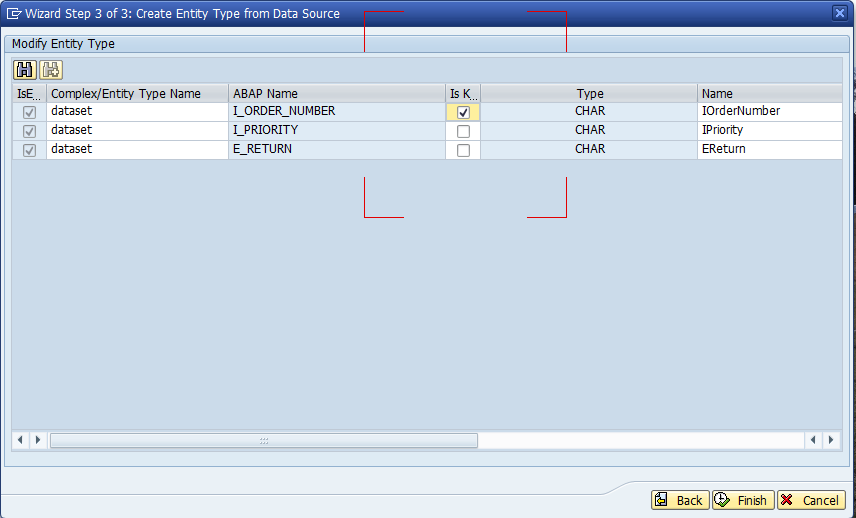
After you select the fields you want, you must define at least one key.

segw07

Now, you have the entity.  With this piece, you’re ready to start doing something with the data.

In a future post, I’ll talk about the next steps for the service.

Thanks for reading,
ABAP – Web Dynpro – Dynamic Cell Variants

Well, in my continued adventure, I found a new component in web dynpro call a cell variant.  The basic idea behind this is that you can change what kind of cell is within a table.  For example, sometimes you may want a field editable, based on the contents, and other times it should just be a text view.  Well, I had something similar in my latest web dynpro experiment.  I needed to do  dynamic cell variants.  By this, I wanted to add the cell variant to an ALV table, so I couldn’t just manually add it to the column.  Well, thanks a cool document I found, I was able to pull this off…  mostly.

http://www.sdn.sap.com/irj/scn/go/portal/prtroot/docs/library/uuid/f0e7461d-5e6c-2b10-dda9-9e99df4d136d?overridelayout=true

Now, I use the term mostly, because of course, I tried branch out on my own.  It’s probably easiest to explain with a little code and my example.  First, I had a column in my ALV table that either listed a single serial number, or should provide a link to another window to show all the serial numbers associated with the document.  This is perfect for the cell variant.  I set it up so that

Here’s where I started, and syntactically, it would fine:

data: l_cv_ser TYPE REF TO cl_salv_wd_cv_standard,
lr_link_ser TYPE REF TO cl_salv_wd_uie_link_to_action,
l_col TYPE REF TO cl_salv_wd_column.

create OBJECT lr_link_ser.
lr_link_ser->set_text_fieldname( EXPORTING value = ‘SERNR’ ).
* create cell variant
create OBJECT l_cv_ser.
  l_cv_ser->set_key( VALUE = ‘MULTIPLE’ ).
* add link to action editor
l_cv_ser->set_editor( lr_link_ser ).
* Get column
l_col = lv_value->if_salv_wd_column_settings~get_column( ‘SERNR’ ).
* add cell variant to column
l_col->add_cell_variant( r_cell_variant = l_cv_ser ).
* assign attribute
  l_col->set_sel_cell_variant_fieldname( ‘SERNR’ ).

Now, if you pay close attention to the bold lines, these were my problem.  See, the data in the column might be MULTIPLE, or it be 1, 2, 3, 800034234, or any serial number.  So in my initial testing, it was all multiple, so it worked great.  suddenly I was getting a short dump when it hit a cell with a value other than MULTIPLE.  It finally hit me…  with a cell variant, you either need to define an editor for each value in the column?  or you need to make a new column with only 1 value or blank.  i ended up going down the second path.

data: l_cv_ser TYPE REF TO cl_salv_wd_cv_standard,
lr_link_ser TYPE REF TO cl_salv_wd_uie_link_to_action,
l_col TYPE REF TO cl_salv_wd_column.

create OBJECT lr_link_ser.
lr_link_ser->set_text_fieldname( EXPORTING value = ‘SERNR’ ).
* create cell variant
create OBJECT l_cv_ser.
l_cv_ser->set_key( VALUE = ‘X’ ).
* add link to action editor
l_cv_ser->set_editor( lr_link_ser ).
* Get column
l_col = lv_value->if_salv_wd_column_settings~get_column( ‘SERNR’ ).
* add cell variant to column
l_col->add_cell_variant( r_cell_variant = l_cv_ser ).
* assign attribute
l_col->set_sel_cell_variant_fieldname( ‘CV_SER’ ).
lv_value->if_salv_wd_column_settings~delete_column( id = ‘CV_SER’ ).

I hope this sheds some light on the cell variant.  it really is a pretty slick tool.
Thanks for reading,