SAP

Home / Archive by category "SAP" (Page 24)

Service Management – Warranty Claims Example OV

This post is the second part of my example in warranty claims.  In my first post, I talked about the IC or the inbound from the claimant/customer.  This next piece is what happen next in the post crediting process, that is sending the information to the vendor.  When we last left off, we set the status to B003, which means the claim has been checked.

Press the Action Button Again:

blog01-01

Select A015:  This will create Version 2 of the claim

blog01-02

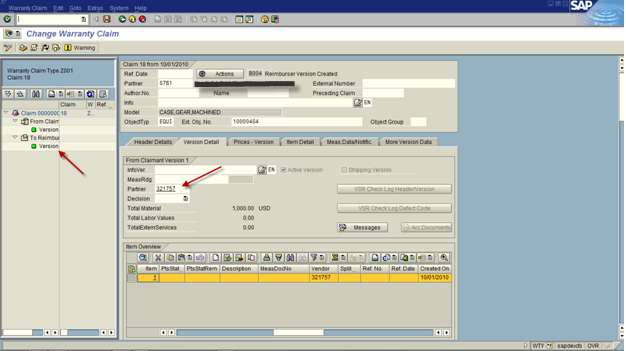
If you look on the left side of the screen, you’ll see that a new version was created.  The reason is becomes very important is that each version can have completely different pricing and partners.  Think of it this way, your customer may ask for $100.  You may ask the vendor for $125.  The vendor may give you $75, and ultimately you give the customer $90.  Who knows?  it all depends on your agreements with your customer and your vendor.  Regardless, warranty claims gives you the freedom to do what you need.

Note:  the version 2 of the claim will need a Vendor as it’s partner (this is the partner that will pay the claim).

Verify the pricing on the Item Detail Screen.  Then Press the Action Button again:

blog01-03

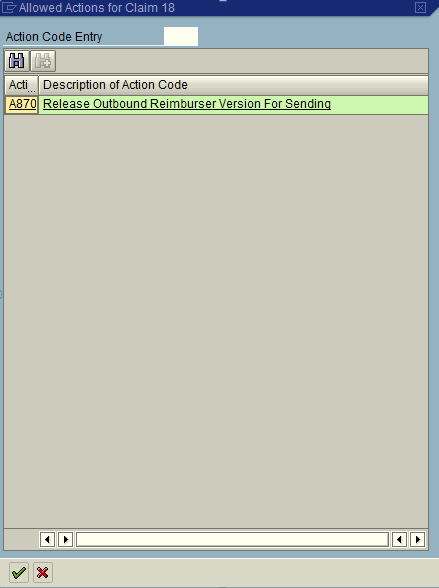
Select A870 to release the claim to be sent to the vendor.

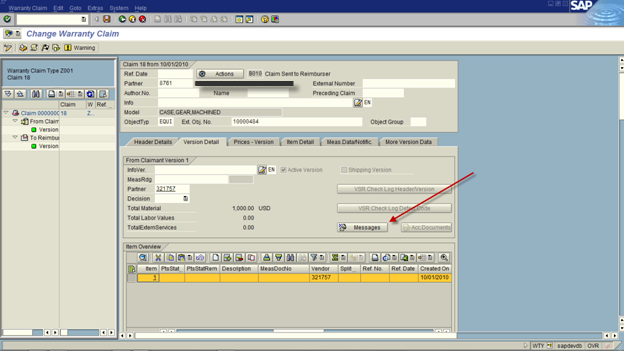
The Status is now set to B010: Claim Sent to Reimburser

This next section is optional, but it gives you the opportunity to print or send output.  Depending on your process, this could be IDOC, printed or emailed.

blog01-04

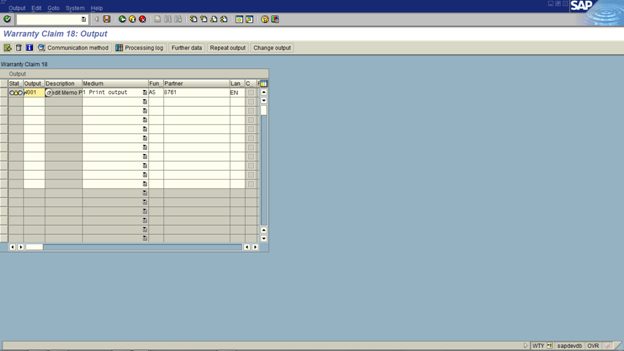
Press the Messages button to print out

blog01-05

This will work just like any other output determination.  One of the biggest things to keep in mind is that there are no printed forms out of the box for warranty claim.  There some IDOCS (I believe), but nothing that you could print or email.  That means, if you need it you will have to design it from scratch.

Next time I’ll talk about the IV or inbound from the vendor.

Thanks for reading,

Service Management – Warranty Claims IC example

Now that I’ve given you a taste of configuring warranty claims, I thought it might help to start with an example.  I’m going to walk through a Post Crediting example.  So today I’m going to talk about the first step in the post crediting processing, the Warranty Claims IC or inbound from the the claimant.

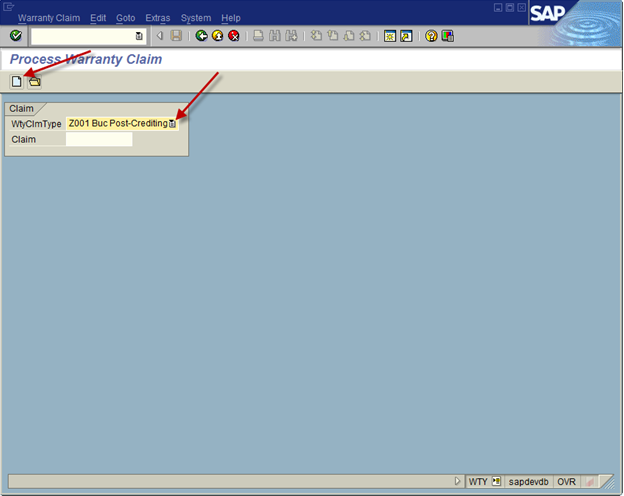
Now, everything starts with transaction WTY, so we head over there to create our sample claim.

blog01-01

Set the Claim Type: Z001

Press Create

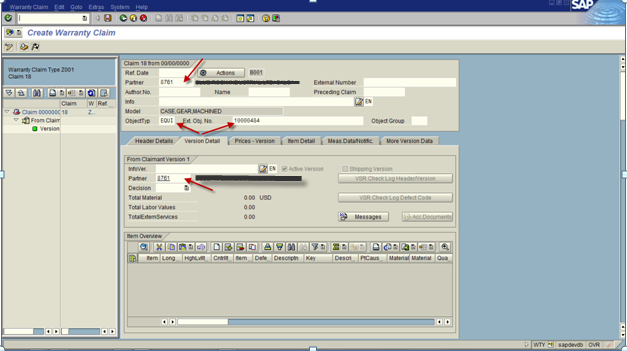
blog01-02

Now, everything is configurable, so these screen shots show exactly one possible setup.  So the information I suggest entering is one possible set of data that can be collected.  In this claim, it is based on an equipment record.  This example is a claim from a customer, and will be serviced by a vendor.

Header Information:
Enter in the Partner (claimant customer)
Object Type: EQUI (this is the header equipment)
Ext Obj. No: Equipment Number

Version Detail Tab
Partner: (Claimant Customer Number)

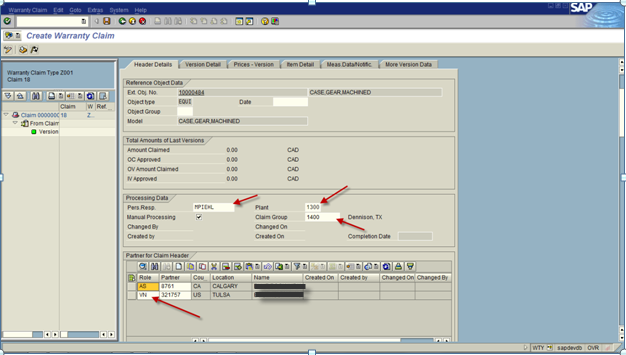
blog01-03

Header Detail Tab:

Person Resp: optional
Plant: will come in automatically
Claim Group (should be whomever will be the reimburser)
Partner Table Control: Add an entry for the Vendor (VN and vendor number)blog01-04

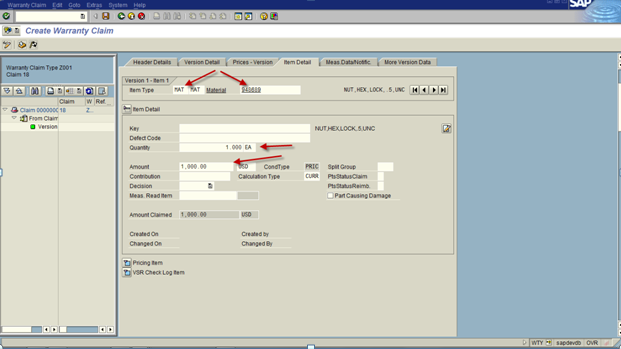
Item Detail Tab – this is the area where you enter in the material to repair or return:

Item Type: MAT
Material: The material that is being repaired/returned
Quantity:  1.000
Amount: this is the proposed amount of the claim.

blog01-05

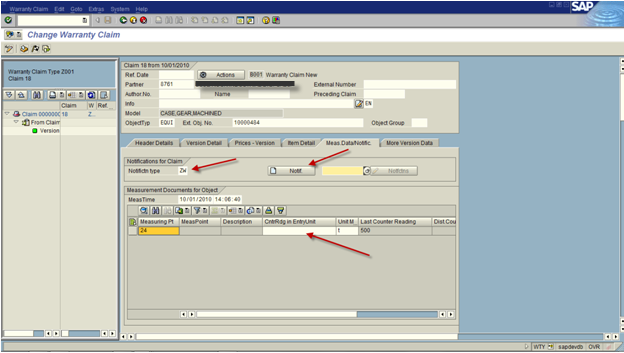
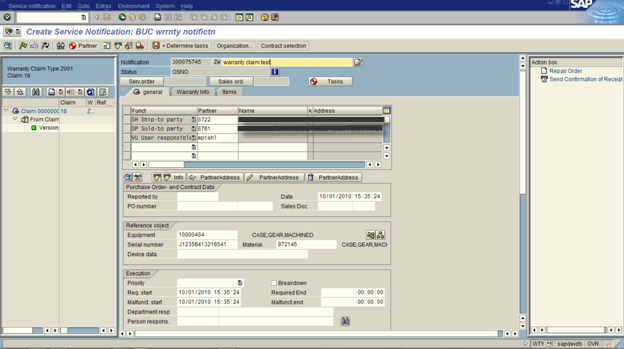
This next section gives you the opportunity to create a service notification connected to the claim. This is especially valuable if you use the return and repair process.
Notification Type:  ZW

Create Notification Button (this will replace IW51 or you can enter in an existing notification number)  If the header level equipment has a measuring point, you can enter in the measuring document.

blog01-06

Enter in the remaining information, and green arrow back.  (don’t create the repair sales order.  this is will be a separate step).

Next up, we get to revisit the VERSION DETAIL.
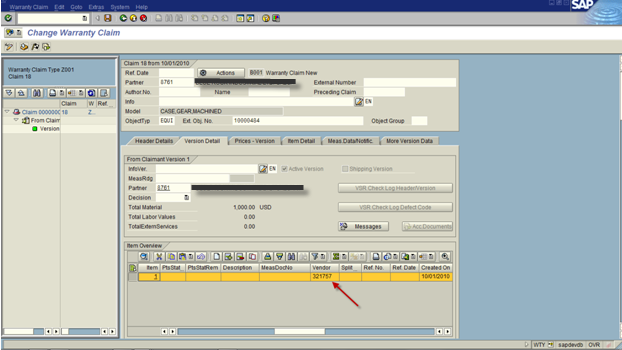
VERSION DETAIL Tab.

For each item that is under warranty: enter in the vendor number.

blog01-07

Save after entering in all of this information.

Now the notification can be processed as it normally it would.  After the part has been received and analyzed, you can continue processing the claim.

Update the amount to be claimed for the item (item detail tab).

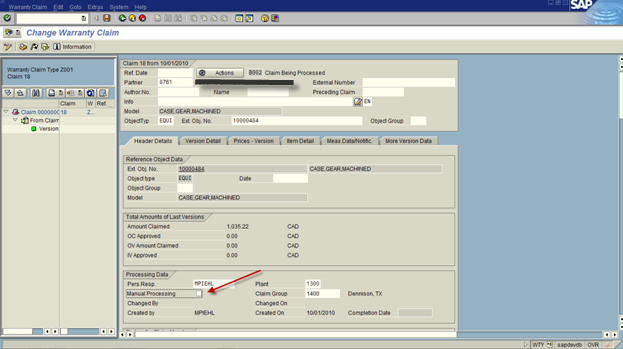
Currently the Claim will be at Status B002: claim being processed

blog01-08

Now, when you are ready to move to the next step of the claim, you need to move to the next status.
Uncheck the manual Processing check box.

Press the Actions button:

blog01-09

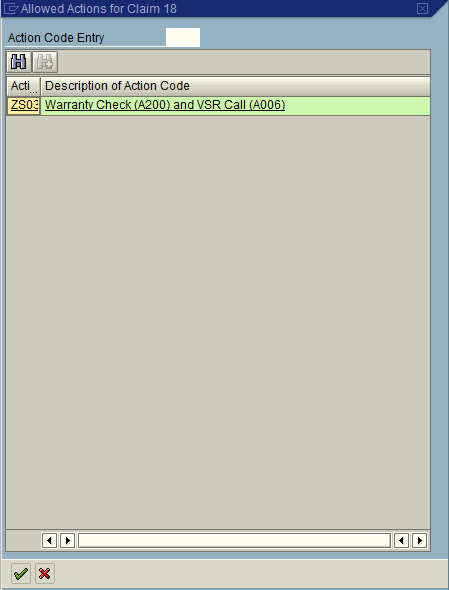
Select ZS03 and hit the green check.

If the top level equipment has a master warranty associated with it, then this screen will appear showing if the part is still under warranty/contract or not.

The notification will now be at B003: Claim Checked.

This bumps the status and allows you to create the next version of the claim, but we will save that for another post.
Thanks for reading,

Uncheck the manual Processing check box.

Press the Actions button:

ABAP – Changing a Namespace

Well, once you finally get to the phase of creating a namespace and making yourself a program, inevitably, things change.  In my case, I joined forces with a partner, created a new company and started moving forward.  So, in order to keep things keep everything consistent, I had to generate some new namespaces.  The problem is that you can’t simply rename things for a new namespace, you have to copy each component to the new namespace, then delete the existing stuff.  Of course, the fun comes in the sequencing.

In order to start everything, I recommend using transaction SE80.  Since a namespace is generally associated with a package, the easiest way to pull everything for a particular package.  This will give you everything associated with the namespace.  Initially, you I suggest just copying everything.  For this piece, it doesn’t matter the sequence.

Once everything is copied, now is where the fun part begins.  Go back to the original namespace pull up all of the objects.  Typically I go through and start with the highest level objects.  This will include any programs, web dynpro objects or BSP objects.  For each object, do a where used to make sure it isn’t included anything else, if the where used list is empty, then I’ll delete the item.  Next I move to functions and function group.  Then I’ll move onto the data dictionary objects.  Starting again with the highest level tables and table types.  Then move down the chain to structures and finally data types.

It’s not a simple task, and can be rather tedious… but at the end of the day, you can move from one namespace to another with very little risk, and just a little bit of time.

Thanks for reading,

Warranty Claims – Partner Setup

Well, when you start playing with warranty claims, you quickly find that it is very particular when it comes to partner setup.  Your customer and vendor both need to be have some particular settings in place in order for the partner to even be used in the warranty claim.  So I’m going to show you what you need to have in place.

First, let’s begin with the customer master.  For any customer that you want to be a claimant, you must assign the appropriate partner type.  By default, it’s AS, but like most things in SAP, you can set it to what you want.
owty-01

Next up, the Reimbursing Vendor:

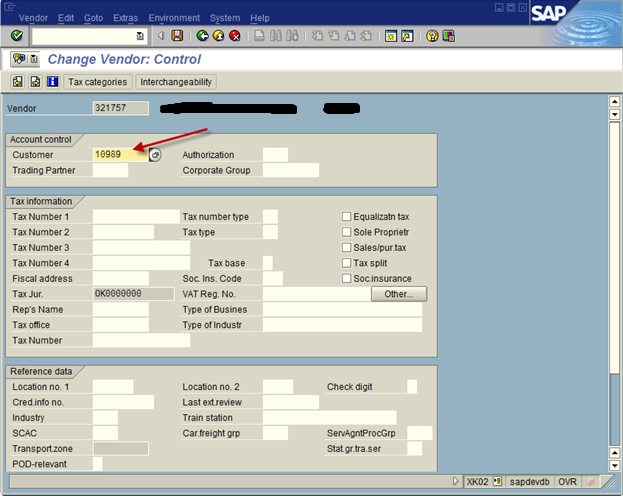
You need a customer (with at least Company code Data maintained) for each vendor that will be used for warranty claims processing.

Enter the corresponding customer here.  the customer must be a sold-to party:
owty-02

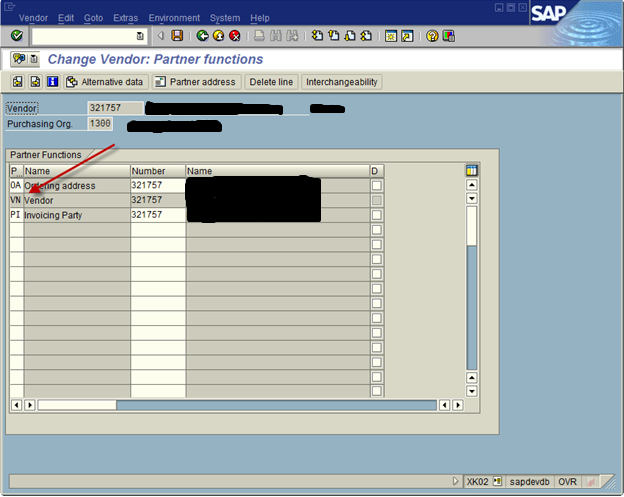
Be sure that the vendor partner is set up for the vendor master in the appropriate org.

owty-03

Vendor Customer:

Be sure that Tax jurisdiction is blank if the vendor will be used across multiple company codes.
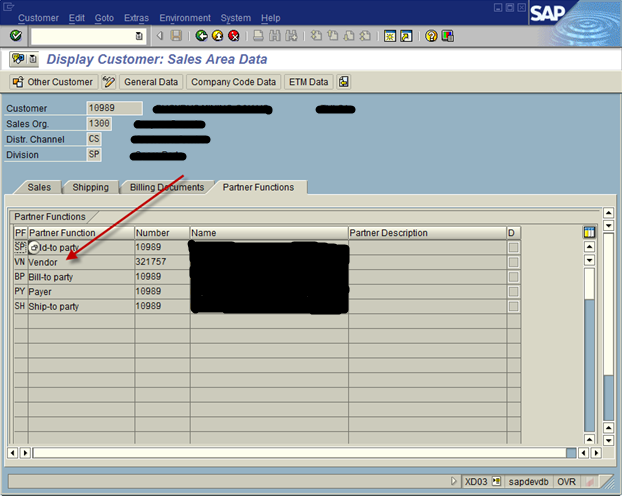
Be sure the VN partner is attached to the customer.
owty-04

If you follow these simple rules, you’ll be in good shape, and will be able to attach your customer/vendor to the warranty claim.  If not, expect some issues when you attempt to do your first claim.

Thanks for reading,

Warranty Claims – Configuration – Define Warranty Claim Types

This step in warranty claims it the first real piece of the puzzle when it comes to defining the different warranty claim scenarios.  I will always encourage you to come to the define warranty claim types screen and create a custom claim type, and copy from the closest standard claim type.  SAP does a great job of providing multiple base claim types that will likely be close to your final needs.  For this coming example, I’m going to follow the postcrediting warranty claim types, and create a custom version.  If you aren’t sure which option to choose, check out my post on the basics of warrany claims to gain some insight.
owty-01

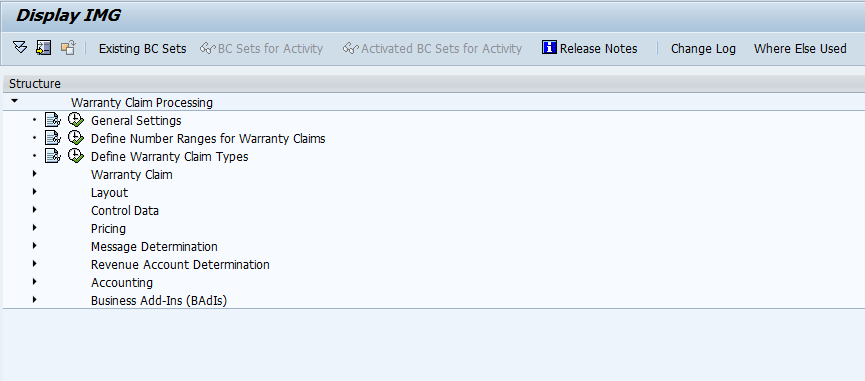
Now, we start at the OWTY transaction to see all the configuration pieces.  We select Define Warranty Claim Types.
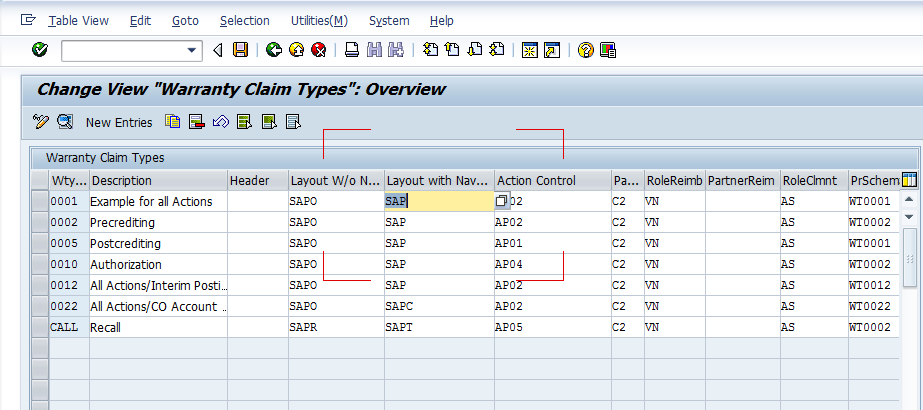
owty-02

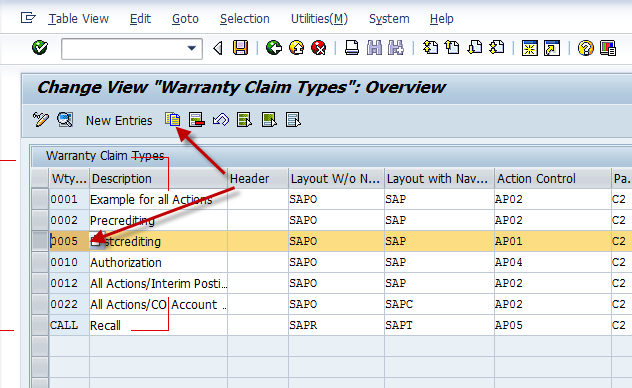
By default, SAP provides multiple options to start with.  In fact, you might be able to use the out of the box options, but being the SAP purest, I always encourage you to create a ZXXX claim type.
owty-03

So, highlight the option you want to copy, and press copy.  This will bring you to the Define Warranty Claim Types detail screen.
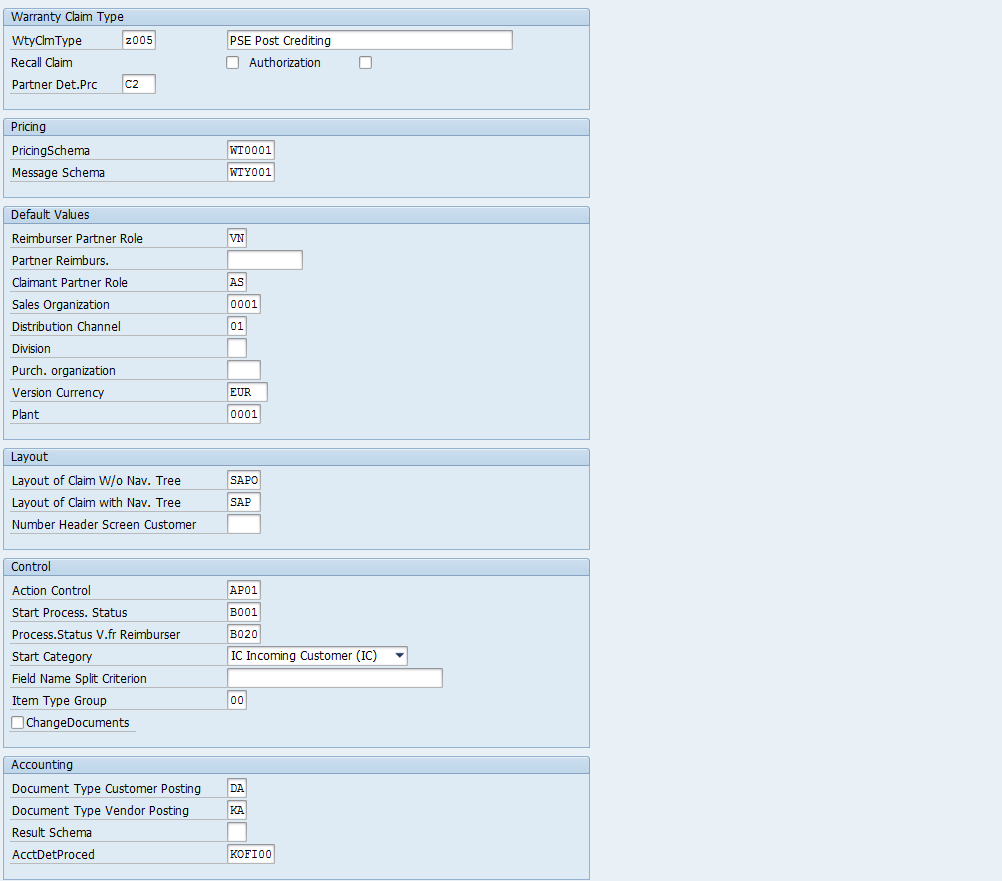
owty-04

Again, this is a busy screen.  there are a lot of fields, and most of them are vital to the workings of the claim.

Start with renaming the warranty Claim type, I selected Z005 for this example, and changed the description.  At this point, you can save and come back to these settings later, or update everything at once.  Now, onto everything else.

Recall Claim:  This sets this claim type as a recall.  A recall is a special subset for warranty claims.  In general, you can think of this as a defect in a product, and you want to create a bunch of claims all related to the same thing.  This is a recall.
Authorization:  Allows you to set this as applicable to authorization, WTYAUT transaction.  In future posts, I’ll talk about the actual execution of the claim and go into transactions like these.
Partner Det.Prc:  this like so many documents, allows you to set your own partner determination procedures.  This is very handy to determine what partners can and should be related.  Certain partners will be required no matter what, but we’ll get to those shortly.

Pricing
Pricing Schema: serves to determine specific prices for each warranty claim item and each warranty claim version and then to to post them to FI.  In short, this is your pricing procedure.
Message Schema: this is your output determination procedure.  Especially useful, since it’s likely you will have special documents, either printed or IDOC relevant to warranty claims.

Default Values
Reimburser Partner Role: This is a very important piece to notice here.  I’ll do a post soon that talks about this more detail, but you need a specific partner type for your reimburser, and it must have some additional settings within it to allow it to be part of a warranty claim.
Partner Reimburs.: this allows you to set a default vendor or reimburser for the claim type.  This is valuable if you always know who will be doing the work.
Claimant Partner Role: exactly like the Reimburser Partner Role.  This is typically a customer, but this must be a specific partner type that gets assigned to the customer.  I’ll go into this in a future post as well.
Sales Organization/Distribution Channel/Division/Purch organization/Plant:  These are all defaults.  So if your claim will only be used in a specific area, be sure to set it here.  You will get the option to enter this information within each claim if you need.
Version Currency:  self explanatory

Layout
The layout section is likely to be revamped as you better understand the flow of the warranty claim.  You have complete control of how the screen is laid out, and you can do it with or without a navigation tree.  We will discuss the Layout section in the future.
Layout of Claim w/o Nav. Tree:
Layout of Claim with Nav. Tree:
Number Header Screen Customer:  When using customer exit WTY00001, a customer-specific screen area is activated in the bottom of the header data area in the warranty claim by using this screen number. The customer-specific screen area can have a maximum of two lines without a frame or one line with a frame.

Control
This section, like layout, is something you should configure your own values for.  The control of the warranty claim is truly where the power resides in this technology.  We’ll discuss the control section of configuration in future posts.
Action Control: set the action control profile
Start Process. Status:  Based on your action control profile, you can define what status a claim should start at.
Process.Status v.fr Reimburser:  Based on your action control profile, you can define what status a claim should start at.
Start Category:  should the claim start with IC, OC, IV or OV
Field Name Split Criterion:  If the claim can split, what field will determine how to split it.
Item Type Group:  assigned to the warranty claim using the claim type. This means that only specific item types are allowed in a claim type and/or specific item types are excluded from a claim type.
Change Documents:  this field I’m always a huge advocate of.  In all instances, I encourage this field checked.  Unless you’re really concerned with a change table, it can only benefit you to be able to see exactly how and when each change occurred.

Accounting
Document Type Customer Posting:  The document type that you enter here is the document type for the warranty credit memo that is sent to the claimant. The claimant is the debtor in warranty processing. You define document types in Customizing for Warranty Processing under Accounting –> Define Document Types .
Document Type Vendor Posting:  The documet type that you enter here is the document type for the warranty debit memo that is sent to the reimburser. The reimburser is the creditor in warranty processing.
Result Schema:  This is for PA transfer.  This is outside of my expertise, so always, talk to your FICO expert when filling in this field.
AcctDetProced:  this is your account determination procedure.  If you’re not sure, talk to your SD/FICO expert for guidance.

Now, that’s the define warranty claim types step in configuration.  You will likely revisit this step in configuration if you following the configuration order listed in OWTY.  I’ll talk about what you should configure first in the future.

Thanks fore reading 🙂

Warranty Claims – Configuration – Define Number Ranges

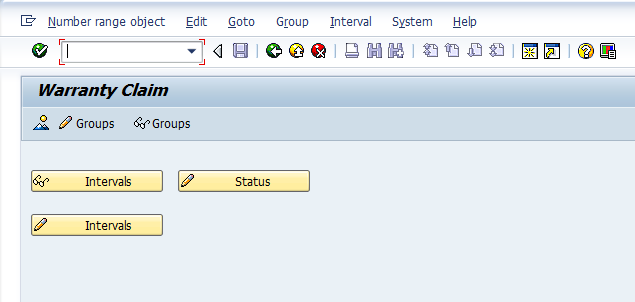
Now, I have to confess, doing the define number ranges step the first time was a huge pain.  The way the screens are setup don’t follow the standard convention of a number range screen.  For example, Change Status, or Change interval have no buttons.  But I’ll show you how to navigate through this…  Again, if you missed yesterday’s post, this the second step in configuring your warrant claim, at least it’s the second menu item listed.  Use transaction OWTY to get to this screen.

owty-01

So, when you first arrive at the screen, it looks like any other number range.  The biggest difference is that there is no predefined number range interval.  So before you can do anything you need to create the first number range.  Here’s how you do it.

owty-02

You can either press the change groups button, or use the menu Group–>Maintain.

owty-03

Once you arrive at this screen, you need to use the menu Group–>Insert

owty-04

On this screen, give a text/description, the to and from interval, and then press insert.

owty-05

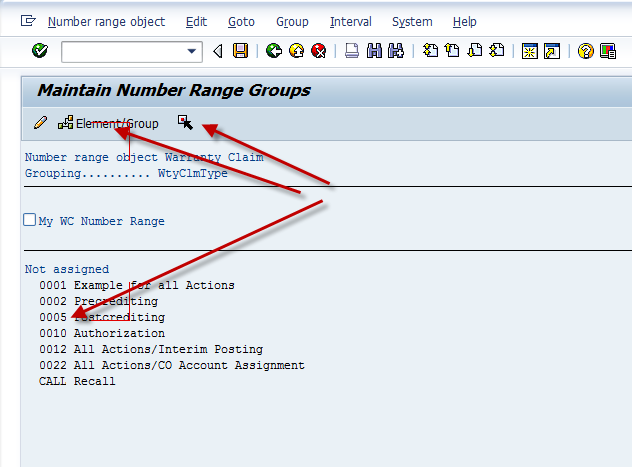
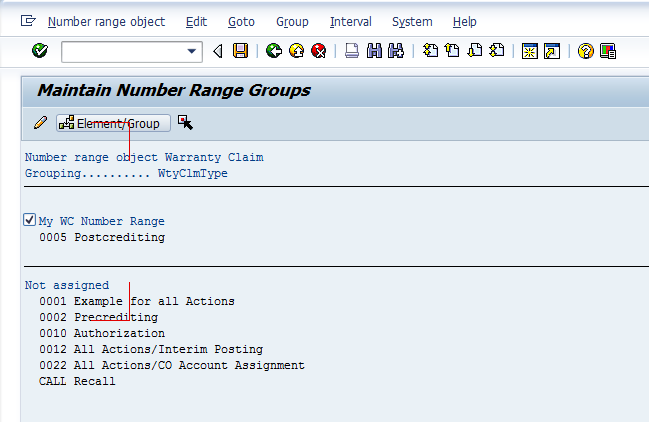
Now, you can finally do the standard task of assigning your claim type to the number range.  Keep in mind, you will have to revisit this step if you create a new claim type (which I will recommend in a future post 🙂 ).  So, first check the box next your number range (mine is My WC Number range).  Then place you cursor on the range you wish to assign.  I chose 0005 for this example, press the select button, then press the Element/Group button.  If you did it correctly, you should see this:
owty-06

So, that’s the trick to getting your number ranges rolling for warranty claims.

Thanks for reading,

Warranty Claims – Configuration – General Settings

I recently had a request to start talking more about warranty claims.  I did a post a while back that talked that the theory behind warranty claims and what you need to consider in order to implement it.  If you haven’t seen it, I encourage you to check out that post.  Now assuming that you know you want to implement warranty claims, let’s get started with step 1.  The general settings.

First, if you’re not familiar, the transaction OWTY is the place to go for all your warranty claims configuration needs.

owty-01

So, I like to start at the beginning, so select General Settings.

owty-02

Now, you’ll notice that there are a lot of fields here.  So, let me begin by saying, many of these may not be needed, depending on the scenario you need to implement.  The first thing to recognize is the abbreviations used within warranty claims:

IC: Inbound Claimant – this is the information coming in from the customer or whomever is requesting reimbursement or a replacement.
OV: Outbound Vendor – this is the information to send to the vendor that will do the work.
IV: Inbound Vendor – this is the information sent back to you from the vendor.
OC: Outbound Claimant – this is the information you send back to the claimaint/customer.

Ref Equipment – this can be used as the reference piece of equipment to copy from.  Personally, this isn’t a feature that was useful in my projects due to the fact that the equipment records were always in existence before the claims occurred.

Calender:  This is the factory calender to use when calculating deadlines.
Deadline Parts to be Returned:  This is the number (in days) for the claimant to return the equipment to the vendor (or you) before the claim is no longer valid.Answer Period Reimb. Version: this only applies to a claim split.  This is functionality have not used in my previous projects.

For each of the following areas you can define a different condition for each of the IC, OV, IV, OC steps.
Condition Type Part Amount – this is the pricing condition for a parts/materials amounts.
Cond. type Amnt LbrValue – this the pricing condition for the labor amounts.
Condition Type Amount – this the pricing condition for the overall amount.
Cond Type Percent Part – this is the pricing condition for parts/materials as a percentage.
Cond Type % Labor Value – this is the pricing conditon for labor as a percentage.
Condition Type Percent External – this is the pricing condition for external as a percentage.

Claim Grouping Field – this field allows you to select the way claims are grouped within the warranty tree.  PARNR would be a common way to group things by customer.

So, that’s the first step in configuration.  While much of this screen is extraneous for any one particular claim type, you may have multiple claim types, each for a slightly different scenario.  Some dealing in percentages, some straight amounts, etc…  It is recommended to set a pricing condition for each of the fields.  Often times, you’ll want to make a custom ZXXX condition, to assure it goes to the appropriate account determination.

That’s our first step in Warranty Claims.  I’ll be doing more posts over the coming weeks.  Thanks for reading,

Web Dynpro – Editable ALV Table

Well, I’m still learning things about the Web Dynpro version of the ALV Table.  In this post, I’m going to about how to make an editable ALV Table within ABAP Web Dynpro.  So far, I’ve talked about how to make the table, and now it’s time for a little more advanced stuff.

Here’s some simple code to handle this aspect:

  data: l_ref_cmp_usage type ref to if_wd_component_usage.

" Instantiate the ALV usage
  l_ref_cmp_usage =   wd_This->wd_CpUse_My_Alv( ).

  if l_ref_cmp_usage->has_active_component( ) is initial.
    l_ref_cmp_usage->create_component( ).
  endif.

" Get reference to the model
  DATA: l_ref_INTERFACECONTROLLER TYPE REF TO IWCI_SALV_WD_TABLE .
  l_ref_INTERFACECONTROLLER =   wd_This->wd_CpIfc_My_Alv( ).

  data: lr_config type ref to Cl_Salv_Wd_Config_Table.

  lr_config = l_ref_INTERFACECONTROLLER->Get_Model( ).

|" Set read only mode to false (and display edit toolbar)
  lr_config->if_salv_wd_table_settings~set_read_only( abap_false ).

  data: lr_table_settings type ref to if_salv_wd_table_settings.
  lr_table_settings ?= lr_config.
  lr_table_settings->set_read_only( abap_false ).

Now, this is only the first half of the equation.  By default, every column is a text view within the table.  In order to have anything to edit, you'll need to change certain columns to be a different editor.  If you want to set something to say a checkbox, this is how you'd go about doing it.
  data: lr_column_settings TYPE REF TO if_salv_wd_column_settings,
        lt_columns         TYPE        salv_wd_t_column_ref,
        ls_columns         TYPE        salv_wd_s_column_ref,
        lr_checkbox        TYPE REF TO cl_salv_wd_uie_checkbox.

"  Embed the UI elements within the ALV
  lr_column_settings ?= lr_config.
  lt_columns = lr_column_settings->get_columns( ).
" Embed a checkbox within the column APPROVE
  LOOP AT lt_columns into ls_columns.
    CASE ls_columns-id.
      WHEN 'APPROVE'.
        CREATE OBJECT lr_checkbox1
          EXPORTING
            checked_fieldname = ls_columns-id.
        ls_columns-r_column->set_cell_editor( lr_checkbox ).
        FREE lr_checkbox.
    ENDCASE.
  ENDLOOP.

While there are a lot of ways to handle this, this is the most straightforward.  
As always, thanks for reading,

ABAP – Using ABAP Help On

Since I’m working on training someone completely new to SAP and ABAP, I’m realizing there are a lot of tricks that I know that I take for granted.  One of the things I realized was the ABAP Help On feature.  It’s actually very good and often even includes sample code to show you how it looks.

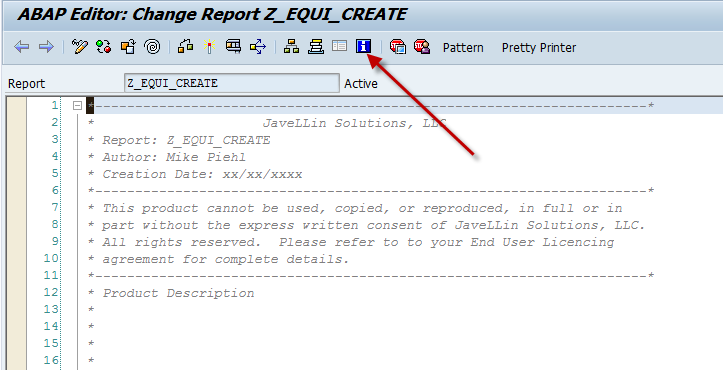
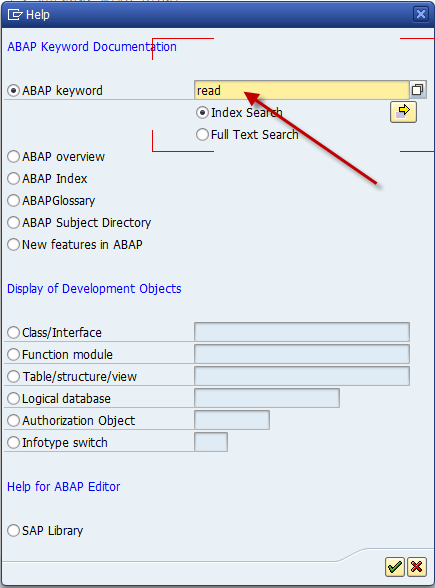
blog01-01

This is the magic button.  If you have some text highlighted, it will pull it directly into the next screen.

blog01-02

Now, there are a lot of options, but the most commonly used by me is the first option.  enter in your keyword, take the defaulted index search and hit enter.

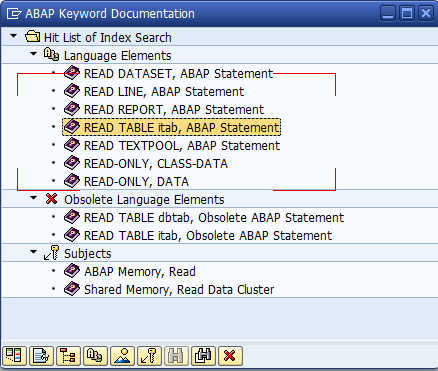
blog01-03

Now you get your result list.  Find the best match and double click it.

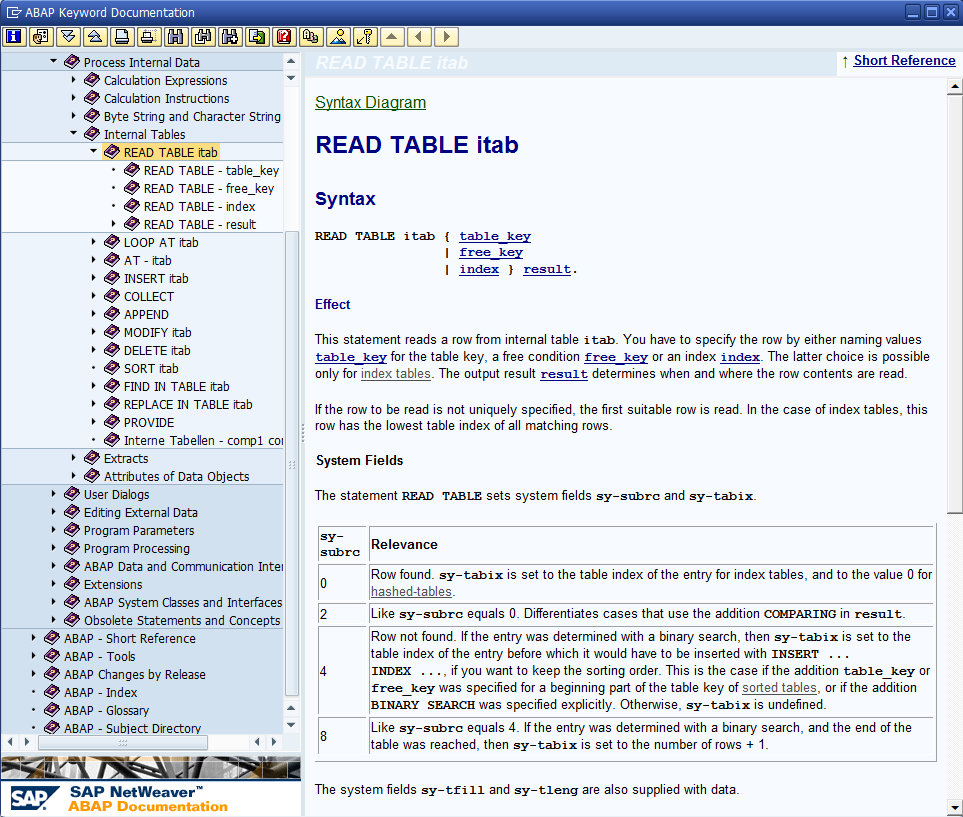
blog01-04

it will come back with a good explanation, syntax diagrams, options you can attach, and sometimes sample code.

in addition, it drops you into the correct place in the help menu, so if you didn’t pick exactly what you needed, you might see it in one of the nearby menu options.

Anyway, basic to my expert readers out there, but if you don’t know much about ABAP, it could come in handy.

Thanks for reading,

Variant Configuration – Setting up Sales Order Costing

When you use variant configuration, one of the things you often need or want to do is setup sales order costing for your configuration.  Surprisingly to me, sales order costing is NOT setup automatically for the TAC item category.  So let me walk you through how to set this up (at least as far as I can take you).  Like so many things, you’ll need some input from your FICO expert to make sure all the settings are proper for their world 🙂
blog01-04

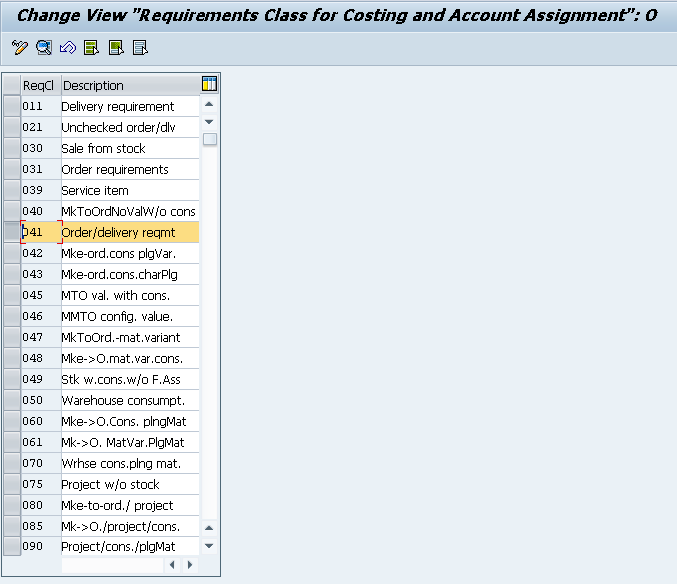
Now, I’m going to start at the beginning, so you might be able to skip this step, but I’m going to assume you don’t know the requirements class you need to update.

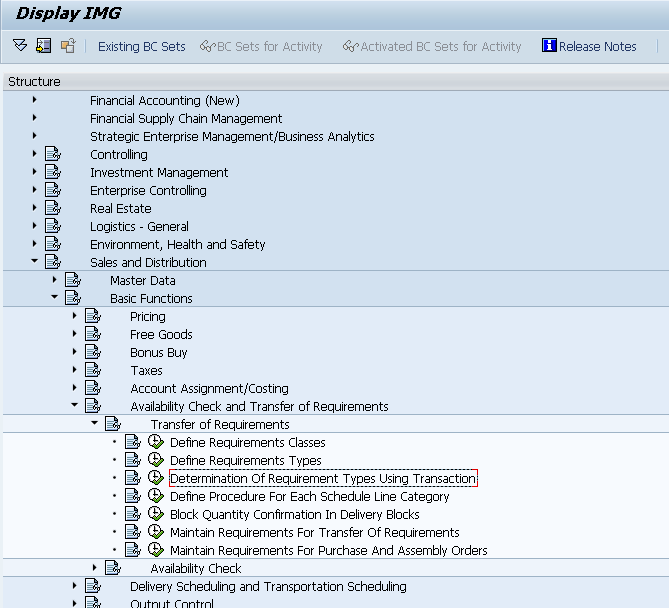
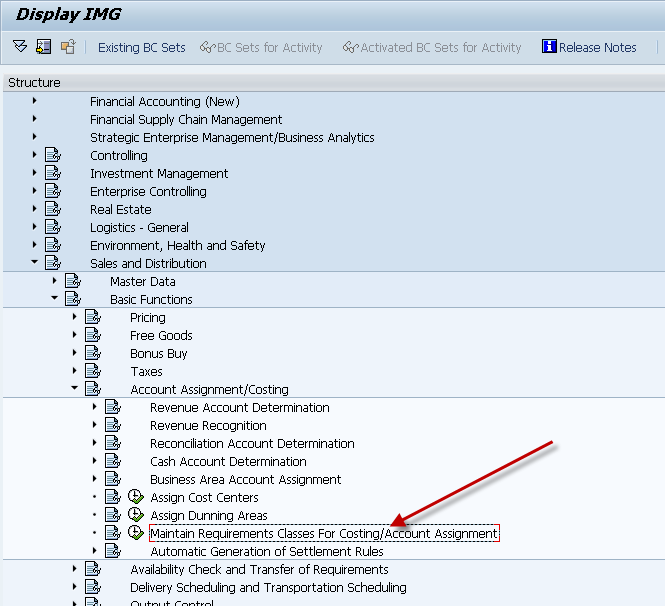
So, use this path to the IMG in order to find your requirements class based on your item category.

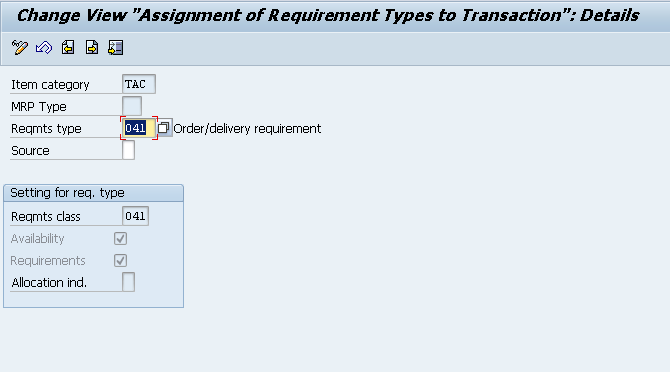
blog01-05

I’m going to show the standard Item Category, TAC for a configurable material.  You can simply substitute your item category in here.

blog01-06

Now, it’s nice because you can see your requirements class at the bottom portion of this screen without backtracking to the requirements type screen.

blog01-01

We can get to the real work.  We have to go to a little bit different spot in configuration to adjust these settings.

blog01-02

Now, using the requirements class we located earlier, we can go to the details.

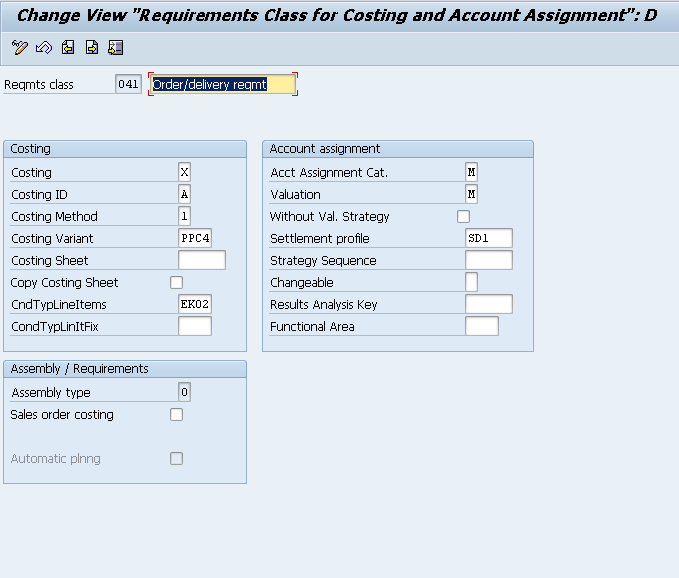
blog01-03

Now, all the work happens on this screen.  Originally, this screen was completely blank in standard SAP.  What I’ve populated is the most standard configuration I’ve used in the past.

Costing:  Setting this to X makes it required for sales order costing.
Costing ID: determines if you want automatic sales order costing (A) or automatic with marking (B).
Costing Method: (1) Product Costing, (2) unit costing
Costing Variant: PPC4 for sales order costing

CndTypLinItm: this is something optional, but it tells you where you can put the value within pricing  if you wish to use it for margin or cost plus calculations
Acct Assignment Cat: M for Ind Cust wo KD-CO
Valuation: M Separate valuation with reference to Sales Document/Project.

Settlement Profile: SD1 – Sales Order Make to Order Production

The one field I skipped is the Settlement Profile.  This one I always defer to my FICO person.  I don’t even pretend to know which one of these to select.

Once you set this stuff, you should be good to.

Thanks for reading,