SAP

Home / Archive by category "SAP" (Page 23)

Netweaver Gateway – Creating the Project

Well, since I recently spoke about using the gateway client, I figured I should talk about creating the service to use the gateway client.  The first step in this process is creating the project.  Like so many things, you must start small in order to build…  so let’s the netweaver gateway project and get this party started.

First, go to transaction SEGW

segw01

Press Create.

segw02

Now, put in the project name, description and package.  For me, I do everything within my own namespace, so notice how both the project and the package must start with the namespace.  Press the green check and you have your project.

segw021

In future posts, I’ll walk you through the next steps.

Thanks for reading,

Warranty Claims – Define Action Controls

Sorry, it’s been a while since I talked about the Warranty Claims configuration.  Time is always working against me, so finding the time is often challenging 🙂  So, on with the show…  This post is going to jump ahead a little bit from where we left off.  The reason being, to me, the sequence of configuration doesn’t really flow with the way you’d set the system up.  So it’s my blog, I can do it my way.  Defining the process is one of the most important pieces of the claims process, in my opinion at least, so I wanted to start with the action controls.

wty01-01

First, go to OWTY, and you this is where you find the configuration.

wty01-02

First, pick your claim type.  You can will often be using a custom claim type, but for simplicity, I’ll start with the AP01, post crediting claims.

wty01-03

Now, here’s the where things get heavy.  The first column, is our chosen claim type.  The next 4 columns are where the power comes from.  Now, in the start processing, this is the current status your claim is at.  Column 3 is the actions that are allowed to happen at that status, and column 4 is the status that the claim will move to if that action is taken.  Let’s look at an example
when the status is B001 is Warranty Claim New.  When the claim is at this status, you have the following actions you can take:

S001: Automatic Processing Postcrediting after VersionsFrClaimant
S003: Warranty Check (A200) and VSR Call (A006)
T*:  this is all the T actions…  however, you won’t see the TXXX actions in the list (because they are “hidden” actions).  But things like T060, complete claim are available by pressing other buttons, so you want to make sure they are available.

Now, if we pick S001, it will set the claim status to B010: Claim Sent to Reimburser, along with the back end actions that go along with it (we’ll talk more about that later).

wty01-04

If you want, you have the option to create your own options or change the existing ones.  Once you understand this concept, you can more easily build the “road map” to the process you ultimately need to create.

Thanks for reading,

Netweaver Gateway – Using the Gateway Client

Well, I just found a great document out there in SCN for how to use the Gateway Client.  I was kind of struggling with this, but after finding this trick, it makes it a lot easier.

http://scn.sap.com/docs/DOC-47626

There really isn’t a lot to say about this.  The author did a great job of making it simple.  I’ll be doing more posts in the near future about NW gateway, since I’ve recently learned how to make an RFC and create a service for it in the Gateway.  Don’t want to forget what I learned, and maybe you will find it valuable as well.

Thanks for reading,

Basis – Using SGEN

One of my old colleagues recently pinged me, and asked if I could talk about the SGEN.  For anyone not familiar with SGEN, this is nice built in tool from SAP that regenerates all the program in certain areas.  Now the most important time to execute this transaction is anytime you update a kernel, apply some support packs, etc…  This is typically when I execute it.  So I’ll walk you through the basics of what I know.

sgen01

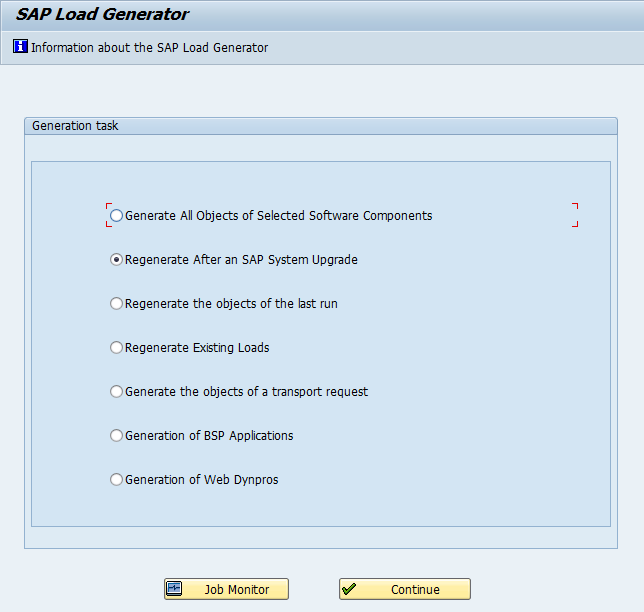
When you first execute SGEN, this is what you’ll see.  The descriptions are pretty easy to interpret. I typically use the first option, because I’m not sure how to get the second option to work.  I’ve applied support packs, but there must be some step I’m missing because it always gives me an error that say I can’t use this.  I’m going to show you the first option, because it will work no matter what.

sgen02

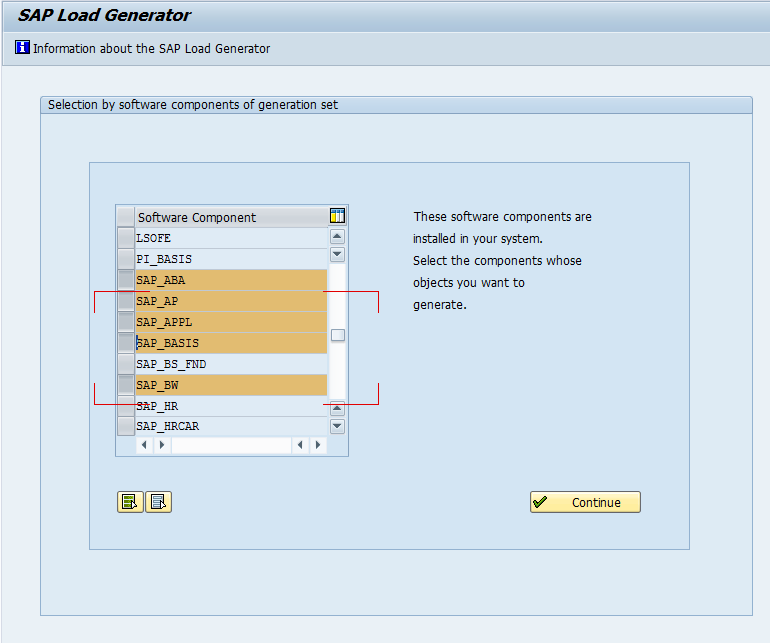
Now, once you get here, you have a huge list of SAP components that you can choose to regenerate.  Now keep in mind, this is a very process intensive transaction, so be careful what you choose (and when you choose to do it).  Of course, if everything is compiling anyway, what do you have to lose.  ha ha ha.  I’ve highlighted the most common areas that apply to everyone.  Just a word from experience, you will still encounter some compiling even after you run this.  (unless you choose to regenerate every component, which will likely take some time.).  So, choose the components with care.  It’s often better to get 90%, and save 2 days of processing =)

sgen03

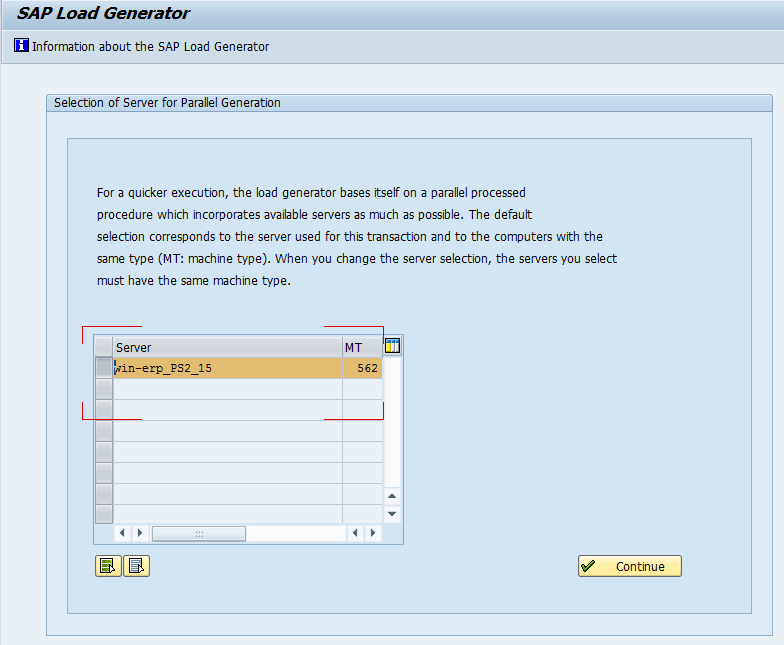
Once you pick your components you can choose what servers will do the regeneration.  Mine is a small system, so I only get one choice, but most corporate environments will have multiple servers to execute against.  Once you’re done, press continue.  Often, this can run for a while.  This step finds everything to regenerate, and strips out includes and stuff.  depending on the processing power of your system, it can take a few minutes, up to a couple hours.  (trust me, I’ve experienced both.  ha ha ha)

sgen04

Now, once you get this far, you’re ready to go.  You can either select Start Job directly (fancy way of saying, execute now).  Or you can schedule it for an off time, like you’d schedule any other job.  Once the first 100 items have been executed, it will give you an estimated time of completion.

That’s what I have for today.  As always, thanks for reading,

ABAP – Creating an RFC

Now, in one of my many latest endeavors, I need to create RFC’s to port my code out to an Iphone/Ipad application.  Happily, we have a great contact that is helping me with this stuff.  Now, I knew this was coming, so at least I put the majority of my code into objects/methods.  This makes moving the code pretty simple.  however, I still needed to add a new wrapper to an existing object.

So I go to SE37, create myself a function.  Under attributes there is one major piece to turn on:

blog02

Set this flag, and you’re good to go.  Now, I have run into a small little obstacle that I have yet to overcome.  I’m using the Netweaver gateway to port my code to the application.  Initially, I had set a bunch of tables (so it would like a select option).  For some reason, we were unable to get the information to be sent to through the gateway like this.  When we moved it to be a straight exporting parameter, everything worked fine.

So, if you happen to be someone that knows NW Gateway, is there a trick to send in information as an input table?  and still have the information sent through the gateway?  I’m sure it’s something dumb that I missed, so any feedback you might have, please post a comment.

Thanks for reading,

ABAP – SELECT vs. SELECT INTO CORRESPONDING FIELDS OF TABLE

Well, it turns out my new system is teaching me all sorts of things lately.  Today, I learned the value of how to code the select statement.  In my old ERP 6.0 SR3 system, I built a small program to make notifications in my system.  I use it to generate master data to test my dashboard.  Well, the statement worked just fine so I didn’t think anything of it.

Select equnr from VIQMEL into lv_equnrfor all entries in lt_equip
where equnr = lt_equip-equnr and

kzloesch = ” and
owner = ‘4’.
… do something here.
Endselect.

The statement seemed harmless enough…  until I went to load this into my new EHP4 system.  It has the upgraded kernel, latest support packs, blah blah blah.  It suddenly when a minute, to hours to execute this same piece of code.  I still don’t know exactly what changed…  but sure as hell, my code changed 🙂

I moved to:

select equnr from viqmel into corresponding fields of table lt_qmelwhere equnr = lt_equip-equnr and
kzloesch = ” and
owner = ‘4’.
loop at lt_equip into wa_equip.
read table lt_qmel into wa_qmel with key equnr = wa_equip-equnr.
if sy-subrc = 0.
… do something…
endif.
endloop.

this dropped it make into the less than a minute to read the new code.  wow.  I don’t know what caused the issue, maybe it was 7.01 vs. 7.00, but the same table read in a slightly different way made a huge difference in this program.
Thanks for reading,

ABAP Web Dynpro – Setting ALV Column Header

Not that long ago, I discovered the whole world of ALV tables within ABAP Web Dynpro. As is so common for me, I’m still figuring out all the ins and outs of the code. I have done several tables in my first application, and they all went pretty straightforward. Suddenly, I went a little off the norm, and the column text that I was using stopped working. So because of that, I wanted to make sure I shared this little tidbit about setting the ALV Column Headers. I did a post on this stuff, but I missed a key element. If you’re looking for explanation, take a look at this post.

        ls_col_hdr = ls_cols-r_column->get_header( ).         ls_col_hdr->set_ddic_binding_field( if_salv_wd_c_column_settings=>ddic_bind_none ).         ls_col_hdr->set_text( ‘R’ ).

Now, the important thing to notice is the 2nd line I have listed above. In certain instances, no matter what you try, you can’t undo this binding. So, when in doubt, explicitly break the link. it’ll save you a lot of headaches 🙂

Thanks for reading,

Variant Configuration – Adding Values to a Multiple Value Characteristic in use

Now, this is an obscure, so no idea if anyone else has had to do this, but I just had a situation where a multiple value characteristic started off as free text only and the client needed to change it to define the values.  I thought this would be a simple exercise, however I quickly found out a few things.  If your characteristic is in use and you choose not to check the additional values box, then it’s all or nothing before you can save.  That means you need to track down every value that was entered for you multiple value characteristic and give it a value in CT04.
Now, I went through the where used and thought I found every value that I had used.  Well, I was wrong.  So, after spending a little time in debug, I found the following trick.  If you place a breakpoint in the following area, you

Program: SAPLCTMV
Include: LCTMVF2I
Form: CHECK_DEL_OF_VALUE

Function: CTCH_CHECK_CLASSIFICATION

If you place a breakpoint here, and look right after this function, you’ll see a couple of error lines.  If you look at the value of  sy-msgv1, you’ll see the value that is missing in your characteristic.  Now, this is probably an iterative process to get everything, but this will help to prevent you from wasting too much time looking for one specific value to add to your characteristic.

Thanks for reading,

Service Management – Warranty Claims example – OC

This is the final piece of the post crediting process.  Last time we covered the IV or inbound from the vendor.  This last piece is the OC or outbound to the claimant/customer.  We left off at the B025 status.

Press the action button.  Now you will create the claim version 4, to be sent to the claimant.

blog03-01

Select Action A013: Copy Versions from Reimburser to Versions To Claimant.

*** Note: you could reverse the posting by selection A052: Reversal Version from Reimburser in FI

Status is set to B028: Claimant Outbound (Reply) Created

blog03-02

Version Detail: Be sure to set the partner to be the claimant (customer number).

blog03-03

Be sure to verify the pricing on Item Detail.

After verifying the data, Press the Action Button:

blog03-04

Select Action: A860: Release Outbound Claimant Version for Sending

Status: B030 Claimant Outbound (reply) Sent

Press the Action Button again:

blog03-05

Selection A041: Post Versions to Claimant in FI

this will post the money to the customer account.

Status: B031:Claimant Version Posted

Finally Press the Checkered Flag to mark the claim as complete.

Status: B060: Claim Closed

*** Note, if the claim is rejected you would press the checkered flag as well.

So that’s the entire post crediting process in warranty claims.  I hope this helps shed some light on the full process and some of the things you can do with warranty claims.

Thanks for reading,

Service Management – Warranty Claims example – IV

Last time we talked about the OV or outbound to the vendor.  Now we cover what happens when we get a response from the vendor, or the IV.  We left off at status B010.

When the Vendor approves or rejects the claim, you can hit the action button to create the 3rd version of the claim.

blog02-01

Select A019 to create the 3rd version of the Claim.

The status is now set to B020: Reimburser Inbound (Reply) Received

Be sure to update the Item Detail tab with the amount that the vendor will reimburse.

blog02-02

Be sure to update the Version Detail tab with the Decision (Approve or Reject).

blog02-03

Press the Actions Button:

blog02-04

Select Action A036: VSR Call Version from Reimburser (Callup Point 13/14/15)

Status is now set to B022: Claimant/Reimburser Version checked

When the money is received, press the Action Button:

blog02-05

Select A043: Post Versions from Reimburser in FI

This will set the status: B025: Reimburser Version Posted

blog02-06

Press Save.

To see the accounting docs that were generated, press the document flow button.

blog02-07

Click on the accounting document.

blog02-08

Green arrow back to the claim, and press the action button.

Now, at this point, you’ve received the money from the vendor.  Next time around, we’ll talk about the OC or outbound to the claimant/customer, the end of the warranty claims cycle.

Thanks for reading,