VC

Home / Posts tagged "VC"

Variant Configuration – Using a Parameter ID in a Dependency

Another fun tidbit I learned from my friends at Elogic.  Have you ever needed the model to change based on who is running it???  I know it sounds unusual, but I ran into this scenario.  We had a group that was constantly updating the bill of materials, however the business had begun a round of testing.  They needed to have the BOM locked down, but we didn’t want to have the modeler’s doing weird things just to test the new things they created.  For this, we used a Parameter ID in a dependency to handle this issue.

So, we created a copy of the BOM that was consistent.  This would provide the business with a bill of materials that wasn’t constantly adding new materials that would change the MRP results, or costing amounts, or introduce new errors.  Then, in our test environment, we added both BOM’s and used a parameter ID to determine who would see each bill of material.

Now for the new part, using a PFUNCTION, we called an ABAP function that would check for a specified user parameter.

* Read the user setting for this parameter
CALL FUNCTION ‘G_GET_USER_PARAMETER’
EXPORTING
parameter_id    = l_parid
IMPORTING
parameter_value = l_parva
rc              = l_rc.

l_parid is the paremeter ID to look for, and l_parva is the value returned from that parameter.  Using this function, you can define the cstics you want to use.  then you can assign this PFUNCTION exactly like any selection condition.

While I admit, it won’t be common, you never can tell when this could come in handy.  If you need more code around the PFUNCTION, just ask, but it’s pretty easy stuff.

Happy configuring…
As always, if there is anything we can help you with, please press the contact us button above, and let us know what we can do for you.

Mike

Variant Configuration – Exploding Variant Configuration BOM Completely

Recently, I learned a new trick from my friends at Elogic, and I since I didn’t want to forget it, the easiest way is to share it with all of you 🙂  I had a request from the business to know every components, exploded all the way down to the lowest level, so they knew what materials would need to be created in the new test system.  Initially, I couldn’t think of a good way aside from looking at the planned/production orders.  Then Lawrence showed me this trick for exploding variant configuration BOM completely…

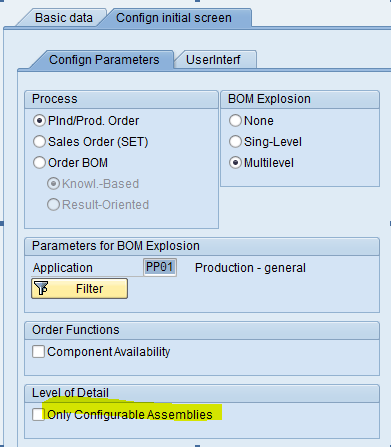
  1. Ensure that your configuration profile does not explode only configurable assemblies.
  2. Go to  transaction CAVC_TEST transaction and click on the CAVC_O_ORDER_BOM_INIT button.  Fill in the sales order and item.  Click Execute.
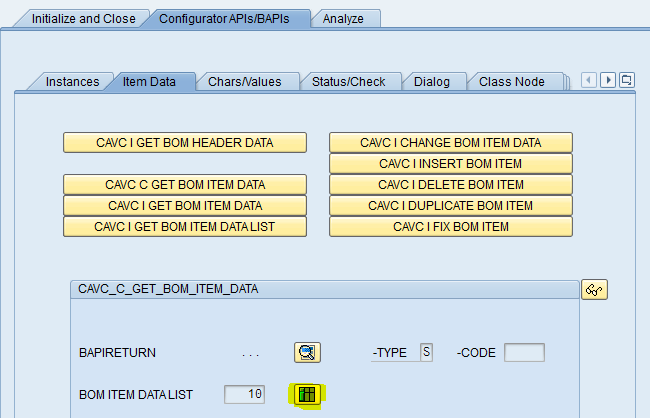
  3. Click on the highlighted button below, then click the Execute button.
  4. Click on the highlighted button below:
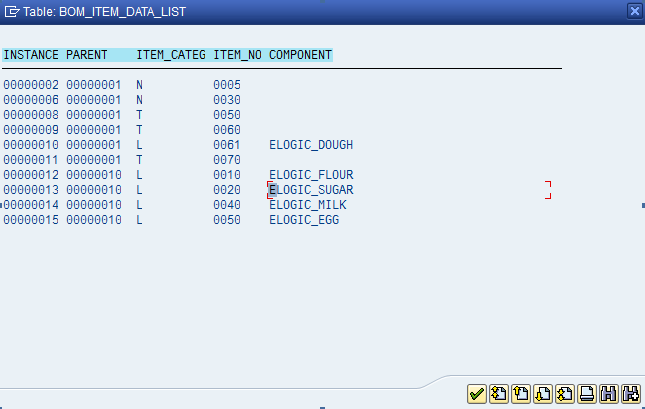
  5. Press Shift-F8 when the List screen (below) appears.
  6. Save the Component list wherever you want.


Well, hope you find this useful.  this is brand new transaction to me, so I’ll have to continue playing with it.

In the meantime, if you need more in depth help, press the contact us button above and let us know what we can do to help you.

thanks for reading,

Mike


Variant Configuration Performance Tuning

This lesson is timely because I’m dealing with this issue right now at my current client.  Their model uses class nodes in the bill of material VERY heavily, so we’ve been noticing awful performance in CU50.  SAP does provide some solutions for variant configuration performance, take a look at the following note to get some additional ideas:

Note 917987 – General performance in variant configuration

Now, we have done a few things in an attempt to improve the performance.  First, we were using class type 200 with a reference characteristic.  I learned, for class nodes this is actually a no no, unless you check a box in configuration to redundantly store the characteristic value.  Here’s what SAP’s help says about it:

Class Maintenance

Using Reference Characteristics Only

This constellation cannot access the database directly to read the assignment records. All classified objects are processed sequentially.

In order to change it, you must check that little box up top for redundant storage.  Now the drawback of this approach is twice as many table entries.  For that reason, we chose to move the characteristic to be NOT a reference cstic.  The only issue this causes is that value for material number (in our case) will not be populated automatically.  Not a huge deal.

Now, we changed all of that stuff, and still no change.  this was disappointing.  After some debugging, we (using transaction SE30 for performance tuning) we found that the issue was with table KSSK.  Surprise, Surprise, it holds the class connections.  So we handed it off to basis.  They began by running statistics on all of the tables listed in the above OSS note.  Still no help…  finally, we needed basis to reorganize the tables and indexes for KSSK & INOB.  This may sound like a lot of mumbo jumbo, but if you ask your basis person it will make sense to them =)

Short story is that sometimes you can get performance without changing your model.  Now I don’t regret the changes we did, they will still be beneficial, but don’t forget about the technical aspects.

As always, if you need further help in variant configuration, please press the contact us button above and let us know how we can help,

thanks for reading,

Mike

Variant Configuration – Delete Class Assignment

After yesterday’s post, I thought I’d throw this one in there too.  In your Development environment you may find that you need to delete class assignment of a class or another material inside of CL24N or CU42.  It could be you need a smaller class, or just accidentally linked a material that shouldn’t have been connected.  Why isn’t the issue.  You got yourself in a pickle, it’s dev, so you’re willing to live with the potential inconsistencies in order to get your model right.  After all, like we discussed yesterday, you absolutely, positively do NOT do this in production.  Then you use ECM or make a new material and replace it like any other engineering type change.  Ok… now that I have that out of the way, let’s get to the good stuff =)  You can use SE38 to put the breakpoint here straightway (it’s by far the fastest way).

Program: LCLFMF2D

Form: LOESCHEN

          if sysubrc is initial.
call function l_check_function
exporting
cucp_var_class_type       
allksskklart
cucp_root_object_key      
allksskobjek
cucp_root_object_table    
sobtab
cucp_datuv                
rmclfdatuv1
cucp_aennr                
rmclfaennr1
exceptions
deletion_allowed          
1
deletion_allowed_with_ecm 
2
others                    3.
case sysubrc.


Set sy-subrc = 1

Then execute the remainder of the code (F8).  That’s all there is to it 🙂

it’s scary that it could be that easy to delete class assignment, even though SAP transactions won’t let you do it =).

If you ever need more help in VC or SM, please use the contact us button above and let us know what we can do to help.

thanks for reading,

Mike

Variant Configuration – Deleting Class with Assignments

Just recently run into a fun little challenge, and my newest VC mentor pointed me in the right direction.  (Thanks Lawrence =) ).  In the dev system, you will often create models, do some testing, and then realize you did the wrong thing (sometimes a simple change, sometimes an epic failure.  ha ha ha).  If you reach the epic failure and need to perform deleting class that is assigned to some orders or materials, you can override the system.  This the little tidbit can help you get rid of stuff in your model that should no longer be there.

DISCLAIMER.  Do not do this in production.  This is an ugly way to make this happen, so it should only be done in development.  It will likely leave sales order line items/production orders in an inconsistent state.  So please use this technique as a last resort.

Go to transaction CL6M (delete class with assignment).

enter in the data you want to delete, but before pressing execute, go to the transaction box and enter /H then hit enter.  This will drop you into debug.  As an alternative, you can place these breakpoints using SE38.

Program: RMCLKDEL
Form: CLASS_ALLOCATION

find the line:
IF NOT VERWKZ IS INITIAL.

You will need to change the variable: verwkz =to initial.

NEXT:

Find the following code in the listed form:

Form: VERWENDUNG_KLASSE_KONF

* Verwendung in Konfiguration
CALL FUNCTION ‘CUCP_CONFIGURATIONS_EXIST’                 “051516
EXPORTING  CUCP_VAR_CLASS_TYPE   = KLART     “051516
CUCP_CLASS            = KLAH-CLASS”051516
CUCP_DATE             = DATUV     “051516
EXCEPTIONS USED_IN_CONFIGURATION = 1.        “051516
IF SY-SUBRC GT 0.                                         “051516

You will need to change the variable sy-subrc to 0 or initial

* ÄNDERUNG AUF DIREKZUGRIFF AUF ANWEISUNG DURCH DIE STÜCKLISTEN  3.1H
* Grund: tote Positionen
CALL FUNCTION ‘CLEX_BOM_CHECK_USAGE_CLASS_DIR’
EXPORTING
CLASS_NAME = KLAH-CLASS
CLASS_TYPE = KLART
EXCEPTIONS
NOT_USED   = 1
OTHERS     = 2.

*… Fehlernachricht ausgeben, falls Klasse verwendet wird.
CHECK SY-SUBRC NE 1.

Finally, change the variable sy-subrc = 1.

now you can execute (F8) the remainder of the program and your class will be deleted.  If you have open sales orders you wish to continue using/testing with, you should go in change mode and visit the configuration.  You may show an inconsistency depending on the class and it’s location in the structure.  Be sure to delete any inconsistencies and validate the cstics and values you still need in the configuration.

Once again, if you need any VC help, please use the contact form above and let us know how we can help,

Thanks for reading,

Mike

Variant Configuration – CU60E – Uploading to a Variant Table

Hey everyone, I figured it was about time I drifted back to VC for a while.  I’ve been posting about business and service a lot lately, so here’s a little tidbit that has come in very handy for me.  Often time when you’re loading in a variant table, there can quite a few entries.  So SAP built in a pretty little cool utility.  It’s CU60E.  The only problem with it is that isn’t intuitive exactly how it works, so here’s how you can make use of it.

1.    The characteristics in your file must be listed in the same order as they appear in the variant table.

2.    The file must be saved in a ‘;’ delimited file (Use CSV, and then do a find a replace).

3.    Validate the CSV file to make sure there are no quote marks included.  If there are, they need to be deleted.

4.    The upload should only be done for the initial load of the table.   When it runs, it wipes out the existing contents, and uploads the file.  You cannot append to an existing table using this transaction.

If you follow those 4 simple steps, you’ll be able to upload to any variant table using CU60E.

happy configuring!

Remember, if you need any help with variant configuration, service management or production planning, please use the contact us button above, and let us know how we can help,

thanks,

Mike

1.    the variant table.

2.    The file must be saved in a ‘;’ delimited file (Use CSV, and then do a find a replace).

3.    Validate the CSV file to make sure there are no quote marks included.  If there are, they need to be deleted.

4.    The upload should only be done for the initial load of the table.   When it runs, it wipes out the existing contents, and uploads the file.  You cannot append to an existing table using this transaction.

Variant Configuration – $Root, $Parent and $Self

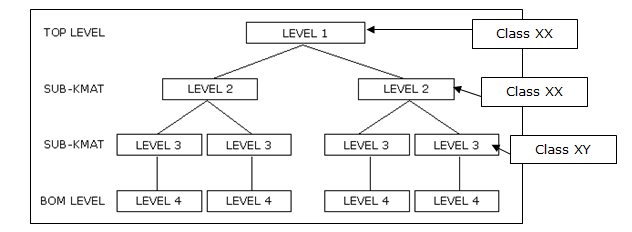
If you didn’t know better, you’d think this was some strange post about psychotherapy.  Well, it’s just one of the underlying concepts you need to understand for variant configuration.  this is one of the concepts that is easier to describe with a picture.  So let’s start with one.  $ROOT, $PARENT and $SELF are the different ways to refer to the characteristics in your model.  Each of them works a little differently.

Now, what you’ll notice is that we have several nested KMATS at multiple different levels.  Now to start this conversation, we’re talking procedures.  Using the picture, let’s do a simple table to show you

Configuration $SELF $PARENT $ROOT
Level 4 Level4 Level 3 Level 1
Level 3 Level 3 Level 2 Level 1
Level 2 Level 2 Level 1 Level 1

Now, if you look at the picture, we only call out the BOM level at the bottom.  In reality, there is a BOM level for each configurable material, but it would be redundant to go through that.  The important things to realize is that $ROOT and $SELF always points to the same place.   Only $PARENT changes.

there is an exception to this rule, and because of that, I suggest avoiding $ROOT.  The exception is when you take a KMAT that was not part of another configuration, and suddenly add it to the BOM.  As soon as you do this, $ROOT suddenly points to a new level.  Personally, it’s not a method I like to use.  Prefer to use $PARENT, and then I make sure to pass the values from level to level if needed.

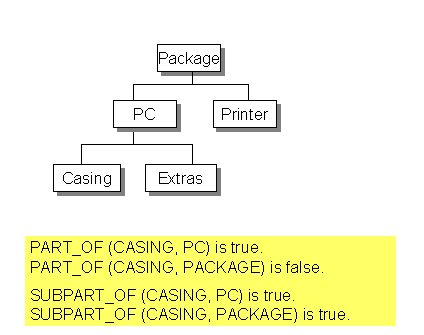
This pic comes straight out of SAP help.  It’s a little bonus for this blog post to help explain how constraints can deal with the separate levels.  In a constraint, the concept of $SELF, $ROOT and $PARENT don’t exist.  Everything is about classes and if they are part of each other.

I hope this make sense,

If you need more help, click the contact button above, and let us know how we can help you,

Mike

Variant Configuration – Passing Values between Nested KMATS

In this age, having a model without nested KMATs (multi-level configuration) is a thing of the past.  Because of that, I wanted to do a quick post about transferring values between the different levels of the bill of material structure.  There are 2 methods to accomplish this (at least using the standard ERP functionality).

1.  Procedure:  $SELF.X = $PARENT.X  or $SELF.X = $ROOT.X

2.  Constraint:
Object:
mod1 is_a(300)  mod,
mod2 is_a(300) mod,
Assy is_a(300) mod_component

Condition:
part_of (Assy, mod1, ‘0100’) or
part_of (Assy, mod2, ‘0100’)

Restricitons:
Assy.X = mod1.X,
Assy.X = mod2.X

Inferences:
mod1.X,
mod2.X

This rule is a very generic way to show you how to pass values down to a lower level cstic.  This variation goes one step further and actually checks to make sure that the nested KMAT is a at certain position in the bill of material.  This is not required, but can be very handy if is the same class exists in multiple positions in the BOM.  Notice, we copied down, but you could just as easily copy back up by reversing the restriction.  While not a common practice, the option is still there.

You’ll notice that the first method is far more simple, and will do the trick.  the constraint is more complicated to write, but has more power.  Personally, I’m a constraint kinda guy, so I tend to use that method.  But you need to use what fits your situation best.

Now, whenever you need to transfer characteristics between levels, you NEED to test early on in the process how it behaves in a sales order, planned order, production order and sales order costing.  Many times the behavior that works great in CU50, doesn’t translate the same way in a production order.  You may have assign the constraint/procedure at a different configurable material in order to get the rules to fire in all scenarios.

Happy configuring.

Remember, if there is anything we can do to help, please click the contact us button at the top of this page.

Mike

Variant Configuration – Value Comparison

Now, this topic is related to my last post.  Specifically, when you have a material variant that you need to transfer the stock from a return.  Often there are characteristics that should not be included when you are doing a value comparison of a configuration for a material variant or a serial number.  An example of this is a reference characteristic.

However, there can be other characteristics that are based on a reference characteristic that should also be ignored when you are attaching a serial number or performing type matching.  In order to set any characteristic to be excluded from the check, you can use the following program:

RCU_EXCL_CHARACTERISTICS

Simply enter in the characteristics that should be ignored (You can even make it specific to

just one material)

this is a pretty useful program to determine what should be considered when doing a value comparison, and don’t be surprised if you need to keep running it every time you get a new return for a while.  Just because different cstics will pop up based on what you’re returning.  Either way, this is great for material variants/variant matching, and an absolute requirement for stock transferring.

I encourage you to check it out.

Have fun…

As always, if you are you interested in more help, please contact us and let us know what we can do for you.

Mike
Variant Configuration – Return Configurable Materials

I’ve been a roll with VC for the blogs, so I’m gonna keep going with it (besides, I’ve been pouring all my SM knowledge into the SM E-course).  Today I want to talk about the configuration needed to handle return configurable materials.  I’m also going to talk a little about the processes you’ll need to consider when you decide to accept configurable returns.

First, the easy part.  the configuration is pretty straight forward.  Most of the work is already done for you out of the box.  The item category REC is meant for configurable materials.  The one major change that I encourage is in the item category configuration.  Being a purest, I’ll always encourage you to copy it and make a ZREC, but that’s your call.  The one field that I change is the Special Stock Indicator.  Why you may ask?  If you don’t set this, when you attempt to do your Post Good Receipt on the configurable item if you don’t change this to be E, you won’t get stock back in the system.  Rather, you will get a confirmation of service when you receive this.  Me, I’m a fan of knowing exactly what is coming into my plant.  In addition, I might be able to strip this part down for components, or maybe even resell it.  What this means is that when you receive the item in, it will be sales order stock for your return sales order.

This brings me to the process process portion of the VC return.  Now in order to use this, you will need to do some material movements.  I’m not going into a MIGO lesson here, but you need to know that you must either issue this directly from the sales order ot another sales order, or you might even need to create a material variant and then transfer the stock.  I’ll talk more about the material variant process in another post…  Anyway, returns in VC can be complicated.  Be sure you’re aware of the process cost.  If your product is cheap enough, it could be worth it to leave the settings as they are, and just throw the item away as soon as it arrives.

Anyway, more to come on VC returns, but this will get you started,

Remember, if you need VC or SM help, please contact me and let me know how I can assist you.

Thanks,

Mike