Configuration

Home / SAP / Archive by category "Configuration"

Variant Configuration – Block QtRq in the requirements

You know, I get this question about every 3 to 6 months, so it seems like  a good thing to blog about…  So here’s the deal.  Like everything in life, it’s a trade off.  When you DON’T check the Block QtRq you want the material blocked to ensure the most accurate availability of items.  When I say that, it means that the material will get locked instantly, so if inventory is going to be consumed, no one else can consume at the same time.  Now the drawback of this is that everyone else will get an error if they attempt to configure the item.  If you check Block QtRq, you open up the item so multiple people can be configuring the item at the same time, but you run the risk of inaccurate availability dates.

image001

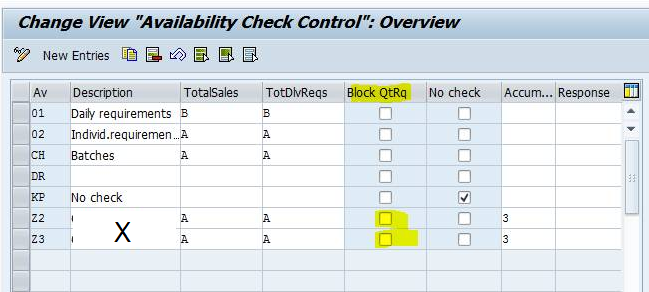
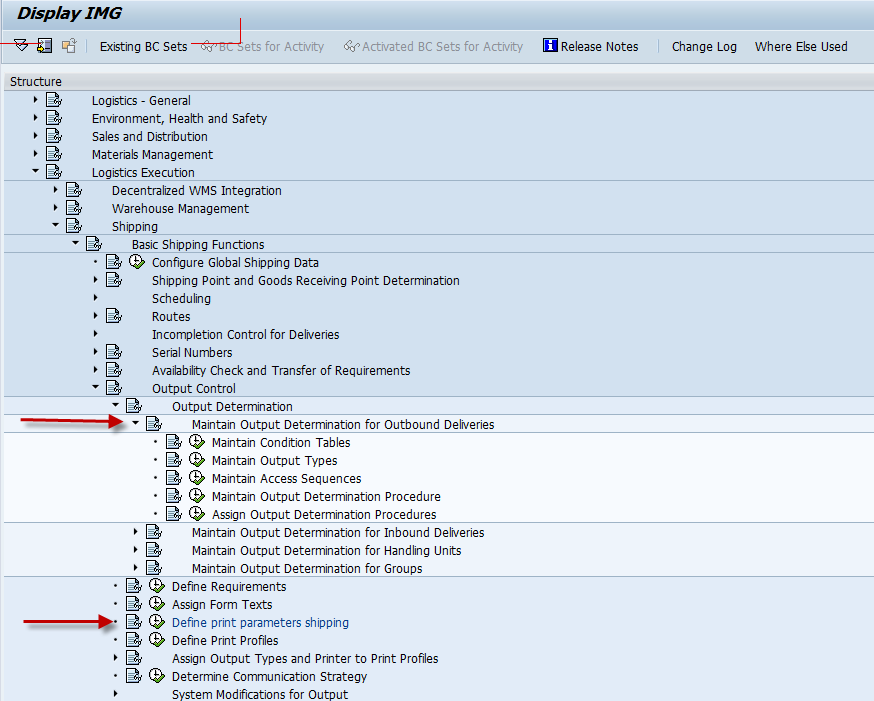
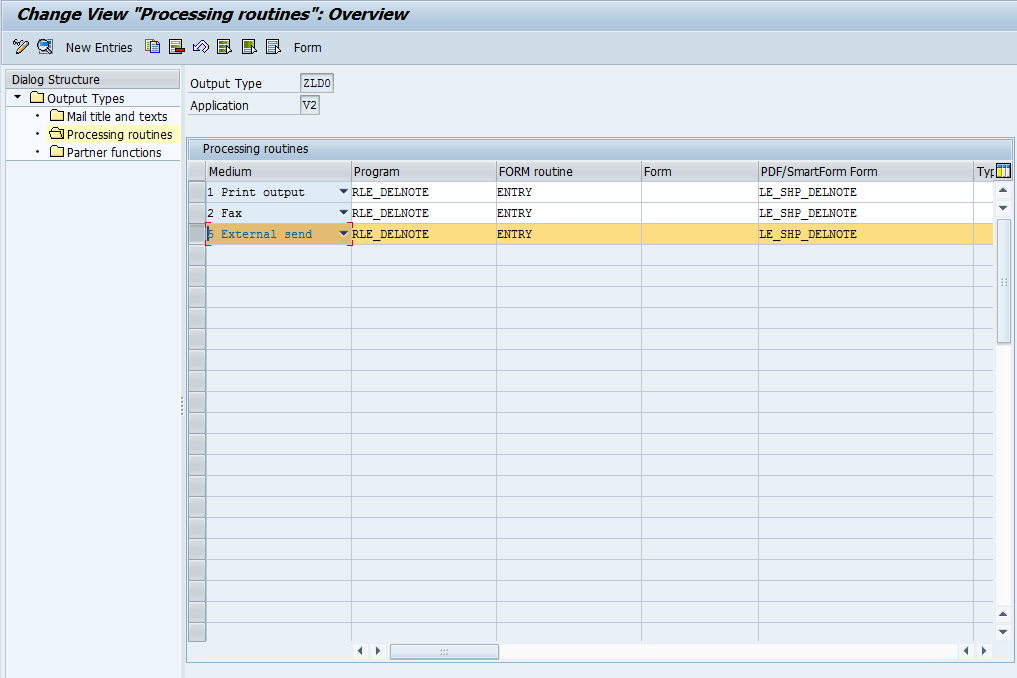
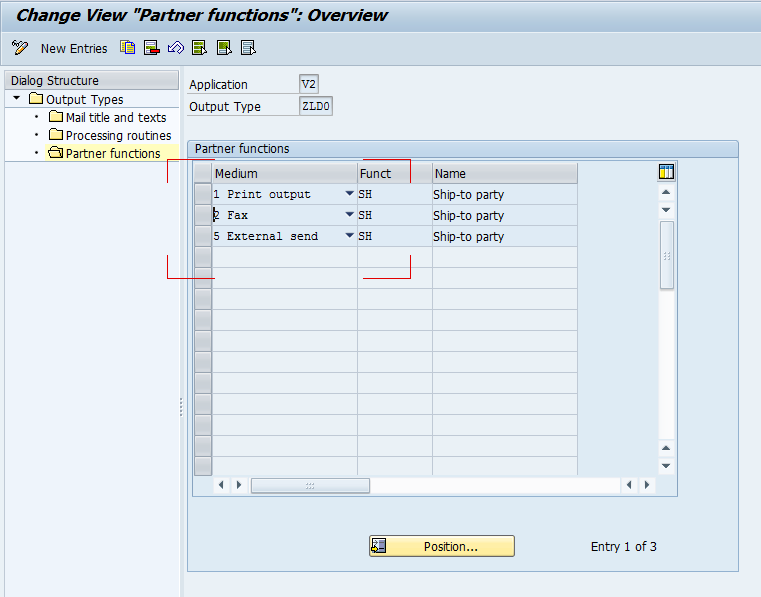
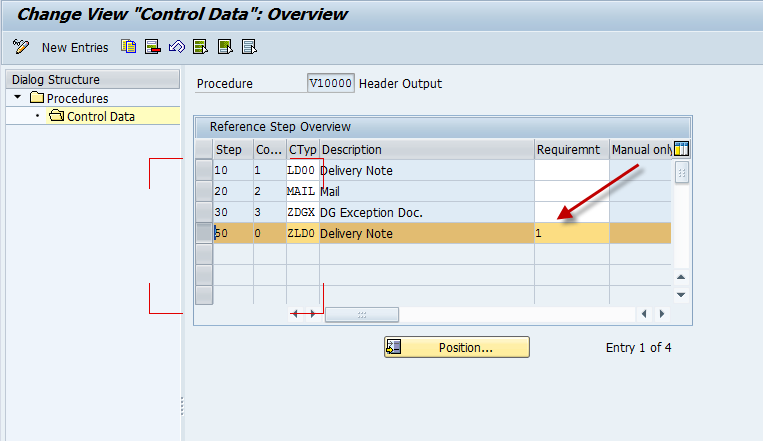
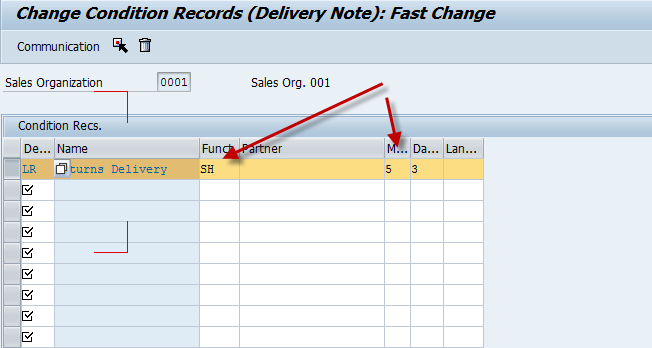
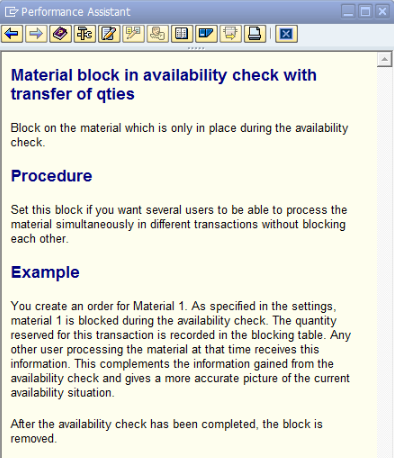
If you look at the configuration screen it seems like such a simple little check box.  But there is always to much confusion that goes along with it.  Just to be thorough, here’s what SAP says about this field:

image002
Both of these methods work and are acceptable.  What you need to determine is the business risk of “possible” availability snafus.  By that I mean, you could try to configure 2 similar items at the same time.  Both will see available stock and capacity, but for example, let’s say one major component has 1 item left in stock, and it is 2 weeks before more stock arrives.  If you don’t lock the material, then you could run into the case where both configurations attempt to consume the part, and both will give you a promise date of Friday.  When in reality, one could be done on Friday, the other will take 3 weeks.  Now you may have to go back to your customer and explain that you can’t deliver on Friday.  In some industries, this is no big deal because they have additional lead times built in or 98% of the time have plenty of inventory to turn these types of items around, in other industries, if the inventory situation isn’t strong enough, or the lead times aren’t adequate this could lead to unhappy customers.
Everyone asks, what should I set the Block QtRq to?  I always have to apologize and explain I can’t answer the question because it all depends on your customers and your business processes.  There is risk in unlocking the material, but only your business organization can determine if the risk is worth the reward.

Hope this makes senses and thanks for reading,

Service Management – Output Determination part 1 – Deliveries

Today I want to talk about Output Determination, more importantly, I want to talk about how you can notify your customers when things happen.  Not that long ago, I spoke with a prospect, and one of their requests was to have the customer notified at different points of the process.  I originally thought about doing it inside of my app, but then I realized that everything is “PULL” in a web application.  The easiest way to do it standard configuration.  There are multiple areas within service management that you might be interested in notifying your customers.  This first piece, in my opinion, is probably the most valuable, and most commonly used.  We’re talking about deliveries.  Today, what I’m going to show you is how you can setup output determination for inbound or output deliveries that get triggered upon Goods Issue.  The idea is that often your customer wants to know when you receive their equipment for repair, and even more important when you ship it back.  The configuration I’m going to show you today will work for either.  So let’s jump right into it.

blog01-00

First off, you’ll need to do some work in configuration.  In SPRO, here’s where you need to start.

We’ll start with the Output Determination for Outbound Deliveries folder.  We’ll start the Maintain Output Types.

blog01-01

In my example, I made a new output type ZLD0, and made a copy of LD00.  For starters, make sure you have a line for 5-External Send.

blog01-02

Don’t forget to update the partner tab, and make sure whatever Partner Type you want the email address from (I’m using SH), is assigned to 5-external send as well.

Next up we move to Maintain Output Determination Procedure

blog01-03

Now you will either need to create a new procedure, or update an existing one.  For simplicity, I just updated the V10000.  I then added step 50 for my output type.  The real key here is the Requirement.  “1” happens to be the requirement that Goods Issue must occur.  There are a bunch of predetermined requirements you can use for Output Determination, but if you can’t find one to fit your needs, you can always write your own.

Next, we move onto Assign Output Determination Procedure

blog01-04

Finally, make sure the procedure is assigned to your delivery type.

Next up, you need to make sure your shipping Point is setup for your condition type.  If you are using an existing condition type, you probably won’t need to do anything, but I’m throwing this in because it wasn’t setup in my new condition type.

blog01-07

Alright, with all of that out of the way, the configuration is complete.  But it won’t do anything for you without master data.

So head to your trust VV21/22 to create condition records.

blog01-05

I’m highlighting 2 fields that will matter for you.  Keep in mind, that the fields shown will depend on your access sequence you choose for your condition type.  Mine was simply Sales Org/Delivery Type.  So I’ve entered in my returns delivery, and told it to look at my SH partner, and use 5-external send as the medium (email).  Go ahead and save, and the next time you PGR an LR delivery, it will generate this output.

In the upcoming parts, I’ll talk about doing the same thing for Sales Orders, Service Orders and Notifications.

As always, thanks for reading.

Material Master – View Level Access, how important is it to you?

While I’m the VC or the SM person on most of my projects, one of the things I’ve heard rather often is that the business wants to control who can access the material master by screen.  Now, I’ve heard that through security, you can provide field by field authorization restrictions.  Short story, nightmare for your security team.  No project that I’ve worked on has been willing to go down that path.  No, most companies I’ve worked for have “given up”.  They give people access to everything and use the honor system to make sure people only touch “their” data.

First question, does this sound familiar to you?  If so, I’d like to hear how you’ve overcome the issue.

Why am I asking?  we are actually working a little mini-app that creates a single transaction for each set of screens in the material master.  For example, the four MRP screens are 1 transaction,  Work Scheduling another, etc…  We’ve included a configuration screen so that you even hide all of the fields that you don’t care about.

http://javellinsolutions.com/products/material-master-advances-sap-material-master-applications/

What I’m trying to do is to get a pulse on the need for something like this before I invest too much time in it.  I confess, it’s not our most creative application or our most complex, but it seems like there’s a need for something like this.  So if you happen to have an opinion on whether or not I’m wasting my time, I’d love to hear from you.

Thanks for your input.


Basis – Debug Authorization

Here’s another chance for me to add to my notebook.  Adding debug authorization is a trick I often have to do in my development projects.

When you have your own system, one of the first things to figure out is how can I get the authorization to debug a program, or in my case a Web Dynpro application.  Now, you can certainly assign yourself the role of SAP_ALL.  But what happens when you want to test with a real user???  Well, you need to narrow down that Authorization.

So, simply add this authorization:
S_DEVELOP
Then fill in the following attributes…
OBJTYP: DEBUG
ACTIVITY: 1 & 2 & 3

I know, not really exciting, but I never know if it might help you…  it certainly is something I’ve used multiple times.


Configuration – Customizing SPRO to Add folders and nodes

A new trick that recently discovered, is that you can actually add your folders and nodes to SPRO.  While, to most people, this isn’t all that interesting, when you design software in SAP, what could make you look more professional than to have your section in configuration.

Like always, my blog is also my notebook, so if this isn’t for you, have no fear, I’ll get to something more relevant in the next couple of days =)

Txn: S_IMG_EXTENSION

Now, do a pull down on IMG Structure, and select the node that you want to add a folder underneath.  In my example, I’m going to add it to the top level.  And then you also need to select the Enhancement ID.
blog-01

Pull down on Enhancement ID.

blog-02

Press Create
Enter in the namespace + description, and save it in a transport request (at least if you want to transport it anywhere).

blog-03
Press Enhance Structure Button

blog-04

This will bring up the IMG screen.  Simply select the node that you would to insert your folder after.  Then press the button Shown above.

blog-05

Give the folder a description

blog-06

Next, you need to insert an activity.  In my example, I used 2 subfolders, and a transaction at the 3rd level.  Feel free to structure it anyway you like =)

blog-07

First, create the activity.  Give it an ID, and then a description.
Next up, create a document for the ID.  This will be the documentation that shows up alongside the activity node.
blog-08

Next up, fill in the fields shown above, including the application component.  Take your best guess, or give it several options if it spans multiple areas.  Then save it on the button of the screen.

blog-09

Finally go to the maintenance object tab.  This is where you assign the transaction to call.  One of the things to keep in mind, is that you must specifiy a table, and it must have a maintenance view generated for it (SM30).  Put the table into the customizing Object, give it a TYpe: S, and then enter in your transaction.

Save it on the bottom, save it on top.
Green arrow Back
Save once more.  You now have your IMG folder/transaction =)

Thanks for reading,

Mike

Service Management – Service Order Number Range

Here’s a simple little post that I often forget, so why not add it to my notebook (or to everyone else, my blog).  Whenever you create a new service order type, you must remember to set the service order number range.  Relatively easy, but it does work a little different than setting the number ranges in SD, so I thought I’d run you through it quick.  Here’s where you go in configuration.  (the shortcut is txn: OION)

Select configure number ranges

Then press Edit Groups

Now once you are here, scroll all the way to the bottom until you find the section called Not assigned.

if you see any order types in this section it means they have not been assigned to a number range (I know, rocket science, right?)  So, press click on the order type and press the select button.  Then scroll up to the number range you want to assign this order to.  Click the check box in front of it, then press the Element/Group button.  Viola…  (if you don’t see the number range, you’ll have to back up to the previous screen and check the intervals.

Now, the biggest thing to remember with all of this is that if you transfer the new order type, you most likely haven’t (and shouldn’t) transport the number range assignment.  Number ranges are one of those all or nothing type transports.  So, in the new client, remember to repeat these steps to avoid shortdumps =)

thanks for reading, and as always, if you need Service management or Variant configuration help, click the contact us button above and let us know how we can be of service,

Mike

Variant Configuration – Return Configurable Materials

I’ve been a roll with VC for the blogs, so I’m gonna keep going with it (besides, I’ve been pouring all my SM knowledge into the SM E-course).  Today I want to talk about the configuration needed to handle return configurable materials.  I’m also going to talk a little about the processes you’ll need to consider when you decide to accept configurable returns.

First, the easy part.  the configuration is pretty straight forward.  Most of the work is already done for you out of the box.  The item category REC is meant for configurable materials.  The one major change that I encourage is in the item category configuration.  Being a purest, I’ll always encourage you to copy it and make a ZREC, but that’s your call.  The one field that I change is the Special Stock Indicator.  Why you may ask?  If you don’t set this, when you attempt to do your Post Good Receipt on the configurable item if you don’t change this to be E, you won’t get stock back in the system.  Rather, you will get a confirmation of service when you receive this.  Me, I’m a fan of knowing exactly what is coming into my plant.  In addition, I might be able to strip this part down for components, or maybe even resell it.  What this means is that when you receive the item in, it will be sales order stock for your return sales order.

This brings me to the process process portion of the VC return.  Now in order to use this, you will need to do some material movements.  I’m not going into a MIGO lesson here, but you need to know that you must either issue this directly from the sales order ot another sales order, or you might even need to create a material variant and then transfer the stock.  I’ll talk more about the material variant process in another post…  Anyway, returns in VC can be complicated.  Be sure you’re aware of the process cost.  If your product is cheap enough, it could be worth it to leave the settings as they are, and just throw the item away as soon as it arrives.

Anyway, more to come on VC returns, but this will get you started,

Remember, if you need VC or SM help, please contact me and let me know how I can assist you.

Thanks,

Mike

Variant Configuration – Requirement Types

Well, today is a quick lesson that I just relearned.  When you are configuring the sales order/item category for a variant configuration item, one of the big things you have to configure is the requirement types.  Now there are some standard ones, but based on what you need, you’ll probably still tweak.

So let’s start at the beginning… where do you configure this?
Txn: SPRO  Sales and Distribution–>Basic Functions–>Availability Check and Transfer of Requirements–>transfer of requirements

In here, the first 3 pieces are what you generally need to be concerned with.  All the real work happens in the define requirements Classes step.  In here, you can define if the order generates a planned order, a production order, a service order, can it take configuration? the screen shot below shows you the full assortment of items you can control.  Ultimately, you will need to use trial and error to fit your business.  the screen shot is for the standard 040, which works for configurable items.  Certain things like the accounting section will need input from your FICO team, but out of the box, this one will work for you.

Now, once you’ve created or modified your requirement, you’ll need to create the requirement class.  I personally think this step is silly, but you have to do it.  I’ll usually name the class the same as the requirement, but do whatever you like.

Now for the last step.  Assign the requirement to your item category.  use the configuration:  Determination of Requirements Types using Transaction.

Use the search to find your VC item category.  In the second column enter in your requirements class.  Now, the last and final piece, put a 1 in the third column.  This is a subtle thing, but it tells configuration to follow the requirements settings in your sales order, not in the material master.  If you don’t put the 1 in there, you could spin your wheels for a while (like I just did) trying to figure out why it’s ignoring your Sd settings.  Anyway, that’s your tip of the day…

As always, I’m learning the hard way so you don’t have to =)

If you’re in need of consulting or SAP Add-in applications, please don’t hesitate to contact us.  We’ll soon be releasing several new VC applications, including a history report.

thanks for reading,

Mike


Service Availability

It’s been a while since I talked service, so I thought I’d start posting some simple tips and tricks again.  In case you forgot, and if you read my blog often you might have, I’m actually a functional consultant, not a basis guy =)  Service and VC are favorite areas to work in.  I think they provide an interesting set of challenges and are often areas where it is hard to find good people (which is awesome for me).  Anyway, I’m working on a 5 – 10 part course talking about the basics of service management.  I haven’t decided how long it will end up being, so stay tuned.  I have so much in the hopper, but I want to actually show you guys I do know something about SM, service availability.

Today, I want to talk about Service Availability.  I’ve seen it used sporadically in places, but never very well.  So I want to talk about the how and why.  Now, before I get into the meat of the topic, let me explain why this part is important.  Just as in sales, knowing if all of the components are available is extremely important to managing your workload.  SAP provides the same availability functionality in the service order as it does in the production (except of course, running it in mass…  but for that, check Armory by JaveLLin Solutions. couldn’t help the shameless plug).  Transaction IWBK is actually a good transaction to show you all of the availability associated with a service order, and it even gives you fancy traffic lights to let you know at a glimpse if everything is available.  In addition, the status of the service order itself lets you know if all components are available.

Now, you may be asking, why do I care?  Often you have a decent workload of service orders and you require components in order to begin work on them.  Wouldn’t it be nice to see at a glance if all the components are available to know if you should start working on the order?  Perhaps you released the order to get some MRP requirements out there for parts.  Well, if you don’t know when the parts are available, how do you know when you can start working on the order?  Meanwhile, the clock is ticking for getting this part back to the customer.  Your metrics look worse and worse, all because you don’t know if you have parts to start working on a repair.

Alright, you understand the problem, so what can you do about it?  First thing you need to do is make sure the availability check is configured the way you need it.  Just like the availability for sales and production orders, you can have a unique one for service (or more often you’ll use the same one that production uses).  The screen shot below shows you were to find the configuration to see what in the system.

If you look at the Define Checking Rules, you’ll see the following.  Please note, SM is the default.

Next go the Define Scope of Check…  this is where the real work is done.

Remember, that the scope of check can be different depending on the material availability check.

This example shows 02 – SM

Every one of these options determines things that either availability includes or excludes.  Every organization is different, so I can’t tell you there are default settings to use.  I can tell you that you should experiment with whatever you do select.  Have a service order with some components and make sure your settings do what you expect.  ATP is touchy…  powerful, but touchy…  in my e-class, I’ll go into more details about the exact settings.

finally, you need to assign the availability check to the plant/order.  And you also can change the check for creation vs. release.

Here’s the settings you can control:

Alright, now that you’ve seen where to configure the availability check, you should understand how to run it…

Well, it’s pretty simple.  SAP only offers one place to execute availability.  IW32.

Press this button to availability.  There are several important system status that relate to availability:

MANC – Availability not checked
MSPT – Missing parts
MACM – All parts Available

If you use IW38/IW39 or Iw72/Iw73 and you look at system status, this will give you the quick look to determine if you have components available or not.  Please note, this doesn’t do a hard allocation of the components.  it simply says, based on the availability check (see above) that it is in stock.

I hope this little overview gives you an understanding why availability could be an important piece of service that you’ve overlooked.

Thanks for reading,

Mike

OMWD – The key to material cost estimates

After lots of digging and some help from google, I finally found what I was missing to make material cost estimates.  The following transaction all needed some tweaking in order to make my materials finally cost properly.

KA01 – needed to create a bunch of cost elements.
FS00 – needed to create some G/L accounts

the list of things to create, came from:  OBYC & OKTZ.  I had to dig through and use the error message to get to the right area, but for me, it was GBB, and my valuation area was empty, this finally led me to OMWD.  the missing piece of my puzzle.

It’s a relief to finally have that working…  now, on to posting some service order costs.