SM

Home / SAP / Archive by category "SM" (Page 13)

Warranty Claims – Layout – Define Screen Layouts

Well, I thought I might as well do posts on the Warranty Claims.  I wanted to start talking about the Layout section of configuration.  If you are familiar with the notification or equipment records, you should be very familiar with this concept.  You have a lot of building blocks, and endless possibilities of what to show, what sequence and what tab.  Let me show you just how flexible it can be.  The Define Screen Layouts is ever more flexible, in my opinion, than the equipment record or notification.  You have unlimited items you can load onto a tab, not just the standard 4 or 5 fixed locations.
blog5-01

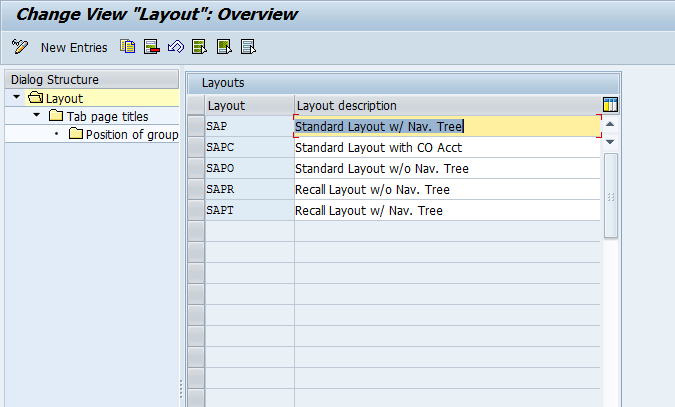
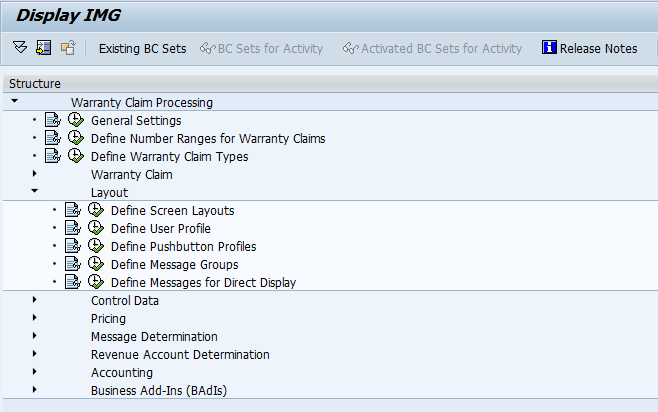
Using OWTY, you can see the layout folder.  Define Screen Layouts is our destination today.

blog5-02

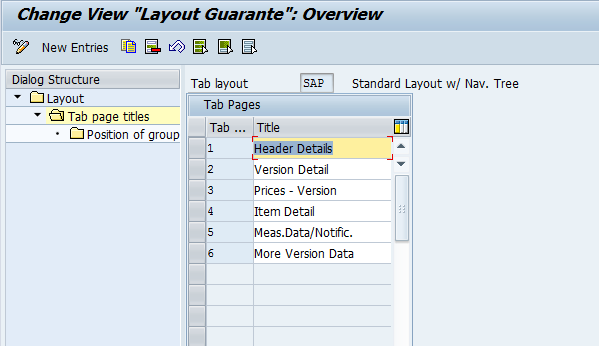
So, you will now notice the familiar tree structure on the left.  If you are designing your own layout, I highly encourage you to copy one of the existing layouts and change it to fit your needs.  For demonstration purposes, I’ll walk you through the SAP layout.  Highligh SAP, then double click on the Tab Page Title on the left.

blog5-03

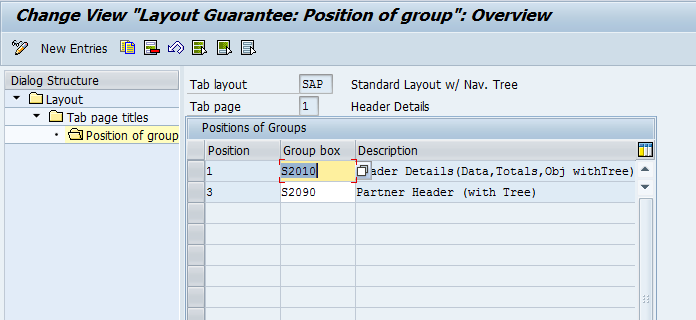
Now on this portion, you can see each tab that is configured for the layout.  Again, you can define as few or as many tabs to be displayed for your layout.  You can also adjust the titles of each tab.  For demonstration, I’ll select the Header Details tab, to show you the next drill down.

blog5-04

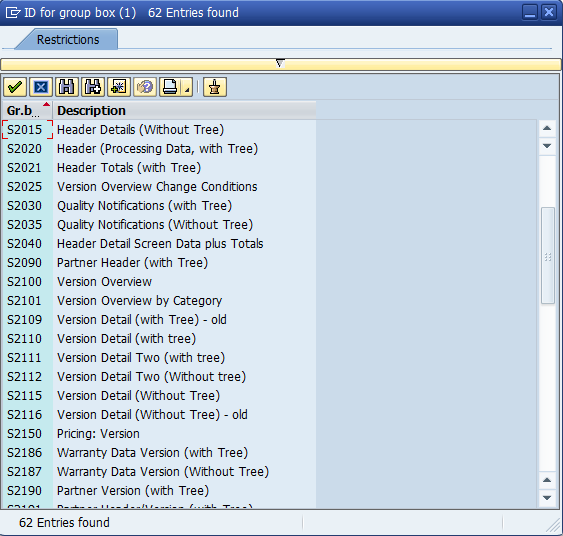
Now, for those of you familiar with the equipment configuration, this will be somewhat familiar.  The nice thing to notice is that you are not confined to the 4 or 5 fields.  You can add as few or as many boxes as you want.  The Group Box contains sets of fields that you can add.  Unfortunately, you cannot alter the fields within a group box, but at least you can limit what you show.  As an example, check out some of the many group boxes available for the warranty claim layout.

blog5-05

This is the part that typically requires a lot of experimenting.  Many of the options look similar, but will have quite a different look and feel.  So I encourage you test each one to make sure the optimal selection is made.

You’ll just continue this process for each tab, until you have your claim layout.  Remember, if you create a new layout, you will need to go back to your claim configuration and enter this new layout.

thanks for reading,


Warranty Claims – Control Data – Warranty Check

Well, I recently talked with some old colleagues about an upcoming new avenue of business for them.  One of the options was Warranty claims, so that got me thinking that I should get back to this configuration piece of warranty claims 🙂  Today I’ll discuss the Warranty Check.  The configuration itself is pretty straightforward.  The idea behind this single piece of configuration is how the action (A200 Warranty Check) should behave.

blog4-01

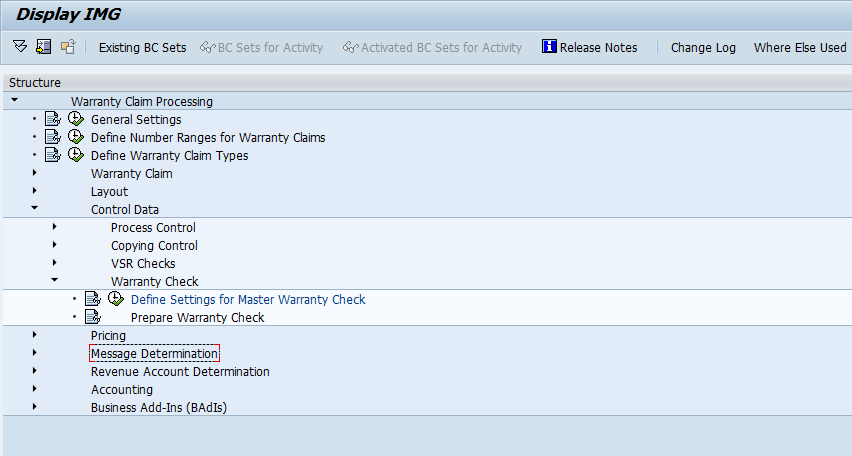
Using OWTY you can see where to configure this step.

blog4-02

Now the configuration portion only has 2 pieces.  One is the LinkItemResults which can be either AND or OR.

This field comes into play if you have a complex master warranty that contains more than 1 item.  So if you have a simple time based, this won’t impact you at all.  But if your master warranty has multiple items within it, and you select AND, then all items must be true for it to be considered under warranty.  If you select OR, any one item will suffice to be considered under warranty.

The FactoryCalender is exactly what it sounds likes.  Just another calender, that will be used to calculate time based warranties.

I’ll try to post more warranty claims config in the coming days, as I don’t have anything else interesting to post at the moment.  I’m currently trying to catch up on my sleep after 3 incredibly long weeks.

Thanks for reading, and as always, if you want to hear about something in particular, let me know.
Service Management – Using the Installed Base

I recently decided I wanted to understand a little better how the installed base works within in ERP 6.0.  I certainly found some things I liked, and some things that were disappointing.  For any of you experts out there, perhaps you can tell me if I’m missing something in configuration (I looked, and found nothing).  So, let me tell you about my finding…

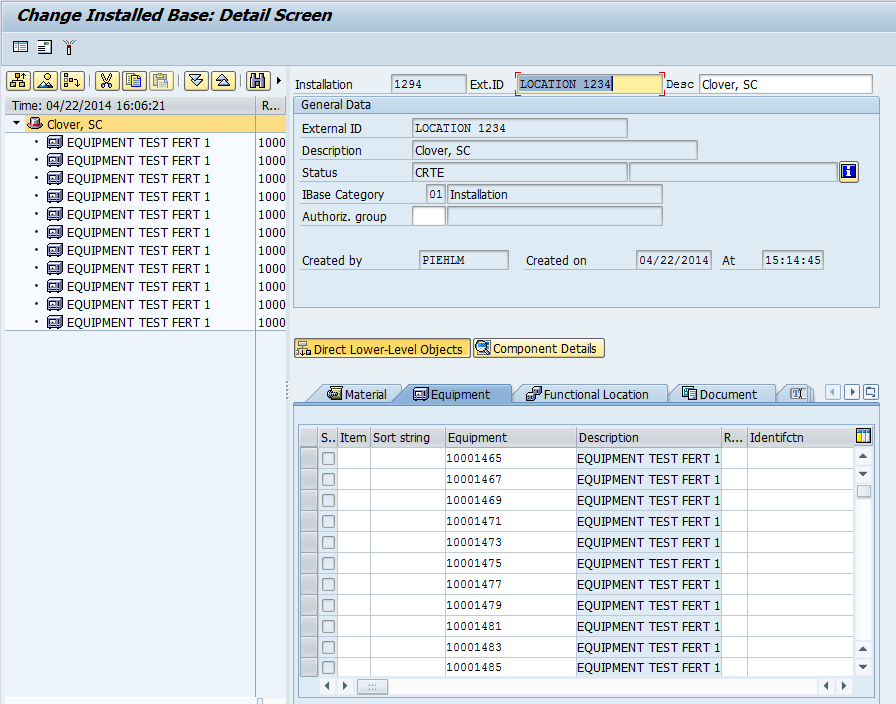
Transaction: IB51 allows you to create a standard installed base.  you select your type of IB and simply press enter.  Here is a sample screen shot of a quick IB that I put together.blog01-01

What I like is the ability to add most any type of object into the installed base.  I can add straight materials, equipment, functional locations, Documents, Text or even other Installed Bases.  Very cool, because it can truly be a repository of most anything you might have at a location.

Now, it got even a little more cool, when I looked at transaction IB61, this allows me to copy from a sales order or a production order and bring in the items automatically into the installed based.  A very handy tool.

Now, for the con of the Installed Base.  The number one thing I was missing was the ability to assign partners to the Installed Base.  I have become a big fan of attaching partners to equipment records, functional locations, notification etc…  suddenly not having that option left me feeling a bit naked.  You can assign a single address, and probably work some hokey methods to tie text to a partner number.  But why not just integrate the option.  Oh well.  It could be worse.  In addition, installed base does not fix the issue of having to manually maintain everything when something changes.  So, just like the serial number hierarchy within the equipment record or functional location, if you make any changes, you have to manually do the adjustment in the installed base.  The most common example I run into is that a customer sends back a piece of equipment and for one reason or another, a new unit is sent to the customer and the old number remains at the plant (or gets scrapped).  You must manually go into the installed base and make the swap if you want to keep things accurate.

Overall, it’s not bad functionality, if only I could assign partners to it.  If you know what I’m missing, please comment on this post.  I’d love to know 🙂

Thanks for reading,
Warranty Claims – Copy Control – Assign Copy Procedures to Claim Type

Figured I better finish off these section of configuration before I get sidetracked again J  So today we’re still talking about Warranty Claims, Copying control.  Today we will go over the Assign Copy Procedures to Claim Types.

blog02-01

Again, go to OWTY to find this configuration, and you’ll see where to get to this menu.

blog04-02

Beyond this, it’s pretty straightforward.  For each claim type and vervion type, you can select the copy procedure you want to use.  In addition, there are a few extra check marks:

COpyPriceMAT
CopyPriceFR
CopyPriceSUBL

You can control copying prices separately for the item types MAT, FR and SUBL.  We will talk more about these in a future post when we start talking about items.  For now, just know that you can control what prices should be copied.

That’s it, nice and easy.
Thanks for reading,
Warranty Claims – Copy Control – Define Copy Procedures

Well, with all the preparation for the SAP SCM and Logistics conference, it’s been a long time since I’ve had the opportunity to do some warranty claims stuff.  I had some time on the airplane, so what better time to give you something SAP related again.  Don’t worry, I’ll be giving you the low down on the conference soon, just as soon as I have time to figure it all out myself 🙂

Today I wanted to talk about the warranty claims, and this time around I’m going to talk about the Copying control.  Today I’ll cover the Define Copy Procedure (tomorrow I’ll do the assignment).

blog02-01

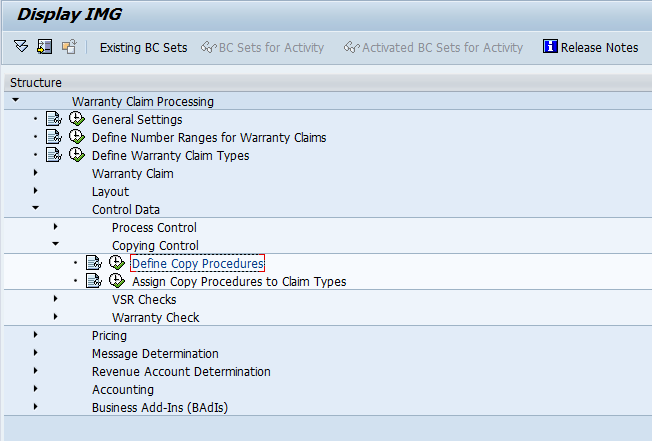
Now, as always, I like to show you where to find this.  So go to OWTY, and here you can find the menu to get here.

blog02-02

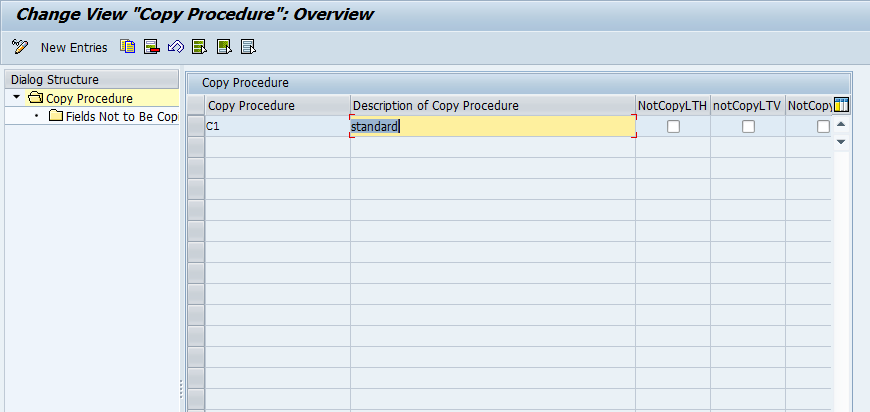
Now, we get to the screen.  The important thing to recognize is that everything is copied except for what you define here.  Being the purest that I am, I always think you should create your own version.  For today, I’ll just show you C1.

The check boxes on the initial screen work as follows:

  • NotCopyLTH = Do not Copy Long Text in Warranty Claim Header
  • NotCopyLTV = Do not Copy Long text of Warranty Claim Version
  • NotCopyLTI = Do not Copy Long Text of Warranty Claim Item

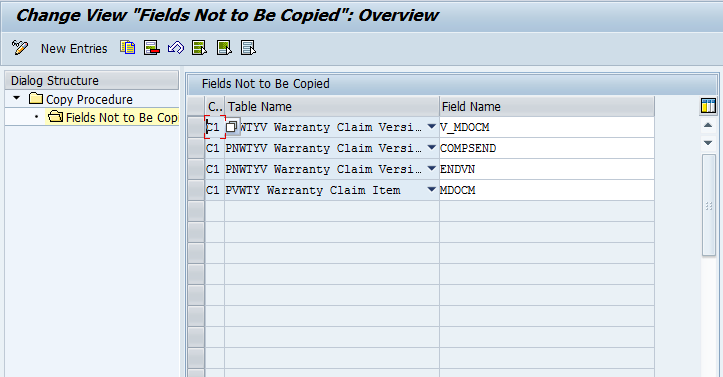
Beyond that, not much here.  Next we drill down to the fields not to be copied.

blog02-03

In this section, you will need one line for each field to exclude.  Notice that first you must select the table:

blog02-05

Then you can select your field.

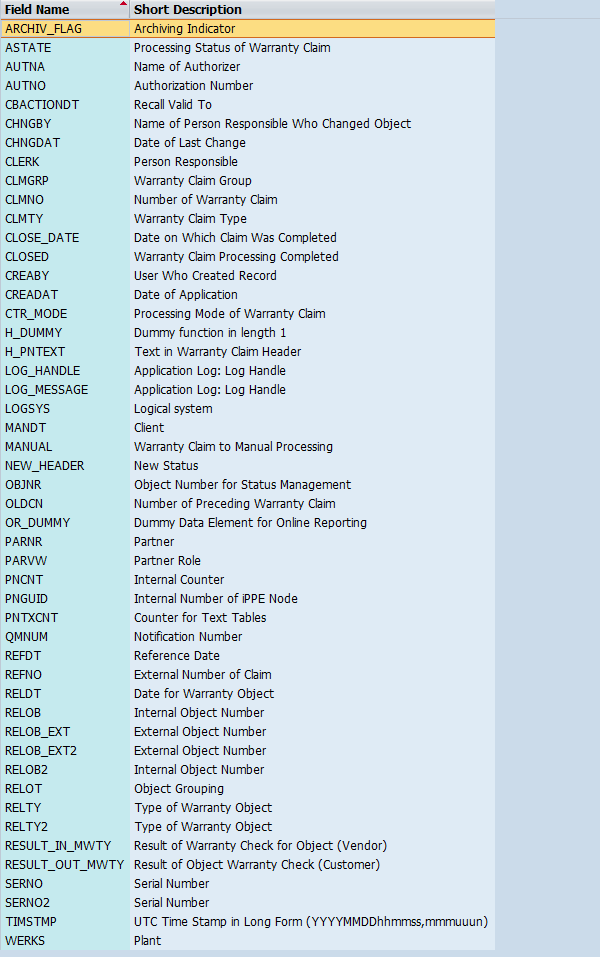
For Claim Header you get all the following fields available:

blog02-07
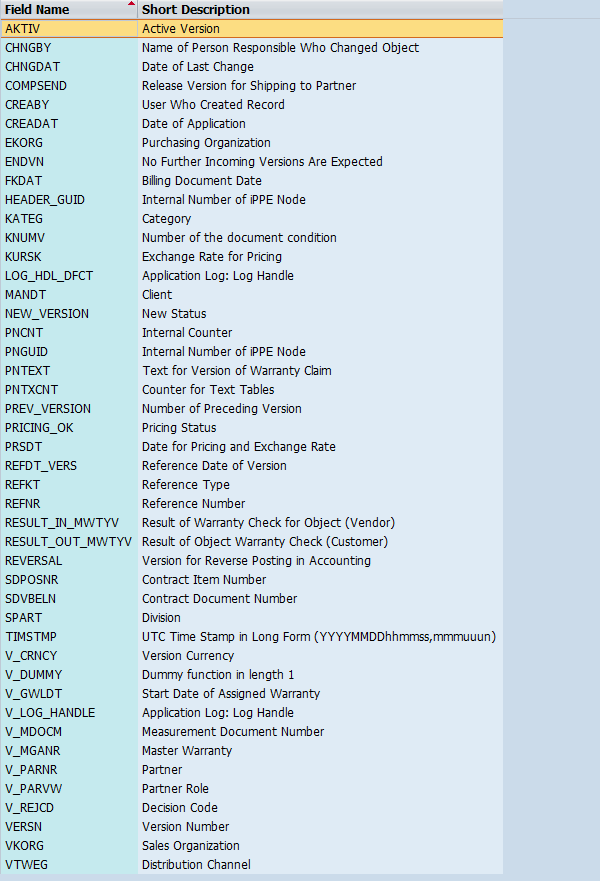
For the Claim Version you these fields:

blog02-04

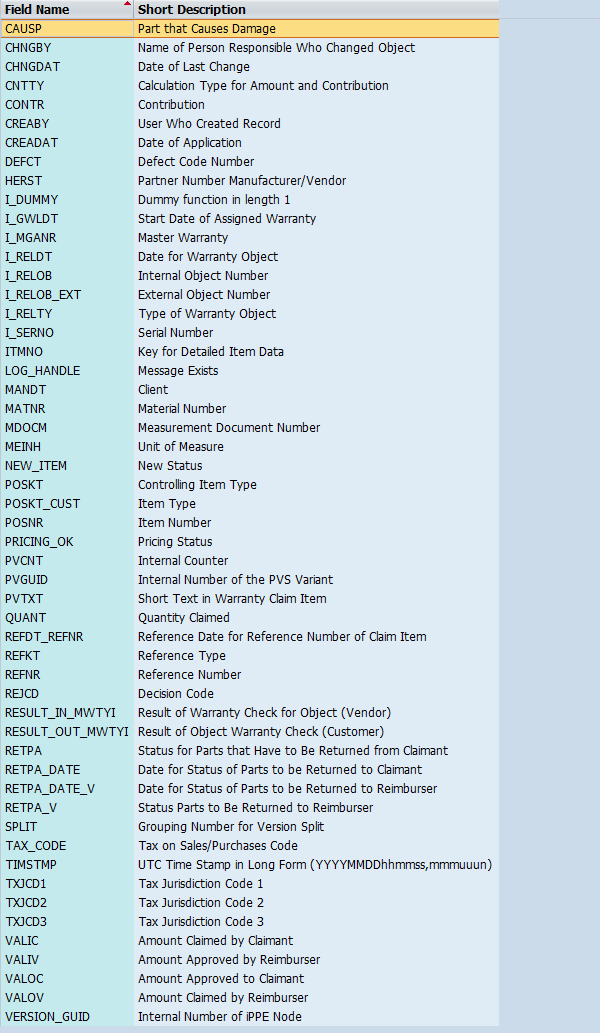
For Claim Item you get these fields:
blog02-06

Simply keep adding new entries until you have excluded everything you want from the copy function.  That’s it.
Thanks for reading,
Warranty Claims – Check Action Profile

Since I’ve been talking about warranty claims, and in particular the process control, I figured I better talk about all of it 🙂  This latest installment is a little piece called the Check Action Profile.  Now, I hadn’t used this feature a whole lot in the past, but it’s more functional than I originally gave it credit for.  Let me show what it can do.

wty01-01

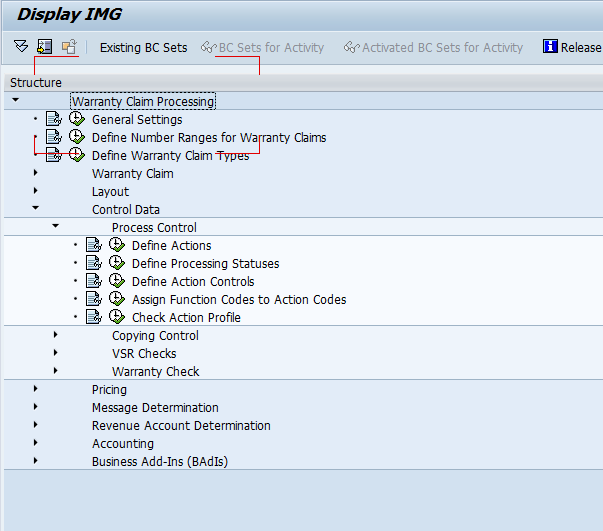
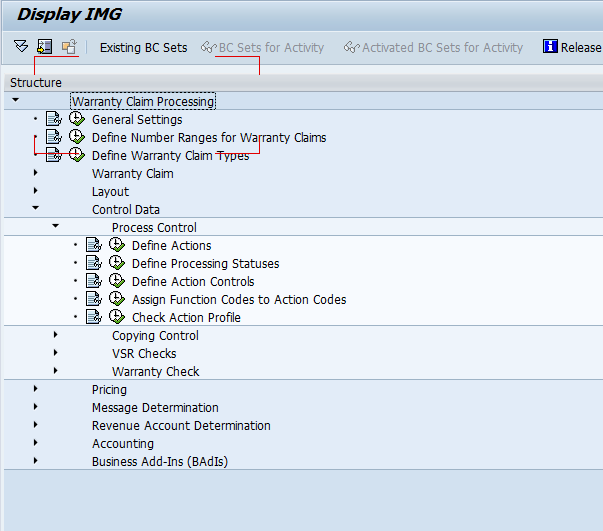
First off, head to OWTY, and you can navigate to this particular step by following the above screenshot.

wty01-02

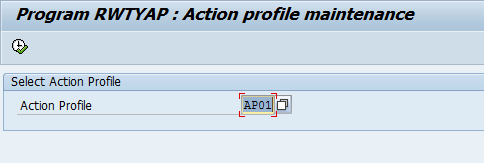
Next, you’ll see this screen that allows you select a single action profile.  I picked the post crediting profile, since it’s the one I use the most often.

wty01-03

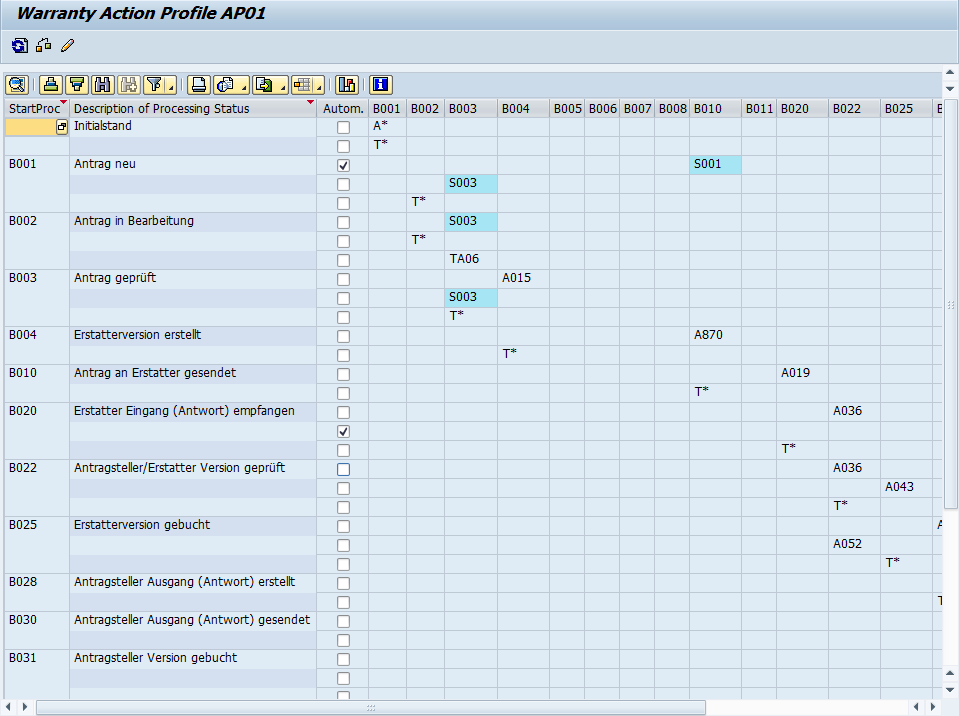
Now, as soon as you execute, you’ll notice a huge grid, that gives you the road map of the entire process control you have setup.  You can see at a glance what Processes can call what actions, what is automatic, etc…  Now, the piece that I liked the best was the check.

wty01-04

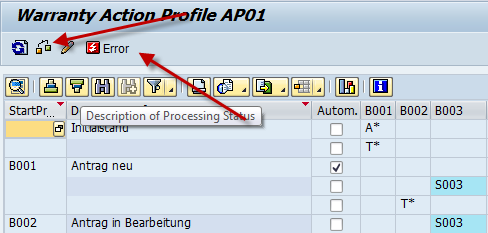
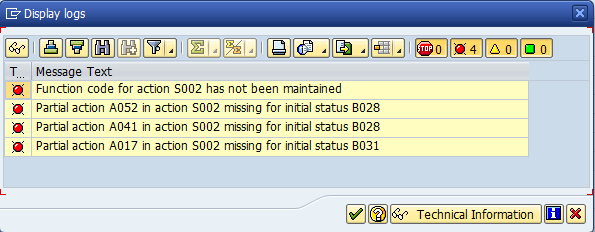
so if you press the button that looks like a syntax check, it will either come back with nothing, or you will see the little error button.  If you press this, you’ll see what is inconsistent in the profile.

wty01-05

It’s hard not to laugh a little, since this is the untouched process that SAP provides to you, and it has things missing.  The important thing is that you can quickly identify where you missed something or where you should revisit to close the gaps.

It’s all pretty easy, but very helpful.  Thanks for reading,
Warranty Claims – Assign Function Codes to Action Codes

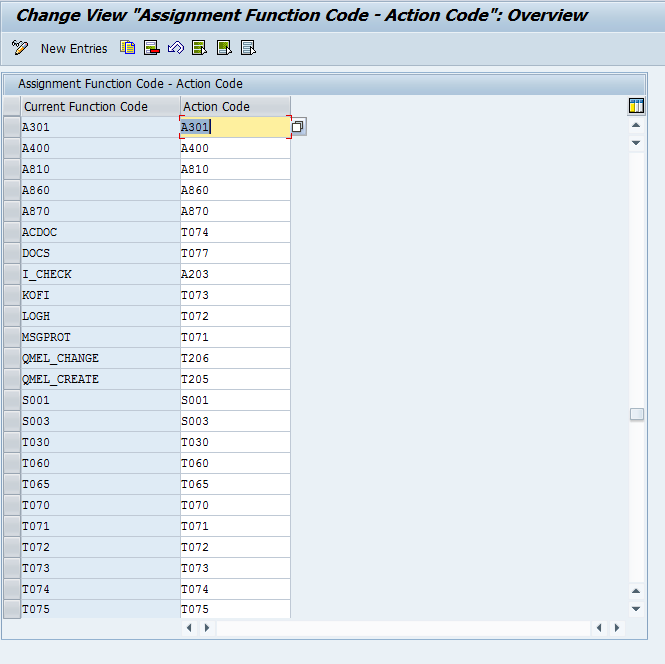
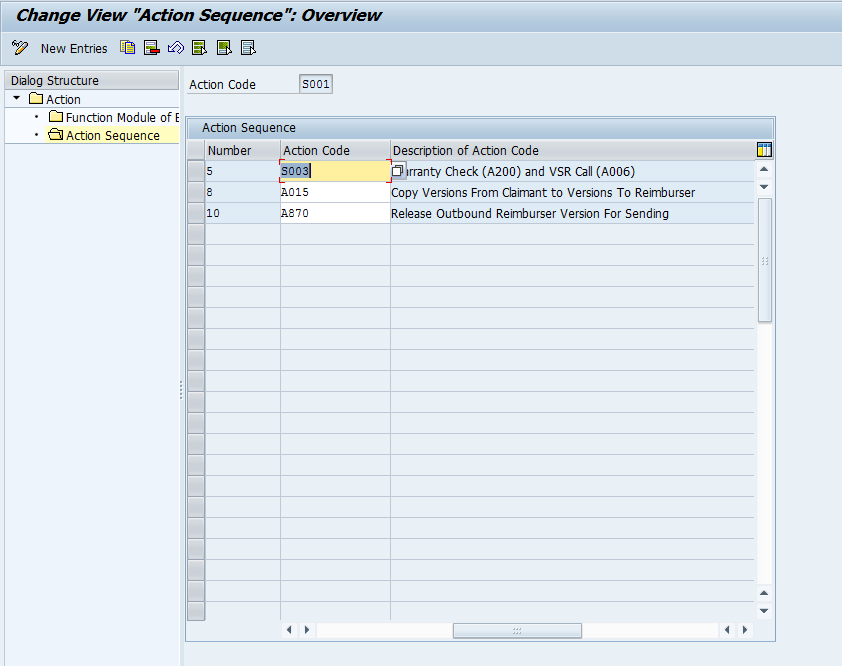
Well, since I’ve been hitting the warranty claims stuff pretty hard lately, I figured I might as well through another easy one out there.  This piece of configuration is really pretty straightforward, and likely something you will never touch.  But in my own quest for knowledge, and since I may put together an e-book in the future about warranty claims configuration, I decided to find out what this configuration was all about.  As it turns out, in 99% of the cases, the function code is equal to the action code.  About the only time it might be different is if you add some custom buttons.  Regardless, if you need it, here is how you do it.

wty01-01

Go to OWTY to find this menu path.

wty02-02

Beyond that, like you can see, there are 2 columns, and in most instances, they are identical.  There are a few instances where a different function code exists, but all in all, a pretty mundane, and rarely used piece of configuration.

Thanks for reading,
Warranty Claims – Define Actions

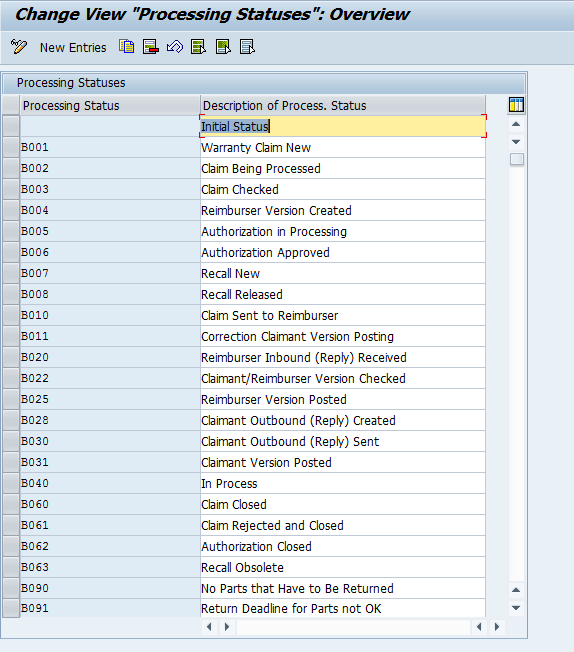
Now, getting back to warranty claims.  Today I’m going to talk about the define actions step.  This is another piece connected to my last 2 warranty claim posts.  Defining an action is the piece that does the work.  Last post we walked through creating/changing a status.  Today we talk about the action, so after all of this, the process control will make sense 🙂

wty01-01

Start at OWTY to get to the configuration.

wty01-03

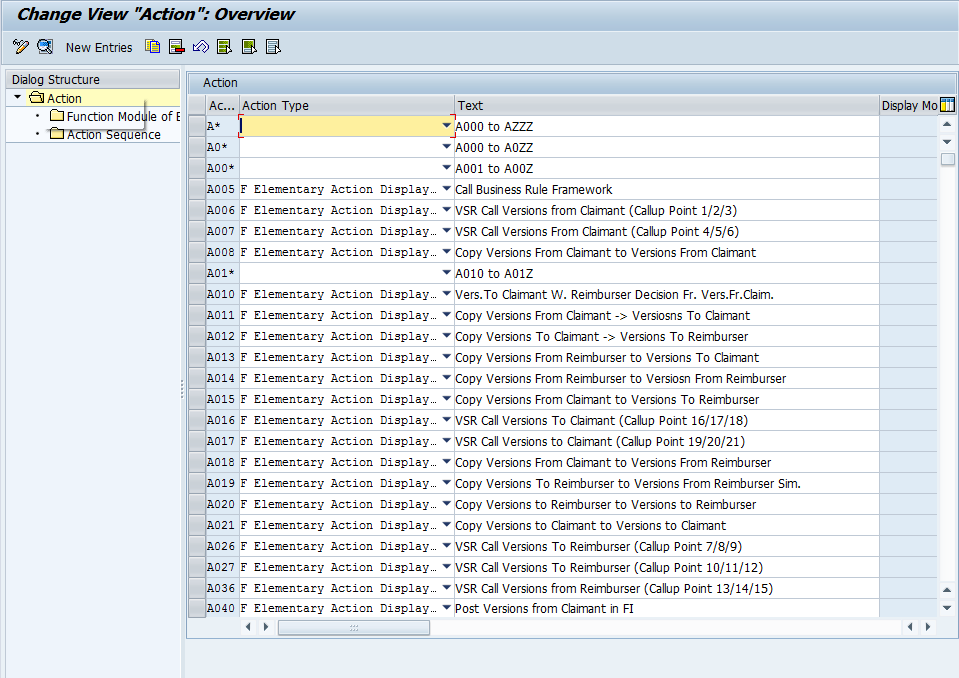
Now, the first thing you’ll notice is that there are a LOT of actions available.  There are 4 types of actions:
Elementary Action Displayed in Action Box
Elementary Action Hidden in Action Box
Interlinking Action Displayed in Action Box
Interlinking Action Hidden in Action Box

Elementary Actions are exactly what they sound like.  They perform exactly 1 function.

wty01-02

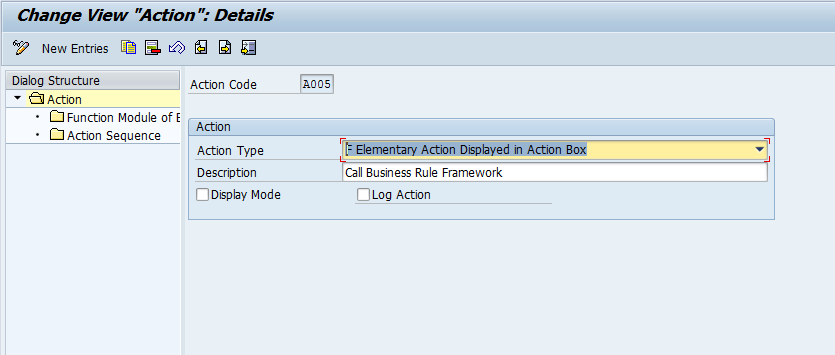
Now, I picked the A005 to show you the action details.  Notice you can set the action type & the description.  In addition, you can check Display Mode, which means the action can be called, even in display mode.  Finally, Log Action check box allows you to include this action in the log for the claim (in my opinion, all actions should be logged… of course, I’m a big fan of seeing what’s happened in the past).

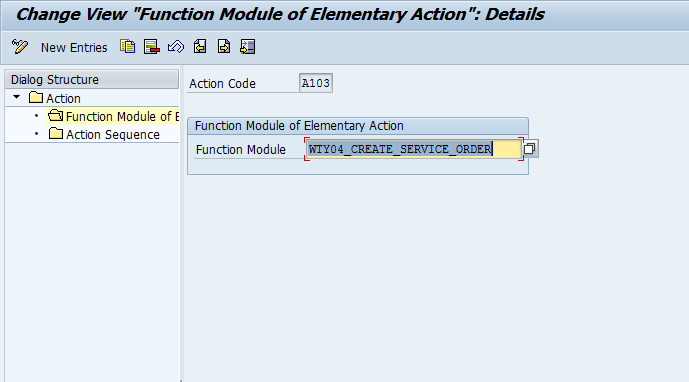
Now, if we move onto Function Module of the Elementary.
wty01-05

This time around, I selected action A103, and you can see the function module that gets called .

Now, if we look at an interlinking action.

wty01-04

Notice, now you can chain together several elementary functions.  Doesn’t matter if it’s hidden or displayed.  This is fun functionality, since you can pull together multiple steps at once, so the user doesn’t need to perform multiple actions to accomplish a task.

So, that’s the define actions step.  Thanks for reading,
Warranty Claims – Define Processing Status

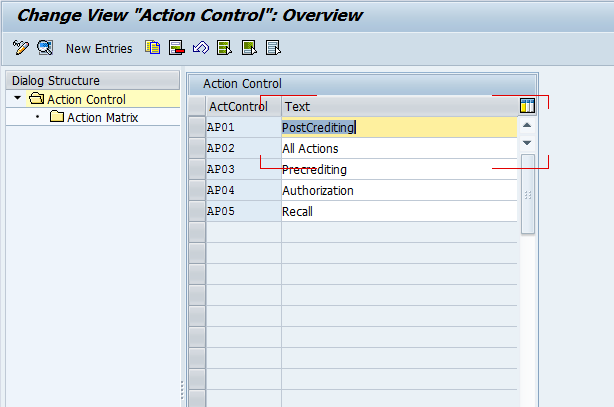
I’m finally getting back to some of the warranty claims stuff again.  Today we’ll talk about a smaller piece of the configuration, but it connects directly to my last post on warranty claims.  This post is also within the Process Control portion of the claim.  The define processing status step allows you to create your own statuses within the claim and give it any description you want.  When you combine it with the define action controls you can connect your processing status with any action you want.  Here’s how you go about creating your own status.

wty01-01

Going back to OWTY, you can find this step in configuration.

wty01-02

Now, this is just a sampling, but you can easily create your own set of statuses.  I’ll get to more in depth claims configuration soon.

Thanks for reading,
Warranty Claims – Define Action Controls

Sorry, it’s been a while since I talked about the Warranty Claims configuration.  Time is always working against me, so finding the time is often challenging 🙂  So, on with the show…  This post is going to jump ahead a little bit from where we left off.  The reason being, to me, the sequence of configuration doesn’t really flow with the way you’d set the system up.  So it’s my blog, I can do it my way.  Defining the process is one of the most important pieces of the claims process, in my opinion at least, so I wanted to start with the action controls.

wty01-01

First, go to OWTY, and you this is where you find the configuration.

wty01-02

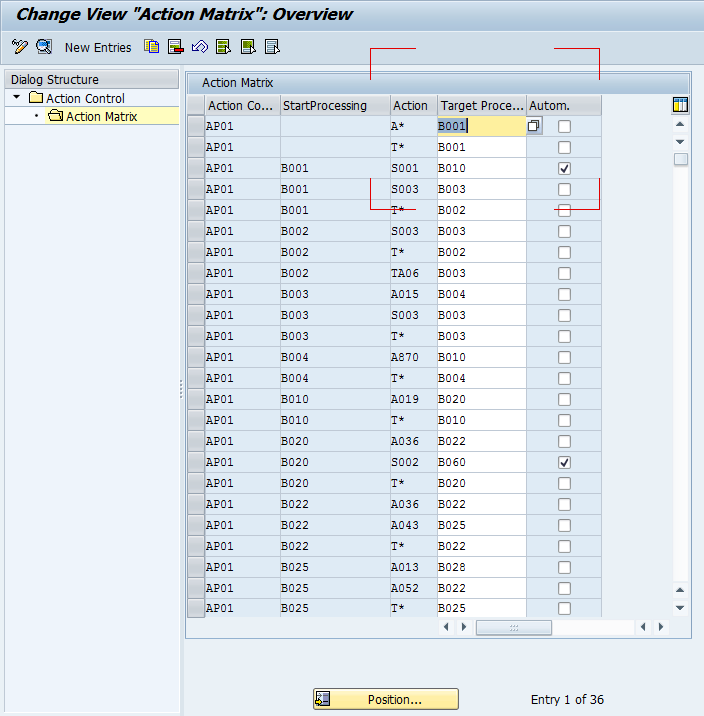
First, pick your claim type.  You can will often be using a custom claim type, but for simplicity, I’ll start with the AP01, post crediting claims.

wty01-03

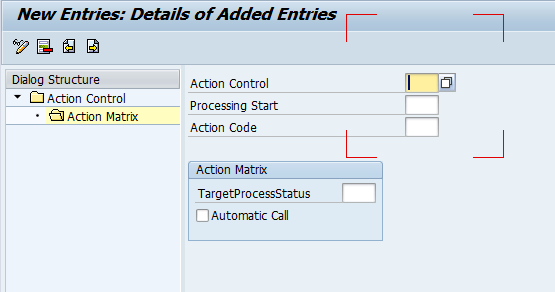
Now, here’s the where things get heavy.  The first column, is our chosen claim type.  The next 4 columns are where the power comes from.  Now, in the start processing, this is the current status your claim is at.  Column 3 is the actions that are allowed to happen at that status, and column 4 is the status that the claim will move to if that action is taken.  Let’s look at an example
when the status is B001 is Warranty Claim New.  When the claim is at this status, you have the following actions you can take:

S001: Automatic Processing Postcrediting after VersionsFrClaimant
S003: Warranty Check (A200) and VSR Call (A006)
T*:  this is all the T actions…  however, you won’t see the TXXX actions in the list (because they are “hidden” actions).  But things like T060, complete claim are available by pressing other buttons, so you want to make sure they are available.

Now, if we pick S001, it will set the claim status to B010: Claim Sent to Reimburser, along with the back end actions that go along with it (we’ll talk more about that later).

wty01-04

If you want, you have the option to create your own options or change the existing ones.  Once you understand this concept, you can more easily build the “road map” to the process you ultimately need to create.

Thanks for reading,