SM

Home / SAP / Archive by category "SM" (Page 9)

Service Management – Workflow – Setting up the Trigger

Part 4 of the workflow series.

Step 4. Set Up the Workflow Trigger

In this step, you link the business object type event to the actual status. Execute transaction code BSVZ. In the screen that appears, load in the custom business object for the object (Figure 16). Choose the appropriate schema, which in this case is the status profile because I am using the system status as my trigger. In the Event column, select the previously created event from the drop-down menu.

If you view the drop-down menu in the StatusOT (S…) column, you see many options. I chose ORI (maintenance order) for my example, but the list may give you some interesting ideas of things to use as a trigger for your workflow.

wf-16

Figure 16 Add the workflow trigger

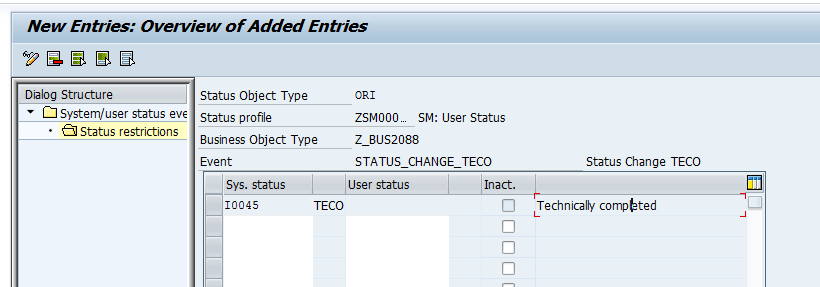
Set the restriction. Select the new line that you created in Figure 16, and double-click Status restrictions in the left window (Figure 17). You now can view the specific statuses to use to trigger the method. I use TECO for my example.

wf-17

Figure 17 Set the status restriction for the trigger

If you wanted this to trigger off a user status instead, you configure the User status column instead of the Sys. status column.

Next up we will cover creating the workflow task.  Thanks for reading,

Service Management – Workflow – Creating the methods and events

Continuing on with our workflow series 🙂

Step 3. Create the Methods and Events [Heading 2]

This step provides you with the power of workflow. This action requires the use of methods and events. Think of an event as the trigger, in this case the change in the status of the service order. Methods are code that is executed when someone pulls the trigger.

Now, you could use the existing event teccompleted, as you can see below in Figure 7, but for demonstration purposes, I walk you through creating a custom event. First, you create an event in BO Z_BUS2088 for the status change.

Using transaction code SWO1, enter Object/Interface Type: Z_BUS2088, if it isn’t already populated. Click the Change button wf-bt01

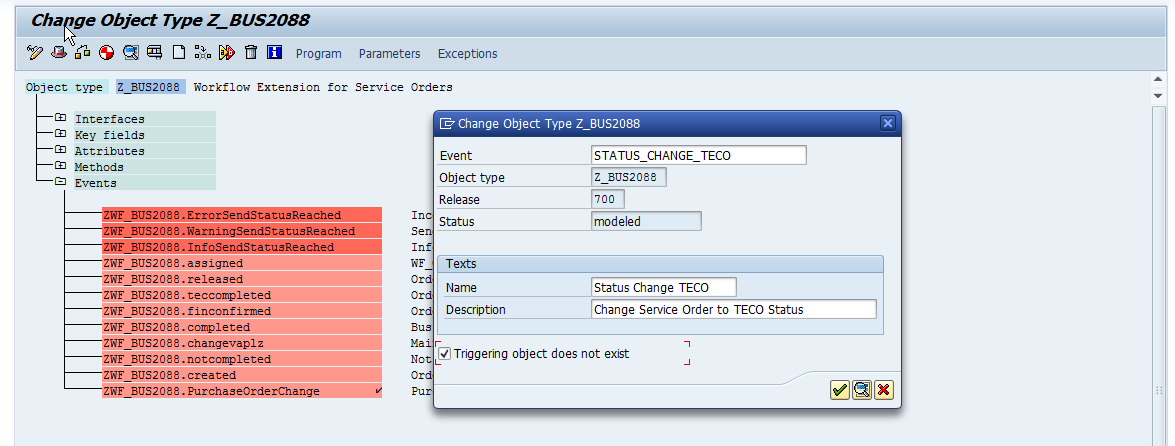
In the next screen select the event line and click the create iconwf-bt02.  In the pop-up dialog box enter the event name, as shown in Figure 7.
wf-07

Figure 7 Create a new event

This action adds a new event to the bottom of the list as shown in Figure 8.

wf-08

Figure 8 Event added

To activate the new event, remain in the Change Object screen (Figure 7) and follow menu path Edit > Change Release Status > Object Type Component > To implemented.

Then follow menu path Edit > Change Release Status > Object Type Component > To released.

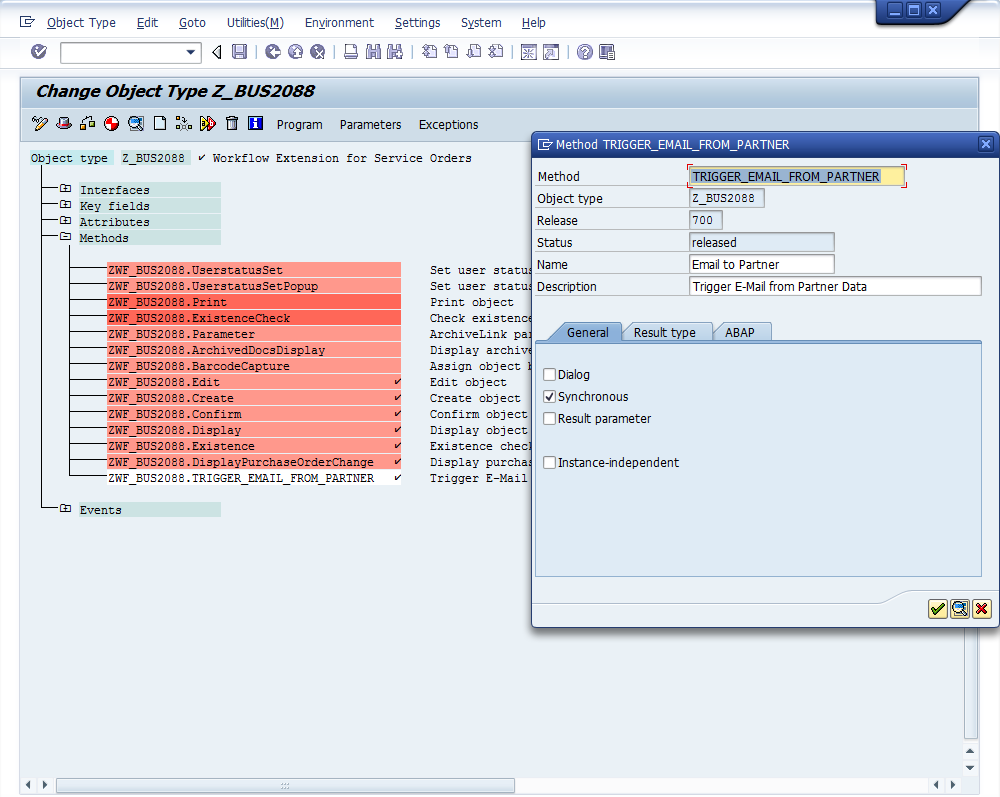
Your next step is to create a method, which is where the code resides. Keep in mind that you still need some development to perform the task. Depending on authorization, this may require assistance from an ABAP developer. This time, select the Method line, as shown on Figure 9 and click the create iconwf-bt02 .

wf-09

Figure 9 Create a method without reference

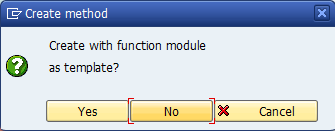
You can either choose to create a method with a function module or as an ABAP method or routine within the program. Figure 10 appears after you click the create icon. If you click the Yes button, you can enter an existing function module to be used as a template. If you click the No button, you can create the method manually. In this example, I create the method manually.
wf-bt03

Figure 10 The Create method pop-up window

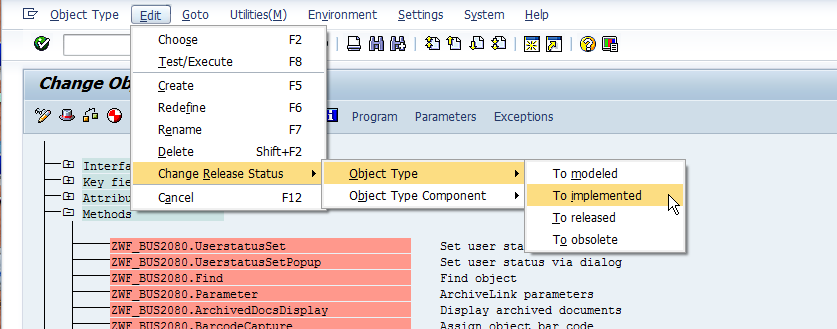
The next step is to implement the method we just created.  Scroll down the screen until you find ZWF_BUS_2088.TRIGGER_EMAIL_FROM_PARTNER.   Follow menu path Edit > Change Release Status > Object Type > To implemented (the system warns you through error messages if you forget this step) as shown in Figure 11.
wf-11

Figure 11 Implement the new method

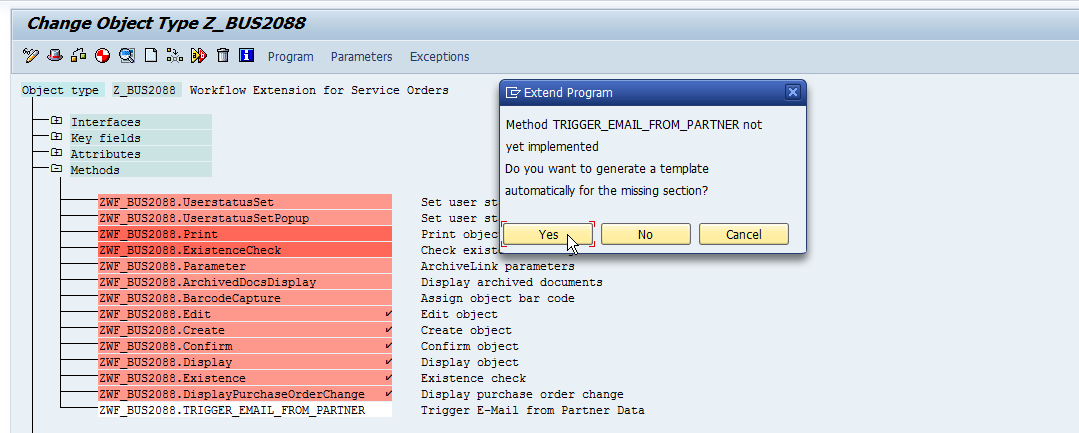
Implementing the method allows you to put code into the method. To do this, place the cursor on the method ZWF_BUS2088.TRIGGER_EMAIL_FROM_PARTNER and click the Program button shown in Figure 12. The first time you click the Program button for this method you need to generate the template. When the pop-up screen appears, click the Yes button.
wf-12

Figure 12 Add code to the method

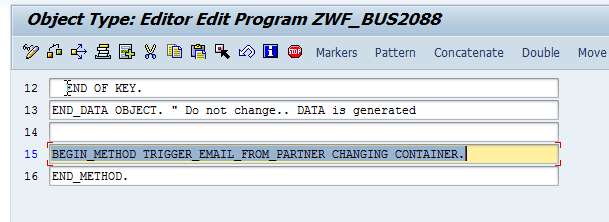
Generating the template for the method sets up the initial code to work within the method. Generating the template also displays the ABAP editor (Figure 13). Enter your code after line 15. Be sure to end your code with the END_METHOD statement, shown currently in line 16.
wf-13

Figure 13 Enter the code within the method

To help you test that it is working, I encourage you to add the code shown in Figure 14 after line 15 (Figure 13):

CALL FUNCTION ‘TH_POPUP’
EXPORTING
CLIENT = SY-MANDT
USER   = ‘USERID’
MESSAGE = ‘This workflow works’
EXCEPTIONS
USER_NOT_FOUND = 1.

Figure 14 Sample code

You should now be able to release your method by following menu Edit > Change Release Status > Object Type Component > To released. Releasing the method adds a check mark at the end of the name of the method to show that it is released (Figure 15).

wf-15

Figure 15 The released method

Next up, we will cover setting up the workflow trigger.  Thanks for reading,

Service management – Workflow – Extending the Business Object

Picking up where I left off from yesterday.

Step 2. Extend the Business Object

Each SAP object is assigned to a business object (BO)/interface. Don’t confuse this object with the Business Objects associated with Business Warehouse (BW) or Business Intelligence (BI). For service orders, the appropriate BO is BUS2088. In this step I create a new business object called Z_BUS2088 as an extension of the original BUS2088.

Execute transaction code SWO1. In the screen that appears, enter the business object (BUS2088) in the Object/Interface Type field. Click the Subtype button (Figure 4). In the pop-up screen, enter the appropriate information to create your objects and press the green check mark.

wf-04

Figure 4 Create a new object type

Your BusinessObjects object is now created. The next step is to implement your object. From the main screen after you execute transaction code SWO1, follow menu path Object Type > Change release status to > Implemented. You now need to release your object. From the same screen after you execute transaction code SWO1 (the Business Object Builder Initial Screen), follow menu path Object type > Change release status to > Released.

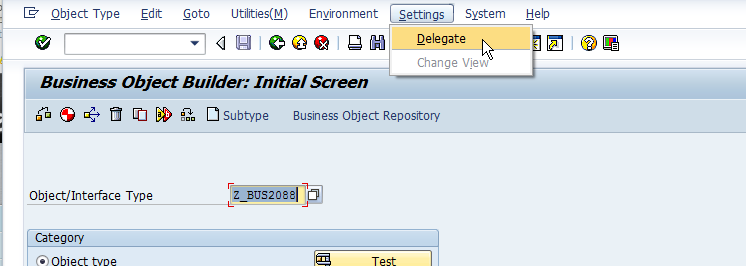
Next, you need to delegate the new object. This means you link the Z_BUS2088 to replace the original BO (BUS2088) in my example. Remain in the screen that appears after you execute transaction code SWO1 (the Business Object Builder Initial Screen) and select the new business object that you created (e.g., Z_BUS2088) from the list of options in the Object/Interface Type field. Follow menu path Settings > Delegate to execute this function (Figure 5)

wf-05

Figure 5 Delegate the Business Object Type

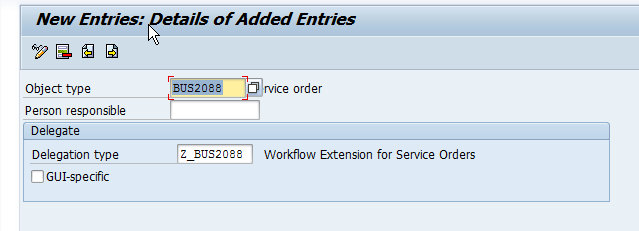
In the next screen, enter names in the Object type and the Delegation type fields (Figure 6). This step gives power to the new object to allow it to execute instead of the BUS2088, without changing the SAP standard version.

wf-06

Figure 6 Delegate object type details

You now have created the framework you need to extend the service order object. The extension enables you to add additional functionality to the existing business object.

tomorrow I’ll show you how to create the methods and events.  Thanks for reading,
Service Management – Using SAP Workflow – Initial Customizing

A while back, a good friend of mine showed me that workflow really isn’t that tough.  Some of the things I assumed about SAP Workflow included:

  • You can’t do it without implementing a lot of HR configuration
  • You have to do everything in the SAP Inbox
  • It would take months to get a workflow up and running
  • The workflow always becomes lost in “limbo”

While all of these things may be true in some instances, it doesn’t have to be the case. This next series of blog posts is going to prove it. Now, if you need to set up a multiple step process involving several groups with delegates if someone is on vacation and complicated logic depending on the values set in the document, this process won’t be enough for you. The goal is to expand your toolbox for simple tasks.

Why use SAP Workflow when I can use a user exit or an enhancement spot? That’s an excellent question, and in many situations, user exits are the best approach. The biggest difference between workflow and the more standard user exit/enhancement spot approach is how and when it executes. Let’s look at two Service Management examples.

Example 1. You need the system to verify data that was entered into the document every time you save. The service order needs to have an accounting indicator set based upon custom logic. It does not have to be complicated, but to make sure the downstream processes work, you need a correct value entered. A user exit is perfect for this approach because you want to force users to enter a correct value before they can save the document.

Example 2. You need to kick off an email to customer service representatives as soon as a particular status is set so they can generate a quotation to the customer. For this purpose, SAP Workflow is a much better option. You don’t need the code to execute every time you save the service order. You only want it to happen when the particular status is set. You could write code to do a quick check of the status to see if it should execute, or write a background program to check every service order every five minutes, but why write that logic when it already exists in the SAP system and doesn’t cost you anything?

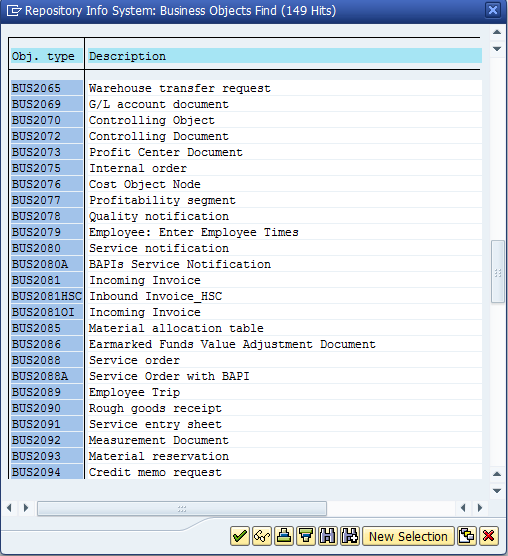
The example I’ll start today illustrates how to send an email as soon as the service order is assigned a status of TECO (technically complete). This functionality exists in nearly every SAP module. Often you just need to find the correct business object to complete this process. Figure 1 lists a very small sampling of the available business objects. Once you determine the appropriate object, you can follow the step-by-step instructions to activate your own workflow.

wf-01

Figure 1 A sample of available business objects in standard ERP

Step 1. Initial Customizing for Workflow

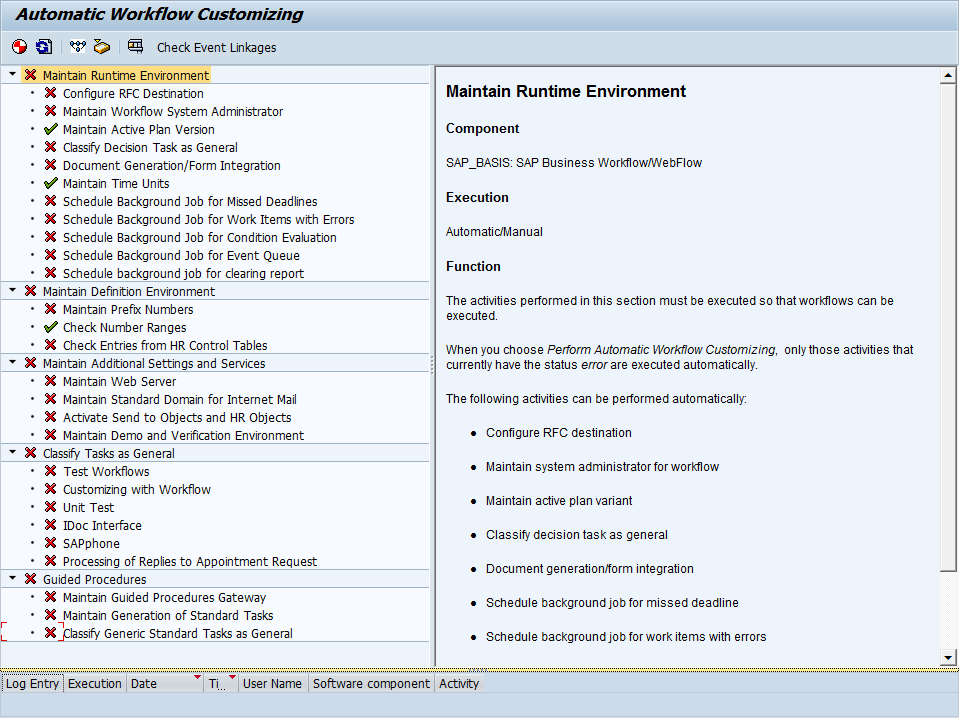
Transaction code SWU3 is the standard transaction for automatic workflow customizing. This is a single transaction that allows you to set up the configuration needed to start using SAP workflow. This is a one-time setup for each system. This configuration step must be done in every system needing workflow. This transaction sets up all the remote function calls (RFCs) and background jobs to manage tasks. In a system that has not used any workflow, the SWU3 transaction initially looks like the screen shown in Figure 2.

wf-02

Figure 2 The initial screen for automatic workflow customizing

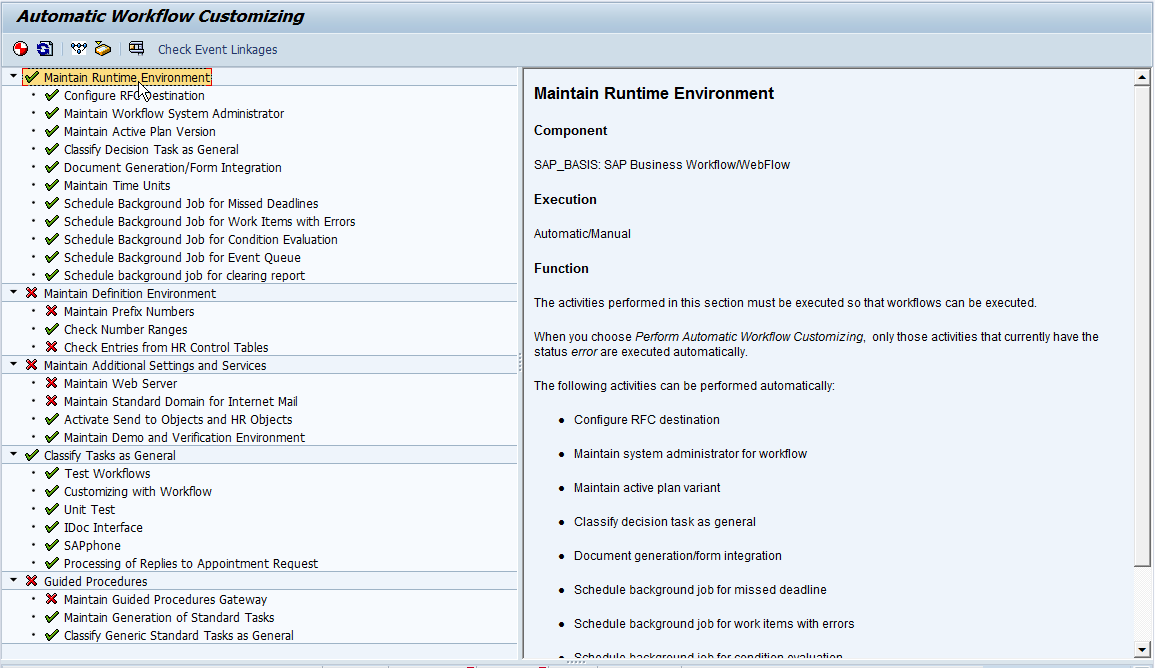
You need to go through each line item in Figure 1 that shows a red X and click the perform automatic workflow customizing icon . Pressing this icon activates each function you need using the default settings. The default configuration suffices for the majority of simple workflows. Note that the icons to the left of each task change from a red X to a green check mark. When your customizing is complete, the list looks like the screen in Figure 3. Note that not every line needs to have a green check mark. Certain lines on the screen would require additional configuration; however, those steps are not required for the type of workflow I demonstrate.

wf-03

Figure 3 The Automatic Workflow Customizing screen after customizing is complete

Note

The action Maintain Workflow System Admin creates the user WF-BATCH. This is the user against which all the workflow functions run. You need to work with your security team to ensure this user has all the authorizations needed to execute any workflows.


Don’t want these to get too long, so I’ll pick up tomorrow with the next steps.  Thanks for reading,
SM – Configuring the Equipment Category – Serial Number Profile

Now, we get to a really piece.  The serial number profile.  Without a doubt, one of my favorite areas.

IMG->Plant Maintenance and Customer Service->Master Data in Plant Maintenance and Customer Service->Technical Objects->Serial Number Management->Define Serial Number Profiles

Serial Number Profile 01

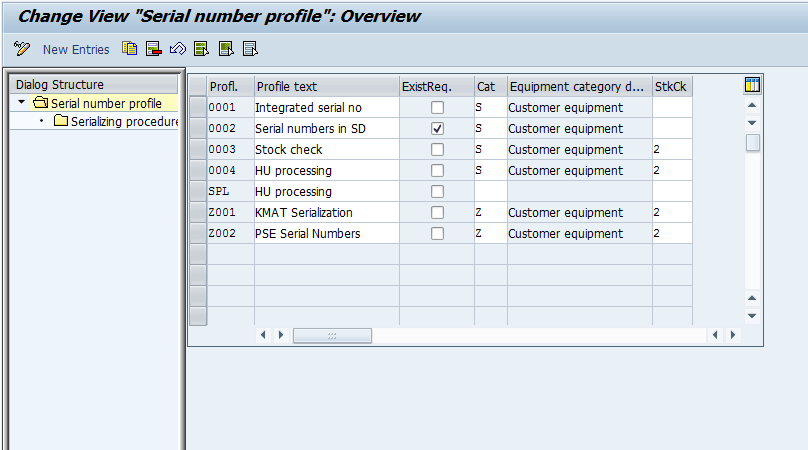
Like always, I suggest making your own profile, I’m going to show you the Z002 profile that I created.  You’ll notice on this first screen there are several fields that control the functions.

  • Description – We will call this self explanatory.
  • – If you check this, it means that you must first create the equipment record before it can be used.  If you don’t check this box, the system will generate the equipment record automatically.
  • Cat – equipment category that will be generated.
  • StkChk (or stock check).

Serial Number Profile 02

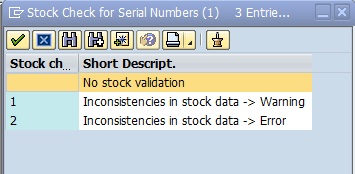
You’ll see that you have a few options of how the stock can be checked.  If it’s blank, the serial number is not validated in inventory, if it’s 1, it warns you, if it’s 2, then it’s required that the serial number be used for inventory and be checked before movements can occur.

Next we move onto the details of the serial number profile.

Serial Number Profile 03

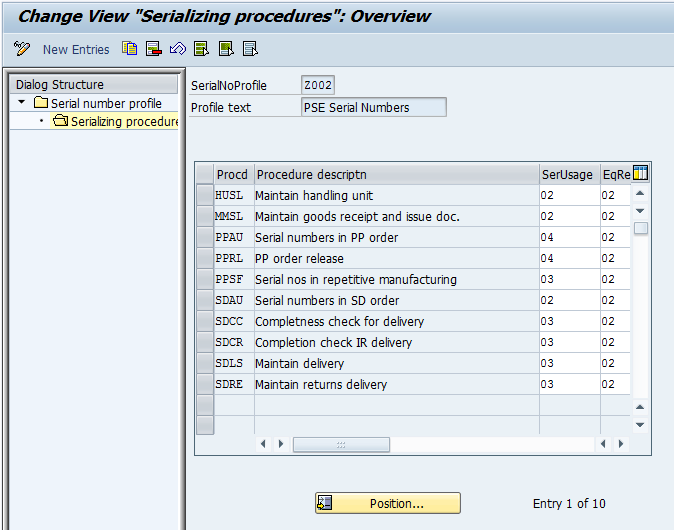
You’ll notice that there are only 3 fields that control this very powerful piece of configuration.  First is the procedure.

Serial Number Profile 04

Here are some notes on the commonly used procedures.

  • SDAU – This procedure makes possible the use of serial numbers in sales orders, inquiries and quotations.
  • SDLS – This procedure makes possible the assignment of serial numbers for deliveries.
  • SDCC – This procedure makes possible the assignment of serial numbers when performing completeness checks for deliveries. This checks for the serial number upon Goods Issue
  • SDRE – This operation makes possible the assignment of serial numbers for returns deliveries.
  • SDCR – This procedure makes possible the assignment of serial numbers when performing completeness checks for returns deliveries. This checks for the serial number upon Goods Reciept
  • PPAU – makes possible the use of serial numbers in production and refurbishment orders and defines how they are assigned
  • PPRL – makes possible the assignment of serial numbers when production and refurbishment orders are released. If serial number requirement exists and no or not all serial numbers have been assigned, the order cannot be released

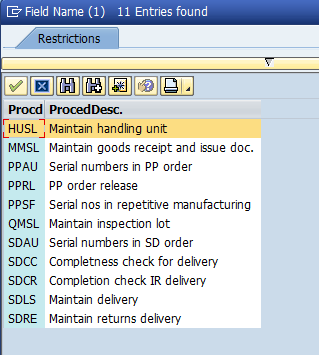
Here is the complete list of procedures that you can assign to your serial number profile.  If any of these are included in the profile then it means that serials either can or must be entered for the transaction.  You’ll notice there are a lot options.  Be sure to include each of these procedures that you want to include serial numbers.

The remaining 2 fields control how the procedure behaves.

Serial Number Profile 05

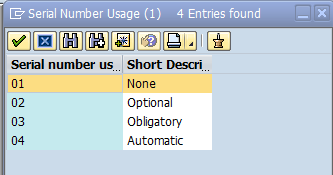
The usage determines if it’s none, optional, obligatory or automatic.  This field is pretty self explanatory, but that doesn’t make it any less powerful.

Finally the last field:

Serial Number Profile 06

This last value determines if it’s just a serial number record (01) or if it’s an equipment record (02).  I’m a fan of the equipment record because it contains additional views.  You never know when you might need the info.

The last piece is to assign this profile to a material number (sales and Distribution: Plant Data).  Once that happens, all the transactions will start to behave based on this profile.

thanks for reading,

SM – Equipment Category – Assign Partner Determination

I wanted to keep going with the different pieces of configuring the equipment category.

Assign Partner Determination Procedure to Equipment Category *

IMG->Plant Maintenance and Customer Service->Master Data in Plant Maintenance and Customer Service->Technical Objects->Equipment->Assign Partner Determination Procedure to Equipment Category

tech obj - equip cat 07

We will drill into the details to explain what can happen here.

tech obj - equip cat 08

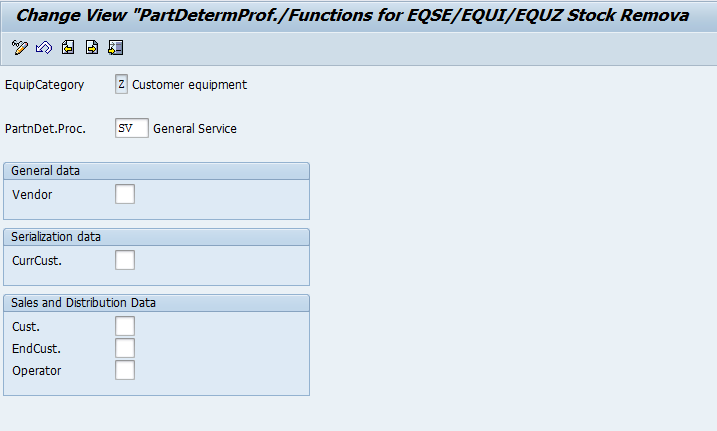
Partner Determination Procedure:  this is very straightforward.  Enter in the appropriate partner procedure that should have been defined already.
Vendor:  You only need to populate this if you plan on serializing your vendor’s equipment.  Be sure the partner type you select is defined as unique in the profile.
CurrCust.:  This is the current customer for the serial number.
Cust.: The partner function for the customer within the equipment master.  Be sure the partner type you select is defined as unique in the profile
EndCust.: The partner function for the End User within the equipment master.  Be sure the partner type you select is defined as unique in the profile
Operator: The partner function for the operator within the equipment master.  Be sure the partner type you select is defined as unique in the profile.


thanks for reading,

Service Management – Configuring the Equipment Category – Define Number Range

This is another short and sweet post.

Define Number Ranges *

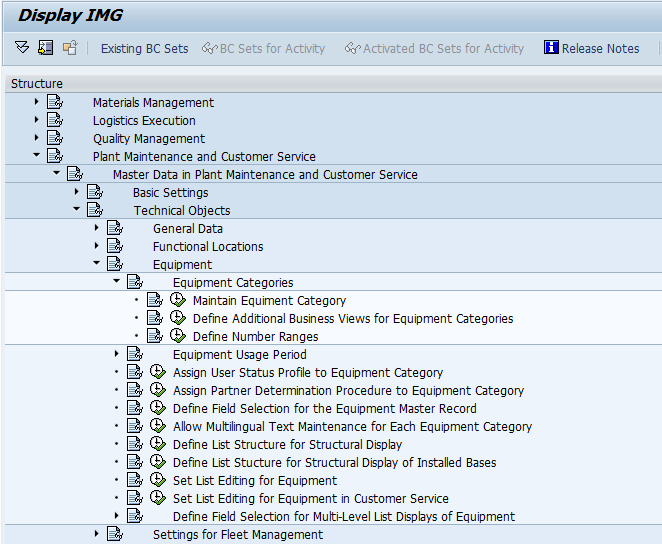
IMG->Plant Maintenance and Customer Service->Master Data in Plant Maintenance and Customer Service->Technical Objects->Equipment->Equipment Categories->Define Number Ranges

tech obj - equip cat 05

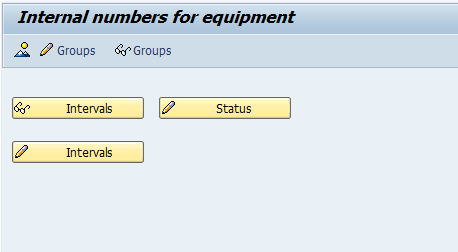
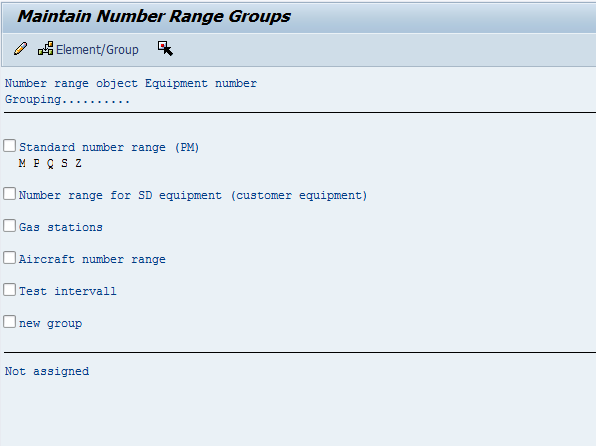
Following the same pattern as all other number ranges.

tech obj - equip cat 06

Here you can see the number range that each equipment category is assigned.

Thanks for reading,
Service Management – Configuring the equipment category (2)

Today I wanted to continue talking about configuring the equipment record.  This is a short one, but no less important.

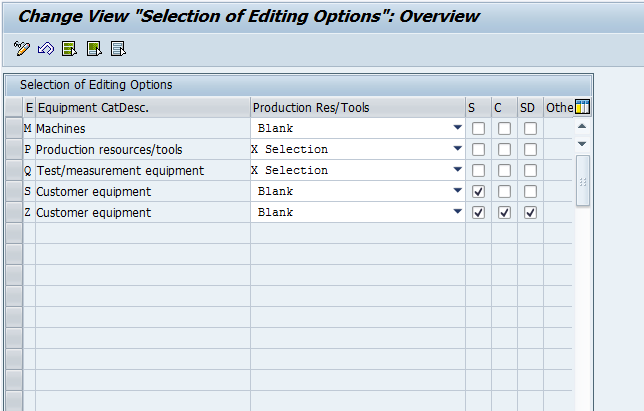
Define Additional Business Views for Equipment Categories *

IMG->Plant Maintenance and Customer Service->Master Data in Plant Maintenance and Customer Service->Technical Objects->Equipment->Equipment Categories->Define Additional Business Views for Equipment Categories

tech obj - equip cat 04

Here is the configuration that allows for advanced selection of views.

  • Production Res/Tools
  • Sales Equipment – this will provide the sales data tab for the equipment
  • Configuration Supported – if you use Variant Configuration, you will want to activate this view
  • Serial Data When Maintaining Equipment
  • Other Data Active

Like everything, don’t activate anything you won’t be using.  The more you activate and leave blank, the more you will train your user to ignore things.

thanks for reading,
Service Management – Configuring the Equipment Category

Like my last post, I wanted to continue talking about some configuration within SM.  In fact, this section again is one of the fundamental building blocks of service management.  It revolves around the equipment category.  Without the equipment record (or you could use functional location or serial number), service loses a lot of it benefits.  Let’s get into the meat of it.

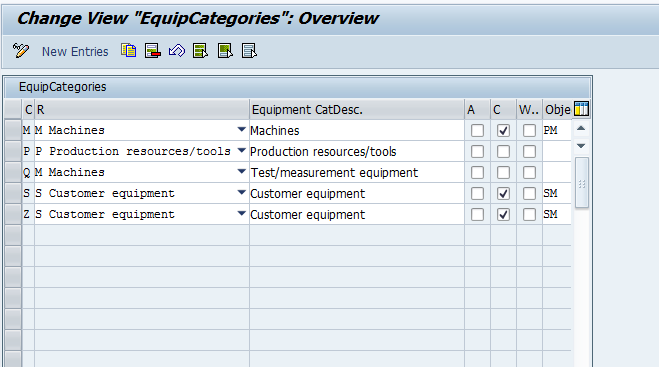
Maintain Equipment Categories

tech obj - equip cat 01

IMG->Plant Maintenance and Customer Service->Master Data in Plant Maintenance and Customer Service->Technical Objects->Equipment->Equipment Categories->Maintain Equipment Categories

tech obj - equip cat 02

For each equipment type you have the following settings you can apply:

  • No Alpha-numeric Equipment Numbers
  • Indicator showing equipment category with change documents – I highly encourage this to always be checked
  • Indicator: Generate Event for Workflow – Should workflow events be generated
  • Parameter ID Object Info– this is from the object information key. For more information see the Advanced Configuration Guide.
  • View profile for tab index Customizing – Use this to determine what profile should be used.
  • Keep construction type and material number synchronous
    • tech obj - equip cat 03
  • Equipment Type with Change Documents During Creation – I highly encourage this to always be checked.

I have my general settings I tend to apply to the equipment, but as always, be flexible based on the business needs.

Thanks for reading,
Setting the View Profile for a Technical Object

Today, I wanted to get a little more technical.  It’s been a while since I had a chance to go over some configuration, so I wanted to start at the top of everything.  The equipment record.  For those of you doing this for a while, I’m sure this is either old hat to you… or you did it so long ago, you may have forgotten this is there 🙂  Until I started writing my first book, I only had a vague recollection.  So, why is this step important?

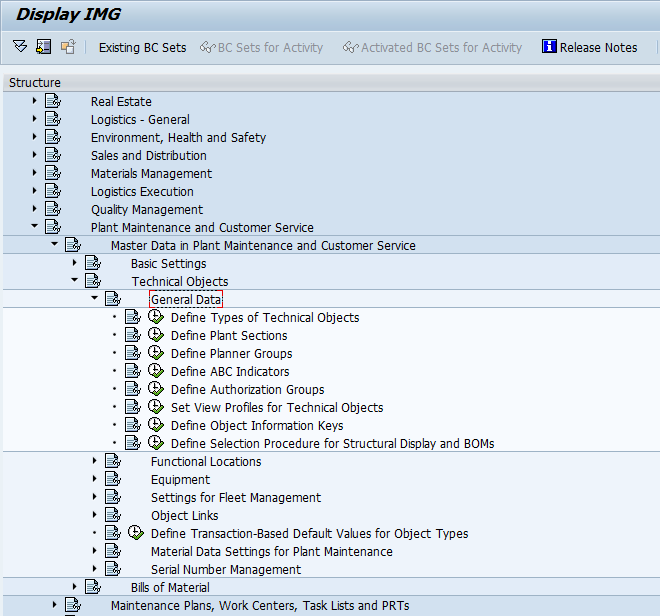
First off, where do you find this in configuration?
tech obj - set view profile 01

IMG->Plant Maintenance and Customer Service->Master Data in Plant Maintenance and
Customer Service->Technical Objects->General Data->Set View Profiles for Technical
Objects

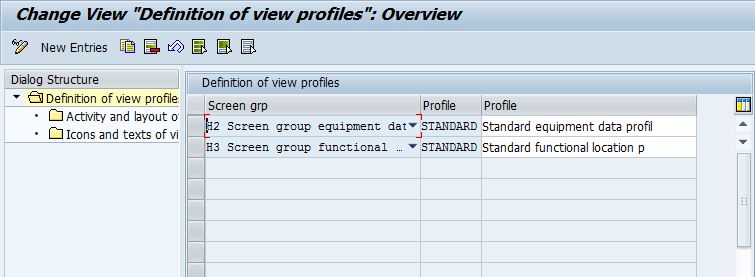
tech obj - set view profile 02
Now we arrive at a very powerful portion of configuration. This screen is
what allows you to manipulate what your equipment master screens will look like.
This screen will allow you to create your own profile, and set screens that you want
shown. Here’s how.

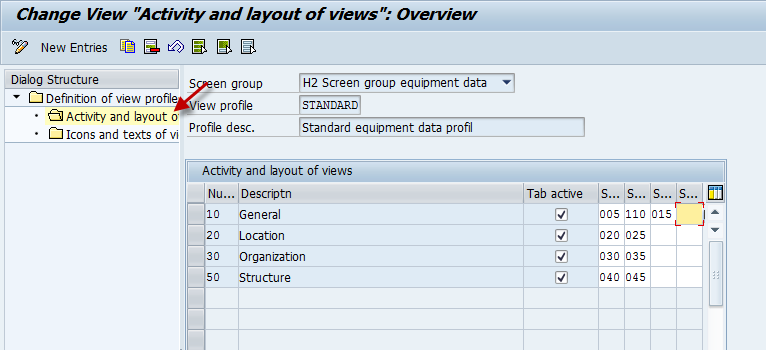
tech obj - set view profile 03
Once you select the Activity and Layout, you now define what tabs will be shown, and
more importantly, what fields will be visible on each tab. I highly encourage you to
always include 110 for warranty.

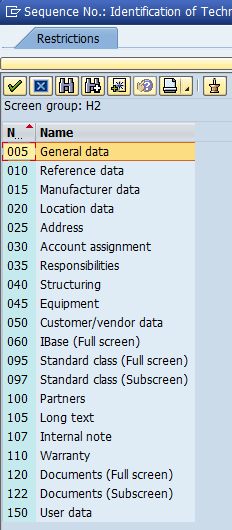
tech obj - set view profile 04
Here is the entire list of screens that are available. Obviously, you will need to
structure what best fits your business, but I encourage you display all of the different
screens, to make sure you know your options and see what’s available.  I think I might do another small book in the future to show all the different field options for the equipment record (much like my book on service notifications.)

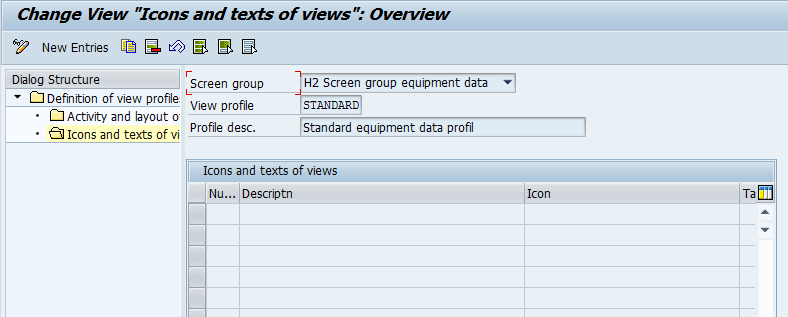
tech obj - set view profile 05
This last portion is not something I typically use, but like the notification, you have
the option to add icons to each of the tabs.

That’s all for today.  I’m thinking of doing more posts like this in the future.  Let me know if this is something you like.

thanks for reading,