ABAP Web Dynpro

Home / SAP / Archive by category "ABAP Web Dynpro"

Adding Additional Document Flow to a Warranty Claims

Well, since my bread and butter is SAP, I have found some new tricks since I was last blogging, so might as well sprinkle those in along with all my new endeavors.  ha ha ha.
I guess this blog post could also have been called implementing a Badi…  but that doesn’t so as much fun 🙂  My goal was to add some additional links into the Warranty Claims document flow.  Namely, I wanted to see purchase orders that might be generated during the flow of the claim.  Out of the box, these are not part of document flow, so I began searching on how to do it.

Everything started with using this blog post to get me started on how to do the Badi.  But of course, the real work came from figuring out how to get it all connected.  So first let me tell you some of the basic data you will need to make this work:

BAdi Definition:  WTY_DOCU_FLOW
Interface:  IF_EX_WTY_DOCU_FLOW

I needed to update 2 methods in order to make it all work.

  • ADD_DOCUMENT – this adds the link into document flow
    •   DATA:

          lt_gbinrel   TYPE TABLE OF gbinrel,

          gs_wdocs        TYPE pwty_wdocs,

          lt_trl_borid TYPE          trl_borid,

          ls_trl_borid TYPE          borident.

      **** via document relation

        CALL FUNCTION ‘WTY03_RELATION_FIND’

          EXPORTING

            iv_claim   IV_CLMNO

          TABLES

            et_gbinrel lt_gbinrel

            et_object  lt_trl_borid.

        LOOP AT lt_trl_borid INTO ls_trl_borid.

            CASE ls_trl_boridobjtype.

              WHEN ‘BUS2012’.

                gs_wdocsdoctype  ‘EBELN’.

                gs_wdocsdocttext ‘Purchase Order’.

                gs_wdocsclmno    IV_CLMNO.

                gs_wdocsdocno    ls_trl_boridobjkey.

                APPEND gs_wdocs TO ct_wdocs.

            ENDCASE.

        ENDLOOP.

  • DOCUMENT_DISPLAY – I enhanced this so that you could double click on the node in document and drill to the PO
    • Data:  ld_ebeln type eblen.
    • case is_wdocs-doctype.
      • when ‘EBELN’.
        • ld_ebeln = IS_WDOCS-docno.
        • set parameter ID ‘BES’ FIELD ld_ebeln.
        • call transaction ‘ME23N’ and skip first screen
    • endcase.

Now, of course there isn’t Purchase order action out of the box either…  so I had to build that as well.  to do that, I had to define an action (see TXN:  OWTY –> Control Data –> Process Control –> Define Actions)

I created a new one, and then assigned a function module to it that called a BAPI to create the PO (and of course it pulled data from the claim to have it all happen in the background).  If you would like more details on creating this function, let me know and I can walk you through that in a future post.  The key piece of this is to create the document flow links using the function ‘BINARY_RELATION_CREATE’.  this links the PO and claim.

Once you have the new action, you need to build it into the Action controls and of course, play with a bit to make sure 1) you are creating the PO, 2) you are linked to it and 3) that your BAdi above is firing to add the document flow.

All and all, it was a lot more moving pieces than I expected, but it was a fun exercise (once it was done.  LOL).

Ping me if you have issues, and as always, thanks for reading,

Web Dynpro – Setting a Default Select-Option

Well, there are some things I take for granted, and that’s how easy things seem to be inside of standard ABAP programming.  I come realize this whenever I try to do one of these “simple” activities in Web Dynpro.  Take today’s adventure.  I had some select-option fields, and I just wanted to default a value in there.  Sounds so easy.  And eventually it was.  here’s what I finally found.

I had a select option for ERDAT (creation date).  I’m not going to go into the select option creation.  I think I talked about that a while ago, so just search my blog if you need more info.  SERDAT is the ID of my option that I want to default a value for.

*** SET DEFAULT FOR ERDAT
DATA lo_nd_range_erdat TYPE REF TO if_wd_context_node.
DATA lt_range_erdat TYPE wd_this->Elements_range_erdat.
DATA ls_range_erdat TYPE wd_this->Element_range_erdat.
*** here’s the magic ***

FIELD-SYMBOLS<LT_RANGE_ERDAT> TYPE TABLE.
CREATE DATA LT_RANGE TYPE TABLE OF /JVS/SO_ERDAT.
ASSIGN LT_RANGE->TO <LT_RANGE_ERDAT>.

*** end the magic ***

*** this code is just setting the value back to my context node.
* navigate from <CONTEXT> to <RANGE_ERDAT> via lead selection
lo_nd_range_erdat wd_context->get_child_nodename wd_this->wdctx_range_erdat ).
ls_range_erdatsign ‘I’.
ls_range_erdatoption ‘BT’.
ls_range_erdathigh sydatum.
ls_range_erdatlow sydatum 30.
APPEND ls_range_erdat to lt_range_erdat.
lo_nd_range_erdat->bind_tablenew_items lt_range_erdat set_initial_elements abap_true ).
*** back to the default ***
*** notice I needed to set the value to the DATA field symbol.
APPEND ls_range_erdat to <LT_RANGE_ERDAT>.
LR_HELPER->SET_RANGE_TABLE_OF_SEL_FIELD(
EXPORTING
I_ID ‘SERDAT’
IT_RANGE_TABLE LT_RANGE ).

*** end the default code


I hope you can find a use for this,
Thanks for reading,

Web Dynpro – Activating Services

It occurred to me, this might be rudimentary to most anyone that’s been doing BSP’s or Web Dynpro, for the newbies out there, this might not be obvious.  Since I just put a new Web Dynpro App into my test system, I thought this would be a great chance to document the process and share it with y’all 🙂

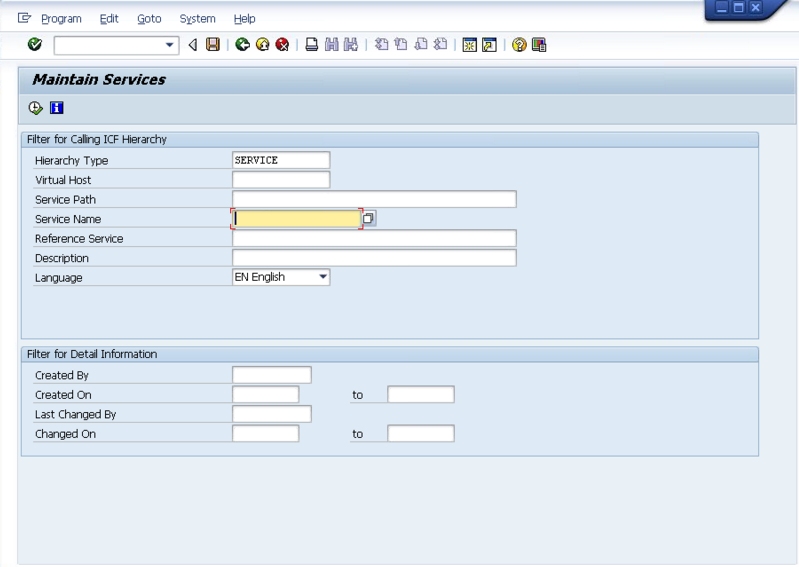
First off, go to transaction SICF.  Depending on your version of SAP this might look a little different (this is ERP 6.0).  But you’ll be able to see what I’m talking about.

blog02-01

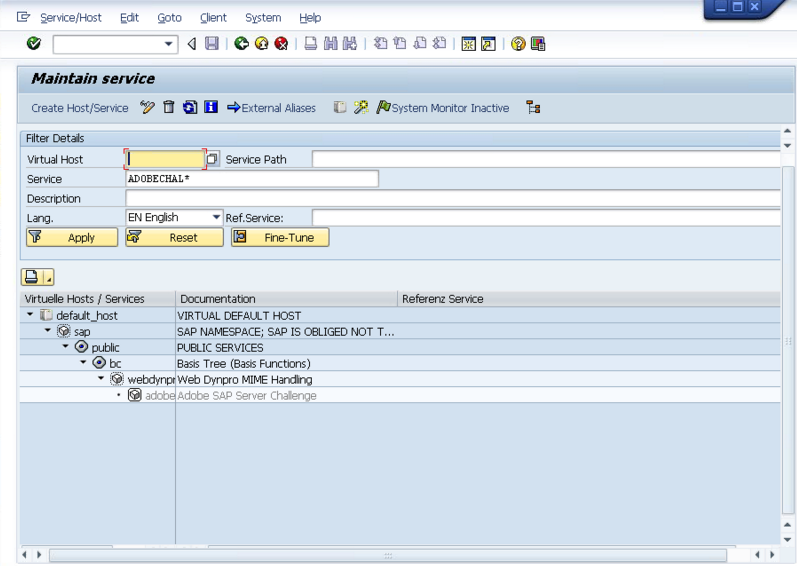
Normally, when you go to use Web Dynpro for the first time, there are a bunch of services that need to be activated.  Your web browser will tell you exactly what they are.  You either navigate the menus manually, or if you enter in the Service Name, SAP will take you directly to the one you want to activate (I like option 2).

blog02-02

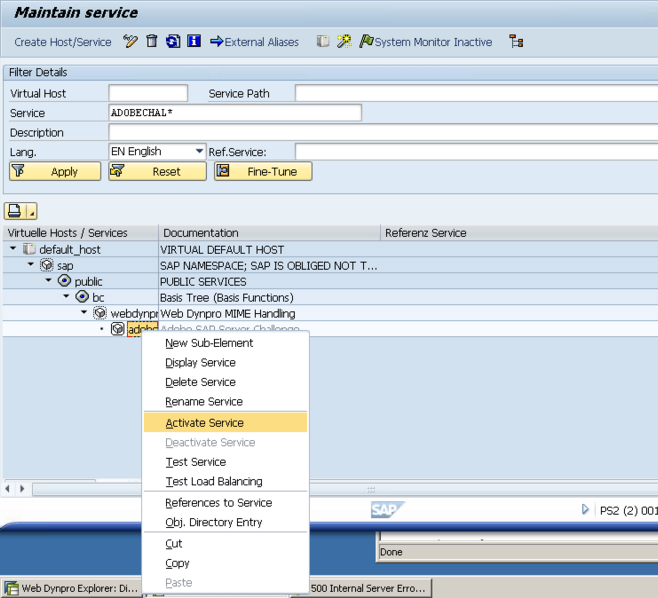
Here’s an example service.  You’ll notice that it’s grayed out when it is inactive.  So go ahead and right click on the service.

blog02-03

Select the Activate Service.

blog02-04ow

Now, depending on what you select to activate, if there are other services below the one you selected, you can choose Yes with the hierarchy to activate the service and everything below it.  Or you if select Yes, it will just activate that one service.

That’s it.  Now, keep in mind, there are a lot of other things within the service itself that can be updated, but for now, this is my little tidbit.

Thanks for reading,

ABAP – Web Dynpro – Dynamic Cell Variants

Well, in my continued adventure, I found a new component in web dynpro call a cell variant.  The basic idea behind this is that you can change what kind of cell is within a table.  For example, sometimes you may want a field editable, based on the contents, and other times it should just be a text view.  Well, I had something similar in my latest web dynpro experiment.  I needed to do  dynamic cell variants.  By this, I wanted to add the cell variant to an ALV table, so I couldn’t just manually add it to the column.  Well, thanks a cool document I found, I was able to pull this off…  mostly.

http://www.sdn.sap.com/irj/scn/go/portal/prtroot/docs/library/uuid/f0e7461d-5e6c-2b10-dda9-9e99df4d136d?overridelayout=true

Now, I use the term mostly, because of course, I tried branch out on my own.  It’s probably easiest to explain with a little code and my example.  First, I had a column in my ALV table that either listed a single serial number, or should provide a link to another window to show all the serial numbers associated with the document.  This is perfect for the cell variant.  I set it up so that

Here’s where I started, and syntactically, it would fine:

data: l_cv_ser TYPE REF TO cl_salv_wd_cv_standard,
lr_link_ser TYPE REF TO cl_salv_wd_uie_link_to_action,
l_col TYPE REF TO cl_salv_wd_column.

create OBJECT lr_link_ser.
lr_link_ser->set_text_fieldname( EXPORTING value = ‘SERNR’ ).
* create cell variant
create OBJECT l_cv_ser.
  l_cv_ser->set_key( VALUE = ‘MULTIPLE’ ).
* add link to action editor
l_cv_ser->set_editor( lr_link_ser ).
* Get column
l_col = lv_value->if_salv_wd_column_settings~get_column( ‘SERNR’ ).
* add cell variant to column
l_col->add_cell_variant( r_cell_variant = l_cv_ser ).
* assign attribute
  l_col->set_sel_cell_variant_fieldname( ‘SERNR’ ).

Now, if you pay close attention to the bold lines, these were my problem.  See, the data in the column might be MULTIPLE, or it be 1, 2, 3, 800034234, or any serial number.  So in my initial testing, it was all multiple, so it worked great.  suddenly I was getting a short dump when it hit a cell with a value other than MULTIPLE.  It finally hit me…  with a cell variant, you either need to define an editor for each value in the column?  or you need to make a new column with only 1 value or blank.  i ended up going down the second path.

data: l_cv_ser TYPE REF TO cl_salv_wd_cv_standard,
lr_link_ser TYPE REF TO cl_salv_wd_uie_link_to_action,
l_col TYPE REF TO cl_salv_wd_column.

create OBJECT lr_link_ser.
lr_link_ser->set_text_fieldname( EXPORTING value = ‘SERNR’ ).
* create cell variant
create OBJECT l_cv_ser.
l_cv_ser->set_key( VALUE = ‘X’ ).
* add link to action editor
l_cv_ser->set_editor( lr_link_ser ).
* Get column
l_col = lv_value->if_salv_wd_column_settings~get_column( ‘SERNR’ ).
* add cell variant to column
l_col->add_cell_variant( r_cell_variant = l_cv_ser ).
* assign attribute
l_col->set_sel_cell_variant_fieldname( ‘CV_SER’ ).
lv_value->if_salv_wd_column_settings~delete_column( id = ‘CV_SER’ ).

I hope this sheds some light on the cell variant.  it really is a pretty slick tool.
Thanks for reading,

ABAP Web Dynpro – Setting ALV Column Header

Not that long ago, I discovered the whole world of ALV tables within ABAP Web Dynpro. As is so common for me, I’m still figuring out all the ins and outs of the code. I have done several tables in my first application, and they all went pretty straightforward. Suddenly, I went a little off the norm, and the column text that I was using stopped working. So because of that, I wanted to make sure I shared this little tidbit about setting the ALV Column Headers. I did a post on this stuff, but I missed a key element. If you’re looking for explanation, take a look at this post.

        ls_col_hdr = ls_cols-r_column->get_header( ).         ls_col_hdr->set_ddic_binding_field( if_salv_wd_c_column_settings=>ddic_bind_none ).         ls_col_hdr->set_text( ‘R’ ).

Now, the important thing to notice is the 2nd line I have listed above. In certain instances, no matter what you try, you can’t undo this binding. So, when in doubt, explicitly break the link. it’ll save you a lot of headaches 🙂

Thanks for reading,

Web Dynpro – Editable ALV Table

Well, I’m still learning things about the Web Dynpro version of the ALV Table.  In this post, I’m going to about how to make an editable ALV Table within ABAP Web Dynpro.  So far, I’ve talked about how to make the table, and now it’s time for a little more advanced stuff.

Here’s some simple code to handle this aspect:

  data: l_ref_cmp_usage type ref to if_wd_component_usage.

" Instantiate the ALV usage
  l_ref_cmp_usage =   wd_This->wd_CpUse_My_Alv( ).

  if l_ref_cmp_usage->has_active_component( ) is initial.
    l_ref_cmp_usage->create_component( ).
  endif.

" Get reference to the model
  DATA: l_ref_INTERFACECONTROLLER TYPE REF TO IWCI_SALV_WD_TABLE .
  l_ref_INTERFACECONTROLLER =   wd_This->wd_CpIfc_My_Alv( ).

  data: lr_config type ref to Cl_Salv_Wd_Config_Table.

  lr_config = l_ref_INTERFACECONTROLLER->Get_Model( ).

|" Set read only mode to false (and display edit toolbar)
  lr_config->if_salv_wd_table_settings~set_read_only( abap_false ).

  data: lr_table_settings type ref to if_salv_wd_table_settings.
  lr_table_settings ?= lr_config.
  lr_table_settings->set_read_only( abap_false ).

Now, this is only the first half of the equation.  By default, every column is a text view within the table.  In order to have anything to edit, you'll need to change certain columns to be a different editor.  If you want to set something to say a checkbox, this is how you'd go about doing it.
  data: lr_column_settings TYPE REF TO if_salv_wd_column_settings,
        lt_columns         TYPE        salv_wd_t_column_ref,
        ls_columns         TYPE        salv_wd_s_column_ref,
        lr_checkbox        TYPE REF TO cl_salv_wd_uie_checkbox.

"  Embed the UI elements within the ALV
  lr_column_settings ?= lr_config.
  lt_columns = lr_column_settings->get_columns( ).
" Embed a checkbox within the column APPROVE
  LOOP AT lt_columns into ls_columns.
    CASE ls_columns-id.
      WHEN 'APPROVE'.
        CREATE OBJECT lr_checkbox1
          EXPORTING
            checked_fieldname = ls_columns-id.
        ls_columns-r_column->set_cell_editor( lr_checkbox ).
        FREE lr_checkbox.
    ENDCASE.
  ENDLOOP.

While there are a lot of ways to handle this, this is the most straightforward.  
As always, thanks for reading,

ABAP Web Dynpro – ALV Table Columns

Ok…  now I finally got to the really important stuff for me.  I have a configuration table that tells how columns are available, and how they sequenced by default.  So obviously, if I’m going to use the ALV simple table versus the “standard” Table Class, I need to control the ALV Table Columns, this includes sequence, visibility and column header text.

So, again, I’m doing all of this in the WDDOINIT method, since it’s a one time read.  Here’s how you can do it yourself.

  data lo_cmp_usage type ref to if_wd_component_usage.
DATA lo_INTERFACECONTROLLER TYPE REF TO IWCI_SALV_WD_TABLE .
DATA lv_value TYPE ref to cl_salv_wd_config_table.

*** instantiate the component
lo_cmp_usage =   wd_this->wd_cpuse_alv_comp( ).
if lo_cmp_usage->has_active_component( ) is initial.
lo_cmp_usage->create_component( ).
endif.
lo_INTERFACECONTROLLER =   wd_this->wd_cpifc_alv_comp( ).
*** get the ALV table
lv_value = lo_interfacecontroller->get_model( ).

** first, get all of the columns from the table.
lt_cols = lv_value->if_salv_wd_column_settings~get_columns( ).
READ TABLE lt_cols INTO ls_cols with key ID = <TABLE FIELD NAME>.
*** For visibility, you the following values
*      WHen ‘VISIBLE’
lv_vis = ’02’.
*     when ‘INVISIBLE’.
lv_vis = ’01’.
ls_cols-r_column->set_visible( lv_vis ).

*** set the sequence of the columns
lv_seq = lv_sequence.
ls_cols-r_column->set_position( lv_seq ).

*** Set the header text and tooltip
ls_col_hdr = ls_cols-r_column->get_header( ).
lv_col_text = lv_text.
ls_col_hdr->set_text( lv_col_text ).
ls_col_hdr->set_tooltip( lv_col_text ).

Of course, you can loop through and find your values from anywhere.  The important thing to notice is that it’s pretty simple.  Especially in comparison to the process I was using that had to delete a column and re-add it in order to sequence it properly.  This is a lot less involved.  So far, I haven’t found anything that I do that would force me away from the ALV Table.  I guess I’ll see what happens, but I may start converting my SM Portal to the ALV Tables.  The processing time doesn’t seem bad, so if you happen to know why the “standard” vs SALV table is preferable, I’d love to hear from you.

As always, Thanks for reading,

ABAP Web Dynpro – ALV Table Settings

Well, the next phase of my journey was the ABAP Web Dynpro ALV Table Settings.  I wanted to control things like the number of rows to display, what buttons should be available etc…

So after a little more research, I found that is pretty easy to do too.

Again we go to the WDDOINIT and add the follow code (or something like it ).

  data lo_cmp_usage type ref to if_wd_component_usage.
DATA lo_INTERFACECONTROLLER TYPE REF TO IWCI_SALV_WD_TABLE .
DATA lv_value TYPE ref to cl_salv_wd_config_table.

*** instantiate the component
lo_cmp_usage =   wd_this->wd_cpuse_alv_comp( ).
if lo_cmp_usage->has_active_component( ) is initial.
lo_cmp_usage->create_component( ).
endif.
lo_INTERFACECONTROLLER =   wd_this->wd_cpifc_alv_comp( ).
*** get the ALV table
lv_value = lo_interfacecontroller->get_model( ).

*** Set Table Buttons and attributes
lv_value->IF_SALV_WD_TABLE_SETTINGS~SET_SCROLLABLE_COL_COUNT( value = 10 ).
lv_value->IF_SALV_WD_STD_FUNCTIONS~SET_EXPORT_ALLOWED( value = abap_false ).
lv_value->IF_SALV_WD_STD_FUNCTIONS~SET_PDF_ALLOWED( value = abap_false ).

this particular example turns off the print button (PDF Allowed), turns off the Export button (Export_Allowed), and sets the scrollable column count = 10.  Just because my particular table could be 100 columns wide.  So I want it to render nicely, and 10 is a pretty good number of columns.  In addition, I’m leaving the settings button available, so a user can make his own settings if he doesn’t like my default.  I really like this ALV stuff 🙂

Alright, back to it.  Thanks for reading,

ABAP Web Dynpro – ALV Table Button

Well, after my last post, I realized, this is cool.  Now it’s time to make it better.  So the first objective is to add an ALV table button for refresh.  It turns out, it’s pretty easy to accomplish this.  Here’s what you need to do.

So, go into your WDDOINIT and add the following code (or some variation).

*** initial ALV table
data lo_cmp_usage type ref to if_wd_component_usage.
DATA lo_INTERFACECONTROLLER TYPE REF TO IWCI_SALV_WD_TABLE .
DATA lv_value TYPE ref to cl_salv_wd_config_table.
DATA: lr_btui_refresh TYPE REF TO cl_salv_wd_fe_button.
DATA: lr_bt_refresh TYPE REF TO cl_salv_wd_function.

*** instantiate the component
lo_cmp_usage =   wd_this->wd_cpuse_alv_comp( ).
if lo_cmp_usage->has_active_component( ) is initial.
lo_cmp_usage->create_component( ).
endif.
lo_INTERFACECONTROLLER =   wd_this->wd_cpifc_alv_comp( ).
*** get the ALV table
lv_value = lo_interfacecontroller->get_model( ).
*** create the button object
create OBJECT lr_btui_refresh.
*** set icon
lr_btui_refresh->set_image_source( ‘ICON_REFRESH’ ).
lr_bt_refresh = lv_value->if_salv_wd_function_settings~create_function( ID = ‘BT_REFRESH’ ).
lr_bt_refresh->set_editor( lr_btui_refresh ).

Now you can also add text to the button instead of just the image source.  If you drill into the cl_salv_wd_fe_button class to see the methods available.

I’ll have more tomorrow as I keep learning.  Thanks for reading,

Web Dynpro – The ALV Table

Well, with all the work that I did for my Customer SM Portal, I thought I knew what I was doing with the ABAP Web Dynpro, especially around tables and dynamically changing them.  I recently started working on a new application that is more scaled back.  One of the requirements is to have the same sort of functionality as an ALV Table in the ABAP.  So we want to have the filter, sorting, and flexibility to play with your layout and settings.  Well, I started to look at the current tables I’d been using, and realized I had to implement each of those functions myself.  Well, that looked like a rather big task to undertake, so I went to my buddy, the internet and looked up Web Dynpro ALV Table and quickly found that SAP was nice enough to provide a way to implement the ALV Table.  Of course, it meant another change to the way I was doing things… but hey, I learned something new.

First of all, thanks that Sankar.  If you like to see exactly how to do this in video format, check out this like.  Sankar does a great job in demonstrating exactly how to code this stuff.  My only problem is that sometimes it was hard to read the code and class names (which is why I’m going to cover this in text form). https://www.youtube.com/user/sankar1bhatta?feature=watch

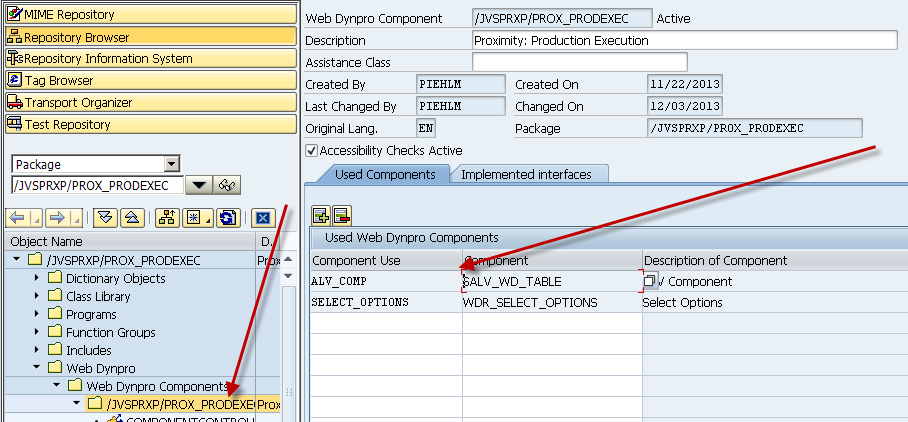
So, let me walk you through the steps of how to create an ALV Table.  The first step is to add a new Web Dynpro Component. blog01-01

So, go to your top level, and add a Used Web Dynpro Component.  You can name the Component Use whatever you like, the component itself is SALV_WD_TABLE.  This is the magic that will allow you to use all of the ALV functions. I’m not going to cover this in depth, but the next step will be to add a context node + attributes that will be the structure for the table you want to create.  Be sure to create this in the componentcontroller, and not directly in a particular view. This next part was new to me.  I believe it’s called external component mapping.  So let me walk you through this next part.

blog01-02

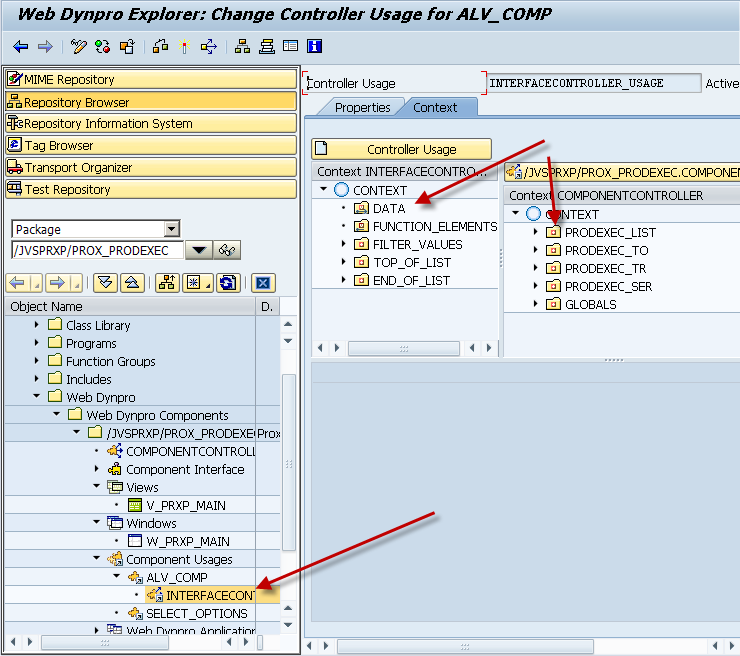
First, drill down into the component usuages until you find the ALV component you defined above (mine is ALV_COMP).  Next, you need to drag your context (table you want to create in ALV) from the right side, over to the Data node on the left side above.  You have now linked that table structure to the ALV components. Finally, we need to add this to the layout so you can actually see the table.  So, go to your layout and add a ViewContainerUIElement.  Wherever you place this is where your table will come in. We have one final step, and then you’re ready to test.

blog01-03

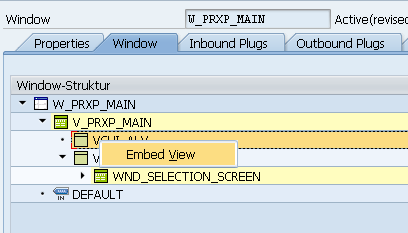
So, go to your window, and find the VCUI element that you just created, and drill down and then right click to Embed View.

blog01-04

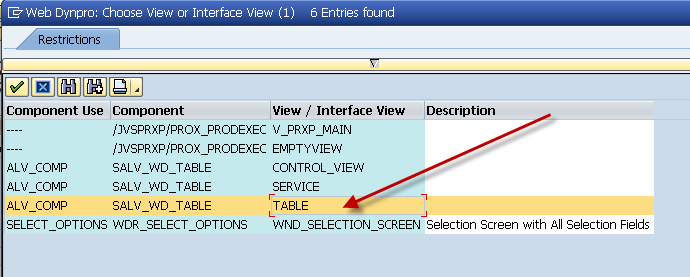
Select the Table interface, and you’re ready to go.  Just fire up your application.  In some future posts, I’ll discuss how you can customize this, but for many applications, this might be enough.

Thanks for reading,