ABAP Web Dynpro

Home / SAP / Archive by category "ABAP Web Dynpro" (Page 2)

Web Dynpro – wda_ls_main.js Error in IE

Well, here’s something new I just ran into.  Last night, my system crashed, which by itself was no big deal.  I just had to restart my virtual server.  But then I went to do some testing in Rapier and suddenly I couldn’t even get the login page to show up.  All I got was an error in IE (internet Explore) talking wda_ls_main.js  Well, this sounded cryptic and unhelpful.  So I went to SDN, and quickly found that it’s a browser issue, not anything with my code.  Which was good, since it worked last night and I hadn’t changed anything.

The solution was simple, go to the internet options, delete all the browsing history.  Apparently, from time to time, something strange gets cached and it won’t reload.  I wasn’t able to really get any more info than that (that I understood at least.  ha ha ha).

so if you run into this error on you AWDP page, try just clearing out the history.

Thanks for reading,

Web Dynpro – Creating a Table Tree

I have to say, this turned out to be a lot easier than I originally expected.  I recently did a post where I talked about this.  Well, I was about to make things a lot harder than I needed to.  I thought I had to do the NST (nested) version of the table tree, but it turns out, I didn’t need to.  So today, I’ll walk you through just how easy it is to create a table tree for your ABAP Web Dynpro application.

Now, the first really cool thing is that you need a fancy new structure.  You can convert any existing table into a table tree.  It’s just a new column that you add.  This made life much easier (of course I found new ways to complicate it.  ha ha ha).  So now, what do you need to do…

First, you need a context node and some attributes.  Here’s a run down of what you need:

Then we will create attributes required for the tree column. We require 5 attributes

  1. Attribute which contains the current level of the node. Create an attribute called “NODE_LEVEL” of type STRING.
  2. Attribute which contains the parent level of the node. Create an attribute called “PARENT_LEVEL” of type STRING.
  3. Attribute which contains X or Space depending upon the node is expanded or not. Create an attribute called “EXPANDED” of type WDY_BOOLEAN.
  4. Attribute which contains X or Space depending upon the type of the node, whether the node is a branch or a leaf. Create an attribute called “IS_LEAF” of type WDY_BOOLEAN.
  5. Then whatever else you want in your table.  None of these columns need to show up in your table, but you need them in the context.

Now you create a table, and link this context node to it.  I like using the wizard to create all my columns, but create it any way you like.  Now, create a new column, but this time it’s a special column.  Use the menu: Insert Master Column.  This is where all the power is.  The element inside should of type: TreeByKeyTableColumn (use the NST version if you want to calculate the lower nodes as you click on the table).  I was already calculating the full structure, so I didn’t need to go down this path.
Once the column exists, you need to bind several elements:
Expanded -> Expanded
Is_leaf     -> Is_leaf.
Parent_key -> Parent_level
Row_key   -> Node_level

Now, the big thing to remember is that the Parent_Key & Row_key are the direct link to make the tree work.  If you leave parent_key blank, this will be shown as the top level.  In my example, I had multiple values with blank parent.  From there, you just need to make sure that each sub level has a row key, and a parent key that matches one of the levels above it.

From there, just make sure you bind all the table entries into the context, and you magically have a table tree.

I’m pretty excited about this one.  It was easy, and looks very cool.  Now, onto my follow on functionality (there’s always something new).  Who knows, it might even give me an idea for another post :).

Thanks for reading,

Web Dynpro – Sorting Columns of Table

Now, in my recent experiments, I came to find just how much better the performance is when you can define the table in advance, and then manipulate it, rather than create the entire thing dynamically (check out some of my previous posts if you want to see how to do that).  So I decided create the full table in the layout tab, and then remove the columns I didn’t need.  Everything worked great, until I wanted to control the sorting columns of Table dynamically.

The first thing I found is that when you define a table using the wizard (not dynamic), it make the columns grouped columns.  I still don’t really grasp the difference, but it does force you to use a different set of methods and also has different behavior.  But thanks to Google, I found this nice little tidbit.  It showed me that you can delete the Grouped Column, and replace it with a standard column.  And with a standard column, you can define the sort order.  Here’s some sample code to get you rolling.

DATA: lo_table    TYPE REF TO cl_wd_table,
grcol         TYPE REF TO cl_wd_abstr_table_column,
tcol           TYPE REF TO cl_wd_table_column,
lc_element TYPE string VALUE ‘CTR_ITEMS’.

IF first_time EQ abap_true.
* get table reference
lo_table ?= view->get_element( id = lc_element ).
CALL METHOD lo_table->remove_grouped_column
EXPORTING
id                  = ‘COL_NAME’
index             = 1
RECEIVING
the_grouped_column = grcol.
tcol ?= grcol.

CALL METHOD lo_table->add_column
EXPORTING
index              = lv_sequence
the_column     = tcol.
ENDIF.

ABAP Web Dynpro – Tree_by_Key and Tree_by_Nst

Hello again.  In my ever changing world, today I happen to be back to Web Dynpro and my Service Management Web application.  My life is truly fun and varied.  ha ha ha.  Anyway, my latest quest is to use a table tree.  Short story, a table tree looks like an ALV grid, but it has the branch/leaf concept like a tree.  I needed this particular structure because I want to sure additional columns when a node is a expanded, rather than just the node.  So I started doing some digging.  I was able to find a demo program in SAP to get me started.  I had 2 different web applications inside of the same program.  My immediate question was what is the different of between TREE_BY_KEY and TREE_BY_NST.

Strangely, this isn’t an obvious answer.  I started by looking at the code and there isn’t a lot of obvious differences.  So I went back to my trusty friend, Google.  While I may fear the amount of information they collect on me and pass to the government, they are still the best source of information when I’m looking for SAP stuff (I’ve tried Bing and Yahoo, but the results aren’t as good).  Anyway, I found a great blog that gave the answer I was looking for.  But like so many of my quests, it only got me half way there.  I learned that TREE_BY_KEY is for a known structure.  If you know the levels and everything before runtime, you should use TREE_BY_KEY.  Of course, in my world, I needed to use TREE_BY_NST because it is for dynamically building the folders and nodes when you don’t know the structure until during runtime.  So this blog is great because if walks you through the TREE_BY_KEY.  My next hunt is to learn about TREE_BY_NST.  I’m hoping that it will be similar, and I’ll be looking at the DEMO_TABLE_WITH_TREE application in SAP to give me a start.  Expect more information as I learn yet another new piece of ABAP Web Dynpro.

Thanks for reading,

Web Dynpro – Testing a Dynamic Table

Now, since I always learn things the hard way, and if you’ve been reading my posts for any length of time, you’ll know that I can be a bonehead when it comes to things…  but I’m too stubborn to give up (hence why I’m writing this post.  ha ha ha).  Anyway, my latest discovery was in the testing of my new dynamic table.  I really needed a table with some editable fields, but in the creation of my table, the context node was empty.  So the table was being created, but there were no lines in the table.  Well, maybe it was the lack of sleep, but my brain was moving a little slow, so I didn’t grasp that the dynamic table was empty…  thus, impossible to see if there were any fields editable.

So, short story, you need to populate at least one row in the table, even if it’s empty.  Here’s an example:

* navigate from <CONTEXT> to <NOT_ITEM> via lead selection
lo_nd = wd_context->get_child_node( name = wd_this->wdctx_item ).
lo_nd->get_static_attributes_table( importing table = lt ).
IF lt IS INITIAL.
APPEND wa to lt.
lo_nd->bind_table( new_items = lt set_initial_elements = abap_true ).
ENDIF.

this simple addition, and suddenly I could see my editable fields in my dynamic table.  Probably obvious to a lot of folks, but yet another lesson learned in my never ending journey.

Thanks for reading.


ABAP – Web Dynpro Dynamic Table, again

Well, as it turns out, I didn’t figure out everything I needed for a dynamic table.  =)  The dynamic table code that I previously talked about works great, until you want to control the read only vs. editable aspects of the table.  I found a great way of creating a Dynamic Table in ABAP Web Dynpro that gives me the control that I needed to do allow for editing.

First things first, you need to create a context node and the attributes for to define the table.  You could do this dynamically, but I’m finding it’s cleaner to build it normally.  Either way, once it exists, here how to build the dynamic table.

*** create dynamic table for Notification – Items
cl_wd_table=>new_table(
exporting
id = ‘TB_TABLE’
bind_data_source = ‘CONTEXT_NODE’
visible_row_count = 5
read_only  = abap_false
receiving
control = l_table ).

*** build table columns
loop at <cols> into wa_config.
wa_cols = cl_wd_table_column=>new_table_column( ).

*For Dynamically creating Input Field
CASE type.
when ‘TEXT’ OR ‘TIME’ or ‘DATE’ or ‘DROPDOWN’.
CALL METHOD cl_wd_input_field=>new_input_field
EXPORTING
bind_value = lv_bind
id         = lv_id
state      = lv_state
read_only  = abap_false
on_enter   = ‘ON_ENTER’
RECEIVING
control    = lr_input.
wa_cols->set_table_cell_editor( lr_input ).
when ‘CHECK’.
CALL METHOD cl_wd_checkbox=>new_checkbox
EXPORTING
bind_checked = lv_bind
id           = lv_id
state        = lv_state
RECEIVING
control      = lr_check.
wa_cols->set_table_cell_editor( lr_check ).
ENDCASE.
ELSE.
CALL METHOD cl_wd_text_view=>new_text_view
EXPORTING
bind_text  = lv_bind
id         = lv_id
RECEIVING
control    = lr_textview.
wa_cols->set_table_cell_editor( lr_textview ).
ENDIF.

l_col_hdr = cl_wd_caption=>new_caption( ).
l_col_hdr->set_text( lv_col_text ).
wa_cols->set_header( l_col_hdr ).

l_table->add_column( wa_cols ).
endloop.

l_root ?= view->get_element( ‘TC_XXX’ ).
grid_data = cl_wd_grid_data=>new_grid_data( l_table ).
l_table->set_layout_data( grid_data ).
l_root->add_child( l_table ).
Now this code obviously won’t work out of the box, but you should be able to get the idea of how to use it.  If you have questions on this let me know and I can expand on the code provided.  Thanks for reading.


ABAP – How to Spool SD Output Documents

Well, this is a continuation of my post from yesterday, so if you missed it, I talked about using the ABAP Web Dynpro Download element to display documents on your web application.  What I talked about yesterday was completely based on having a spool job to convert.  So…  today I’ll talk about how you can Spool SD Output Documents again and again, and easily retrieve them.

SUBMIT RSNAST00
WITH S_KAPPL = i_kappl
WITH S_OBJKY = i_objky
WITH S_KSCHL = i_kschl
WITH P_AGAIN = ‘X’
WITH P_SUFF2 = lv_suff2
AND RETURN.

You might already be familiar with the program RSNAST00, but who knew you could use it for this (I didn’t…  =>  ).  You’ll notice, it’s a pretty simple program.  You give the Output type, the document key, and you can even using define a special key field (SUFF2) that makes it easier to retrieve.

After you run the program, simply go to table TSP01 and enter in the enough criteria to pull out the spool. Then you simply assign this to a context element, and link it to your download element.  And by doing this it will give you another popup window in your favorite web browser showing your output.

Now for my shameless plug.  I’ve done this all in Rapier now (it’ll be released in version 2 this fall), but thanks to this technique, I’ve been able to output Order Confirmations, invoices, etc…  directly onto the customer website, so they pull their own documents anytime they want.  If you’re interested in seeing this in action, let me know and I’ll be happy to setup a demo to show you.  Rapier 2.0 is gonna be really cool.  I’ve been putting a lot of hours into this recently, so you’ll want to check it out.  And, remember, if you’re in the market and you buy now, you get the charter customer price, and the ability to influence functionality that will be officially released this fall.    Ok… commercial over… =)

Thanks for reading,

ABAP – Using Web Dynpro Download Element

One of my recent adventures was find a way to pull documents out of SAP, and display them within my web application.  This turned out to be rather challenging, but I learned some neat tricks about ABAP Web Dynpro along the way.  The Web Dynpro Download Element is one of my new favorites, once I figured out how I could use it.

Let’s set the stage.  You have a document withing SAP that you want to display to your web user.  The Web Dynpro Download Element works perfectly for this…  provided you can feed it the proper data.  What I figured out is that in order to make this work, you need to get your document into an XSTRING format.  I think this is a RAW string or something like that, but it’s not important.  What is important is how do you get it into the XSTRING format.  One of the cool tricks I found online was using the following function module:

CONVERT_OTFSPOOLJOB_2_PDF

This function will convert a spool job into the XSTRING format you need to output it.  Now, getting things into the spool can be another headache, so tomorrow I’ll talk about how to get your standard SD documents into the spool again so you can read them out of the Web Dynpro Download Element.

Thanks for reading,


Web Dynpro – reset_view

Here’s a cool little trick that I picked up in order to make my dynamic screens even more dynamic.  The reset_view statement turned out to be the piece of the puzzle I needed in order to to have a dynamic screen with multiple variations.  While this may be outside the norm, it’s still a great little trick, and let me show you why.

Here’s the scenario.  I’ve created a view with a set of dynamic elements.  Now the trick comes in that depending on the scenario, even that dynamic screen might change.  When I first set it up, I kept getting a short dump because the system was trying to recreate dynamic elements that already existed.  By adding the statement:

  view->reset_view( ).

at the beginning of the WDDOMODIFYVIEW (which is where I do all of my initialization for the view) that reset the stage, so that I could “rebuild” the view with any elements that I needed.

While this isn’t earth shattering, it just might be the trick you need to keep your ideas flowing.

Thanks for reading,


Web Dynpro – Challenges with Centering an Embedded View

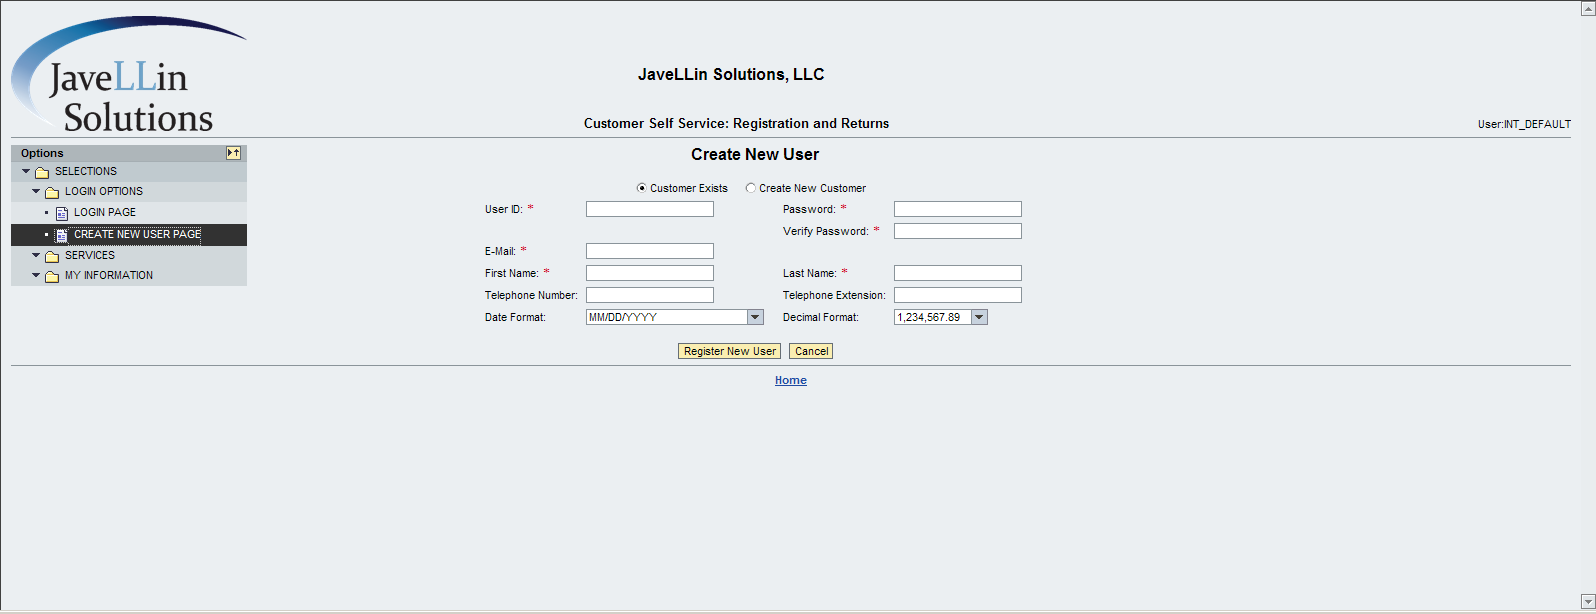
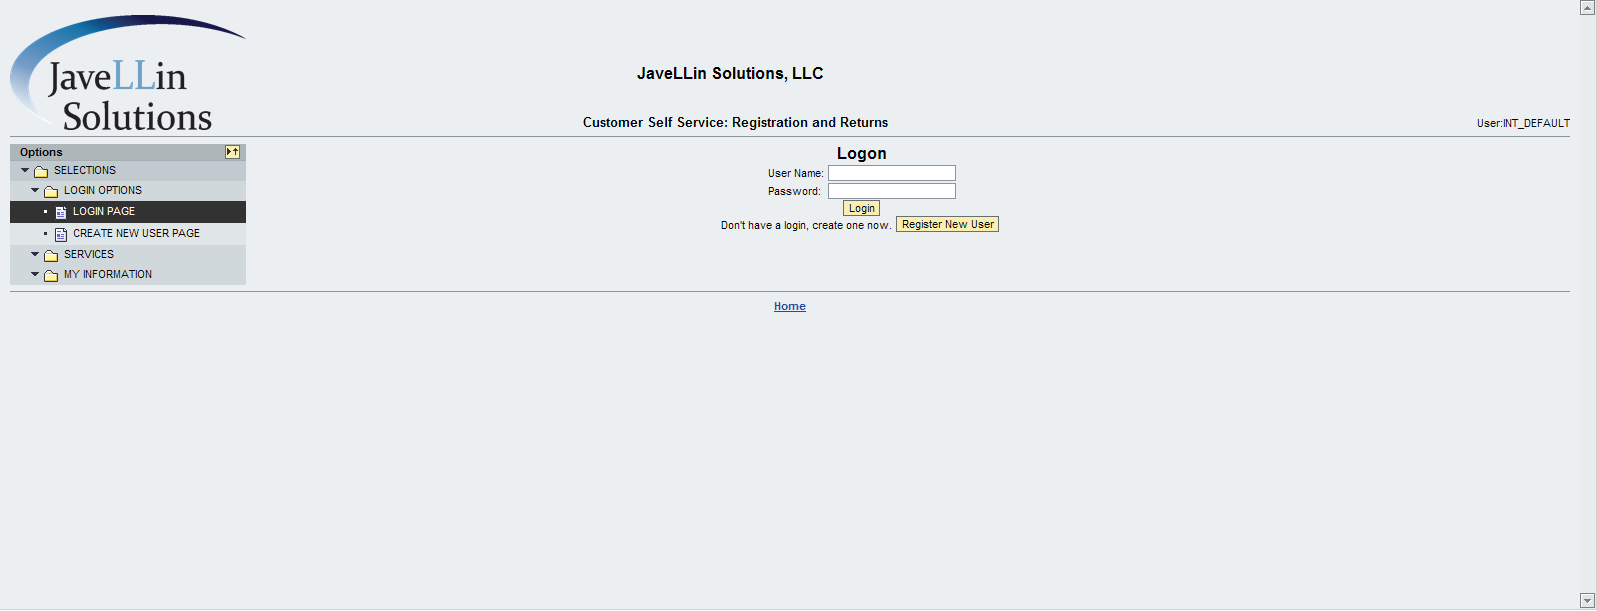
Well, I spent way too much time trying to get this working just right, and I finally had to set it aside.  Maybe one of my great readers might be able to shed some clues on what I’m doing wrong, or perhaps you have the same issue 🙂  Anyway, I have redone my Rapier Application into ABAP Web Dynpro, and I really like the results.  The only problem is that when my browser is maximized, I can see that my embedded view isn’t centered properly on the screen.  It’s not a huge amount that it’s off, but enough to be noticeable.  What makes it even more maddening is that is seems to be related to whether the embedded view has one or 2 columns of data.  I can see a much greater shift if there’s only a single column…  Take a look…

blog-awdp layout-01

Now, I’m dynamically creating the elements in 2 columns.  The 2 columns will always be there.  I’m just generating what items show up and where in each column.  I mention that because the columns themselves are not dynamic…


blog-awdp layout-02

Now this one isn’t being generated dynamically, and it only has a single column of data to enter.  Not sure if either of these factors have to do with my issue, but you can see how the Login page is shifted further right than the create new user page.

Now, here’s some of the things I’ve tried… (and using this combination is what got me the closest to what I want…  but still room for improvement)

Main View (contains embedded views)
I have a transparent container with 2 subitems.  1 tree,1 view container.  It uses the gridlayout, and has 2 columns, I’m stretching it horizontally.  Layout-halign = beginofline.

Next, my view container underneath it spans 1 column and has the h-align = beginofline.

Next, the views.  I’ve made a point to set them all up the same way (especially these 2 that I’ve been using as my test case to get them both centered in the same spot).
In the RootUIElementContainer, is set to a single column and is NOT stretched horizontally.
For each of the elements below, I have both the element and layout for horizontal to be centered.  When I look at the screen, it looks exactly how I want it.  so it seems like the views are fine.  I just want this view to be centered on the open area in my screen.

So…  after all of that…  any ideas out there that I should try to see if I can get these centered?  or is this a limitation of AWDP?  I appreciate any help you might be able to lend me here 🙂