sap

Home / Posts tagged "sap" (Page 6)

Creating the printer LOCL

I know this is an easy one for most basis folks, but I had to do some hunting to find it.  So, maybe it’s useful for you too.
This is the guide to creating a local printer LOCL on your SAP system.  Pretty easy.  enjoy:

Follow the procedure below to create a device definition for frontend printing:
1.      Call transaction SPAD, and choose Output Devices.
2.      If you are not in change mode, switch to this mode by choosing This graphic is explained in the accompanying textChange.
3.      You can now do the following:  Create a new entry
4.       Fill out the mandatory fields of the device definition as follows for frontend printing:

Device Attributes Tab Page

Output device

Enter a name for the output device that makes it clear to your users that this is the frontend printer, such as Locl.

Device Type

We recommend that you use the device type  SWIN, SAPWIN, or a language-specific version for Microsoft Windows PCs. However, you can use any device type.

Use the device type pdf1 or a language-specific version for Frontend Printing Using SAP GUI for HTML.

Host Spool Access Method tab page

Access Method

Specify the access method F for frontend printing.

Host Printer

Enter the name __DEFAULT to use the default printer at a Microsoft Windows system.

If you specify __DEFAULT as the host printer, and the user enters the name of the output device, such as LOCL, in the print window and chooses enter, the system displays other printers defined on his or her work station PC. However, you can deactivate this list for users by selecting No Device Selection at Frontend on the Host Spool Access Method tab page.

4.      Save your entries.
Result

When you save the device definition, it is available for your users’ use. To print documents using their frontend, users must enter the name of the output device that you have just created in the Output Device field of the print window.
Example


Networking your SAP Virtual Server to the outside world

What can I say?  this one has been on my wish list for a VERY long time, and thanks to a new friend of mine, Brent Brunner, I can finally see my BSP’s/web applications somewhere beyond my local machine.  It is so cool, for first time I know that my Rapier BSP doesn’t work on the Safari browser (not great, but now I can address it).  So for anyone out there, here are the basic steps to accomplish this:

On the Virtual Machine
1.  be sure the network is setup as a bridged adapter.
2.  for that adapter, you need to set the network to be a static IP address.  It doesn’t really matter what address you pick, but you don’t want it changing.  So go into your network adapter and specifically enter the IP address/gateway/etc…  If not sure of all these values, use the CMD prompt and the command:  ipconfig -all  This will give you all the network numbers you need.
3.  find out what port SAP is expecting for <HTTP Port>.  You can use transaction SMICM.  by default, the value is 8000.

On your router settings:  (I’m not going into much detail here since very router is different).
1.  find your primary machine.  You need to set this as a static IP address.  It should match the IP address you chose on the virtual machine.  On my AT&T Uverse box, I went to LAN–>IP Address Allocation.  I found my actual computer, and set it to the IP address from step 2 above.
2.  you need to define some exception ports.  Is should be the same port you found in transaction SMICM.  For this I went to Firewall–>applications and I clicked add a new application.  Then I filled in TCP/IP and the ports I wanted to exempt.  Then I selected my main system, and attached the applications.

Find your public IP address
1.  You can use the website:  www.whatismyIP.com  this is now the IP address that the outside world can use to connect to your system.

On your hosting site (for me it was hostgator).
1.  create a subdomain = to your virtual system name.
2.  Create a DNS entry for your subdomain.domain = your public IP Address
3.  Wait 12 – 24 hours for the changes to propogate through the web.  (this was the part I hated, because I didn’t know if it was working).

Accessing your stuff.
now any BSP’s or anything like that, you’ll need to first give the server, so it will be the subdomain.domain:<HTTP port>/sap/bc/…

I hope I’m not forgetting any steps.  I don’t pretend to be an expert about this, but I’ve spent the last 24 hours learning from Brent and trying to make it all work.  Now as of tonight, it’s all working.  Very exciting to a geek like me.  Here’s my disclaimer.  I’m fairly sure my network is still secure, but like anything, when you open doors, someone could get in.  Make sure your anti-virus software is up to date, and keep on the lookout for anything strange.  Who knows?  I might have to turn it off at some point and pay the $$$ for a VPN to do the same stuff, or other such fancy networking stuff.

Thanks for reading…

And a special thanks to Jeremy Meier…  without your connection, i’d still be stuck with a local machine 🙂

Our First Trade Show – Carolina ASUG – Lessons Learned

My latest learning experience was the trade show. Now I’ve attended trade shows in the past, but this is the first time I’ve gone to one in the vendor mindset. Now, this was a relatively small group. It was a regional ASUG, so it was a great place to learn. My partner Mike and I got up at the crack of down on Thursday morning and drove 4 hours. We hit the vendor fair, that had about 10 or so booths. We talked to about half of the booths, in order to try to learn what other people are currently doing. We talked to some companies that were even doing SAP Add-ins, just like us. So we got some great information about pricing and we saw some good marketing materials that we can strive to check out. (speaking, please check out our one page document on any of our products. I’d love to hear your feedaback).
Here’s some of the lessons I learned

Lesson 1: Consistent Image:  Mike and I were in the process of getting the new company launched, so that meant we both came in under our own company name, Paper Street Enterprises & DMS. This wasn’t terrible, but since we were often at a booth together, we got a lot of strange looks, especially when we presented a JaveLLin Solutions business card.   So we decided that we need to get some shirts to wear (polo for sure), get a logo, get business cards, change our membership to to the new company.  Little things like that.  ha ha ha

Lesson 2: Avoid panel discussions if possible: On the first day, the last presentation was a panel discussion about ABAP Add-ins.  It was awesome because it gave us a chance to give a quick pitch.  However, we ended up following a guy that took twice his allotted time and just wouldn’t get off the stage.  This quickly annoyed the entire audience because this discussion was holding people up from going to happy hour.  Nobody wants to hear a sales pitch when they could be drinking free beer.  ha ha ha.  We learned that it’s worth the money to be a vendor and do an actual hour long presentation.  Plus, that will give us a booth.

Lesson 3: Talk to Vendors:  This was a big bright spot in the conference.  in the course of the conference we met 2 great vendors that are actually interested in partnering up with us.  So talk to everyone, you never know.  These vendors can help us get in the mobile arena with little work on our part…  (more about this in a future post).

Those are the big things I walked away with…  I”m sure when I go to CWG in Oct, I’ll be doing another one these…

Thanks for reading…

GUI Scripting: A how to guide

Using SAP GUI Script

SAP GUI Script is a fantastic tool that can be used to create transactional testing data, Change existing master or transactional data, create master data in mass or even just data conversion for certain tasks that LSMW can’t handle.  GUI Script has been around for a while, but it always surprises me that so few people are familiar with it.
The basic concept around GUI script is that you can load information into an Excel worksheet, and using a macro, allows you to load data into SAP.  This document is going to walk you through creating your own GUI scripts and using them effectively.

Turning on GUI Scripting

Tranaction: RZ11
Param. Name: sapgui/user_scripting

Press Display
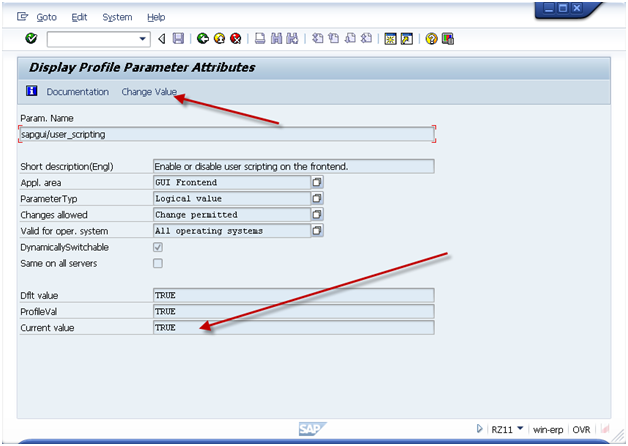
gui-01
If current value is not set to TRUE, press the Change Value and set the value = TRUE.
Please note, typically this a basis function, so if you don’t have access to transaction RZ11, please contact your basis team.
As an additional hint, if you want to have GUI Scripting always active, it is encouraged to activate it in RZ10 (this adds it to the startup profile).

Recording the Transaction

When you are ready to perform the recording,  be sure you know the transaction you want to execute and the data that you can use.  You should also know the screens you plan to visit and the fields that you will be filling in.  Keep in mind, you can always update the recording file, but the better your recording, the less errors you will encounter.
The important thing to remember is that GUI script can NOT perform any logic.  it only works for repeating the same steps over and over again.  This means that if you receive an error on some records, but not others, you will need to execute 2 different scripts.  One script will do the non errors, and other script will do the errors.  You can cut down a lot of time if you can segregate the data early.
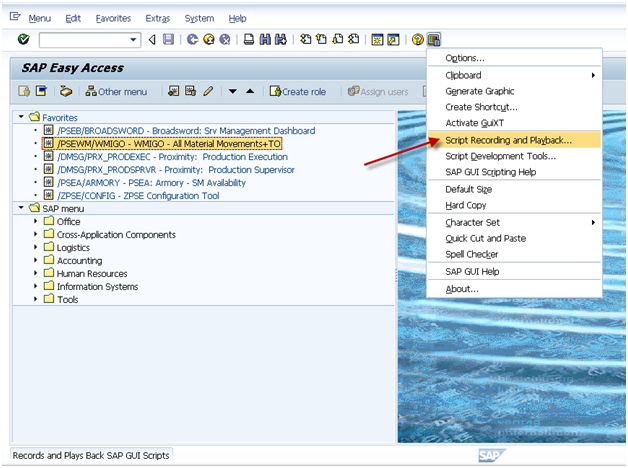
gui-02

Activate the recorder.  It is encouraged to always start the main screen in SAP.  This prevents weird things that happens if an error occurs during the playback.

gui-03

Press More if you want to control where the file is saved.
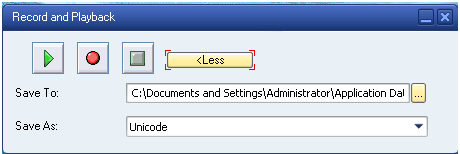
gui-04

When you are ready to start, press the record button (Red Dot Button).

Then proceed to execute the transaction you wish to record.
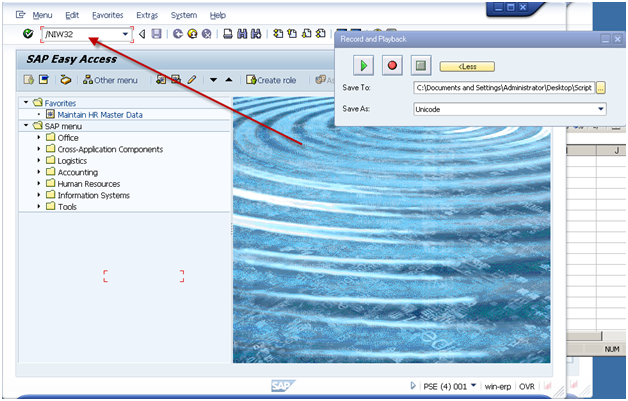
gui-05

Be sure to use ‘/N’ in front of the transaction code.
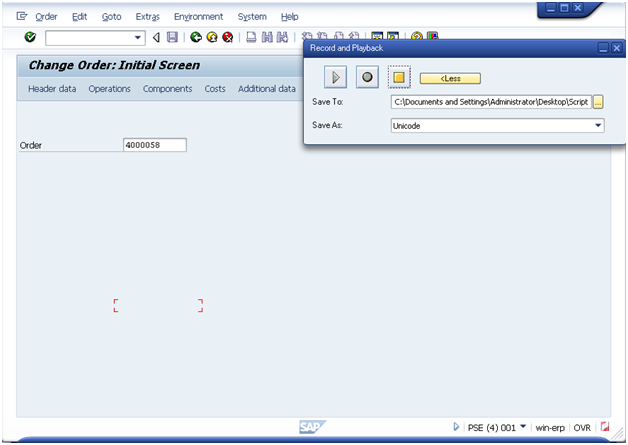
gui-07
Enter in the document number and press Operations Button.
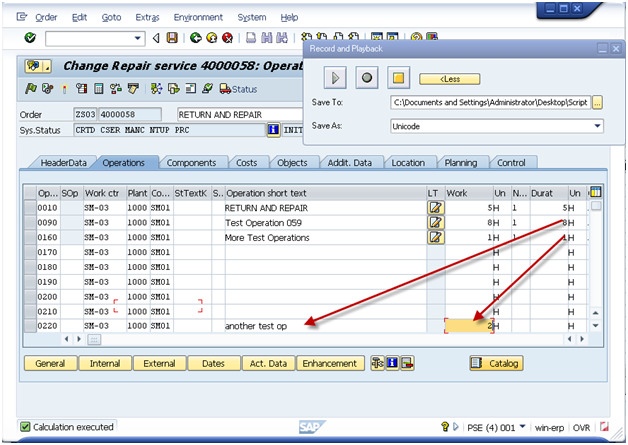
gui-08

Please note, when I added a new operation, I entered it on the bottom of the screen.  This allows you to avoid the risk of overriding exisitng data.

Press Enter.
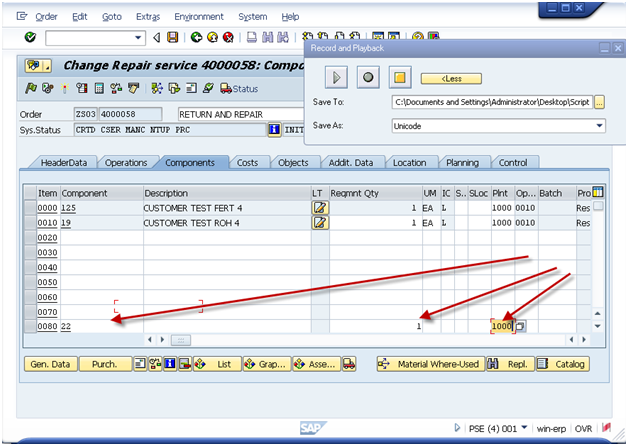
Press Components Tab
gui-09

Again, add the data to the bottom of the screen.
Press Enter
Press Save
Note:  sometimes there will be errors.  If errors occur, you need to remember that maybe not Every order you change will have the error.
gui-10
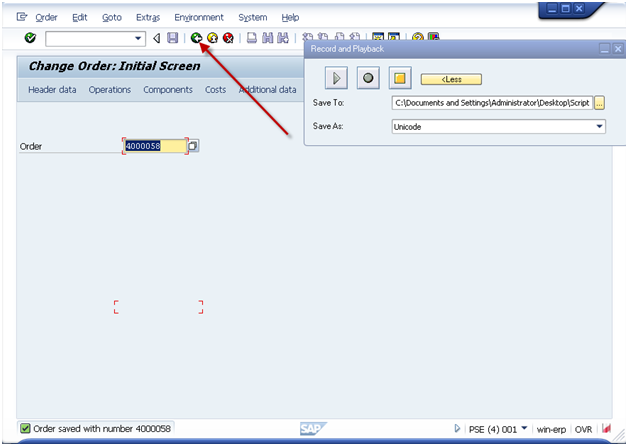
I encourage you to press the green arrow back on every recording at the end.  This just helps to avoid incorrect loading of data.
gui-11
Press stop.
Now, go find the file.  Be sure to RIGHT click on it.  If you double click on it, it will attempt to execute the exact same transaction again.
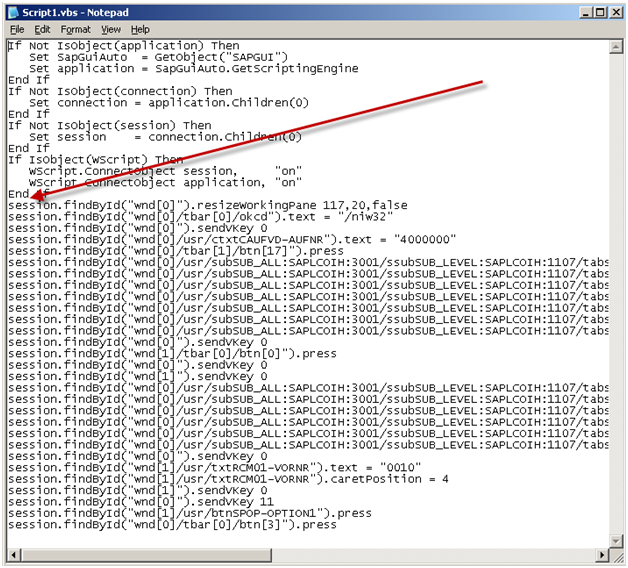
You should see something similar to this:
gui-12
The parts of this file you care about are the lines that start: session.xxx
I encourage you to skip the first line that resizes your screen.  and copy all of the remaining lines in the file.
Next up, add this information to the excel file.

Gui Script

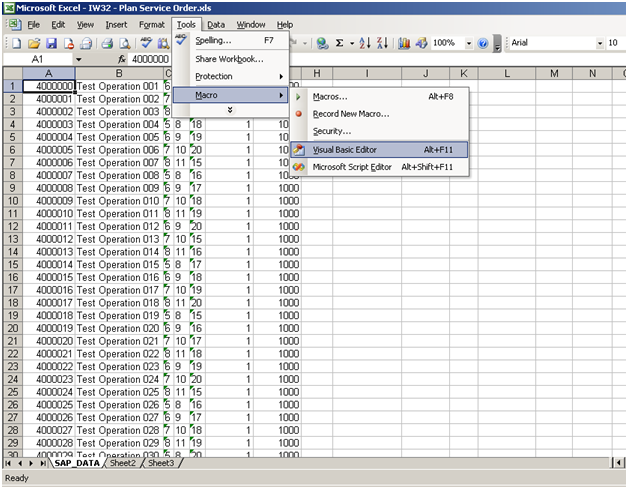
This will depend on your version of excel, but what you need to do is find the macro button:
MS 2003:
gui-13

MS 2007

gui-21
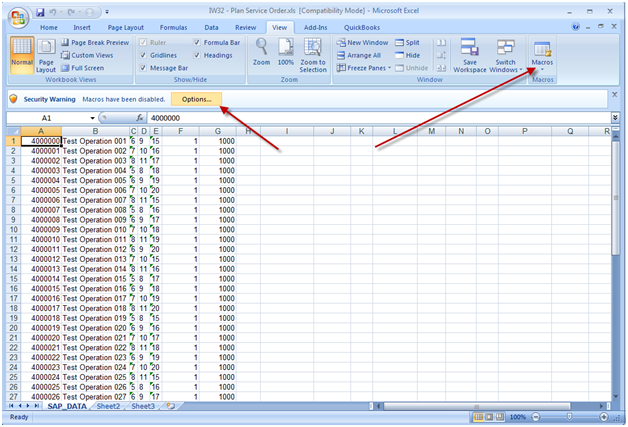
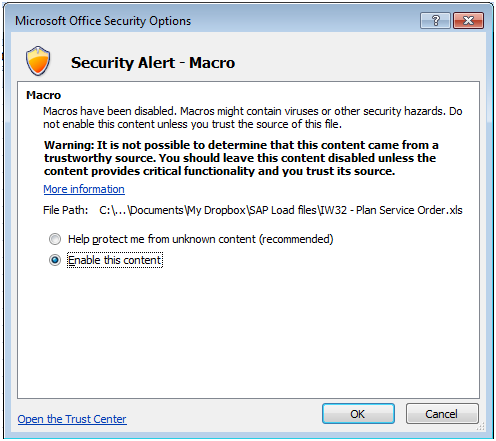
Be sure to enable macros.
gui-14
When the macro window opens, be sure to select the correct view on the left hand side of the screen.  Then move to the code section and find the area shown that says “Paste your recorded script below”.
If there is anything currently in this section, be sure to remove it, and replace it with the information from your recording (session.xxx).
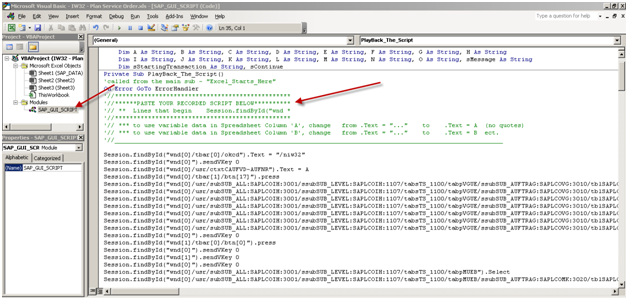
gui-15

Now, I’m going to show you how to point this to your excel document.
session.findById(“wnd[0]/tbar[0]/okcd”).text = “/niw32”

session.findById(“wnd[0]”).sendVKey 0

Change:
session.findById(“wnd[0]/usr/ctxtCAUFVD-AUFNR”).text = “4000000”
To:
session.findById(“wnd[0]/usr/ctxtCAUFVD-AUFNR”).text = A

session.findById(“wnd[0]/tbar[1]/btn[17]”).press

Change:
session.findById(“wnd[0]/usr/subSUB_ALL:SAPLCOIH:3001/ssubSUB_LEVEL:SAPLCOIH:1107/tabsTS_1100/tabpVGUE/ssubSUB_AUFTRAG:SAPLCOVG:3010/tblSAPLCOVGTCTRL_3010/txtAFVGD-LTXA1[7,8]”).text = “my test op”
To:
session.findById(“wnd[0]/usr/subSUB_ALL:SAPLCOIH:3001/ssubSUB_LEVEL:SAPLCOIH:1107/tabsTS_1100/tabpVGUE/ssubSUB_AUFTRAG:SAPLCOVG:3010/tblSAPLCOVGTCTRL_3010/txtAFVGD-LTXA1[7,8]”).text = B

Since this can get long, I’ll jsut show you the first 2 changes.  You’ll notice that I found the first two lines where I entered in data.  I changed it to a single letter (no quotes).  This is the excel column where you enter in the data.  It’s that simple.  If anything is a constant, just leave it as it is.
When you’re done, press save and you’re ready to execute.

Executing the Script

Now, the first step before executing the script is gathering all the data.  Typically, this is done using SE16, SE16N, or certain reports (IW73, VA05, COOIS, etc).  As always, be careful with the data you enter.  It’s your user id that will be assigned to the change :).

Once you have the data you wish to execute, simply go the excel worksheet and execute the macro
*** NOTE:  Remember, when the script is running you can’t do anything with Excel.  You can continue working in SAP, but Excel will be locked for the duration of the script.
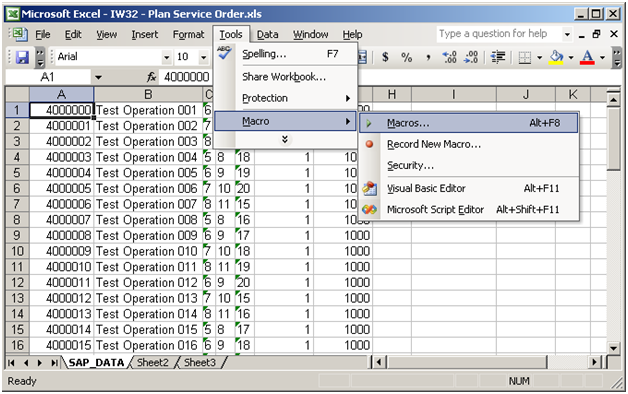
gui-16
**** NOTE ***
This is a VERY important one.  Be sure that the first SAP window open on your screen is the client you wish to change.  If you are doubt, be sure to logout of any client/system you do not want to change.  For example, if you are logged into production and QA.  You want to make the change to QA, I encourage you to log out of production.
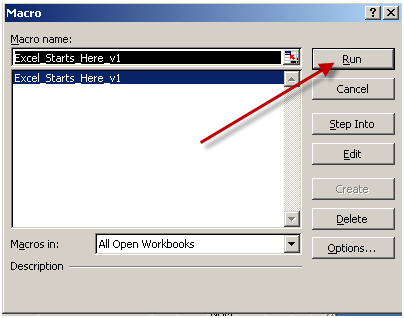
gui-17
Press Run
Note:  if you have multiple excel windows open, be sure the correct macro name is highlighted.  If you aren’t sure, close the other excel documents.
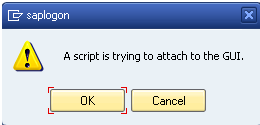
gui-18

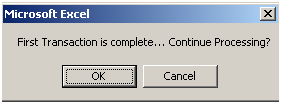
Gui Script will always give you a chance to check the results of the FIRST record.
gui-19

I encourage you to always check and make sure it saved properly before pressing ok.  If it did not, press cancel.  Otherwise the script will go all the way to the end.

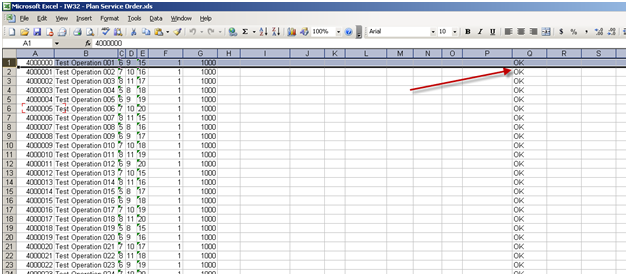
Once you are done, it will return control back to excel.
gui-20

As long as you see OK in the row, the record processed.  if you don’t see ok, you’ll need to check that record and possibly reprocess it.


Upgrading the SAP Kernel

You never know what I’m going to talk about next.  Even I wonder if there is a method to my madness (I hope so 🙂 ).  Anyway, today’s task is to update the SAP kernel on my ERP 6.0 EHP4 system.  I can’t get the crazy thing to start, so one of the suggestions online was to upgrade to the latest kernel, so here I am.

Step one.  Download the files.  YOu need the database file, the database independent file, and of course SAPCAR.EXE.  You can find all this on service.sap.com.  Normally, I just do a search and look for Kernel and my version.  In this case, I needed to find Kernel 7.01.  From here, SAP will guide you down the path depending on your OS and your DB type.  Look for the file with the biggest number or latest date.

Next up, save all these files to a location, and extract them.  This is what SAPCAR is for.  Since I’m on windows, I use the cmd.exe and navigate to where I saved the files.  I then use the command sapcar -xvf *.SAR.  The only catch is that once you start the extract, make sure and move SAPCAR.EXE to a different directory.  It gets extracted out the files you are extracting and will dump when it encounters the same file.  You can also extract to a different directory, which probably the better approach.

Next, save a copy of your current kernel, just in case.  For me, the path is:  c:\usr\sap\<SID>\SYS\exe\us\NTAMD64\.   I’ll just grab all of these files and save them somewhere else.  If things go horribly wrong, I’ll just wipe out the changes and paste these files back in.

So obviously, I copy the extracted files to the kernel location.  Be sure to leave all of the existing files in the directory.  Depending on the Kernel, not everything gets updated.

Now test.  I usually restart my system, just to be safe and then fire up SAP. in general, it’s that’s easy…  Hopefully this gets my EHP4 system working so I can take advantage of the new testing and debugging tools not available in kernel 7.00.  Unfortunately, for me, my Kernel doesn’t seem to be the issue.  So back to the drawing board.  It might mean a new install 🙁

Thanks,

Mike

Eclipse – Editing your SAP Themes

Well, today has been a big relearning experience for me. When I originally designed Rapier, I played around with Eclipse. With is a piece of software that has partnered with SAP that allows you to edit your SAP theme for a BSP or WebDynpro application. If you’re not familiar with a SAP theme, it’s basically all of the colors, fonts, and styles for your web page.
Well, the last time I used Eclipse, it was a almost 2 years ago. So today I had to go through and relearn how to install and use it. IN fact, I’m still playing with it as we speak. What I wanted to talk about today is the basic process for editing your SAP theme and testing it.
Step one is get it installed. You’ll need to download a few things to make this all work properly:
SAP Install Files
This link will give you the SAP specific files you need to edit themes.
http://www.sdn.sap.com/irj/scn/downloads?rid=/library/uuid/b08a05ec-e24a-2d10-189e-f5c6bcbf39a5
This link gives you the how to of installation and how to get started.  This guide is good, but most of the Eclipse is trial and error.  As far as Rapier is concerned, this is the only time consuming part of the whole installation process.  You have infinite colors and a LOT of areas that can be customized.

Finally, once you have something to play with, go back into SAP and execute the program:

BSP_UPLOAD_MIMEREPOS

Then just enter in the path of where you want to upload the theme,
/SAP/PUBLIC/BC/UR/Design2002/themes/
is the default area SAP keeps it’s themes .  Select upload, and all the files will be pulled in.

Finally, point your application to the new theme and give it a try.  If you are using Rapier, just go to /ZPSE/CONFIG transaction and enter in your new theme.

So, get ready to do a lot of trial and error, but before you know it, your website will look awesome.

Thanks for reading,

Mike

Cloning is bad… and I’m not talking about Sheep, SAP transaction cloning

Alright, well, I just learned something the hard way. For those of you that know me, you’ll know I’m good at that =). Anyway, a few days ago I talked about the new SM/WM integration product I was working on. I was all excited because I almost finished a replacement for the MB1A, B & C transactions to perform material movements and auto generate the transfer order. Well, I took a short cut. I copied the transaction MB1A, and did my updates to that. Well, I finished my development, got it all working in my 4.7 development system. So, as my usual process, I moved the code to my ERP 6.0 system. Well, I got instant syntax errors because things have changed a lot between those versions. Naively, I thought this old transaction will never change. SAP transaction cloning certainly bit me in the butt.  It’s been around forever, so I can just copy it. WRONG!!! The code had a lot of enhancements (included enhancement points, changed forms, etc…). So… I’m back to the drawing board. I’m still going to generate the transaction, but now I need to build the entire front end.
Short story, there are no short cuts in solid developments. Anyway, I’ll keep you in the loop for my continued progress.
Thanks for Reading…

Starting a new Product – SM/WM

Like always, I just hate being bored, so I’m working on my next product that I think will take off. For those of your using SAP Service Management, you probably already know that Service Management and Warehouse Management have ZERO integration. Even though WM is fully integrated with production orders, which are very similar to service order, SAP neglected SM. Sometimes I think I picked the Red-Headed Step Child to specialize in… and as it’s turning out, it could be the best thing ever for me (as soon as my apps start getting into the market).
Well, this new tools is 2 phases. The first phase is create a universal WM helper tool. It will use the functionality of MB1A, MB1B, MB1C and add the ability to automatically create a Transfer Order from it. Simple, but according to my good friend and WM expert, Jeff, something many smaller companies would love. Especially if the same person who does the material movement also creates the TO. I’m nearly complete with this first phase.
Next up, will be integrate the SM orders the same way that production orders are integrated with WM. I don’t know if I’ve fully wrapped my head around how I’m going to accomplish this connection. I have 2 schools of thought and I’ll have to contemplate a little more before I start the coding. One option is to utilize user exits along with a custom configuration table. While this method can work, it is a little more intensive for a customer to implement. In order to avoid any possible overwriting, the customer would have to manually place this include into thier code. Not difficult, but not as easy as my other products. Option 2 entails a batch program that would need to run pretty often to pick up any demands released into the system from service orders and then generate the appropriate WM documents. I also need to spend more time understanding all of the pieces involved for production orders.
All fun stuff, and yet another learning experience. Special Thanks to my good friend Jeff Bass. without him, WM would just be another black box of SAP that I know nothing about. Jeff is an amazing teacher of this stuff. If you need WM help, check him out.
Thanks,
Mike

My 2nd Real Product – Service Dashboard

I’m pretty excited right now. A couple months ago, I completed Broadsword: SM Dashboard, an SAP Dashboard. I took my own advise this time around and designed something that some of my previous clients specifically asked for. It helps because I know the process so well, that I came up with all the scenarios I’ve seen throughout my career.
It’s pretty awesome because I was able to learn several new skills building this product (I’ll post more about those in some future posts) and more importantly, I actually have interested parties in this tool. Like everything else, I need a starting point, and once I have several clients running the tool effectively, that should open the door to future sales. Anyway, things are getting exciting, and between the new products I’m developing and joint venture with DMS I feel like my business is about to take off…

Select-Option in OO class

Here’s part 2 of my adventure with SELECT-OPTION. Now one of the cool things that SAP did was to move to an OO programming method. However, since I got very used to SAP forms, functions and programs, I keep finding things that aren’t as easy to do with classes. SELECT-OPTION for example.
Now, what I really wanted to do was to send the select option table into a global class, so I could use it select statements and other table functions. Sounds easy, right? Well, actually it is, once you figure out how to do it.
It turns out, all you need to do is create a global structure/table type that woks as a select-option. The new trick that I learned is that there is a special function in SE11 when creating a table type that allows you to create it as a select-option table.
All you need to do is go into SE11, enter in the name of the table type, select TABLE TYPE as the object to create. Once you are in SE11, Enter in the short text, then go to the menu: edit–>Define as Ranges Table Type. This changes the inputs you’re given for creating the table type.
Enter in the data Element (MATNR for example), then enter in the name of the structure you want to create, and press create. It will automatically create the fields for your SELECT-OPTION range.
Save and activate everything. Now all you need to do is enter it into the parameter for your public class and you’re ready to go.
One last point, don’t forget when calling the class, to send it in as a table…

SELECT-OPTION: matnr FOR mara-matnr.

call method XXXX (
exporting
IT_SO_MATNR = matnr )

Anyway, that’s one of my recent discoveries. I’m learning a lot about layouts and trees currently, so there will probably be a post about some of those tricks as well.
Thanks for reading,
Mike