SM

Home / SAP / Archive by category "SM" (Page 2)

Territory Management without CRM

I have to confess, I’m pretty excited about this.  After hearing multiple clients say they needed to do territory management, but didn’t want to do CRM, I came up with an idea.  After a few weeks of fine tuning and screen design, we came up with a pretty slick design.
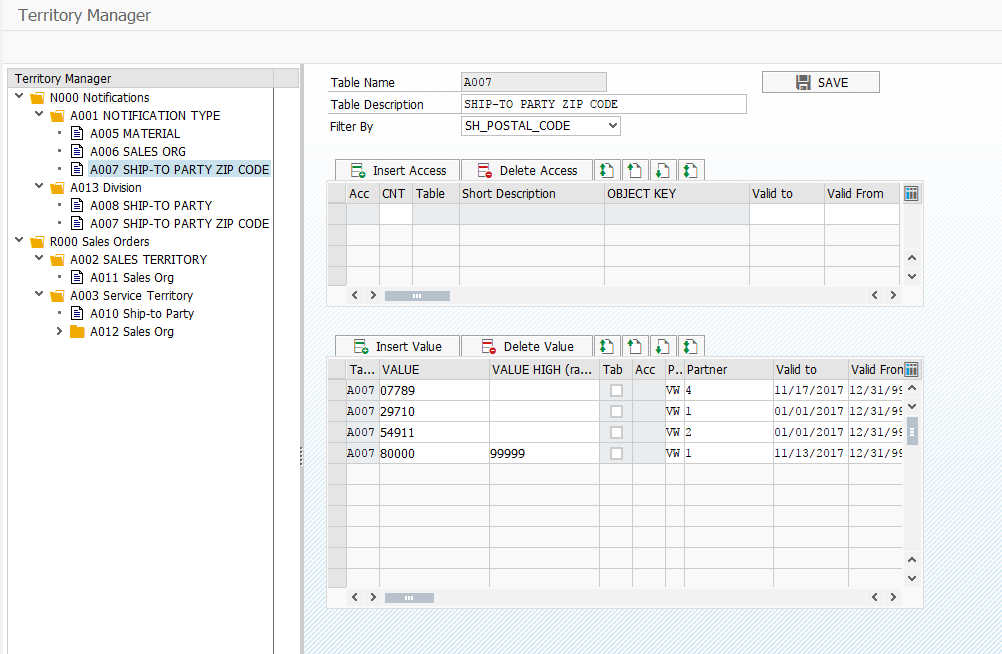
We wanted this to be as functional and open as we could.  So we built it into a folder structure.  Each level allows you to select one “Filter by”, which is your selection condition.  For Example, Table !001 above has entries for each different notification type.  Under that, we have 3 different tables (orders specifically, so you can choose what will be used first, second, last, etc).

A005 searching by specific materials.  If nothing is found, it moves to A006 which looks at specific sales orgs, and if nothing is found there it moves to A007 which looks at Ship to party zip codes.

You can build the structure with as few or as many tables as you want.  We have included one structure for service notifications, and another for sales orders.  This allows you to use the same tool to determine sales reps or service technicians and still maintain unique criteria for each.  All entries are controlled by a validity date, as well as change tracking.

As an added bonus, this is a built in option withing Renovation.  If you create or change a notification, you can have the technician determined automatically.

If you think this is something your organization could benefit from, please reach out.  I’d love the chance to demo it to you.

Thanks for reading,

Service Management – Master Warranty External Number Range

I recently wanted to add an external number range for the master warranty.  I struggled a bit because I forgot to look out for overlapping number ranges, but I’ll talk about that in a bit.  First, how to add a new number range (keep in mind, you screens may look slightly different depending on your version of ECC).

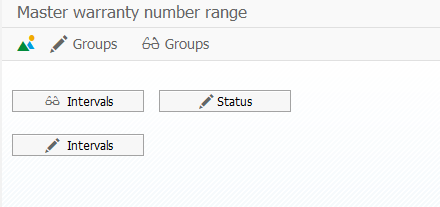
First, go to transaction BG00 (you can also get here in SPRO)

Press Edit Groups

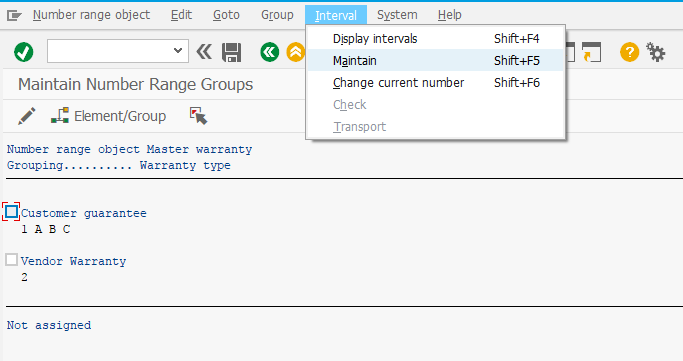
Once in here either press the Create button (shown in newer version) or using the menu:  Interval -> Maintain

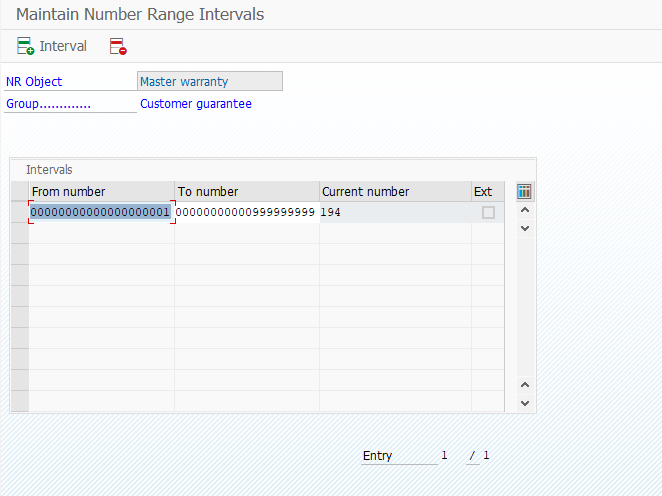
Add a new interval.

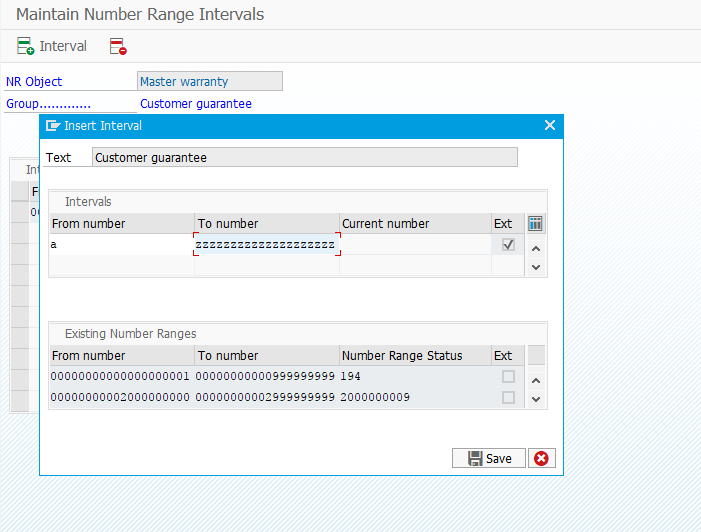
Enter in the start and end (be sure to press external if it isn’t defaulted).

A side note.  I kept trying to add AAAAAAAAAAAAAAAAAA to ZZZZZZZZZZZZZZZZZZ

Interestingly enough, this conflicts.  If you simply select A as your from and ZZZZZZZZZZZZZZZZZZ as your to, everything will be happy.

thanks for reading,

SAP – Territory Management in ECC?

I’ve had several asks in the past few months about doing territory management within ECC (NOT CRM).  I’ve done some digging and hunted around on the web, and aside and haven’t seen anything out there.  Here’s the concept.  A company has a group of technicians that may be region specific, some are product specific and others are assigned directly to some major customers.  The idea is that they need a flexible solution to be able to assign a technician to a notification, a sales order or a service order based on specific criteria.

Well, sitting around and doing some documentation today and an idea hit me.  I could build a territory management solution in ECC pretty easily.  But I wanted to put myself in check first.  First, is anyone even interested.  I think the answer is yes, as i have had 2 clients this past year both looking for something similar.  The other question is there already a nice solution out there?  I didn’t find one, but that’s where I thought I’d throw this out to the crowd.  Would anyone buy a territory management solution in ECC?  or is it easy enough to develop in-house.  I always like to think I have these revolutionary ideas…  but perhaps this would be a waste of time.

I’d love to hear your thoughts,
thanks for reading,

Service Management – Using the Install Base in ECC

In my travels, one of the things that companies are often looking for is an install base of their products.  It seems that the natural solution to this is using the SAP install base transactions.  After all, it is the perfect place to group things together.  You can group equipment, materials, even documents, functional location or other install bases.  So, why not use it?

Here are a couple of the major issues associated with using the Install Base within ECC.

  1. You can assign partners and partner functions.  This is standard in functional locations, but not in the install base.  A simple work around is using the external ID to become the partner number.  You would have to explicitly define your approach to say that there is an install base for each ship-to party, for example.  Not the end of the world, and this work around has been proven to work at multiple clients.
  2. There are no BAPI’s to install or dismantle components from the install base.  For this reason, I built that functionality into my Renovation product.
  3. There are no BAPI’s to create or change an install base header.  For this reason, I built that functionality into my Renovation product.
  4. There is no standard way to automatically update the install base when you ship out a new product, or receive a return of a product.  For this reason, I built that functionality into my Renovation product.  It usese a background job to collect all the specific material movements that should be tracked.
  5. There is no way to know if your end user has moved or got rid of products.  There is no fix for this.  Short of adding an IoT sensor to everything you sell, you will most likely never know what a customer does with your products.  It’s just something that will always be incomplete.
  6. Poor standard reporting.  Like many other areas of service, the reporting just doesn’t meet expectations.  This why I’ve  built a few additional reports into Renovation to make it easier to search install bases and quickly see all the products, along with warranty dates and other key information.

If you use the ECC install base today, I’d love to hear how you tackled some of these challenges.  If you would like to use the install base, but just see too many technical hurdles, let me know.  I’d love to show you what Renovation can do to help.

Thanks for reading,

Service Management – Equipment History and how to find it

I thought I’d do a post on serial number / Equipment history.  The serial number history is an amazing resource, but only if you use the serial number properly.  If you are using standard SAP, in your equipment record there is a tab called serdata.  This magical tab is by far my favorite on the equipment record.  it gives you the material, serial number, if it’s currently in stock and of course the history button:

Now this is a sample history of a single serial number.  This becomes invaluable because if you look at the legend that included in this screenshot, you’ll see a huge list of documents that will be shown in the history, but only if you add the serial number to them.

Some of the biggest culprits are the SD delivery, especially if you do in-house repairs.  if you don’t add the serial number to the inbound delivery, it won’t show up anywhere in the document chain.  You can manually add it to the SD repair sales order (using the menu extras->technical objects), then even the sales order will show it.  Now, keep in mind, your serial number profile will define where the serial number is allowed and where it is required.  I’ll be doing a post soon talking about the serial number profile to give you more details.  the important detail to take away from today’s post is that everywhere you can put a serial number you should.  If you include it in a document, it will show up in the history and give you a complete picture of everywhere the number has been used.

Thanks for reading,


Service Management – Resetting Equipment Status

In a previous post I talked about the equipment status.  This field can be very powerful, but at times, it’s very painful.  I have run into issues the status doesn’t get set or reset properly after certain transactions.  Today I want to talk about how to reset equipment status.

blog2-01

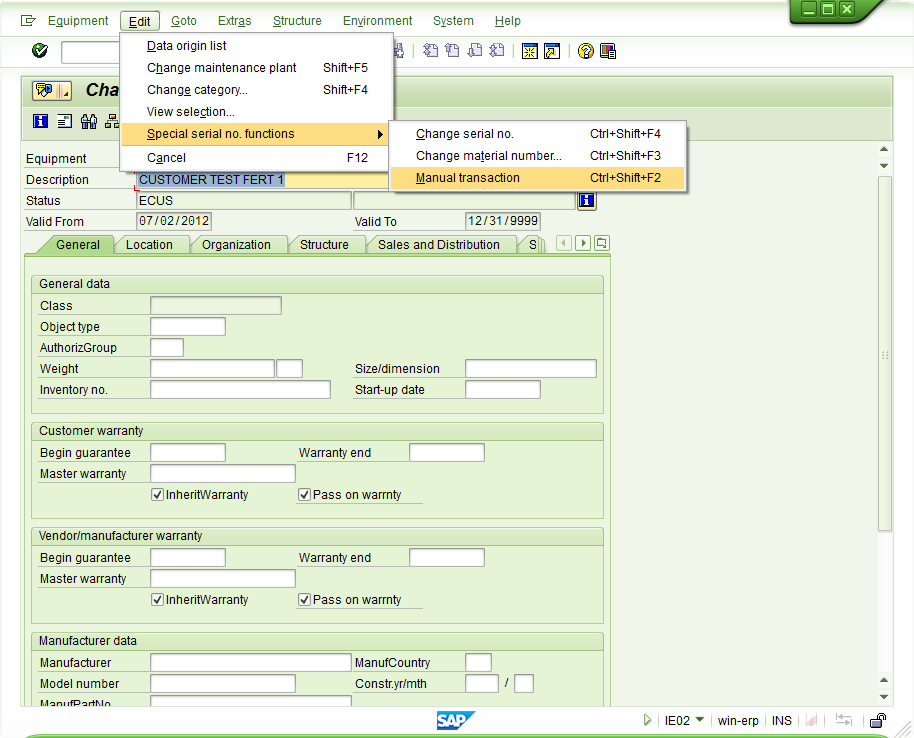
Once inside of the equipment record, edit–>special serial number functions –>manual transaction.  The manual transaction is the equivalent of the equipment status reset.  It allows you to force the status (remember, this won’t impact the stock)

blog2-02

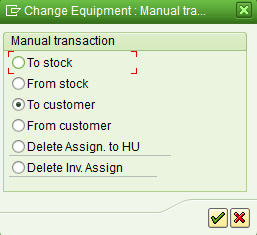
that will bring up this nice pop-up window that presents you with the following options:

To stock: ESTO
From Stock: add AVLBTo Customer: ECUS
From Customer: ESTO
Delete Assign to HU: Clears the handling unit
Delete Inv. Assign: clears inventory connection

Save, and should be able to continue with your transactions.
Good luck and thanks for reading.


Service Management – Equipment Hierarchy

I wanted to talk about something that is relatively simple, yet immensely cumbersome in practice.  That’s right, the equipment hierarchy.  When I say the equipment hierarchy, it may also be known as the equipment structure.  It is the process of linking serial numbers/equipment records into a structure or hierarchy.  The principal is very simple, and I’m going to walk through the process.  After the process, I’ll explain what makes it all so cumbersome (if you haven’t already experienced the pain).

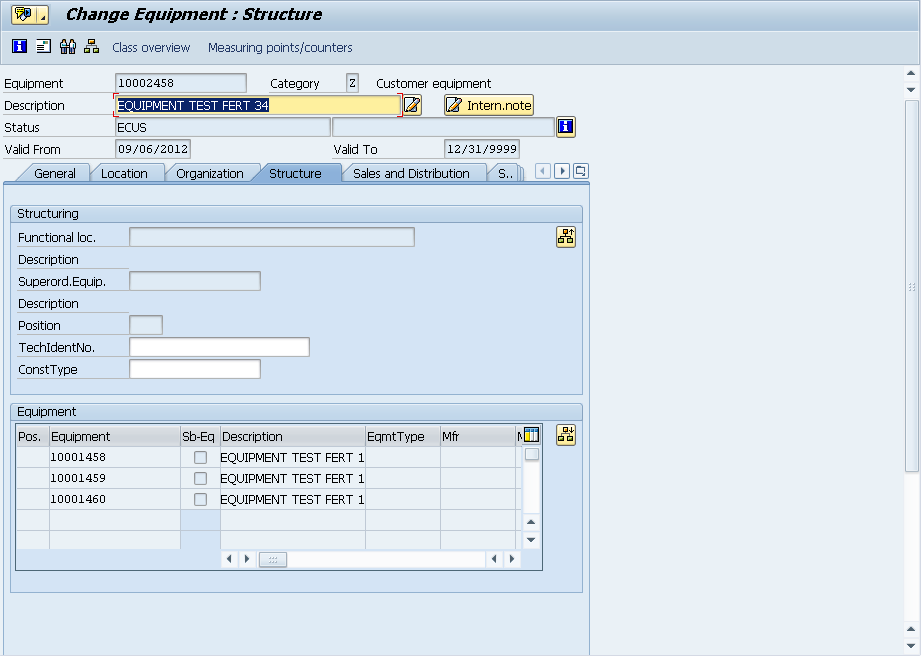
If you go into any equipment record and go to the structure tab.

blog-01

in the bottom portion, you’ll find the button:  blog-02 to structure the hierarchy.

blog-03

On this screen, you simply enter in each equipment record that belongs at this “level”.

blog-04

Now you can see that a structure exists.  If any of the equipment records in this list had their own equipment hierarchy, you’d see the Sb-Eq box checked.

Now at the top of the page, you’ll see the button:  blog-05  and it will bring up the entire structure report.

blog-06

My example was pretty simple, but it would also show functional locations, and would show the entire explosion.  So, pretty easy, right?

now, the problem comes into maintaining this.  Up to this point, I’m not aware of any automated way to capture the hierarchy.  Say for example, have a production order with the top level material being serialized, and you use several other serialized components to assemble it.  You must now manually create that structure (now make it worse, and say it’s a production order for 50, you have to repeat the process 50 times).  The issue becomes complicated because you may issue 50 serialized components to make 10 finished goods.  Which 5 items went into which finished product???  Without a high amount of diligence, it becomes highly manual and extremely difficult to maintain automatically.  I’ll be talking more in the future about some methods to begin capturing this information.

Thanks for reading,

Service Management – Populating Equipment Record Data

If you have dealt with service management, it’s likely this topic may be near and dear to your heart.  It is certainly a piece of functionality I have always looked for within SAP ECC.  What am I talking about?  The ability to set data within the equipment master.  Out of the box, the equipment master has limitless pieces of information that could be maintained within it.  The problem is that most of the information can only be maintained manually.  In the world of service, this becomes especially important because if the equipment record exists at the time of manufacturing, when you ship it to the customer, there is no integration to populate the partners, warranty data, and more.

After seeing too many projects that have needed this functionality and chosen to custom build it, I decided to add this functionality to Renovation.  I’ve nearly completed the first version of this tool.  I wanted to post this out there to get any feedback of functionality that might be the most useful to add for version 1.1.  And of course, to let you know that this exists, if you or your client could make use of it.

We have designed a program, that can be run in the background (most likely on a nightly basis).  Initially, the input is the Post Goods Issue date range.  This will allow you to look at all deliveries, PGI’d within a date range and update key data within the equipment record.

The data that will be updated is configurable (you choose what you want to update), but the list include:

  • Partner & Partner types from the sales order
  • Warranty start dates
  • Warranty End Dates or Master Warranties
  • Sales Area Data
  • Model Number
  • Planning Plant
  • Maintenance Plant
  • and more

In addition, I’ve included the option to set a user status for equipment that start upon installation.  This allows you to update everything except the warranty start date, and make it easy to locate the equipment records awaiting an installation date.

The configuration tables allow you to use the sales area, material number, product hierarchy and material group to set different values for each different scenario.  This means that even if different products or product families have different warranty rules, you can define those in a table using any or all of the criteria, and they will be automatically applied to the correct equipment records.

Some of the future idea I have to expand upon this:

  • Adding selection criteria to allow this to work as a mass change tool for equipment as well.
  • Additional fields for updating (extend to everything in the equipment BAPI).
  • Include Classification
  • Include Long Text

I’d love to hear your thoughts.  Thanks for reading,

Service Management – Using the Install Base

When it comes to using the install base within ECC, I certainly found some things I liked, and some things that were disappointing. So, let me tell you about my finding…

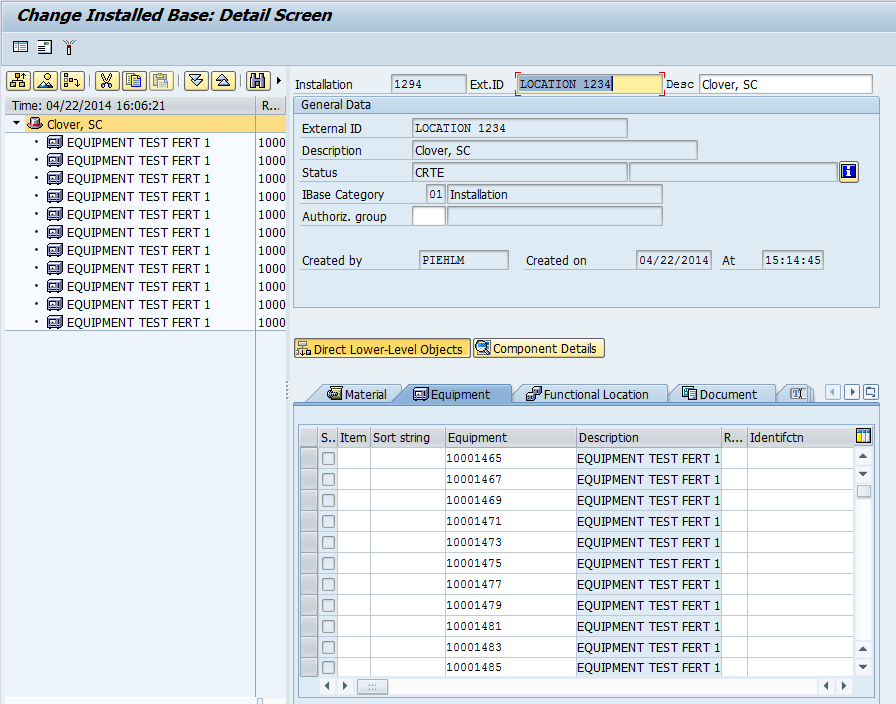
Transaction: IB51 allows you to create a standard installed base.  you select your type of IB and simply press enter.  Here is a sample screen shot of a quick IB that I put together.blog01-01

What I like is the ability to add most any type of object into the installed base.  I can add straight materials, equipment, functional locations, Documents, Text or even other Installed Bases.  Very cool, because it can truly be a repository of most anything you might have at a location.

Now, it got even a little more cool, when I looked at transaction IB61, this allows me to copy from a sales order or a production order and bring in the items automatically into the installed based.  A very handy tool.

Now, for the con of the Installed Base.  The number one thing I was missing was the ability to assign partners to the Installed Base.  I have become a big fan of attaching partners to equipment records, functional locations, notification etc…  suddenly not having that option left me feeling a bit naked.  You can assign a single address, and probably work some hokey methods to tie text to a partner number.  But why not just integrate the option.  Oh well.  It could be worse.  In addition, installed base does not fix the issue of having to manually maintain everything when something changes.  So, just like the serial number hierarchy within the equipment record or functional location, if you make any changes, you have to manually do the adjustment in the installed base.  The most common example I run into is that a customer sends back a piece of equipment and for one reason or another, a new unit is sent to the customer and the old number remains at the plant (or gets scrapped).  You must manually go into the installed base and make the swap if you want to keep things accurate.

Overall, it’s not bad functionality, if only I could assign partners to it.

Thanks for reading,

Service Management – Using Cost Element Groups

Now this is one of the few tricks that I’ve picked up when it comes to the finance portion of the world 🙂  And the only reason I care about this is because it simplifies my configuration for service order costing and also resource related billing.  The concept is called Cost Element Groups.  And they are exactly what they sound like, a group of cost elements.  Now, why do I care?  in both service order cost display and resource related billing, I can enter each cost element into the configuration, transport it, and call it good.  Now, when a new cost element is suddenly introduced, I now need to go back to my dev environment, make sure the cost element exists, then add it to my configuration again, and transport everything.  Cost Element Groups let this all be controlled through master data.  I connect the cost element group one time, and I’m covered for life.  so, let me show you how easy they are, and you can be the judge.

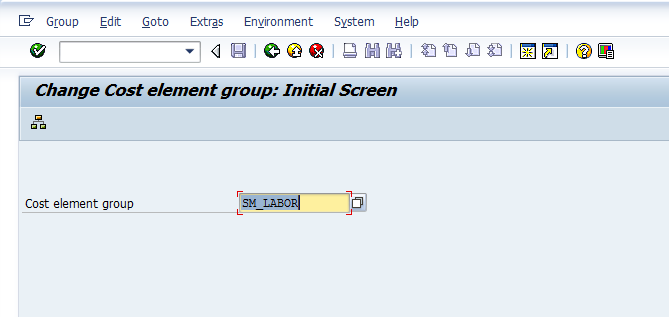
Everything starts with transaction KAH1/KAH2/KAH3.  Below, I’m showing you KAH2 for an existing cost element group, but it’s basically the same for any of the create/change/display transactions.

kah2-01

Enter in the name of the group and hit enter, or the hierarchy button.

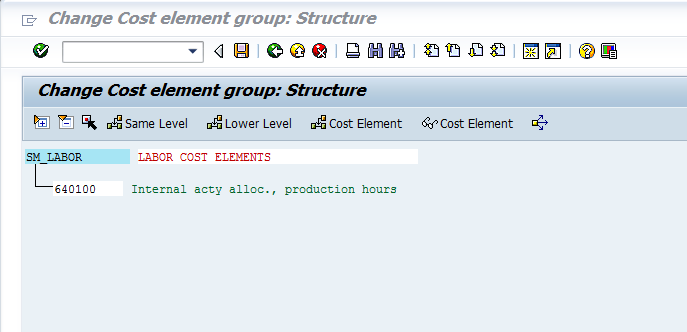
kah2-02

This will bring you to the above screen.  You can add or change the name of the group, then press the Cost Element button.

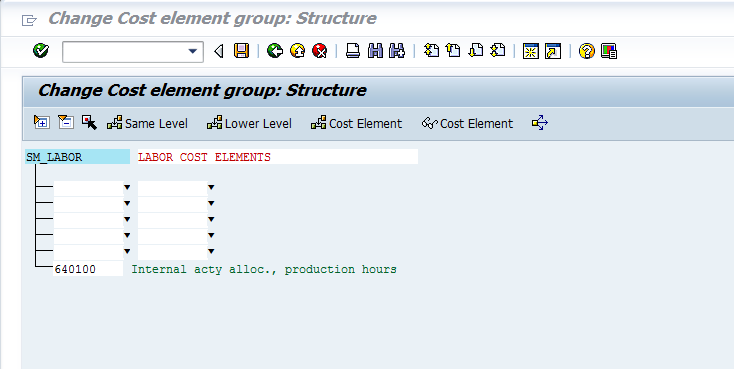
kah2-03

Once you press the button, you will see some new blanks show up.  You can either enter in individual cost elements (just enter the number in the left column) or you can do a range, by entering the start in the left and finish in the right.  Then it will show you all the cost elements that were located within the range.

Simply save, and you’re ready to go.  Now, you do need to remember to create this master data in every system you want to use it, but the flexibility is worth the master data effort.

Thanks for reading,