SAP

Home / Archive by category "SAP" (Page 38)

Basis – System License

I just discovered a very important, but very subtle thing.  SAP Hardware keys are case specific.  In order to use the system license, you need to enter it in correctly.

While to most of you, this doesn’t mean anything.  I just spent the last hour trying to get into the system I’ve spent the last month building.  I finally discovered that the license I created for the system had a lower case ‘W’.  The Hardware key used an upper case ‘W’.  UGH!!!  Anyway, as soon as I requested a new key, used the SAP* user to get back into the system, then used txn:  SLICENSE, installed the new file from SAP…  everything was great.  So, learn from me, hardware keys are case specific 🙂

I know this is a simple one, but take it from me, it can be important,

Thanks for reading,

Mike

Web Dynpro – Dynamically Changing the Web page Title

Well, as I begin digging into my first ABAP Web Dynpro program, I”m slowly starting to figure out what is going on.  Expect some posts on AWDP in the future, since it’s now becoming my latest hobby =)  Today’s challenge was dynamically changing the web page title.

tip number 1.  If you want to change the title of the web page, you know the title that shows up on the tab of Windows Explorer, you can’t do this dynamically until you have Netweaver 7.02 or later.  If you have at least this basis release, you can use the following command:

  wd_this->wd_get_api( )->get_component( )->get_application( )->set_window_title( wd_this->lv_title ).

Now the bad news is that if you don’t have 7.02 or later, you can only change it in the application description.

So, I just need to start tracking these little tidbits as I go.  As always, I’m learning things the hard way so you don’t have to.

Thanks for reading,

Mike

Service Management – Equipment Vs Functional Locations

I recently got a question on my linked-in account about the difference between Equipment Records & Functional Locations.  So I figured, what better way to answer it than to post it on the blog so everyone can see it :).  And it gives me an idea of what to write about, which some days is easier than others.  So equipment vs functional locations.

So, onto the question.  An Equipment Record and a Functional Location are very similar as far as SAP functionality.  They can both do pretty much all the same things, hold the same data etc.  The difference between these items is really more fundamental in terms of what they represent.

Equipment:  this is typically any piece of equipment, say an Iphone, a printer, a laptop.  They can be anywhere, with anyone etc.  Typically serialized, etc.

Functional Location: This is typically more of a permanent structure.  For example, this may be a punch press machine, a central office for your cable company etc.  A functional location is just that, a fixed location.  It can often contain equipment records (especially in the case of a central office, there may be racks, switching devices, fiber optic routers, etc.).  In my experience, I tend to see FL’s used much more in plant maintenance for items that are fixed in the plant.

If anyone cares to comment further, please add it to the post.

Thanks for reading, and please keep shooting me questions,

Mike

Variant Configuration – Using the Save Temporary

I’ve been spending a lot of time lately doing VC related stuff, which I’m sure you’ve guessed by my posts =)  My latest discovery has been the save temporary when you are inside of CU50 or a sales document.  This functionality allows you take a configuration you’ve entered, and copy the whole thing into another order, or another CU50 screen.  Rather handy, especially if you’re dealing with large models like I have been lately.

Now, the functionality is a bit temperamental, at least on the system that I’ve been working on, so if you haven’t used it before, here are something to keep in mind.

1.  When you save the configuration, I recommend going right back to display it.  Just to make sure it really saved a copy (I use the save as variation, so I can tell what I’m copying).

2.  After you create your saved configuration, save your quote or sales order.  It doesn’t seem to keep your saved copy, unless you save the document you were working in.

3.  Be sure the KMAT’s match, or you won’t see your saved configuration.

4.  I can’t really tell how long the saved configurations will last.  It seems to only stick around long enough to add it to a single document (now if you have multiple lines on a quote for example, you’ll be able to add it to all those lines).  But it seems that upon saving whatever you copied it to, the saved configuration is gone.  I guess that’s why it’s temporary 🙂

In any event, don’t be surprised if you need to go back to the original document you want to copy from multiple times before you get it “just right”.  And as always, if anyone can give me some better ideas of how to use this, please comment.  I love to learn new tricks 🙂
thanks for reading,

Mike

Variant Configuration – Using the Interface Design

Well, much of my consulting life has revolved around the Variant Configuration interface design functionality.  While, I’ll be the first to admit, that I am extremely happy it now exists (life was a lot uglier back in 3.0F when it wasn’t there).  I am very annoyed with the lack of functionality.  Take my current mission.  I’m working with a very large model (400+ characteristics) and i”m trying to arrange it into a more useful structure.  This can only be done with the interface design, especially since I’m using the class hierarchy to inherit cstics (I have at least 2-3 levels in every class).

So, what I’ve done is using a combination of tabs and sequence, I’ve arranged the cstics the way I want them.  This is great.  What sucks is that it took me a couple of days to do it.  Mainly because of some missing functionality.  Part of this post is a call for help if you know a better way to handle it :).

1.  There is no way to search for a specific characteristic when building the interface design.  You have to page through until you find it.
2.  When you get the cstics onto the design, you can only select and move one characteristic at a time.  this causes me headaches when I want to move 4 cstics a few pages up, I have to do them 1 at a time.

3.  if I’ve used a cstic in another interface design (like a tab for example), I still see the characteristic in my list for the sequence.  So I have to remember that it’s been used elsewhere.  Not the end of the world, but still a hassle.

One little thing I have found is that if you use the class hierarchy, the interface will at least list them by class (now the order you’ll have to figure out), but everything for one class will be listed, then the next class, and so on.

So, this has been my little venting on the interface design.  I hope someone can comment on something I missed 🙂

Thanks for reading.

Mike

Web Dynpro – Initial Challenges

Wow, I have to admit, I thought after going through a book and doing some exercises, I’d have no problem converting a BSP application to Web Dynpro.  Was I ever wrong!!!  The learning curve is steeper than I expected.  It is very different, and admittedly, I haven’t wrapped my head around all the concepts of how it works.  But, if you know me, you know that I just keep plugging till I figure it out =)

Initially, I set the goal of “simply” creating the initial login page.  Even that has been a challenge.  I haven’t quite figured out how I can layout a page the way I want.  For example, I’ll have a common header and footer for every page.  I found an application that seems to do just that (or close enough for my initial go-around), but digging through it to figure out what’s happening has been challenging.  I’ve been battling a cold as well, so that certainly makes my brain a little more foggy than usual, but I expected it would just fall into place…  well, not there yet, but I’m still hacking away.

Second was to recreate my navigation tree on the left side of the application.  This again is used for every single page, and pretty much drives the entire application.  This again I thought would be simple.  I did it in BSP, how hard could it be?  Well, pretty hard it turns out.  I’m working to understand the “Context” right now, which if I understand it correctly, is like variables, so my next mission is figure out how to populate the Context variables I created.  The funny thing is that once I grasp the Web Dynpro concepts, it should be a piece of cake because I’ll be able to reuse all of the ABAP methods I originally created for the BSP, just move the data to Web Dynpro…  This will be an ongoing post topic for me, so if you happen to be a Web Dynpro guru, and you recognize something, throw me a bone in the comments.  I’d really appreciate it.

Anyway, that’s all for today.  Thanks for reading,

Mike

ABAP – Using the SCREEN structure

lately in my development activities I’ve spent a lot of time developing screen.  One of the pieces of our latest product is a high end configuration screen to give the user as much control as they want for the final product.  Now as many of you know, I have no formal ABAP training, but it’s amazing what you can learn from books, the internet, and just good old trial and error.  Well, one of the things I’ve been using a lot is screens.  If you’re a developer, I’m sure this is old hat, but to me this has become invaluable.  In a previous post, I talk about how important it is to be consistent in naming your screen elements.  Today I’m going to step back and talk a little about the SCREEN structure.

For me, some of the big things I wanted to be able to dynamically control is if the element is visible in SE51 and if you can change it.  For this, there are simple fields in the SCREEN structure:

  • Invisible – setting this to 1 make the field disappear from the screen
  • input – setting this to 1 makes the field editable.

Now the big thing to remember is that if you are doing something dynamic, like I’ve done using tables to control the settings, you must lock the changes in.  Locking them in is very simple.  MODIFY SCREEN.  That simple statement, locks your changes in.  If you forget it, you’ll spend a lot of time being frustrated, wondering why the element isn’t behaving like you’re telling it to (believe me, I know this from experience.  ha ha ha).

Thanks for reading,

Mike

Configuration – Customizing SPRO to Add folders and nodes

A new trick that recently discovered, is that you can actually add your folders and nodes to SPRO.  While, to most people, this isn’t all that interesting, when you design software in SAP, what could make you look more professional than to have your section in configuration.

Like always, my blog is also my notebook, so if this isn’t for you, have no fear, I’ll get to something more relevant in the next couple of days =)

Txn: S_IMG_EXTENSION

Now, do a pull down on IMG Structure, and select the node that you want to add a folder underneath.  In my example, I’m going to add it to the top level.  And then you also need to select the Enhancement ID.
blog-01

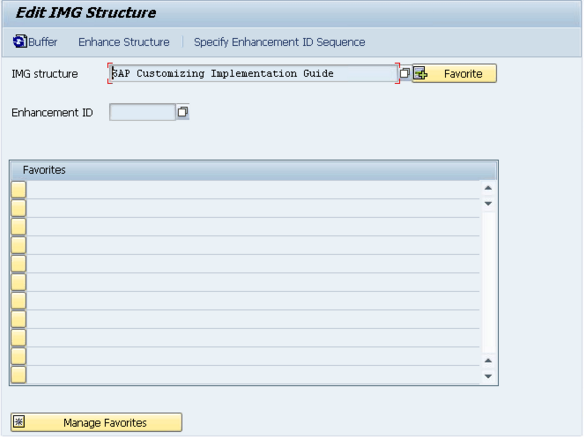
Pull down on Enhancement ID.
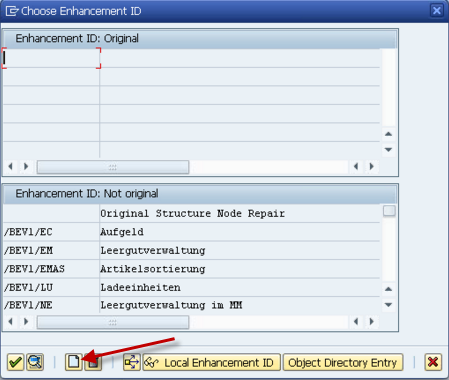
blog-02

Press Create
Enter in the namespace + description, and save it in a transport request (at least if you want to transport it anywhere).

blog-03
Press Enhance Structure Button

blog-04

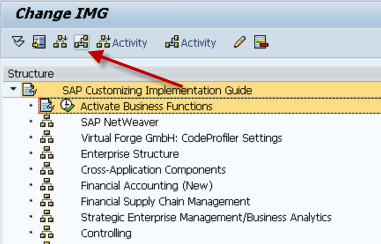
This will bring up the IMG screen.  Simply select the node that you would to insert your folder after.  Then press the button Shown above.

blog-05

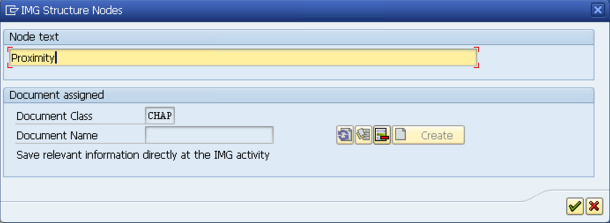
Give the folder a description

blog-06

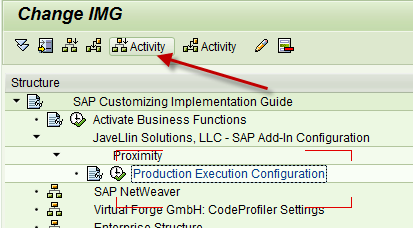
Next, you need to insert an activity.  In my example, I used 2 subfolders, and a transaction at the 3rd level.  Feel free to structure it anyway you like =)

blog-07

First, create the activity.  Give it an ID, and then a description.
Next up, create a document for the ID.  This will be the documentation that shows up alongside the activity node.
blog-08

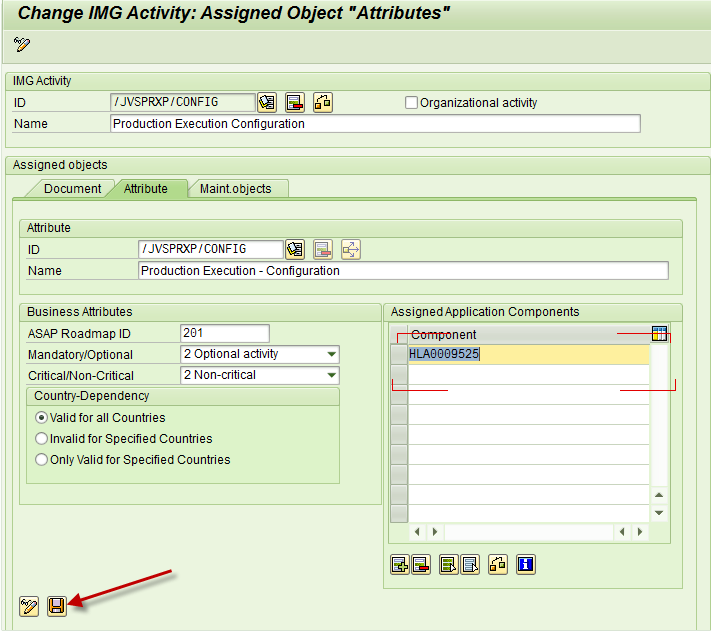
Next up, fill in the fields shown above, including the application component.  Take your best guess, or give it several options if it spans multiple areas.  Then save it on the button of the screen.

blog-09

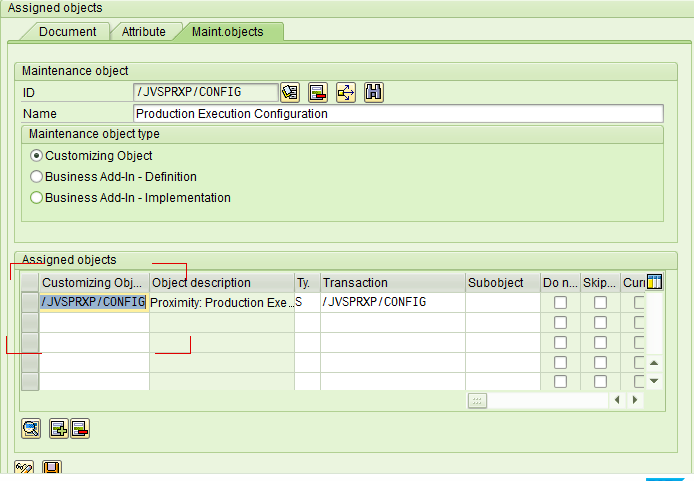
Finally go to the maintenance object tab.  This is where you assign the transaction to call.  One of the things to keep in mind, is that you must specifiy a table, and it must have a maintenance view generated for it (SM30).  Put the table into the customizing Object, give it a TYpe: S, and then enter in your transaction.

Save it on the bottom, save it on top.
Green arrow Back
Save once more.  You now have your IMG folder/transaction =)

Thanks for reading,

Mike

Service Management – Configuring the Repair Procedure

I know this can be considered cheating for a blog post, but not everyone knows that I also post on SDN.  This post is actually a good one about the SM repair procedure that I think is helpful, especially if there are any newbies to service out there looking for good info 🙂

http://scn.sap.com/people/michael.piehl/blog/2013/01/04/service-management–configuring-the-repair-procedure

Thanks for reading,

Mike

SAP Basis – Generating a System Key from Solution Manager

Hey Everybody, I’m trying my hardest to simply change the instance number on my ERP 6.0 system (I’ll talk more about that in another post), but one of the things I tried was doing a system copy (unfortunately that also is causing me headaches), but it reminded me of another little tip.  How do you get the system key from solution manager.  Obviously, step one is to have solution manager, or access to someone else that does (a solution manager system key doesn’t need to be connected to your system.  You can call up any Basis friend, give them a little info and get a key that will work).

Now, on with the show:

After executing T-code SMSY in Solution Manager system, you need to do the following steps:

Create a system by right clicking on System entry and select Create new system.
Enter the System Name i.e., SID (3 chars)
Product = SAP ECC (select from the list)
Product Version= ECC 5.0 (select from the list)
Save the entries.
Select Menu Item “System—>Other Configuration” and enter the SID which you have created earlier.
Enter the Server Name(hostname)
Finally click on Generate “Installation/Upgrade Key Button ”

The system generates a system Key ,copy that system Key and paste it in the SAPINST screen when it prompts for Sol man Key.

That’s it.  Pretty easy, but still required…

Have a great new years eve, and remember as the new budget cycle opens up, if you need help with anything, or have use for one of our SAP Easy Button’s please let us know.

Thanks,

MIke