SAP

Home / Archive by category "SAP" (Page 2)

SAP Personas – Unlocking a Flavor

I’ve recently been spending some time playing with Personas again.  I commonly get the error:

Flavor “X” is locked by user Mike Piehl (PIEHLM)

Which tends to happen after my browser seizes up and I’m forced to refresh the tab. After a quick search on-line, I found the following information:

1) Start transaction SM12

2) Enter /PERSONAS/FLAVOR as table name. Remove/Replace the default value in field “User name” in case another user locked the flavor.

3) Execute search and delete the Flavor lock on the following screen.

Thanks for reading,

SAP – Deleting a Package

Well, this turned out to be more time consuming than I expected.  I decided to finally move my dev system from an EHP4 box, to my EHP7 box.  Generally, not a big deal (or so I thought).  I cloned my existing EHP7 system so I’d have the latest notes, kernel and support packs.  The problem is that it also had all of my code.  The reason why this posed an issue is that I like to have a blank box I can implement my code into, just to be sure I didn’t forget any objects in my transports.

So, once I got the box cloned, and changed the instance number, I needed to go about deleting all of my code.  Most of it wasn’t difficult, but very tedious.  Where I ran into problems is when I deleted everything in SE80 associated with the package, but it still wouldn’t let me delete it.  UGH.  I finally found a post that helped me figure out how to do it.

https://archive.sap.com/discussions/thread/3407751

What this post describes is that in order to delete a package, it takes multiple transports.  First you need to release all the objects you deleted before you can delete the package.  In addition, not everything deletes cleanly (especially when dealing with Gateway Services and UI5).  I’m hoping this is just a factor of not having the latest updates, but who knows.

Anyway, I found that I needed to delete certain table entries (you can get these from the transport logs after releasing), and then repeat the process until you get everything.  Table TADIR is the key, if there are items connected here, you can’t delete the package.  Anyway, hope this might help you (or me) in the future.

thanks for reading,

SAP – Copy Control and Sales BOM Items

I did a post on this in the past, but I learned the hard way that I didn’t include enough details to easily replicate my solution.  So I’m going to cover it again.  Here is the concept.  If you have a sales order with a sales bom, you may want to push a single line item  from the sales BOM to a return order for example.  You don’t want to include all the other pieces, and you want to maintain the reference to original sales order line.

You will get the the error V2 104 – Item xxxxxx is a component of a bill of material so cannot be copied.

Well, the trick to this is maintained at the copy control in the header section.

You will need to create a new requirement (using VOFM, menu:  data Transfer -> Orders.

I created a new requirement, 951 in this example and I copied all the code from 051.

At the bottom of the new requirement, add the following code:

LOOP AT CVBAP.
IF CVBAPSTLNR NE SPACE.
CLEARCVBAPUEPOS,
CVBAPSTLNR,
CVBAPSTLTY,
CVBAPSTLKN,
CVBAPSTPOZ.
MODIFY CVBAP.
ENDIF.
ENDLOOP.

What this will do is ignore if anything is part of a BOM or not.  This requirement shouldn’t apply to everything, so that’s why you will need a new one to be used for return orders (and in my case, service contracts).

Thanks for reading,

Territory Management without CRM

I have to confess, I’m pretty excited about this.  After hearing multiple clients say they needed to do territory management, but didn’t want to do CRM, I came up with an idea.  After a few weeks of fine tuning and screen design, we came up with a pretty slick design.

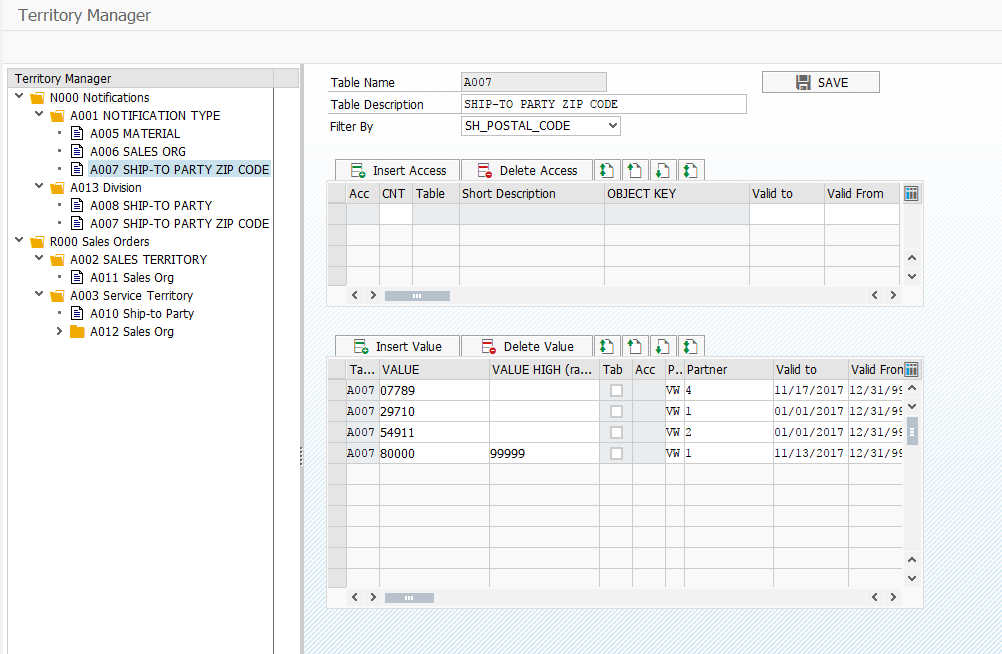
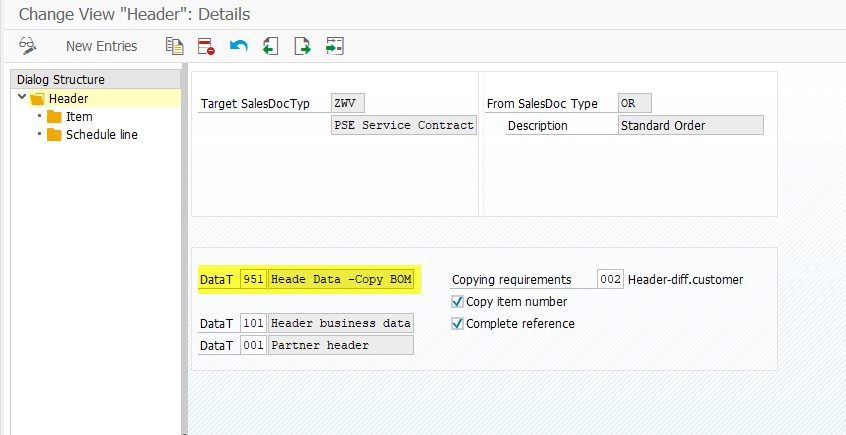
We wanted this to be as functional and open as we could.  So we built it into a folder structure.  Each level allows you to select one “Filter by”, which is your selection condition.  For Example, Table !001 above has entries for each different notification type.  Under that, we have 3 different tables (orders specifically, so you can choose what will be used first, second, last, etc).

A005 searching by specific materials.  If nothing is found, it moves to A006 which looks at specific sales orgs, and if nothing is found there it moves to A007 which looks at Ship to party zip codes.

You can build the structure with as few or as many tables as you want.  We have included one structure for service notifications, and another for sales orders.  This allows you to use the same tool to determine sales reps or service technicians and still maintain unique criteria for each.  All entries are controlled by a validity date, as well as change tracking.

As an added bonus, this is a built in option withing Renovation.  If you create or change a notification, you can have the technician determined automatically.

If you think this is something your organization could benefit from, please reach out.  I’d love the chance to demo it to you.

Thanks for reading,

ABAP – Screen Design – adding a checkbox to a table control

So while building my new territory manager, I ran into a small piece that I forgot about.  Adding a checkbox to a table control.  Turns out, it’s pretty easy, but not exactly intuitive.  So, make sure you have a character based column, that is only 1 char in length.  Once you have that, you can do the following.

Right click on the column, select convert->checkbox-> either left or Right button.

it will then convert your character column to a checkbox.

Thanks for reading,

Service Management – Master Warranty External Number Range

I recently wanted to add an external number range for the master warranty.  I struggled a bit because I forgot to look out for overlapping number ranges, but I’ll talk about that in a bit.  First, how to add a new number range (keep in mind, you screens may look slightly different depending on your version of ECC).

First, go to transaction BG00 (you can also get here in SPRO)

Press Edit Groups

Once in here either press the Create button (shown in newer version) or using the menu:  Interval -> Maintain

Add a new interval.

Enter in the start and end (be sure to press external if it isn’t defaulted).

A side note.  I kept trying to add AAAAAAAAAAAAAAAAAA to ZZZZZZZZZZZZZZZZZZ

Interestingly enough, this conflicts.  If you simply select A as your from and ZZZZZZZZZZZZZZZZZZ as your to, everything will be happy.

thanks for reading,

SAP – Territory Management in ECC?

I’ve had several asks in the past few months about doing territory management within ECC (NOT CRM).  I’ve done some digging and hunted around on the web, and aside and haven’t seen anything out there.  Here’s the concept.  A company has a group of technicians that may be region specific, some are product specific and others are assigned directly to some major customers.  The idea is that they need a flexible solution to be able to assign a technician to a notification, a sales order or a service order based on specific criteria.

Well, sitting around and doing some documentation today and an idea hit me.  I could build a territory management solution in ECC pretty easily.  But I wanted to put myself in check first.  First, is anyone even interested.  I think the answer is yes, as i have had 2 clients this past year both looking for something similar.  The other question is there already a nice solution out there?  I didn’t find one, but that’s where I thought I’d throw this out to the crowd.  Would anyone buy a territory management solution in ECC?  or is it easy enough to develop in-house.  I always like to think I have these revolutionary ideas…  but perhaps this would be a waste of time.

I’d love to hear your thoughts,
thanks for reading,

UI5: Refresh sap.m.table when using JSON Model

This was a little command that had me stumped for while.  Like I mentioned in my previous posts, I was building a detail screen.  I had the data, and I dynamically built a table and I was able to bind it and get my model displaying in it.  Seemed like I was home free.  However, when I would back out and select another entry in my table to see the details, my tables were not refreshing.  They continued to show the same data, over and over again.  I searched the blogs and finally figured out what I was missing.


list.getModel().destroy();

list.bindAggregation(“items”, “/”, colIt);

list.setModel(oModelTab);

I needed to perform these 3 commands (I was missing the destroy for a while).

List is my table, colIt was my column list item that I created earlier.  Once I executed all three of these commands, my table is refreshing exactly like I needed.

Thanks for reading,

UI5: OData read parameters

This one was fun…  Like I mentioned yesterday, I was calling a separate OData service for my details.  Because the list could be long, I didn’t want to call this service for every item on the list.  Instead I chose to run it on-demand.  The trick was that I needed to be creative in my call of this service.  It had multiple expands, a filter and of course I didn’t want it to display the detail page until the service was complete.  So, here is what I did:

var mParameters = { var mParameters = {
filters: oFilters,
urlParameters: {
“$expand”: “Exp1,Exp2,Exp3…,Expn” },
success: function(oData, oResponse) {
oNotDet.setData(oData);
oView.setBusy(false);
sap.ui.getCore().setModel(oNotDet, “notdet”);
var bReplace = Device.system.phone ? false : true;
that.getRouter().navTo(“object”, {
objectId: oItem.getBindingContext().getProperty(“Qmnum”)
}, bReplace);
},
error: function(oError) {
jQuery.sap.log.info(“Odata Error occured”);
oView.setBusy(false);
}
};
oView.setBusy(true);
oModel.read(“NotHdr”, mParameters);

The big things to notice here:

Populate your filters before adding them to the parameters (this just makes it cleaner)
Enter in your urlParameters
Success function will navigate to the new view.  This makes sure the data has been received before the new view is displayed.  In my case this was required because the fields displayed were dependent on the data of the detail service.
Finally, I set the view to busy before calling the read statement, then the sucess/failure will change the setBusy to false.

Hope this is useful.  Thanks for reading,

UI5: Setting a different model within a view

Here was my scenario: I had a UI5 table that called a model.  The model had a list of notifications along with some additional information.  If you click on one of the lines, it would bring up another view, that showed all the details of the model.  The OData service for the details was a different call than for the table.  So for the new view, I needed to set a new model.  I was able to pull the data into my view within the components, but making it available on the XML was another story.  Here is what I finally did:

  1. On the detail view I added the following to a routine that gets called every visit to the view (do not put this in OnInit, or it will only be called the first time).
    1. var oViewModel = sap.ui.getCore().getModel(“notdet”);
    2. this.setModel(oViewModel);
  2. Then in the XML, I was able to use the following syntax:  {/results/0/NotifNo}
    1. for me, it was treated like an array with only one value coming back.  so I explicitly set it to 0.

I hope this can save some headaches for someone else.  I won’t soon be forgetting this.

Thanks for reading,