ABAP Coding

Home / SAP / Archive by category "ABAP Coding" (Page 7)

ABAP – SIMGH for IMG Cleanup

Well, recently, I was doing some prep work/clean up for my upcoming Field Service Engineer Web application.  I intend to reuse as much code as possible from my Rapier application.  In the course of my cleanup, I ran into an issue.  I had created some custom IMG nodes in configuration, and subsequently deleted them in order to clean up some of my export packages.  Well, short story, deleting the nodes didn’t delete all of the underlying pieces.  One of my tables was showing a where used for the IMG node that was already deleted, so I need to use SIMGH for IMG cleanup.

What I found is that since deleting the node didn’t delete the underlying pieces, the only alternative was to find those pieces individually, and delete them.  Transaction SIMGH did for me what S_IMG_EXTENSION couldn’t.  You see, I did all of my creation and deletion using S_IMG_EXTENSION, and for some reason, S_IMG_EXTENSION doesn’t properly clean up after itself.  So my word of warning is that if create your own custom IMG nodes using S_IMG_EXTENSION, be careful if you do any deletions, and be sure to use SIMGH to validate your work.

Thanks for reading,


ABAP – Screen Design with Too Many Elements

I recently ran into this while designing a configuration screen for our Proximity application.  This is something that I didn’t find anything about online, so either I looked in the wrong place, or maybe I’m the only one crazy enough to try this :).  Anyway, in the course of screen design I have a rather large subscreen, that contains a lot of radio buttons, a couple table controls and bunch of input fields.  You get the idea.  Well, as I was nearing the end of the screen, I start seeing some strange behavior, so that’s what I wanted to talk about today.  So if you’re designing a large screen and you see anything strange, keep this post in mind.  Now, keep in mind, this is my SAP ERP 6.0 SR3 system and I don’t have the latest basis release, so this might be something I could fix through basis, but who knows.

1.  RUNT_ILLEGAL_SWITCH short dump.  It’s interesting because the screen compiles just fine, but as soon as you go to execute the screen you see this dump.

2.  Radio button groups start asking strangely.  What I started seeing is that my radio button group that was set to include 2 or 4 buttons, suddenly is grouped around another set of radio buttons, 20 lines above this one (that’s how I can tell it wasn’t just my fat fingers) ha ha ha.

3.  Really long compile times.  If your subscreen starts taking around a minute or longer to compile, this might be another clue that your screen is getting too big.

4.  Your elements just start behaving strangely.  I ran into my table controls suddenly stopped scrolling.  It was populated, but I could only get to the first page.  This one drove me nuts for a couple hours last night.

If you see any of these suddenly start happening, go ahead and just remove a chunk of elements.  The trick that I use is that I “Cut” them out of the screen (leave them in memory) and then compile.  If things start working again, you have too many elements.  So then I paste the elements back in and narrow down how many elements are driving it over the edge.  You really have 2 options, 1 just strip out enough fields that everything will compile properly again or you will have to create another tab/screen/subscreen to handle a chunk of the elements so that you can simplify.

if anyone else has seen this, let me know, I’d be curious, and also if you found any other ways to correct the issue.  As always, I hope this helps.


ABAP – Call transaction and skip first screen tricks

Well, in my current development tasks, I’m really pushing to reuse code in more and more of my applications.  You know, that whole object oriented approach that should be standard for everything =)  Well, one of the tricks I discovered lately is that if you can do a  call transaction and skip first screen from within an application.

It’s great, SAP even provides a statement that allows you to do this.  However, what I found is that there are limitations, as well as some “unforeseen” behaviors that result from using this statement.  So here’s what you need to know.
If you are using a custom transaction, in the “first” screen, you need to make sure that the “Next Screen” on the attributes tab points to another screen number.  Sounds easy enough, but what I discovered is that using this next screen has some weird impacts on running the transaction normally.  For example, my custom transaction has all of the controls in the PAI/PBO code to tell it what to do next.  When I manually pointed to another screen, suddenly my PAI behavior changed.  When I hit enter it moved to the next screen.  My original coding required pressing execute.  While this isn’t the end of world, when I was green arrowed out of the results screen it now left my transaction, instead of returning to the first screen.  This behavior was certainly unacceptable for the flow I wanted.

OK…  how do you get past this.  I took a very easy approach, and let me know out there if there is a better way to handle it.  I created a new screen (a copy of my first screen, and this time I changed the “Next Screen”)  I didn’t change anything else.  Then I created a new transaction code that started from the new screen.  So now I have 2 different transactions.  1 for on-line users, 1 to be called from a program.  This worked perfect for me, but of course it is extra data, that to me seems unneeded.

Thanks for reading, and I hope this can help you…


ABAP – SELECT Statement with a variable table name

I just figured out a cool trick last night, and this may be old hat to a lot of you.  I was working on the latest piece of Proximity, and I wanted to be able to re-use my code, but each place would call it’s own custom transparent table.  The structures were the same, so it was an easy change.  Well, turns out it was a pretty easy trick.  You can create a Select statement with a variable table name.  Check it out the specific details below.

DATA: L_TABNAME TYPE DD02L-TABNAME.
L_TABNAME = ‘Z_TABLE’.

        select single * from (L_TABNAME) into z_wa
where field  = field.

That’s it.  Again, a trick I could’ve used a long time ago, but finally did the research last night to implement it.  Hope you find this handy.


Web Dynpro – Challenges with Centering an Embedded View

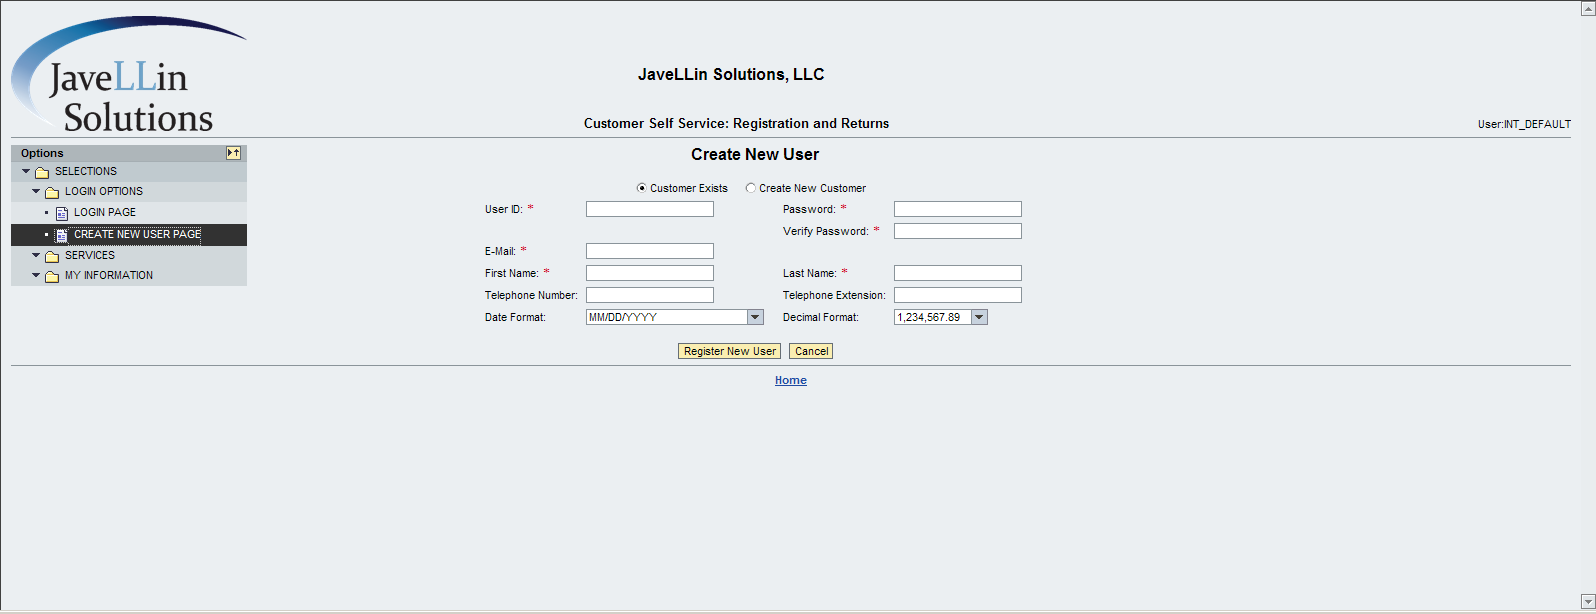
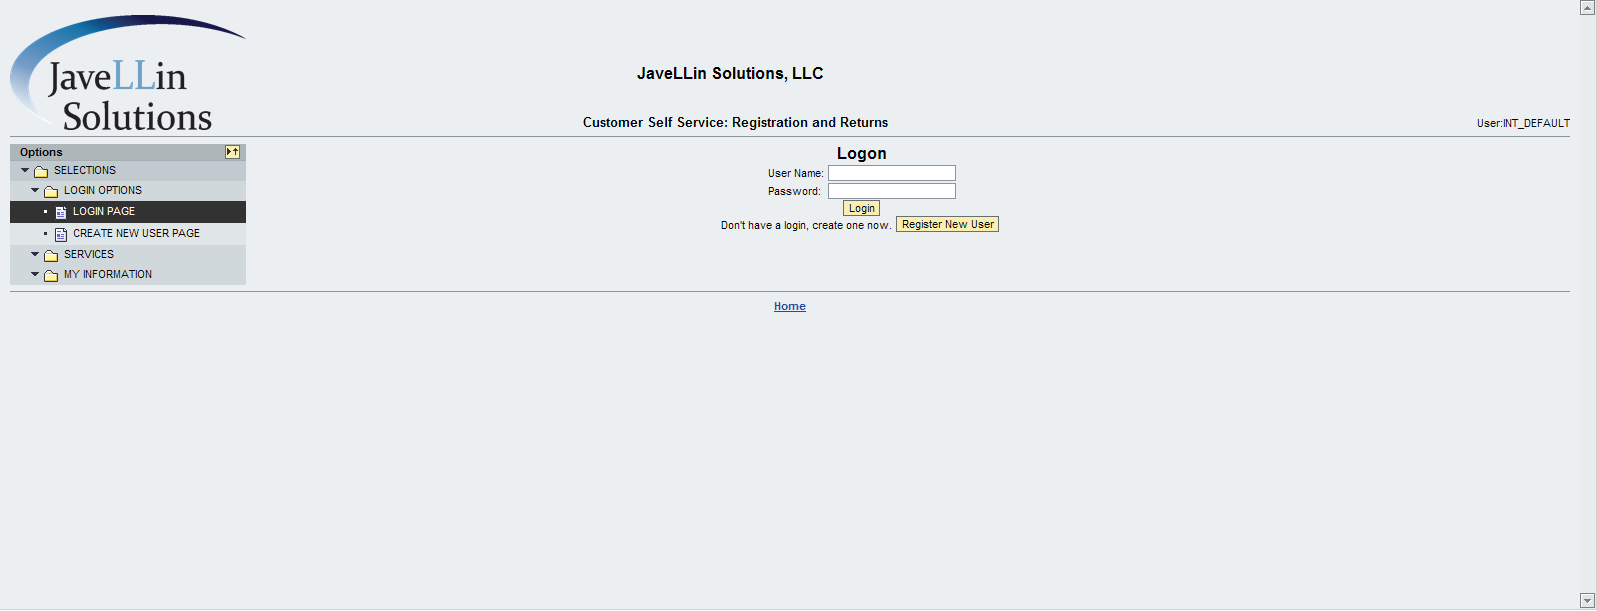
Well, I spent way too much time trying to get this working just right, and I finally had to set it aside.  Maybe one of my great readers might be able to shed some clues on what I’m doing wrong, or perhaps you have the same issue 🙂  Anyway, I have redone my Rapier Application into ABAP Web Dynpro, and I really like the results.  The only problem is that when my browser is maximized, I can see that my embedded view isn’t centered properly on the screen.  It’s not a huge amount that it’s off, but enough to be noticeable.  What makes it even more maddening is that is seems to be related to whether the embedded view has one or 2 columns of data.  I can see a much greater shift if there’s only a single column…  Take a look…

blog-awdp layout-01

Now, I’m dynamically creating the elements in 2 columns.  The 2 columns will always be there.  I’m just generating what items show up and where in each column.  I mention that because the columns themselves are not dynamic…


blog-awdp layout-02

Now this one isn’t being generated dynamically, and it only has a single column of data to enter.  Not sure if either of these factors have to do with my issue, but you can see how the Login page is shifted further right than the create new user page.

Now, here’s some of the things I’ve tried… (and using this combination is what got me the closest to what I want…  but still room for improvement)

Main View (contains embedded views)
I have a transparent container with 2 subitems.  1 tree,1 view container.  It uses the gridlayout, and has 2 columns, I’m stretching it horizontally.  Layout-halign = beginofline.

Next, my view container underneath it spans 1 column and has the h-align = beginofline.

Next, the views.  I’ve made a point to set them all up the same way (especially these 2 that I’ve been using as my test case to get them both centered in the same spot).
In the RootUIElementContainer, is set to a single column and is NOT stretched horizontally.
For each of the elements below, I have both the element and layout for horizontal to be centered.  When I look at the screen, it looks exactly how I want it.  so it seems like the views are fine.  I just want this view to be centered on the open area in my screen.

So…  after all of that…  any ideas out there that I should try to see if I can get these centered?  or is this a limitation of AWDP?  I appreciate any help you might be able to lend me here 🙂


Web Dynpro – Dynamic Drop Down Lists

Now as promised, creating the dynamic drop down lists.  I mostly skipped these in my previous post just because there are some extra steps, and rather than cram everything together, it seemed like a good point to break it up.  Keep in mind, the concept is the same as my previous post, only for a dropdown list, you need to build the list as well.   (See my previous post for all of the other data declarations).

Hope you find this useful, and as always, if you have a better way to do it, please let  me know. J

DATA LV_BIND_DROP TYPE STRING.
*** check for dropdown fields
dyn_children = rootnode_info->get_child_nodes( ).
READ TABLE dyn_children with key name = field TRANSPORTING NO FIELDS.
CHECK sy-subrc <> 0.
* create sub node of structure (tablename)
* I created a tabletype/structure for DROPDOWNNODE.  If has fields of Key &

* value
cl_wd_dynamic_tool=>create_nodeinfo_from_struct(
parent_info = rootnode_info
node_name = dyn_attr_info-name
structure_name = ‘DROPDOWNNODE’
is_multiple = abap_true ).
*** the On_enter is only if you want something to happen when a value

*** is selected.  I used it to set another context variable.
CONCATENATE LV_BIND ‘.VALUE’ INTO LV_BIND_DROP.
CALL METHOD cl_wd_dropdown_by_idx=>new_dropdown_by_idx
EXPORTING
bind_texts = lv_bind_drop
id         = lv_bind
state      = lv_state
on_Select  = ‘ON_ENTER’
RECEIVING
control    = lr_drop.

*** first, build up the list any way you want and put it into a table with

*** 2 columns, 1 key, 1 value
lo_nd_app->bind_table(
new_items            =  value_list
set_initial_elements = abap_true ).

*** if you want to specifically set a value for the dropdown in advance, here

*** just use this.  The tabix is for the value_list you populated.

lo_nd_app->set_lead_selection_index( sy-tabix ).

Web Dynpro – Dynamically adding Screen Elements

Now, one of the big things I needed for Rapier is to have the screens be completely configurable.  In BSP, this accomplished mostly in the page fragments by doing some looping.  This concept doesn’t exist in ABAP Web Dynpro, so I needed to learn how to do it in Web Dynpro.  Here’s what I learned for dynamically adding screen elements to web dynpro view…

First and foremost, if you want to make dynamic elements in a view, you need to have an attribute to go along with it.  As I use Web Dynpro more and more, this is becoming clear to me why.  The easiest way to get a value onto a screen is using a bound attribute.  So you have 2 choices.  You can create every possible attribute in your view, and use some logic to call the correct one, or you can dynamically create the attributes you need.  While either option “could” work for me, I chose to do this dynamically.  Based on future testing/performance, I may change in the future, but regardless, a fun trick J  Once you have the attribute, you can create the element.  In my case, I needed 2 elements.  A label and something else (input field, longtext, etc…).  The process is same for either one.

Some of the groundwork for this.  I’m using matrixlayout to control the transparent container all of these elements are being put in. I’m skipping dropdowns for this post.  I’ll talk more about those in a separate post.  I’ve done my best to leave the data declarations in here, so you have something that is pretty close to working right here 🙂

It’s funny looking back, it’s not much code for as long as it took me to figure it out.  Ha ha ha.

DATA : rootnode_info TYPE REF TO if_wd_context_node_info,
dyn_node_info TYPE REF TO if_wd_context_node_info,
dyn_node TYPE REF TO if_wd_context_node,
dyn_attributes type WDR_CONTEXT_ATTR_INFO_MAP,
dyn_children TYPE WDR_CONTEXT_CHILD_INFO_MAP.
DATA : dyn_attr_info TYPE wdr_context_attribute_info.
DATA lr_container TYPE REF TO cl_wd_uielement_container.
DATA lr_input TYPE REF TO cl_wd_input_field.
DATA lr_check TYPE REF TO cl_wd_checkbox.
DATA lr_longtext TYPE REF TO cl_wd_text_edit.
DATA lr_drop TYPE REF TO cl_wd_dropdown_by_idx.
DATA lr_label TYPE REF TO cl_wd_label.
DATA lr_invisible TYPE REF TO cl_wd_invisible_element.
DATA lr_table TYPE REF TO cl_wd_table.
DATA lo_nd_sflight TYPE REF TO if_wd_context_node.
DATA lr_button TYPE REF TO cl_wd_button.
DATA lr_grid_data TYPE REF TO cl_wd_grid_data.
DATA lr_flow_data TYPE REF TO cl_wd_flow_data.
DATA lr_matrix_hd TYPE REF TO cl_wd_matrix_head_data.
DATA lr_matrix TYPE REF TO cl_wd_matrix_data.
DATA LV_BIND TYPE STRING.
DATA LV_bind_row TYPE STRING.
DATA lv_state(2) TYPE n.
DATA lv_pwd TYPE wdy_boolean.
DATA lv_label TYPE string.
DATA lo_el_context TYPE REF TO if_wd_context_element.
DATA ls_context TYPE wd_this->Element_context.

lo_el_context = wd_context->get_element( ).

*This will create a attribute at run time…
dyn_attr_info-name = field.
rootnode_info = wd_context->get_node_info( ).
dyn_attributes = rootnode_info->get_attributes( ).

* Check to make sure the attribute doesn’t already exist
READ TABLE dyn_attributes with key name = field TRANSPORTING NO FIELDS.
CHECK sy-subrc <> 0.

CALL METHOD rootnode_info->add_attribute( EXPORTING attribute_info = dyn_attr_info ).

*For Dynamically creating Input Field
*Note : Before that change the Layout of ROOTUIELEMENTCONTAINER to MATRIX LAYOUT
lr_container ?= l_view->get_element( CONTAINER ).
lv_bind = field.

case type.
when ‘TEXT’ OR ‘TIME’ or ‘DATE’.
CALL METHOD cl_wd_input_field=>new_input_field
EXPORTING
bind_value = lv_bind
id         = lv_bind
state      = lv_state
on_enter   = ‘ON_ENTER’
RECEIVING
control    = lr_input.
when ‘CHECK’.
CALL METHOD cl_wd_checkbox=>new_checkbox
EXPORTING
bind_checked = lv_bind
id         = lv_bind
state      = lv_state
RECEIVING
control    = lr_check.
when ‘LONGTEXT’.
CALL METHOD cl_wd_text_edit=>new_text_edit
EXPORTING
bind_value = lv_bind
bind_rows  = lv_bind_row
id         = lv_bind
state      = lv_state
RECEIVING
control    = lr_longtext.
ENDCASE.
CALL METHOD cl_wd_label=>new_label
EXPORTING
label_for = lv_bind
text      = lv_label
RECEIVING
control   = lr_label.

*** once the elements are created, they must assigned to the screen as either
*** a matrix head data or matrix data (head starts a new line)
lr_matrix_hd = cl_wd_matrix_head_data=>new_matrix_head_data( lr_label ).
lr_matrix_hd->set_v_align( ’01’ ).
lr_label->set_layout_data( lr_matrix_hd ).
CALL METHOD lr_container->add_child( lr_label ).
case wa_configrma-type.
when ‘TEXT’ OR ‘TIME’ or ‘DATE’.
lr_matrix = cl_wd_matrix_data=>new_matrix_data( lr_input ).
lr_input->set_layout_data( lr_matrix ).
CALL METHOD lr_container->add_child( lr_input ).
when ‘CHECK’.
lr_matrix = cl_wd_matrix_data=>new_matrix_data( lr_check ).
lr_check->set_layout_data( lr_matrix ).
CALL METHOD lr_container->add_child( lr_check ).
when ‘LONGTEXT’.
lr_matrix = cl_wd_matrix_data=>new_matrix_data( lr_longtext ).
lr_longtext->set_layout_data( lr_matrix ).
CALL METHOD lr_container->add_child( lr_longtext ).
ENDCASE.

Web Dynpro – Creating a Radio Button

Well, I’m stilling hanging out in Web Dynpro land.  I found a new enhancement that Rapier 1.0 really needed.  So here I am again.  This time I had to focus on creating a radio button, because I wanted a customer to be able to select either an existing customer, or create a new one.  IN my brain, a radio button was a nice easy solution…  right???  As always, things are more complicated than I expected.  ha ha ha.  Well, here’s how it works.

You’ll need a context element that will hold the texts for the radio buttons.  This will dynamically determine the number of radio buttons displayed.  To make it work, you’ll need a node and an attribute.  The attribute should just be a string.  Be sure to add a supply function to the node.  This is how the texts will get populated.  See below for the code.

In the layout, create yourself a new element.  I used the RadioButtonGroupByIndex element.  I had a very defined set of values (for this example, 2) so that made life nice an easy.  Inside the element, you need to set a few things…  First, ColCount, this is the number of columns that will be used to display the radiobutton.  Second, texts…  this is a table that contains the texts.  Use the context node you created above.  Third, you’ll want an action for on select.  This will determine what happens when you select a radio button.

Now for some code.  First, you’ll need to populate the radio button text.  In the supply function you assigned in the context node, add something like the following code.

data : it type table of if_v_rp_user_create=>element_cust_method,
wa like line of it.
DATA lo_nd_app TYPE REF TO if_wd_context_node.

wa-text = ‘radio 1’.
append wa to it.
wa-text = ‘radio 2’.
append wa to it.
node->bind_table( it ).

So, those are the basic…

ABAP: Eliminating Errors by using exception ERROR_MESSAGE

I have to thank Jeremy Meier for this post.  I have to confess, I’m pretty excited to have my first guest post, so I just wanted to preface his post with a hearty thank you 🙂  The exception ERROR_MESSAGE is a technique I was unfamiliar with until Jer sent this to me.

I discovered this for one of our developers today – he was getting errors in using a standard SAP function module to get material requirements data from an MD04 function module for a report he was writing.  The code was calling a standard message when it hit a rare error check in the code”

if xyz <> abc.
MESSAGE ID ‘123’ TYPE ‘E’ NUMBER sy-msgno WITH sy-msgv1 sy-msgv2 sy-msgv3 sy-msgv4.
endif.

As this is used in MD04, it’s meant to throw the message to the screen – but when he tried to embed this function module in his Z-Report and ran it on a specific material number it caused an error to occur on the expected automated file download to excel to fail.

After looking for the right TRY-CATCH statement – which wouldn’t actully work because there was no “exception” or dump – the solution after digging a bit was to include the exception ERROR_MESSAGE to his function module call, even though it wasn’t a “defined exception” on the function header:

CALL FUNCTION ‘XYZ’
EXPORTING
VALUE1 = VARIABLE1
IMPORTING
VALUE2 = VARIABLE2
EXCEPTIONS
EXCEPTION_A = 1
EXCEPTION_B = 2
ERROR_MESSAGE = 3.

This action trapped the message and saved it to the SYST table where a standard FM can then be used to extract it if necessary, if the function module returns with sy-subrc=3:

if sy-subrc = 3.
CALL FUNCTION ‘BALW_BAPIRETURN_GET2’
EXPORTING
type  = sy-msgty
cl    = sy-msgid
number = sy-msgno
par1  = sy-msgv1
par2  = sy-msgv2
par3  = sy-msgv3
par4  = sy-msgv4
IMPORTING
return = return.
endif.

Realistically, anytime your using SAP function modules that are part of transactions, developers should try to us this to suppress the error messages and return them on their terms.

Web Dynpro – Dynamically Setting the Theme

I had to do some digging to figure this one out.  I have to give all of the credit to the link I found below.  This is geared toward a Non-Portal application,  Like my Rapier application.  It gives some great pointers on dynamically setting the theme within a web dynpro application.

http://www.sdn.sap.com/irj/scn/go/portal/prtroot/docs/library/uuid/7015b1f9-535c-2910-c8b7-e681fe75aaf8?QuickLink=index&overridelayout=true&8053063684070

Here’s the quick details.

1.  In your application, add a parameter RUN.  You can use Type String, C or whatever you want.  This is just a flag.  I also added the WDFORCEEXTERNALSTYLESHEET = X.  I’ll be honest, I’m not sure if I need this or not.  From what I’ve read, this is required if you’re using the portal.  I’m not using the portal, but it works if I set this parameter, so I left it.

2.  Now, go to your main window.

3.  Add an outbound plug of type EXIT.  Be sure to give it a parameter of URL.  If you read my or used my post on the logoff button, you already have this =)

4.  Add an inbound plug (or use the default plug).  You need a startup plug is the only key here.  Now double click on it to go into the code.

5.  Once in the code, add the parameter of Run here.  and add the following code (or a variation of it).

  CALL METHOD CL_WD_UTILITIES=>CONSTRUCT_WD_URL
EXPORTING
APPLICATION_NAME = ‘XXX’ “Your web dynpro applicaiton name
IMPORTING
OUT_ABSOLUTE_URL = lv_e_url.

if run is INITIAL.
CONCATENATE lv_e_url
‘?sap-ep-themeroot=/SAP/PUBLIC/BC/UR/NW5/THEMES/SAP_HIGHCONT’
‘&run=N’ INTO lv_e_url.
wd_this->fire_logoff_exit_plg( url = lv_e_url ).
endif.

Here’s what happens.  The first time you log into the application, it works like normal, but run is initial.  so it leaves the current application, and re-runs it with the additional parameters of you set above.

Now I did run into some strange behavior.  I kept getting a dump because of parameter run.  I implemented OSS Note: 946490, still no luck.  I finally just entered a value into the RUN parameter in the application, and then blanked it out.  Then it finally worked.  Not sure what the deal was, but hope it helps you out.

Thanks for reading and I hope this helps…