ABAP Coding

Home / SAP / Archive by category "ABAP Coding" (Page 2)

ABAP – Refresh ALV GRID and keep position and current cell

Since I’ve been rebuilding my Renovation product into the old school Dynpro, it’s meant relearning a few tricks.  Today, my trick was to keep the position, selections and current cell after refreshing the data with new data or updated date.  First off, I need to thank this post for the great info.

Here’s the basics.  Before you refresh the table, you will need to perform the following on your ALV grid.

  dataes_row_no  type lvc_s_roid.
  dataes_row_info  type lvc_s_row.
  dataes_col_info  type lvc_s_col.
  datafes_row_no  type lvc_s_roid.
  datafes_row_id  type lvc_s_row.
  datafes_col_id  type lvc_s_col.
  datamt_cells type lvc_t_ceno.
  datamt_rows type lvc_t_row.

  grid->get_scroll_info_via_id(
  importing
    es_row_no   es_row_no
es_row_info 
es_row_info
es_col_info 
es_col_info
).

  grid->get_current_cell(
    importing
*        e_row     = e_row
*        e_value   = e_value
*        e_col     = e_col
      es_row_id fes_row_id
es_col_id 
fes_col_id
es_row_no 
fes_row_no
).

  grid->get_selected_rows(
  importing
    et_index_rows mt_rows
*            et_row_no     = et_row_no
    ).
  if mt_rows[] is initial.
    grid->get_selected_cells_id(
    importing  et_cells mt_cells ).
  endif.

Now, there are multiple ways to refresh the table, I use set_table_for_first_display, but the post example uses refresh_table_display.  Either way, after you do your refresh, then run the following to set the position and selections.

    if mt_cells[] is not initial.
      grid->set_selected_cells_idit_cells mt_cells   ).
    else.
      grid->set_selected_rows(
      it_index_rows            mt_rows
*        it_row_no                = it_row_no
*        is_keep_other_selections = is_keep_other_selections
      ).
    endif.

  grid->set_scroll_info_via_id(
  is_row_info es_row_info
is_col_info 
es_col_info
is_row_no   
es_row_no
).

    grid->set_current_cell_via_idis_row_id fes_row_id
is_column_id 
fes_col_id
is_row_no 
fes_row_no ).
  refreshmt_rows[]mt_cells[].

Thanks for reading,
Netweaver Gateway – Using Expand

Netweaver Gateway – Using Expand

I’ve recently started to move a new product onto UI5, and of course, that has open up new areas for me to explore.  The most recent was display the notification.  Initially, this sounded so easy.  Unfortunately, when you look at a document, there are many different tables associated with a single notification.

Header, items, tasks, etc.

I wrote my RFC to accept a single input of notification number, but the output consists of header and a bunch of tables.  Of course, for UI5, having a structured OData is far easier to work with, instead of doing a whole bunch of reads to the same RFC and tie them together myself.  Luckily, I found a great blog post that showed me the major things I needed to do:

http://scn.sap.com/community/gateway/blog/2014/07/18/implementing-expand-entityentity-set

Now, of course, this requires some work on the service side as well as in the coding.  So on the service side, you need to tie everything together with associations and navigation to connect the header to each of the individual tables.  Next, you go to the DPC_EXT class, and update the get_expanded_entityset method.  In this method, you need to build your structure.  You can make this as deep as you want, but this will make your service easier to use on the UI5 side.

Now, you can use the expand command within UI5 to say what pieces to pull out.  One thing I discovered while doing this, if you manually create each step of the association, my service had difficulties reading the expand.  So make sure you right click on Associations and select create.  This will walk you through 3 steps to make the connections.  For some reason when I manually built the pieces, my service couldn’t expand.  It might be my old version of the Gateway, but keep this in mind.

Thanks for reading,

Code Security? Do you Trust your customers?

I was recently asked “How do you protect your code from someone just copying everything you’ve done?”  I sat there with a straight face, and said… “Well…  I don’t”.  The simple question got me to thinking about this interesting question.  Do you take efforts to make sure (or least make it difficult) no one can copy your code?

Now, if you live in most programming languages, they require a compiler, and your code is instantly safe.  But in ABAP, when you write something, it’s out there for any halfway decent programmer with some time on their hands to pirate everything you’ve painstakingly worked on.  Now of course, there is the legal recourse, disclaimers, contracts, etc.  But at the end of day, many of us are small companies, and a big legal battle is the last thing we want to deal with.  So I started googling.  The general consensus seems to be of two camps.  One, you need to trust your customer and to go through and encrypt/hide/etc your code shows bad etiquette.  Two, why bother because any 1/2 way decent programmer in ABAP could get to it anyway… and by you hiding your code, just makes it even more appealing to crack the code.

Now Google/SCN talks about adding a strange character string:  *@#@@[HOME:SAP] that if you put this in front of code it hides it “forever”.  I haven’t tried it out… but I am tempted to just to see if it works.  But at the end of the day, is it worth it?  can customers be trusted?  can you afford not to trust them?

I’d love to hear your opinions.  And as always, thanks for reading,

Web Dynpro – Setting a Default Select-Option

Well, there are some things I take for granted, and that’s how easy things seem to be inside of standard ABAP programming.  I come realize this whenever I try to do one of these “simple” activities in Web Dynpro.  Take today’s adventure.  I had some select-option fields, and I just wanted to default a value in there.  Sounds so easy.  And eventually it was.  here’s what I finally found.

I had a select option for ERDAT (creation date).  I’m not going to go into the select option creation.  I think I talked about that a while ago, so just search my blog if you need more info.  SERDAT is the ID of my option that I want to default a value for.

*** SET DEFAULT FOR ERDAT
DATA lo_nd_range_erdat TYPE REF TO if_wd_context_node.
DATA lt_range_erdat TYPE wd_this->Elements_range_erdat.
DATA ls_range_erdat TYPE wd_this->Element_range_erdat.
*** here’s the magic ***

FIELD-SYMBOLS<LT_RANGE_ERDAT> TYPE TABLE.
CREATE DATA LT_RANGE TYPE TABLE OF /JVS/SO_ERDAT.
ASSIGN LT_RANGE->TO <LT_RANGE_ERDAT>.

*** end the magic ***

*** this code is just setting the value back to my context node.
* navigate from <CONTEXT> to <RANGE_ERDAT> via lead selection
lo_nd_range_erdat wd_context->get_child_nodename wd_this->wdctx_range_erdat ).
ls_range_erdatsign ‘I’.
ls_range_erdatoption ‘BT’.
ls_range_erdathigh sydatum.
ls_range_erdatlow sydatum 30.
APPEND ls_range_erdat to lt_range_erdat.
lo_nd_range_erdat->bind_tablenew_items lt_range_erdat set_initial_elements abap_true ).
*** back to the default ***
*** notice I needed to set the value to the DATA field symbol.
APPEND ls_range_erdat to <LT_RANGE_ERDAT>.
LR_HELPER->SET_RANGE_TABLE_OF_SEL_FIELD(
EXPORTING
I_ID ‘SERDAT’
IT_RANGE_TABLE LT_RANGE ).

*** end the default code


I hope you can find a use for this,
Thanks for reading,

ABAP Web Dynpro – File Download SNAFU

Well, I just spent the better part of 20 hours hacking out my latest issue.  In my Rapier web application, one of the cool features I provide is the ability to download an output document from SAP.  Say for example, a quotation or order confirmation.  Well, I was using some fancy trick that converts the spool to PDF, then using the UI Element File Download.  Everything was great in testing.  No problems.  Then a couple weeks ago, I started updating all my documentation.  I came to do a screen shot of this and it it came out in jiberish.  It happened that I was using Firefox.  I tried it, and it worked fine on Internet Explorer, but all the other browsers displayed the text, instead of the pdf…  WTF!!!

So I did my due diligence, and hunted Google long and hard, hoping for a clue.  Nothing jumped out at me.  So, I then applied the latest support packs to my system.  No change.  Then I thought, maybe the kernel needs an update…  no change…  crap.  That burned through a lot of hours in SGEN time, downloading files, system down time, etc…  all for nothing (well, not nothing, but not the result I wanted).

Finally, last night, I decided to look at the UI Element itself, and what I was mapping to it.  I turned out, I was mapping a blank value to MIME_TYPE.  Interestingly, IE was smart enough to recognize the PDF, but none of the other browsers were.  Since all my dev work was on IE, and much of my testing as well, I missed this little fact.  As soon as I added application/pdf to that field…  magically, it began working on all my browsers again.  Woohoo!!!

Now, I hope you can learn from me again… first off, test your WDP on multiple browsers, unless you know you’re only going to support one browser.  This can’t be done in a customer facing application.  Second, MIME_TYPE makes all the difference.  It explicitly tells the system how to render the file.  Don’t take it for granted.

Thanks for reading,

ABAP – Finding Icon Codes

I just picked up a new little trick.  Often when I’m programming, I like to pull in the standard SAP icons.  The problem is that it is always a hassle to find the 4 digit code that corresponds to the icon I want to use.  So I found this little trick online to simplify the process.

1. Go to transaction ICON to find the icon you wish to use.  It will have a full description, like ICON_ORDER for example.

2. Go to SE11, enter ICON into the Type Group.  Press Display

3.  Scroll through the list (or use Control-F) to find the icon code associated with the ICON_ORDER.

Pretty slick,  Thanks for reading,

ABAP – Changing SAP Data Type Descriptions

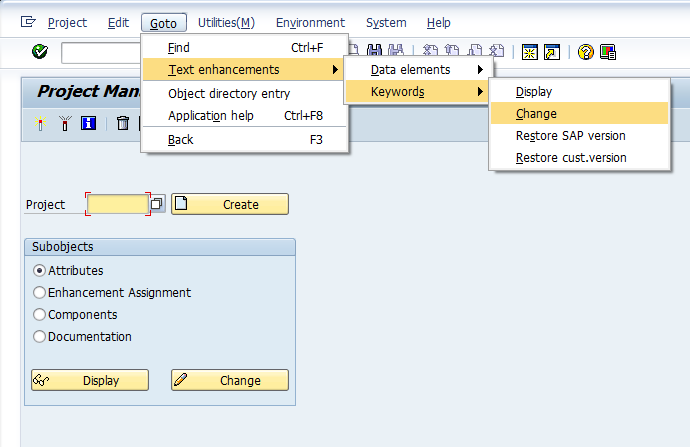
Well, completely by accident, a friend of mine taught me a cool new trick.  There is a standard way to change data type descriptions of standard SAP fields without doing any sort of core mods.  It’s all built right into transaction CMOD, and I never knew it was available.  I truly learn something new about SAP all the time.  So, here goes…  go to transaction CMOD, then use the following menu path:
Goto–>Text Enhancements–>Keywords–>Change

blog02-01

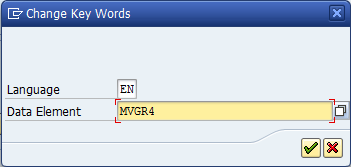
Next, select the data element you want to change the description.

blog02-02

I picked MVGR4 for an example.

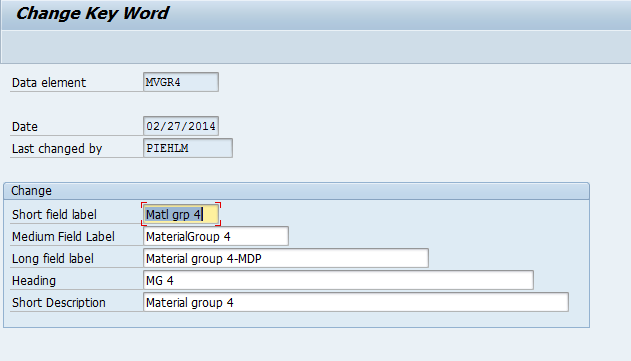
blog02-03

Now update any descriptions you want to change.  Save it, and attach it to a transport.  You’re done.

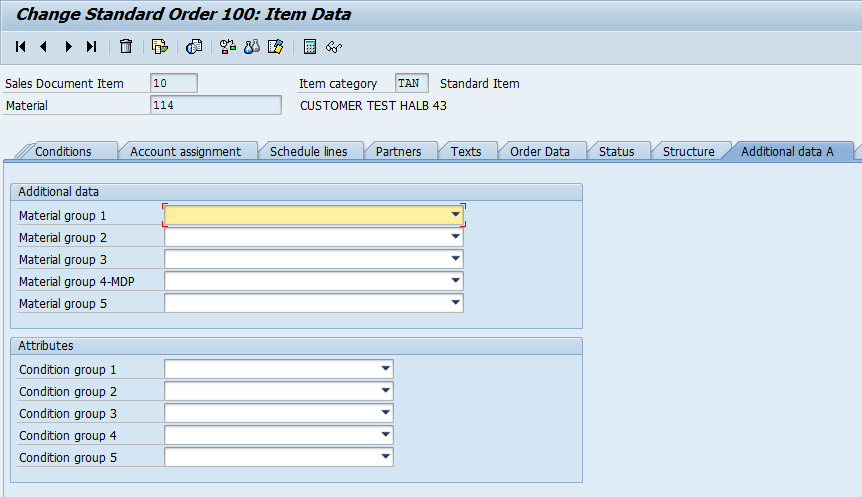
Take a look at what happens in VA02 for this field now:

blog02-09

Pretty cool, and pretty easy.

Thanks for reading,

Netweaver Gateway – Service Implementation

I’m finally getting back to the Netweaver Gateway stuff.  This piece is the most powerful, and also the most complicated.  I struggled with this for a while, so it’s a good idea for me to explain it and make sure I don’t forget myself 🙂  I’m going to focus on the query implementation, but all of the options work the same way.

segw01-01

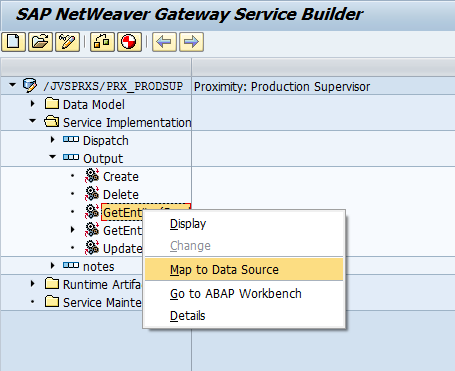
Open up the Service Implementation folder, then open the entity set you wish to map.

Create – Use this to create a new entry.
Delete – Use this to delete an entry
GetEntitySet(read) – use this to read back a single entry
GetEntitySet(query) – use this to read back an entire table.
Update – use this to update an existing entry.

Now, one of the things I’ve found is that for most of these entries, it really all does depend on your RFC that is being called.  For example, you could likely call Create or Update using the same RFC and it would work, as long as your RFC code was properly defined.

segw01-02

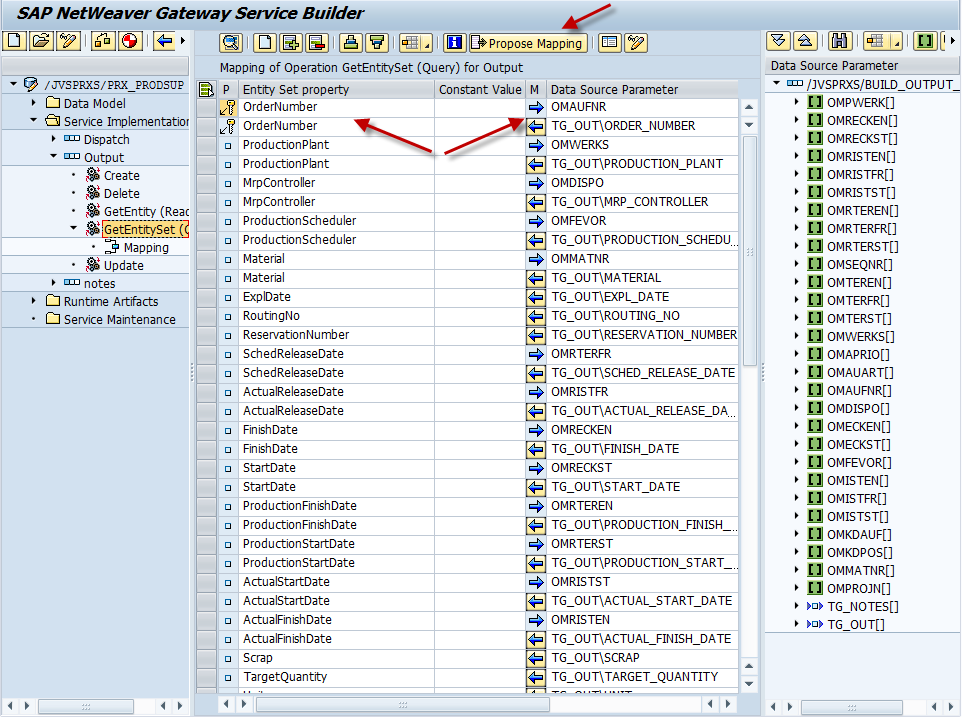
Now this screen shows you a completed mapping for the query operation.  Depending on your RFC and how you defined things previously, you can use the Propose Mapping button to fill in all of the fields for you.  Or, you can drag and drop from the right hand window.  Now, one of the things that I originally had issues with supplying the inputs for my RFC.  What I discovered, is that in Netweaver Gateway, you can have the same parameter show up multiple times, once as an input and once as an output.  All you need to do is point it to the correct field.  If you look above at the OrderNumber field, you’ll notice that it’s listed twice, once with an arrow pointing left (output) and one with an arrow pointing right (input).  If you look in the mapping field, you’ll notice that the input and output point to different fields.

Like everything, you must know your RFC to do this correctly.  Then, if you need to use the same field again, you must use the insert, select the field from the list, press the arrow until it points to the right, and finally select the mapping field from the RFC that should be the import.

At this point, if you have the gateway configured, you are ready to test and connect it to your mobile app 🙂

Thanks for reading,

Web Dynpro – Activating Services

It occurred to me, this might be rudimentary to most anyone that’s been doing BSP’s or Web Dynpro, for the newbies out there, this might not be obvious.  Since I just put a new Web Dynpro App into my test system, I thought this would be a great chance to document the process and share it with y’all 🙂

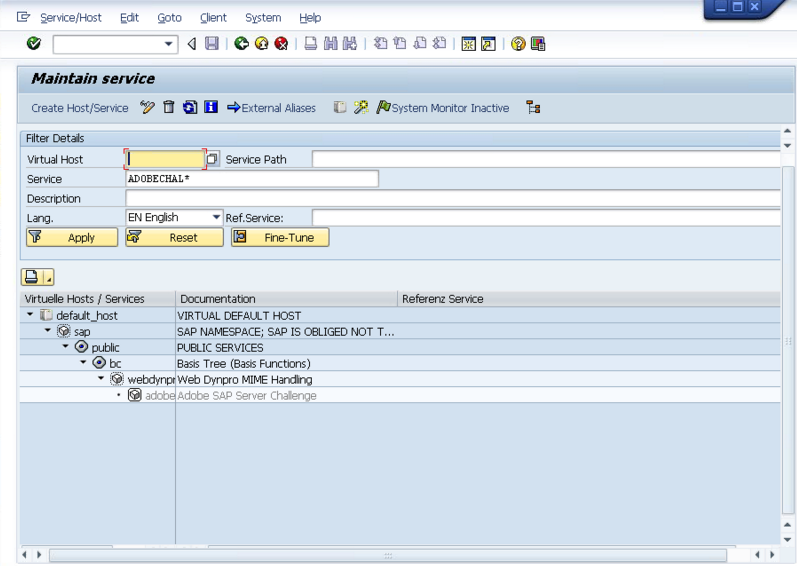
First off, go to transaction SICF.  Depending on your version of SAP this might look a little different (this is ERP 6.0).  But you’ll be able to see what I’m talking about.

blog02-01

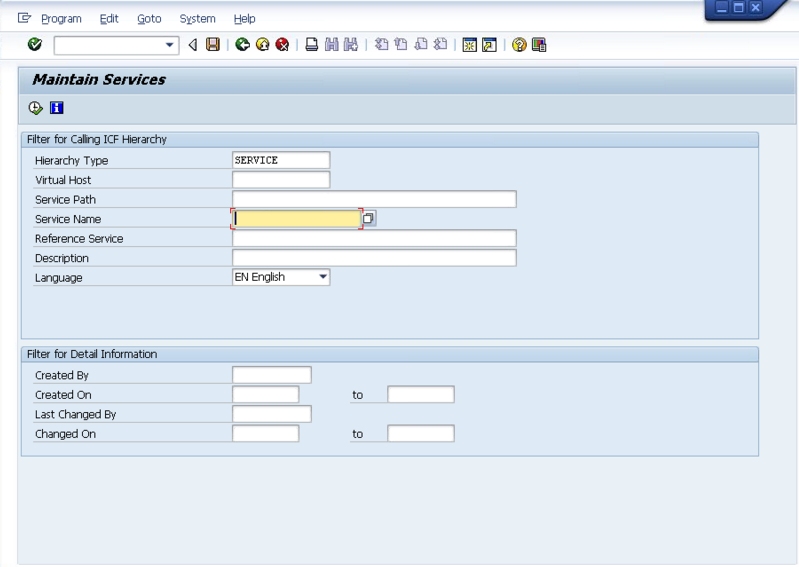
Normally, when you go to use Web Dynpro for the first time, there are a bunch of services that need to be activated.  Your web browser will tell you exactly what they are.  You either navigate the menus manually, or if you enter in the Service Name, SAP will take you directly to the one you want to activate (I like option 2).

blog02-02

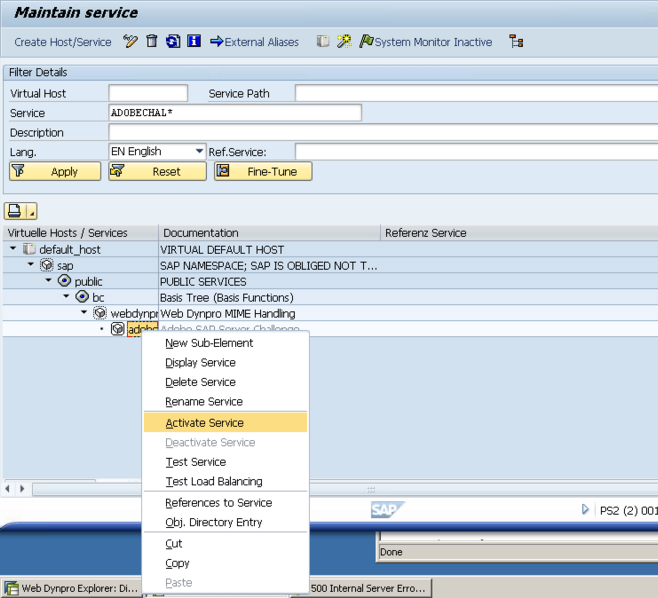
Here’s an example service.  You’ll notice that it’s grayed out when it is inactive.  So go ahead and right click on the service.

blog02-03

Select the Activate Service.

blog02-04ow

Now, depending on what you select to activate, if there are other services below the one you selected, you can choose Yes with the hierarchy to activate the service and everything below it.  Or you if select Yes, it will just activate that one service.

That’s it.  Now, keep in mind, there are a lot of other things within the service itself that can be updated, but for now, this is my little tidbit.

Thanks for reading,

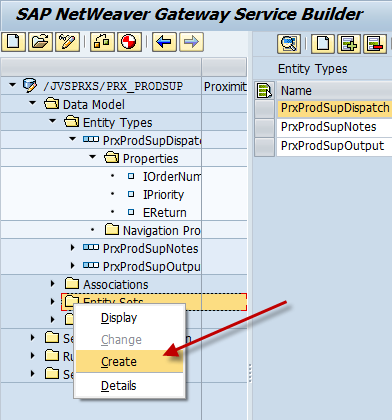
Netweaver Gateway – Creating the Entityset

In the last post, we created the entity for our service.  One of the next pieces is the entityset.  This is a really easy piece, but still required in order to complete the service.  We go back to SEGW.

segw2-01

next…

segw2-02

Name your entityset, and pick the entity you want to link to…  Now you’re ready for the next step…  we’ll get there in a future post.

Thanks for reading,