Blog

Home / Archive by category "Blog" (Page 47)

Turns out, I’m not Super-Human :)

Well, I thought coming back from a vacation I’d be all fired up and ready to take over the world.  Well week 1 back to the real world totally slammed me.  I’ve been battling a head-cold, not to mention that I’m not 30 years old anymore, and most important of all, I may have finally come to the realization that I can take on too much.  Trying to manage my own stuff and consulting clients has hit me like a ton of bricks this week.

Now, the good thing is that I realized, I don’t need to do everything at once.  So, I wanted to send out an early apology.  My blog posts will be sporadic over the next month while I wrap some things up and try to get myself back on track.  I may even try to get more than 6 hours sleep per night as well 🙂

I’ll still post whenever I find a neat trick or tip…  but I’ve been struggling to keep up with my blog, marketing efforts, consulting, and just general running of the business.  I’m also in crunch time for some of my consulting work, so I really need to give that the attention it deserves (even though I really want to finish up my updates on Renovation…  I’ll try to give you a peak at it this week, at least what I’ve done with generating return orders).  As always, thanks for reading,

ABAP Web Dynpro – Dynamic ALV Table – When to Bind

I just found a very subtle little thing, that has been driving me nuts for a few days.  I created a dynamic ALV table and I wanted to be able to select multiple lines.  Seemed pretty easy, I selected the correct Select option to do multiple line testing.  And no matter what I did, I couldn’t select or unselect anything.

Turned out it was a very simple fix.  You can only bind the table once.  If you bind the table more than one, it keeps resetting the selections. Since this occurs in the Modify View method, I needed to check if it was the first time it was executing.  If it was the first time, it needed to be bound, otherwise, don’t bind.  Since it was a dynamic table, for me it was just a matter of moving the bind statement within the IF statement.  Crazy simple, but like everything, little things make a big difference 🙂

Thanks for reading,

Service Management – Adding a configurable component

Now, I recently encountered a limitation of service and maintenance orders.  For those of you familiar with SAP Service Management, you will notice this is a common theme (why else would I spend late nights developing solutions to fill in the gaps 😀 ).  Well, today was an interesting discovery.  It crossed over between my two SAP skillsets, but strangely, I never tried this.  The service order won’t allow you to add a configurable material as a component.  In fact, up until ERP 5.0 or 6.0 (not sure), you couldn’t even repair a configurable material.

Now, this is what I’d consider a corner case, but again, I found a client that wants to do it.  So that leaves me in that familiar place of “how to solve it”.  Now, I’m still in the research phase, so if any of you have found a clever way to handle this issue, I’d love to hear what you did.

Now, I can only come up with two possible ways to handle this.

1.  Material Variants – this method will certainly work, but it takes a lot of master data to create/maintain.  So for every configuration, you’d need a permanent part number.

2.  Purchasing a material from “yourself” – Now this method “might” work.  The idea behind this is that you can generate a Purchase Req, describe the material and configuration, and set the vendor up as your own company.  Then from that PO, create a sales order and configure the material, make it and “ship” to the repair group.

The problem with both of these approaches is that they require a lot of extra data.  Option 1 creates a permanent material in the system.  Option 2 means you need to create a PO, sales order, delivery and invoice.  And all the while, you just want to make a production order for a configurable material and have it issued to the service order.

I’d love to hear your thoughts.  thanks for reading,

Why do I do this??? – Remembering Why I work so hard.

Now I know I’m a glutton for punishment. My normal existence is no less than 2 full time jobs, and sometimes I’m doing 2.5 or 3 at the same time. While this fits well for my easily bored personality, it can also be burning the candle at both ends. When I start to fall into a slump, it’s very important to take a break. I just got back from my vacation, and managed to avoid technology for the entire week. There were times I started to wonder what was going on with my projects, or even my own JaveLLin ideas. But, the resort saved me. I could only get internet in the lobby, and it helped remind me that I needed the time to unplug for a while.

Now, the really important piece of this is the ability unwind for a while. I spent a lot of time by the pool, and a lot of time enjoying my great friends that came along with me.

All of this reminded me of why I work so hard… it’s so that I can do what I just did. I could spend the week away from my computer, ignore my projects, and enjoy my friends and family. I noticed a lot of people parked in the lobby working, on their phones checking emails, face book or whatnot. It felt really good to live in the moment and just enjoy the fruits of my labor. If I just keep working hard… it’s easy to forget why I keep burning the candle at both ends.

So, take my advice, don’t forget why you work so hard and put so much effort into your own endeavors. Enjoy your hardwork 🙂

Thanks for reading,

When you Know you need a vacation!!!

You know, it’s funny, I spend so much time working, that sometimes I don’t even notice just how much I need to unplug. It was this past Friday, that it hit me like a ton of bricks. I was crabby at the world, I was annoyed by everyone I talked to, and the only thing that could help me keep it together was focusing on the kids (and of course, my upcoming vacation). Now, maybe I’m the odd-ball (and trust me, if you talk to any of my close friends, they will agree), but in all seriousness, when you start to get frustrated with your job, your co-workers or even your family… maybe you just need to get away for a little bit.

Now I know you can’t always leave the kids, leave the country, or ditch your family… but what you can do is ditch all your connections to work. For me, it usually hits me out of the blue. Life can be great… great… and then suddenly every email begins to annoy you, you stop sleeping well because you to start to stew about work or what you need to do…

My advise… turn off the tech. ignore all emails for a weekend. Do anything you can to keep yourself occupied and NOT thinking about work. Sometimes it can make all the difference.

Thanks for reading.

Variant Configuration – Disassociate Material Variants

This is a fun little trick, that I will probably never use.  This came from my friend Rama.  If you’re like me, when you create material variants, I’m sure you wondered why you cannot disconnect the materials from the KMAT.  For some reason, this field becomes locked as soon you save the material.  In my normal process, I tell businesses to obsolete the material if they screwed it up, assigned the wrong KMAT or just want it to no longer be connected.  Well, it seems that SAP has come up with a  process to disassociate the material from the KMAT.

OSS Note 941004 – FAQ: Configurable materials and Variants in Configuration
Topic 1.  (so this is the SAP “Approved” method to handle this).

THIS PROGRAM DOES DIRECT TABLE UPDATES AND IS FOR EMERGENCY USE ONLY!!!

1) Use SE16 to edit the MARC record in the database.  Change the STDPD to the new KMAT and change the CUOBJ to zero.


2) Run the RCU_DEL_CONF_FOR_ARCHMATVAR program to delete the instance from the CBase


3) Edit the material master and maintain the material variant configuration


OF COURSE you must be careful to avoid creating database inconsistencies


ALSO, if there are any existing sales orders for the material variant, then the CUOBJ for those line items must be changed in the database from the old cuobj (of the mv) to the new cuobj (of the mv).  After that, it is necessary to update the pricing for


REPORT zlogic_mv_change_kmat NO STANDARD PAGE HEADING.


* Declare variables

DATA: lt_marc type marc occurs 0 with header line.

SELECT-OPTIONS: s_matnr FOR marc-matnr OBLIGATORY,

s_werks FOR marc-werks.

PARAMETERS:     p_stdpd LIKE marc-stdpd.


* Select material variants to change the KMAT

SELECT * FROM marc into table lt_marc

WHERE matnr IN s_matnr AND werks IN s_werks and stdpd ne space.


WRITE:/ marc-stdpd, marc-cuobj.


IF p_update = ‘x’ OR p_update = ‘X’.

UPDATE marc

SET stdpd = p_stdpd

cuobj = 0

WHERE matnr = marc-matnr

AND werks = marc-werks.


SUBMIT rcu_del_conf_for_archmatvar

WITH matnum = marc-matnr

WITH testmode = space

AND RETURN EXPORTING LIST TO MEMORY.

ENDIF.


EXIT.


ENDSELECT.

Now, for my disclaimer.  While this is a nice trick, I still most likely won’t use this myself.  The process I preach is to disassociate the material number in SAP from any logic, or any reason to worry enough about 1 exact number to go through this hassle.  Make your materials internal only, so they mean nothing to customers, distributors, vendors, etc…  if you do this, you never need to do DB updates to fix things.  Thanks my opinion.

thanks for reading,

Looking for Help… Service Testing and Documentation

Well, this is actually a call for help to any of my service colleagues looking to make a few dollars on the side by helping me test and document some of my products.  One of the largest areas I’m deficient on is documentation.  Like any developer, documentation is my least favorite task.  So i’m reaching out to any of you that might have some free time to help me out.

If you might be interested, send me an email:  mpiehl@javellinsolutions.com

We can work out the details, I’ll set you up with a system login.

I’m really looking for someone WITHOUT intimate product knowledge to start using my stuff, and let me know where things are unclear or if you encounter any issues.  If things look good, take some screen shots and develop the equivalent of a BPP for each different function/feature.

Like so many thing, it’s not hard work, but I struggle to find the time to do many of these tasks, so I’m happy to pay someone to help me.

I hope to hear from some of you soon,

Mike

Service Management – Setting up the Work Center

On my most recent assignment, I learned a lot about setting up the service work center properly.  One of the biggest take aways from this that I learned is that the formulas for service orders are very particular.  In particular, there is one field that is essential if you wish to see the planned cost show up in the service order.

blog04

The highlighted field above needs to be SAP008, or something using the following data.

blog05

This becomes very important, because production orders have a far greater range of formula variables that work than service (or network) orders.

So, if you find that planned costs just aren’t showing up in your service order, take a look at the formula assigned to the routing.

Thanks for reading,

Notification Execution – Creating a Notification w/Multiple Serial Numbers

Now, I’m pretty excited, because this is an idea I’ve been toying with for quite some time.  And recently, I’ve finally devoted some resources to making it real.  The concept is simple, allowing a user to enter multiple technical objects onto a single notification.  While SAP doesn’t give you an option this simple, I’ve come up with a way to utilize standard SAP functionality (along with my new Renovation tool) to accomplish this.  While the overall concept isn’t overly complex, dealing with it isn’t easy.

First, let me explain the concept.  The idea is using a parent notification, and then a create w/reference for each serial number.  The concept is that you can provide a parent notification to your customer, all the child notification will house the individual serial numbers.  The problem with this approach is keeping everything in sync, and then of course moving all that data to the next round…  like a return or repair sales order.

This is where Renovation comes in.  Step 1 is to first create a notification.

blog03

What you are looking at is one possible configuration for Renovation to create a notification, along with all of the children.  With our configuration, we allow you to pick and choose the fields you want shown and the sequence to show them.  You can add objects and even see the warranty status of each individual object.  You can enter Items, Tasks, Activities or Causes.  You can even select what values to pass to the child notifications.

If this sounds like something you might be interested in or would like to know more about, feel free to ping me and I can setup a demo.  If you have suggestions on how to make it even better, please let me know.

thanks for reading,

GUI Scripting: A how to guide

I think this might have been one of my most popular posts.  GUI script is one of my favorite tricks.  If you haven’t used it before, you really need check this out.  It’s easy and slick.

Using SAP GUI Script

SAP GUI Script is a fantastic tool that can be used to create transactional testing data, Change existing master or transactional data, create master data in mass or even just data conversion for certain tasks that LSMW can’t handle.  GUI Script has been around for a while, but it always surprises me that so few people are familiar with it.
The basic concept around GUI script is that you can load information into an Excel worksheet, and using a macro, allows you to load data into SAP.  This document is going to walk you through creating your own GUI scripts and using them effectively.

Turning on GUI Scripting

Tranaction: RZ11
Param. Name: sapgui/user_scripting

Press Display
gui-01
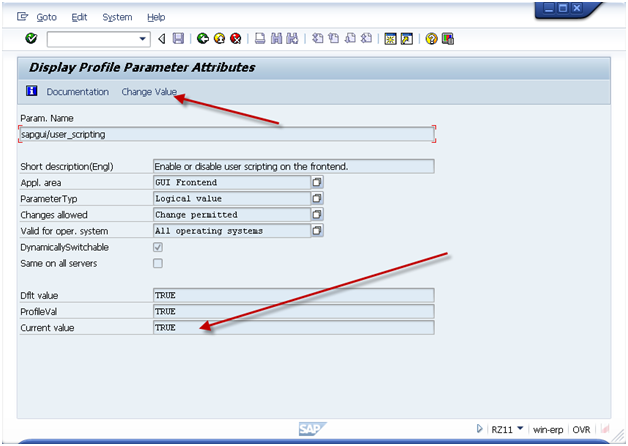
If current value is not set to TRUE, press the Change Value and set the value = TRUE.
Please note, typically this a basis function, so if you don’t have access to transaction RZ11, please contact your basis team.
As an additional hint, if you want to have GUI Scripting always active, it is encouraged to activate it in RZ10 (this adds it to the startup profile).

Recording the Transaction

When you are ready to perform the recording,  be sure you know the transaction you want to execute and the data that you can use.  You should also know the screens you plan to visit and the fields that you will be filling in.  Keep in mind, you can always update the recording file, but the better your recording, the less errors you will encounter.
The important thing to remember is that GUI script can NOT perform any logic.  it only works for repeating the same steps over and over again.  This means that if you receive an error on some records, but not others, you will need to execute 2 different scripts.  One script will do the non errors, and other script will do the errors.  You can cut down a lot of time if you can segregate the data early.

gui-02

Activate the recorder.  It is encouraged to always start the main screen in SAP.  This prevents weird things that happens if an error occurs during the playback.

gui-03

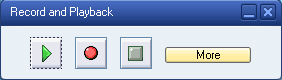
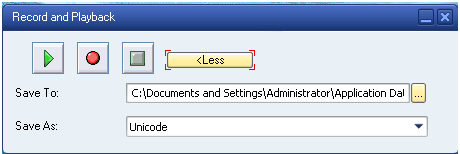
Press More if you want to control where the file is saved.

gui-04

When you are ready to start, press the record button (Red Dot Button).

Then proceed to execute the transaction you wish to record.

gui-05

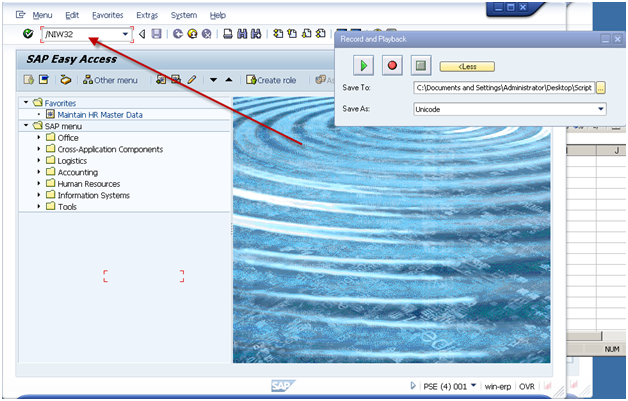
Be sure to use ‘/N’ in front of the transaction code.

gui-07
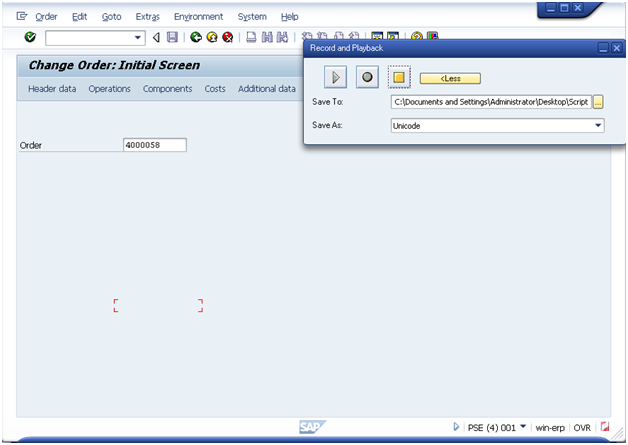
Enter in the document number and press Operations Button.

gui-08

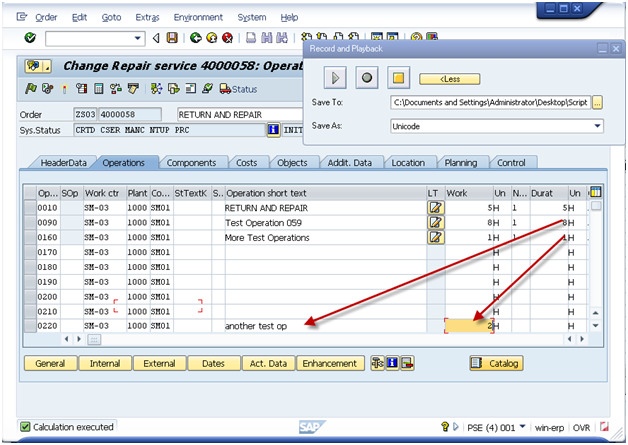
Please note, when I added a new operation, I entered it on the bottom of the screen.  This allows you to avoid the risk of overriding exisitng data.

Press Enter.
Press Components Tab

gui-09

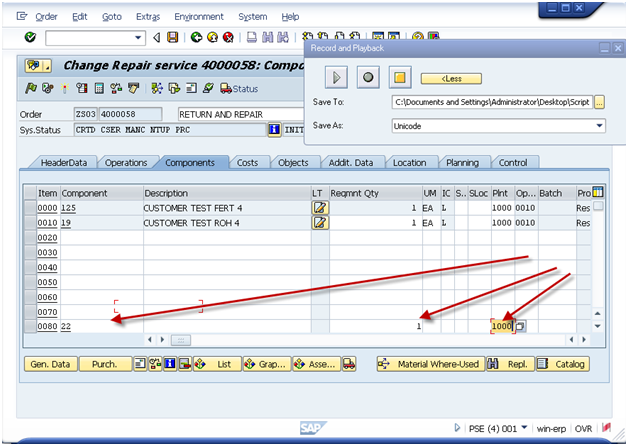
Again, add the data to the bottom of the screen.
Press Enter
Press Save
Note:  sometimes there will be errors.  If errors occur, you need to remember that maybe not Every order you change will have the error.
gui-10
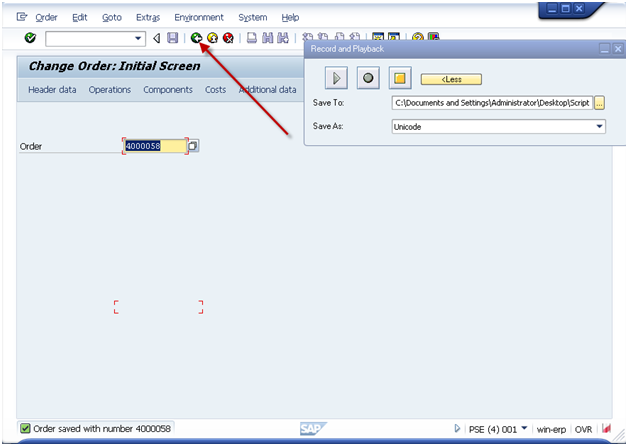
I encourage you to press the green arrow back on every recording at the end.  This just helps to avoid incorrect loading of data.
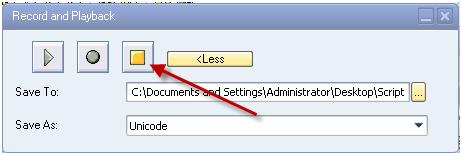
gui-11
Press stop.
Now, go find the file.  Be sure to RIGHT click on it.  If you double click on it, it will attempt to execute the exact same transaction again.
You should see something similar to this:

gui-12
The parts of this file you care about are the lines that start: session.xxx
I encourage you to skip the first line that resizes your screen.  and copy all of the remaining lines in the file.
Next up, add this information to the excel file.

Gui Script

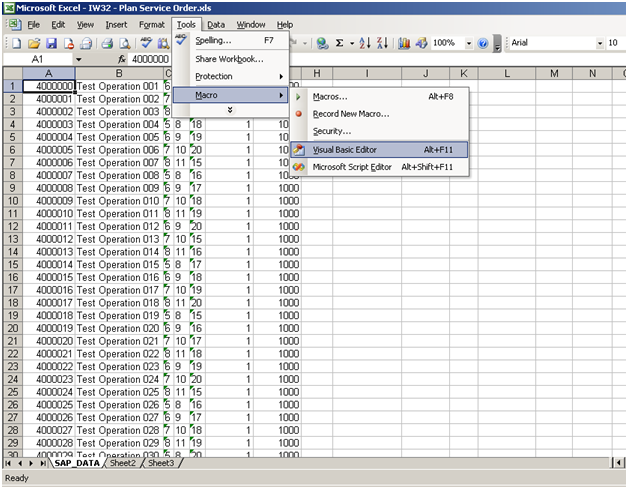
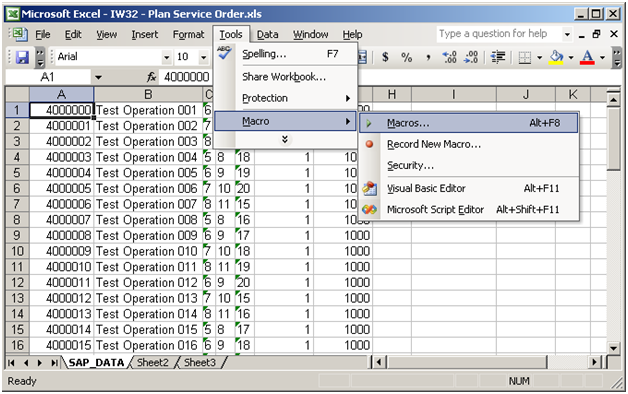
This will depend on your version of excel, but what you need to do is find the macro button:
MS 2003:

gui-13

MS 2007

gui-21
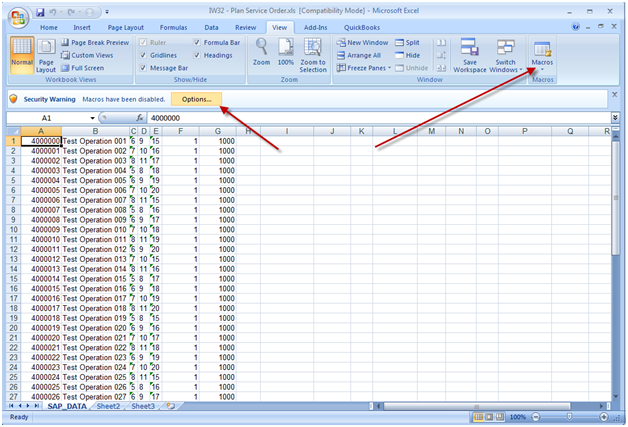
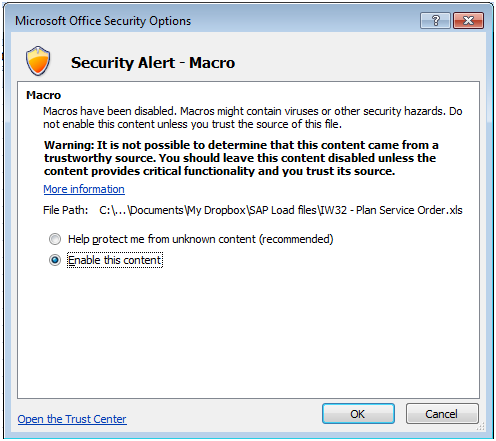
Be sure to enable macros.
gui-14
When the macro window opens, be sure to select the correct view on the left hand side of the screen.  Then move to the code section and find the area shown that says “Paste your recorded script below”.
If there is anything currently in this section, be sure to remove it, and replace it with the information from your recording (session.xxx).
gui-15

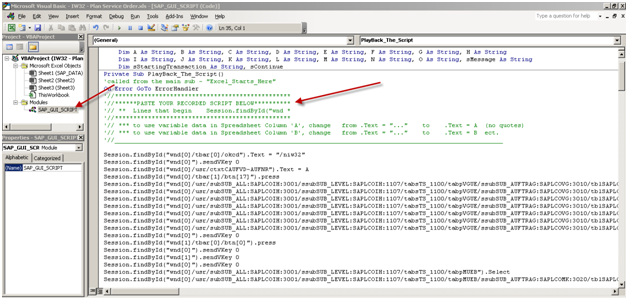
Now, I’m going to show you how to point this to your excel document.
session.findById(“wnd[0]/tbar[0]/okcd”).text = “/niw32”

session.findById(“wnd[0]”).sendVKey 0

Change:
session.findById(“wnd[0]/usr/ctxtCAUFVD-AUFNR”).text = “4000000”
To:
session.findById(“wnd[0]/usr/ctxtCAUFVD-AUFNR”).text = A

session.findById(“wnd[0]/tbar[1]/btn[17]”).press

Change:
session.findById(“wnd[0]/usr/subSUB_ALL:SAPLCOIH:3001/ssubSUB_LEVEL:SAPLCOIH:1107/tabsTS_1100/tabpVGUE/ssubSUB_AUFTRAG:SAPLCOVG:3010/tblSAPLCOVGTCTRL_3010/txtAFVGD-LTXA1[7,8]”).text = “my test op”
To:
session.findById(“wnd[0]/usr/subSUB_ALL:SAPLCOIH:3001/ssubSUB_LEVEL:SAPLCOIH:1107/tabsTS_1100/tabpVGUE/ssubSUB_AUFTRAG:SAPLCOVG:3010/tblSAPLCOVGTCTRL_3010/txtAFVGD-LTXA1[7,8]”).text = B

Since this can get long, I’ll jsut show you the first 2 changes.  You’ll notice that I found the first two lines where I entered in data.  I changed it to a single letter (no quotes).  This is the excel column where you enter in the data.  It’s that simple.  If anything is a constant, just leave it as it is.
When you’re done, press save and you’re ready to execute.

Executing the Script

Now, the first step before executing the script is gathering all the data.  Typically, this is done using SE16, SE16N, or certain reports (IW73, VA05, COOIS, etc).  As always, be careful with the data you enter.  It’s your user id that will be assigned to the change :).

Once you have the data you wish to execute, simply go the excel worksheet and execute the macro
*** NOTE:  Remember, when the script is running you can’t do anything with Excel.  You can continue working in SAP, but Excel will be locked for the duration of the script.

gui-16
**** NOTE ***
This is a VERY important one.  Be sure that the first SAP window open on your screen is the client you wish to change.  If you are doubt, be sure to logout of any client/system you do not want to change.  For example, if you are logged into production and QA.  You want to make the change to QA, I encourage you to log out of production.
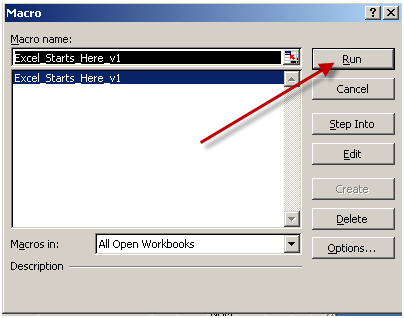
gui-17
Press Run
Note:  if you have multiple excel windows open, be sure the correct macro name is highlighted.  If you aren’t sure, close the other excel documents.

gui-18

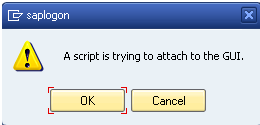
Gui Script will always give you a chance to check the results of the FIRST record.

gui-19

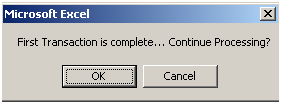
I encourage you to always check and make sure it saved properly before pressing ok.  If it did not, press cancel.  Otherwise the script will go all the way to the end.

Once you are done, it will return control back to excel.

gui-20

As long as you see OK in the row, the record processed.  if you don’t see ok, you’ll need to check that record and possibly reprocess it.