Month: December 2013

Home / 2013 / December (Page 2)

ABAP Web Dynpro – ALV Table Button

Well, after my last post, I realized, this is cool.  Now it’s time to make it better.  So the first objective is to add an ALV table button for refresh.  It turns out, it’s pretty easy to accomplish this.  Here’s what you need to do.

So, go into your WDDOINIT and add the following code (or some variation).

*** initial ALV table
data lo_cmp_usage type ref to if_wd_component_usage.
DATA lo_INTERFACECONTROLLER TYPE REF TO IWCI_SALV_WD_TABLE .
DATA lv_value TYPE ref to cl_salv_wd_config_table.
DATA: lr_btui_refresh TYPE REF TO cl_salv_wd_fe_button.
DATA: lr_bt_refresh TYPE REF TO cl_salv_wd_function.

*** instantiate the component
lo_cmp_usage =   wd_this->wd_cpuse_alv_comp( ).
if lo_cmp_usage->has_active_component( ) is initial.
lo_cmp_usage->create_component( ).
endif.
lo_INTERFACECONTROLLER =   wd_this->wd_cpifc_alv_comp( ).
*** get the ALV table
lv_value = lo_interfacecontroller->get_model( ).
*** create the button object
create OBJECT lr_btui_refresh.
*** set icon
lr_btui_refresh->set_image_source( ‘ICON_REFRESH’ ).
lr_bt_refresh = lv_value->if_salv_wd_function_settings~create_function( ID = ‘BT_REFRESH’ ).
lr_bt_refresh->set_editor( lr_btui_refresh ).

Now you can also add text to the button instead of just the image source.  If you drill into the cl_salv_wd_fe_button class to see the methods available.

I’ll have more tomorrow as I keep learning.  Thanks for reading,

Web Dynpro – The ALV Table

Well, with all the work that I did for my Customer SM Portal, I thought I knew what I was doing with the ABAP Web Dynpro, especially around tables and dynamically changing them.  I recently started working on a new application that is more scaled back.  One of the requirements is to have the same sort of functionality as an ALV Table in the ABAP.  So we want to have the filter, sorting, and flexibility to play with your layout and settings.  Well, I started to look at the current tables I’d been using, and realized I had to implement each of those functions myself.  Well, that looked like a rather big task to undertake, so I went to my buddy, the internet and looked up Web Dynpro ALV Table and quickly found that SAP was nice enough to provide a way to implement the ALV Table.  Of course, it meant another change to the way I was doing things… but hey, I learned something new.

First of all, thanks that Sankar.  If you like to see exactly how to do this in video format, check out this like.  Sankar does a great job in demonstrating exactly how to code this stuff.  My only problem is that sometimes it was hard to read the code and class names (which is why I’m going to cover this in text form). https://www.youtube.com/user/sankar1bhatta?feature=watch

So, let me walk you through the steps of how to create an ALV Table.  The first step is to add a new Web Dynpro Component. blog01-01
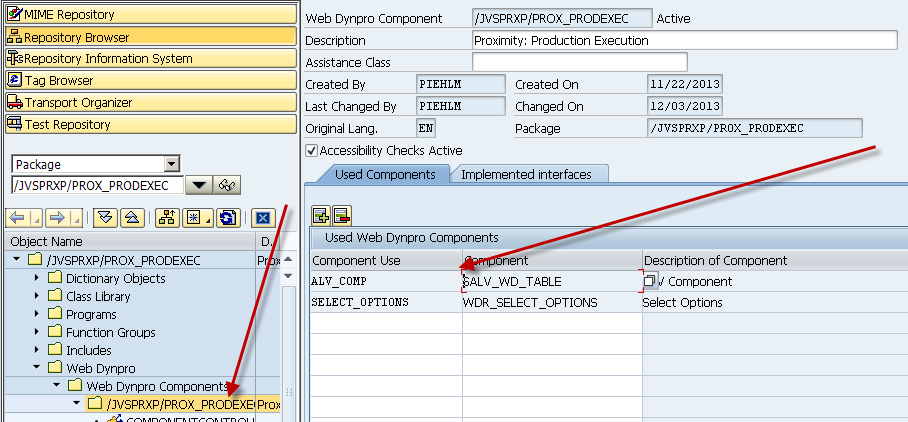
So, go to your top level, and add a Used Web Dynpro Component.  You can name the Component Use whatever you like, the component itself is SALV_WD_TABLE.  This is the magic that will allow you to use all of the ALV functions. I’m not going to cover this in depth, but the next step will be to add a context node + attributes that will be the structure for the table you want to create.  Be sure to create this in the componentcontroller, and not directly in a particular view. This next part was new to me.  I believe it’s called external component mapping.  So let me walk you through this next part.
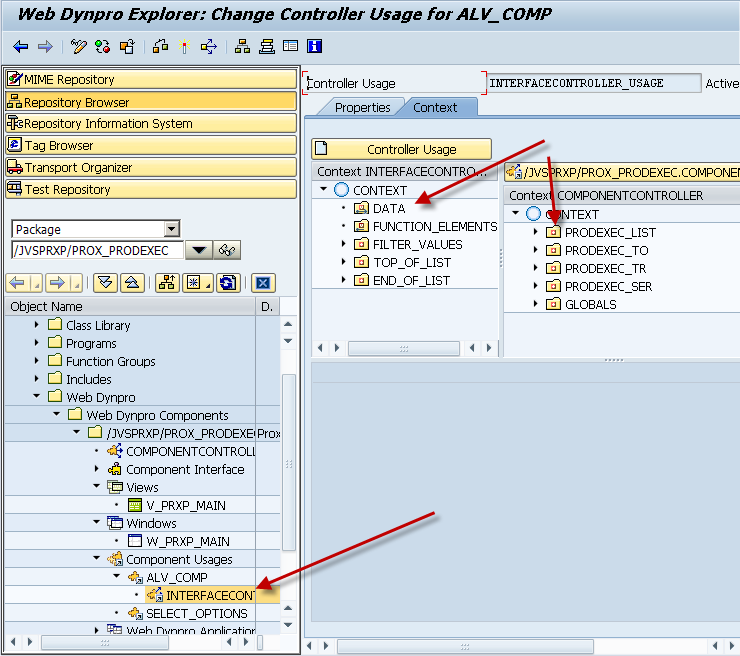
blog01-02

First, drill down into the component usuages until you find the ALV component you defined above (mine is ALV_COMP).  Next, you need to drag your context (table you want to create in ALV) from the right side, over to the Data node on the left side above.  You have now linked that table structure to the ALV components. Finally, we need to add this to the layout so you can actually see the table.  So, go to your layout and add a ViewContainerUIElement.  Wherever you place this is where your table will come in. We have one final step, and then you’re ready to test.
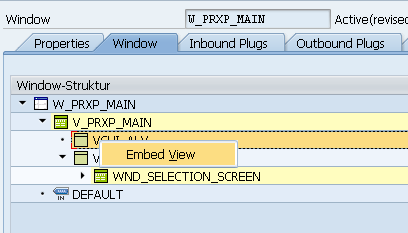
blog01-03

So, go to your window, and find the VCUI element that you just created, and drill down and then right click to Embed View.
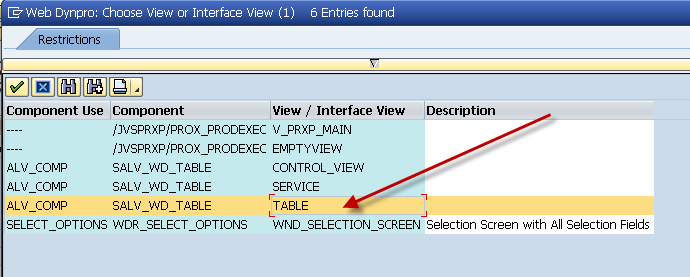
blog01-04

Select the Table interface, and you’re ready to go.  Just fire up your application.  In some future posts, I’ll discuss how you can customize this, but for many applications, this might be enough.

Thanks for reading,

Basis – Upgrading the Kernel from 700 to 720

Well, I’m trying to venture into the mobile world, but as always, there are technical challenges I just never quite expect.  🙂  Today’s challenge is that the NetWeaver Gateway won’t work with the 700 Kernel.  So I had to look into upgrading kernel from 700 to 720.  I owe all of my success to someone I found on SDN.

http://scn.sap.com/community/netweaver-administrator/blog/2013/05/22/upgrading-sap-kernel-from-release-700-to-sap-kernel-720rel-720ext

As expected, it’s a little more complicated than just installing a new kernel, so check this post out if need help doing this.  I now have a system to the latest 720 kernel.  But be warned, it takes a lot longer to boot the system up with the new kernel.  I’m hoping that may only be the first time.  Guess I’ll see the next time I need to take the system down.

Thanks for reading,


Variant Configuration – ESTO issue

Well, of course, I talk about something one day, and then find a rather large “gotcha” the next.  Not quite Murphy’s Law…  but it’s similar.  ha ha ha.  Yesterday I talked about the cool new ESTO process, and today I found out something that kind of sucks.  In order for the ESTO process to properly handle sales order costing, you must recreate your variant BOM in the originating plant.

Let me explain further.  Let’s say that Plant A takes the order, and points to plant B to create the production order, fulfill the demand and then send it over to plant A to finally go back to the customer.  This part works just fine, but sales order costing is NOT smart enough to look at the cost of the part in plant B.  It looks at plant A, and uses that cost.

As a modeler, that means that now the configurable BOM in Plant B, must be replicated in plant A (with the exception of setting the materials in the BOM to be costing relevant only).  This then allows sales order costing to explode the VC BOM in plant A, to come up with the cost that will be incurred in plant B.  While this isn’t the end of the world, it does increase your maintenance.  What I’m not sure about is if the routing must also be replicated (I’m assuming it would).

If anyone can comment on this, I’d love to hear about it.  If not…  be aware of this when you start to implement ESTO.

Thanks for reading,


Variant Configuration – the new ESTO process

Now, the current project I’m on is my first exposure to this process, so maybe I’m just behind the curve, but if you happen to know more about this, please let me know.  The process I’m talking about is ESTO.  Now, this is very similar to the original STO (Stock Transfer Order) which is a process for moving stock between facilities.  It can work similar to a purchase order between plants, with a lot less paperwork.  Now, ESTO is a way that you can do with a configurable material.

So, envision this.  Your facility in Europe takes an order for a variant configuration material.  Through the magic of special procurement keys, you can now send that planned/product order demand to any other plant of your choosing.  Now, I’ve been doing this a while, so this functionality is pretty cool.  I’ve always had to tell customers if you want to do something like this, you have to use material variants.

The magic with ESTO is that it will transfer your configuration to the building plant, so that it can use it’s configurable BOM’s and routing to produce the machine, and then allow it to be shipped to the plant that originated the demand.

While I haven’t been closely involved in the testing of this process it does have me curious.  Again.  if you have any feedback on this process, or things to consider, I’d love to hear them.

As always, thanks for reading.

Basis – Running Standard Jobs through SM36

Well, one of my systems was suddenly experiencing some strange behavior, so like normal, I just rolled it back, and implemented my transports.  But it occurred to me, it’s likely there are some simple things I can do to prevent this from happening in the first place.  So here’s what I found, and I hope this will help 🙂

1.  If you run SM36, then press the standard jobs, and then press press default scheduling, it will schedule a whole bunch of standard reorg jobs, that probably would be helpful for me 🙂

2.  Deleting the Short dumps out of ST22, can be helpful too.  simply go to ST22, and use the menu goto->reorganize.  Then just accept the selections.

So enjoy these little tricks, and if i find anymore, you know I’ll post them out here 🙂

Thanks for reading,