sap

Home / Posts tagged "sap" (Page 4)

Variant Configuration – ETO CWG Tips

Here’s some quick ETO tips I got at the CWG that I didn’t want to forget.

If you are dealing with an engineering special or ETO configuration, you could use output determination to send an email to a group of engineers.  The drawback to this approach is that you need to know it’s a special in advance.  Much more difficult to use if it might be std or might be special.

In addition, the functions starting with CAVC allow you to build your own order bom workbench.  If you wanted to build your own CU51 or OEWB, you could use the functions to design your own transaction.


Remember, if you need more in depth VC help, please contact us,

Thanks,

Mike

Service Management – Understanding the Repair Procedure

One of the key pieces of the in-house repair scenario is the repair procedure.  The repair procedure simply put is the roadmap of actions that need to happen when you perform a service process.  I’m going to talk about how you can set this up and use it to fit your business process.

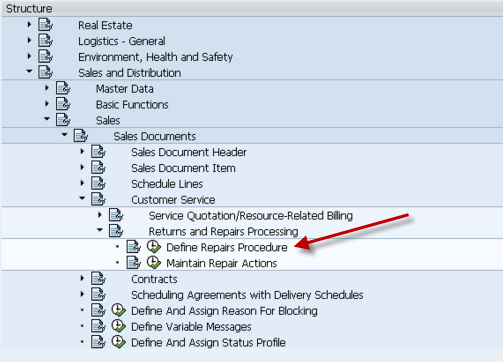
First thing is show you where in configuration you define the repair procedure.  The following screen shot shows you where to go in SPRO to configure the repair procedure.

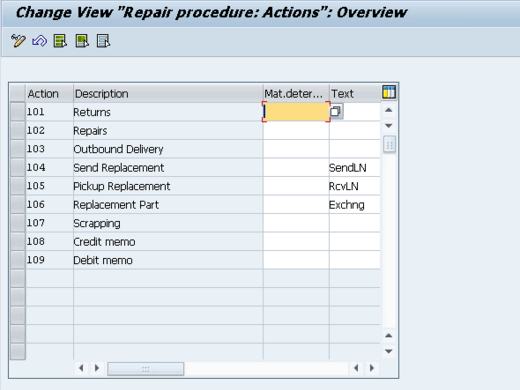
Initially, select the Maintain Repair Actions.  This screen will give you the translation of what each action means.  The actions are the key in the actual repair procedure, so I wanted to show you what they look like.  Normally, this screen doesn’t need to change unless you want to add better text to the action (this will show up in the repair screen).  Some of the important terminology in this screen:

  • Send/Pickup Replacement refers to loaned equipment.   Simply put, you send the customer a unit to use while the repair happens, then they send it back after they receive their repaired unit.
  • Replacement Part – this is an exchange.  It means the customer will keep this unit (and typically return the unit they currently have to you.  then you can repair it and add it to your refurbished/spares inventory).

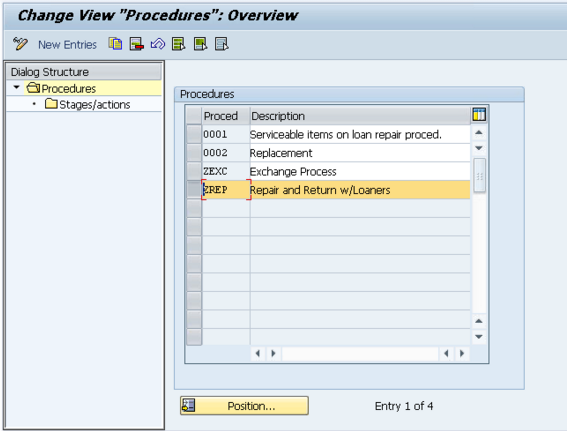
Alright, now on to the real work.  Next we will pull up the repair procedures.  I’m going to walk through the example of an in-house repair that allows loaners.  the next screen will show you how to get into the repair procedure.

Select the procedure you want to view (or copy in the event of creating a new one).

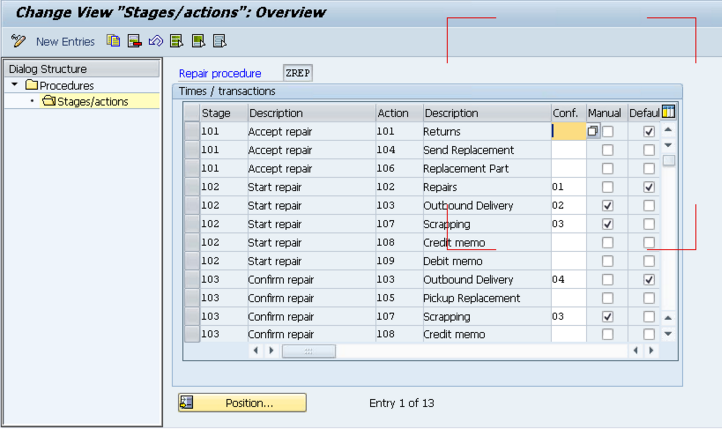
Now, you’re looking at the SAP logic of the repair procedure.  What you’ll notice is that everything is broken up by stages.    Remember, for each stage you can only define a single Default.  The stages are as follows:

  • 101         Accept repair: this is the actual receiving of the item
  • 102         Start repair: this is the repair of the item, or the processing
  • 103         Confirm repair: this is what happens after the service order is confirmed.

Now, if you look at the first stage(101) in the procedure below, you’ll see the following steps.  These are the steps you are allowed to do as soon as you enter in the material to repair.

  • 101         Returns                – this is flagged at Default, so that means this will automatically be placed into the sales order as soon as the repair procedure is selected.
  • 104         Send Replacement – this allows you to send a loaned piece of equipment to the customer
  • 106         Replacement Part – allows you to send an exchange to the customer.

Looking at stage 102, you’ll see the addition of Manual and Conf. populated.  Before I move on, the options for confirmation (conf.):

  • 01           Repair: fix me
  • 02           Do not repair/can be delivered: don’t fix me, but send me back
  • 03           Can be scrapped: scrap me
  • 04           Repaired/for delivery: I’m repaired, send me back to the customer.

Also note, if something is set as manual, even if 01 -> 04 above are selected, the item will not be automatically added to the sales order.  It will have to be manually entered.

Now looking at the actual data for stage 2 you’ll see that the numbers make a little more sense:

  • 102         Repairs                                 01                           : since this is 01, it means repair me, thus generate a service order.
  • 103         Outbound Delivery         02           Manual: this is the scenario  where the item cannot be repaired, so just send it back to the customer.  This is a manual step.
  • 107         Scrapping                            03           Manual:  Similar to 103, but this time we won’t even send the item back to the customer.
  • 108         Credit memo                                                     :  Create a Credit Memo Request for the customer, with reference this line item.
  • 109         Debit memo                                                       : Create a Debit Memo Request for the customer, with reference this line item.

I hope this makes sense of how to structure your repair procedure.  If you’d like more detail, please comment below.  Now for the next piece, how do I attach this repair procedure.

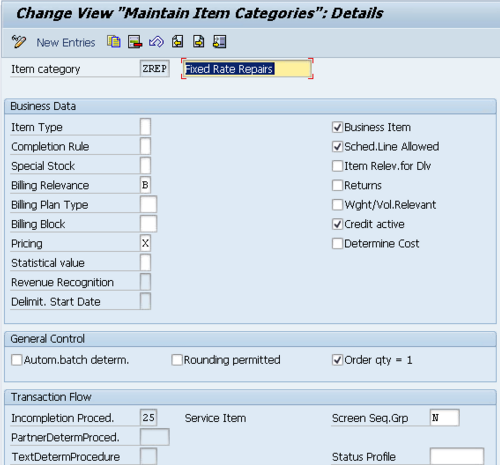
In the item category configuration, scroll to the bottom of the item category, and enter the Repair Procedure.  I’m not going into the details of how to select this item category (I’ll save that for another post).

I look forward to your comments,

If you need more in depth assistance on this, please contact us for additional consulting help,

Thanks,

Mike

Service Order – Using the Document Flow

Now in my opinion, one of the greatest things that SAP has added into the system is document flow.  this is especially true for SM.  If you’re new to SM or SD, you might not be all that familair with using document flow.  If you’ve ever visited an SD or SM document, you’ve most certainly seen this weird little icon:  .  If you plan to do anything in either of these areas of SAP, you’ll quickly realize it is your best friend.

Document flow in SAP is simply the connection to all of the preceding/follow-on documents.  In the in house service scenario, a type document flow may look something like this:
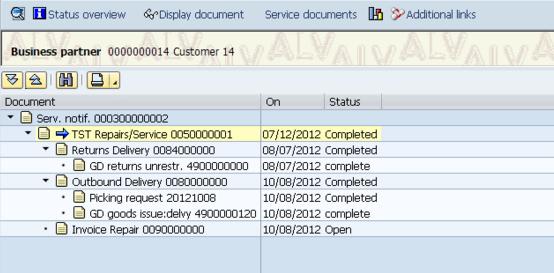
You’ll notice that in this picture I was able to see notification, the repair sales order, the inbound delivery, the outbound delivery, the invoice, and any other SD related documents.  What you also may have noticed is the distinct lack of the service order, but there is a service documents button.

Unfortunately, in the design of document flow and the table structure for capturing this, the service documents were neglected in the initial design, so the Service Documents button I believe was an afterthought.  It’s still better than nothing, and I’ll give you some tips for making the best of it.

The first big thing you need to know is, if you’re starting at an SD document (delivery, sales order etc. ) be sure to click once on the sales order (make sure it’s highlighted, and you’re good).  then press the service documents button.  This will bring up a new screen showing the service order and any of it’s related documentation.

One of the other issues I’ve encountered with document flow is the inability to see sub-service orders in the documentation.  The only way to see if there are sub service orders is to drill into the service order, and look for the structure button
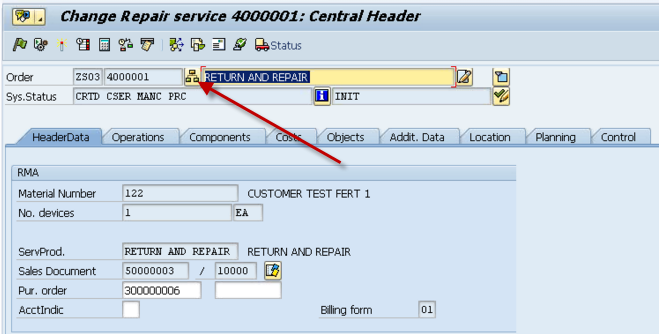
You will then need to click this button to see the sub service orders.  You can then drill into the order and see it’s individual document flow.  As a follow-on to this topic, if you have a complicated doc flow, for example…

Notification

Service Order (for quoting) – Repair Sales Order
     Service order
          Sub Service Order
          Sub Service Order
Inbound Delivery
Outbound Delivery


Now with a structure like this, you again, won’t be able to see everything depending on where in the structure you are at.  For example, if start at the service order (for quoting), you won’t be able to see the actual service order used for repair.  Instead, you’ll have to navigate to the notification, and then you’ll be able to see the structure below the notification, including the repair sales order.  The way the documents are laid out above, shows kind of how SAP structures them.  Since it is a pseudo parallel path, you have to work your way up to a common document before you can see the next path.  In this example, the notification is that common document.

There is a another big thing to remember when dealing with service.  You have to turn on the document flow for many of the items.  For example, purchase reqs, material transfer, etc. must be turned on before they will generate items in the document flow.  I HIGHLY encourage you to make sure these are turned on.  Not seeing the purchase reqs, or materials issued to a service order makes your job as a troubleshooter FAR more challenging.

Now that’s the basics of document flow, and if you’re not already using it, get familiar.  For me, it’s personally one of the best tools offered in the SD/SM module.

Thanks for reading,

Mike

Service Management – Using the Notification Status to your advantage

Now in my many consulting engagements, one thing I’ve seen consistently overlooked is the notification status.  When I ask why don’t you close your notification when you’re done with them?  I always get the same answer, we don’t have the time.  Now I understand that everyone is busy, and extra steps take extra time, but today I’d like to point out why using the notification status can help your service organization.

Now, the first thing to notice is that by default, service notifications do not have a lot of status options.  For the most part, it’s open, closed (there are more if you use the tasks, but that’s for another day).  So it’s pretty easy.  There is also the ability to add the user status (another thing I highly encourage, more on this later).  So we’ve established that there are simple choices in the service notification…  but they are often not used.

Now, the whole point of this post is to tell you why you’re missing out if you don’t use these.  Just like everything in SAP, you can collect data, metrics, and lots of useful information if you just enter it into the system.  I did a post the other day talking about how companies miss the boat by either not entering, or not using the info that SAP offers.  Well, this is directly related to that.

Entering the status of the notification allows you to use standard SAP transactions (IW58 for example) as a work list of notifications that require attention.  More importantly, it can give you the metrics to see how well your call center is performing.  Since SAP collects all the data for you, you just need to tell it when you’re done, you can have instant statistics on how many notifications were created, how long were they open, how many were closed, and even who closed them.  If you run a call center, this information could be vital to determine if you have enough representatives in the call center, are they able to close the majority of calls without follow-up, how many were questions vs. an actual return or RMA request?  All of these metrics can be extracted from SAP (if you want to see this in action, check out the demo for Broadsword, and it will show you a program that shows you all of these metrics.  All of which extract standard data from SAP.

The whole key to this is…  someone needs to perform the tasks of setting the status (user status, or just closing it).  Like everything, the data is no good if no one is looking at it, but if you are a proactive organization,  you are probably looking for ways to cut costs.  Knowing how your call center is performing can give you some key insight into now only your employees and their skill sets, but also into your products and how well they meet the needs of your customers.  (you can tell this by the number of returns, the reason for returns, and the number of repairs).

Well, I hope this was useful… as always, thanks for reading and I’d love to hear from you,

Mike

Installations in SAP – Project Systems vs Service Management

I recently got a request from a consultant friend of mine.  He was wondering about the best way to capture costs of installations.  In my experience, there are 2 very different ways of handling this, and much of it is related to the size/complexity of the installations and the amount of data you are willing to maintain in order to accomplish this.  Let me talk a little about the 2 methods.  In the end, both are great, but you should be able to look at the situation and decide which one fits your needs best.  Now, my quick disclaimer.  I am by no means a PS expert.  There quite probably many things I’m leaving out of the discussion, and I encourage you to talk to a PS expert if you think you need to go down that path :).

1. Project Systems.  This method is typically reserved for large installation (in my opinion).  The nature of project systems is that there is a lot of functionality, but there is also a lot of data to maintain in order to use it.  In PS, you can have multiple different cost collectors, full project tracking, production orders, service orders, purchase orders, etc.  all of these things traceable inside of a network/WBS.  I recommend this approach for anything that is large and may require any sort of planning functionality (for example, planning multiple service technicians, material reciepts, contractors, etc…).  Most importantly, if you need to track it like a project, it should be a project.  As far as costs/price go, usually resource related billing is used to track this since it is often a time and materials type activity.

2.  Service Management.  this is method is gonna be  the down and dirty method.  It’s a single service order (with the ability to make some sub service orders if you so desire).  It will still allow you to plan components and operations, but from a simple order structure.  You use this approach typically for anything small that doesn’t require a full project plan to coordinate (or if you want to do the project planning in MS Project and that’s good enough for your purposes).   The installation service order can be spawned directly from a sales order.  You can still use resource related billing for the cost/price determination in the sales order.

In my experience, the biggest thing you lose between SM and PS is the reporting and scheduling functionality.  PS is far superior in this respect, but if it’s overkill for your needs, you can get by with a much more simple approach in using the service order.

I hope this sheds some light on the differences.

Thanks for reading,
Mike

SAP Data – What good is it if you don’t use it?

A couple weeks ago, I was chatting my friend Justin, and we got into a great discussion about how businesses seem to be so poorly run, despite having access to almost limitless data.  So, what’s the deal?  how is it in an age of ERP systems that capture everything you do, we still see so many organizations struggling, or worse yet, barely hanging?  Well, we came up with a couple of things that I believe explain a lot (and I hope you can learn from it).  Most of this will be from my experience of SAP data.

1.  If you don’t know what the data means, how can you interpret it properly.  This sounds so simple, but when you stop to think about it, in a giant system like SAP, there is so much data.  If don’t know what the data means, how can you possibly use it?  In addition, the bigger the system, the harder it is to mix and match the data into something that makes sense to your team.

2.  If you don’t know where to find the data, it’s gonna be tough to use.  Again, similar to the first point, knowing the data is in there, doesn’t help you find what you NEED to know.  In an ERP system, often there is so much data, that getting the stuff you really need can be challenging.  SAP for example has so many different dates, that knowing which data you really need to be using can be a challenge.  Figuring out the correct data, and then pulling it together to give you the information you need often takes someone with a lot of knowledge about the system.

3. Analysis of the data is key to pinpointing the true issue.  Once you have all the information, and you’ve put it into a readable format, now someone needs to look at it and interpret what it means.  Take my area for example, Service management.  If you have an issue with repairs in-house not happening quickly enough.  There are many areas to review to figure out where the bottleneck really is.  The issue could be the receiving group not processing the delivery soon enough, it could be that the service order doesn’t get released in a timely manner due to missing parts or lack of capacity.  It could even be that the service department doesn’t enter in the data when they need to.  If you don’t know what data to look it, you could be solving the wrong problem.

4.  If you don’t use the information, things can’t get any better.  Now, this is the most difficult of all things to overcome.  When an organization doesn’t act on the data they have extracted, things will not improve.  As a consultant, this is the most frustrating place to be.  Seeing upper management receiving all the data to pinpoint where things are “broken”, but then not taking any actions to improve the the organization.  A couple years back, I was a on a project where inventory was in a terrible predicament.  Things were in the wrong place, employees were not properly transacting things in the system, and every day it got worse.  The entire team kept telling them to perform a full physical inventory, yet the business refused.  Instead, they spent days and weeks counting certain areas they believed were causing the issues.  All this managed to do was shift the problem around and never solve the issue.

As you can see, there are a lot of things preventing businesses from running at their best.  The good news is that of the issues listed above can be solved if you can get someone that does the data, and how to analyze it.  The 4th issue… well that’s beyond anything I can offer any help for =)

Anyway, I’m sure I left a bunch of stuff out…  but I hope you enjoyed it.


Serial Numbers – Number Scheme

Since I got a request for more posts about Service management, I thought I’d dig into my bag of tricks.  One of the things I’ve run into a lot of issues is serialization.  For some reason, serial numbers seems to hold a special place of confusion for many customer.  Today I want to talk about the serial number number scheme.  I’ve picked this as my starting point for serialization because many of my recent projects have had a lot of trouble coming to decisions on this topic.
Serial numbers have a great starting point when it comes to numbering.  As of ERP 5.0 or 6.0 (not sure exactly when), SAP added a field called SerializLevel.

This field allows you to make the serial number number scheme unique at a global level or unique at a material level.  This subtle difference has huge implications on the number scheme.  If SerializLevel is blank, then serial number is only unique at a material master level.  To put things simply, the combination of serial number and material number is unique, but the same serial number can show up for any material number.  If SerializLevel is set to 1, then the serial number is unique across the SAP instance.  This means that no serial number will ever show up  for any other material.  SAP accomplishes this by linking the serial number to the equipment record number.  I’ll have a future post that goes into the details of serial numbers vs. equipment records.  Since every business is different, and you can often become locked into a particular numbering scheme.  The number one decision to make is if the serial number is unique across the organization, or if it can be reused for materials.

There are some things to beware of when using this functionality.  The SerializLevel field is plant dependent.  This means that you do have the ability to set this value differently across different plants.  I discourage setting this differently for the same material.  If you were to set the value to be unique across the origanization in one plant, but unique by material in another, you’ll see some very inconsistent results in the history.  I’ll go into the serial number history in a future post, but when it comes to serialization, consistency is key.

The final issue to cover when it comes to serial numbers is what I’ve heard called “intelligent” serial numbers.  When I say intelligent serial numbers, I use the term loosely.  This can be anything from adding a prefix by product to each number, adding in a manufacture date, or it could be a combination of alphanumeric characteristic that have a decoder ring to explain them.  In my humble opinion, this is a very slippery slope and should be avoided at all costs.  When you move down the path of “intelligent” number schemes, you must introduce ABAP code to accomplish this.  I believe the user exit is IEQM0003 (don’t remember for sure if this is the correct exit).  Regardless, if you start creating an “intelligent” number scheme, you must have multiple number ranges available, you need code to possibly shift from one range to the next.  For anyone that’s been doing SAP for a while, you know that every time you introduce code, you introduce risk, and you introduce additional time to implement.

The most important question to ask is “Why do you need an “intelligent” serial number?”  A serial number should be nothing more than a tracking mechanism for a product.  Requiring the serial number to mean something is a not something that add value to a product, but it does increase the cost.  Anyway, I’ll get off my soap box now.  You get the idea that I think intelligent number schemes are costly, risky and unnecessary.

I hope you found this useful.  I hope to hear your comments, thoughts, or let me know things I missed.

Thanks for reading,

Mike

Web Dynpro Browsers – Not everything is available

One of the biggest frustrations I’m encountering with Web Dynpro (and especially BSP’s) is that they don’t work on web browsers.  So far, I’ve been able to get my simple applications working just fine on Internet Explorer (version 9), but nothing works on Firefox (version 15), I can’t get anything to work on Safari (5.1.7), and only my BSP has been able to run on Google Chrome.  So today I wanted to discuss some of my finding when it comes to Web Dynpro browsers and what is supported.  There are numerous OSS Notes that I’m still sorting through, including:

0999995
1000000
1098009
1296463
1296464
1634749
In addition:  service.sap.com/PAM talks about the availability matrix.  If you navigate to the netweaver, and punch in your specific version (7.01, etc), you’ll see the web browsers that are supported.

I’m still sorting through all these notes, but to provide an application that can be given to your customer is increasingly difficult.  How do I tell a customer, please use my web application, but you can only use internet explorer.  In addition, there are a number of people (myself included) that upgrade to the latest browser when it comes up.  So this means, there will always be a percentage of time that someone won’t be able to access my application.  I welcome any experiences that people have had with this.  Maybe I just don’t have the right support parks.  For example, I’m using ERP 6.0 EHP4, on Netweaver 7.01.  So far, this states that I can use Internet explorer (up to version 9), and Firefox (up to version 10).  Now, if I was using Netweaver 7.3, EHP1, I’d have access to safari & chrome.  Again, this is subject to being on the latest netweaver support pack.  Short story, I’m a little concerned  with selling a Web Dynpro application, because I’m afraid I’ll spend all of my time troubleshooting what releases are supported for the given clients.

Just to throw it out there…  BSP’s are even worse.  Since SAP has stopped supporting the technology.  My Rapier application works fine in internet explorer and Google chrome, but apparently the functionality is too complicated and Firefox & Safari do not support it.  My problem is that I don’t even know what functionality isn’t supported.  I do a lot of dynamic things in my BSP, so it’s a lot areas to focus on.  The question for me becomes, do I focus on correcting the old technology, or just convert it to web dynpro (easier said than done… but that’s another story).

Oh well, gotta do it, but at least I’m getting a better idea of what is and what isn’t supported.

Web Dynpro – Select-Options – Putting Select Options on Multiple Tabs in the Same Window

Well, after spending some actual working on my Web Dynpro application, I’ve already come across my first little challenge.  In my selection screen, I have multiple tabs, each with a set of select-options.  So this ran into my first extension of my skills…

So, it’s not rocket science, but why not share it, just in case it might be able to help you in your endeavors.
So, for more details, check out my other posts on Web Dynpro.  They talk about using select-options, and how to setup the basics.

Building on this concept, I’m going to walk you through the process of adding multiple selection blocks.
First step, go back to the web dynpro component and add multiple component usages.
Now the biggest change is that we will use multiple views.  We will setup one view for each tab (or each selection option).  We will still do all of the same steps, however, the steps take place at a view that will dropped into the main view.
In my example, I have a view for selection screen that contains multiple tabs.  I then have a view for each of the tabs.  This allows me to use a separate component usage in each tab.  This allows me to put different fields on each one and still keep the functionality I want.
Now, the last of the work happens again at the Window.  Now, instead of just embedding the WDN_SELECTION_SCREEN, we will be embedding the single tab view into the ViewContainer, then the WDN_SELECTION_SCREEN inside of that view.

It’s actually pretty slick.  I’m enjoying the flexiblity of Web Dynpro and what it lets me do.  Now if I could just figure out how to get it working in Firefox & Safari.  I have a feeling it has to do with the version of each of those browsers being relatively new.  Either way, I’m still researching, and you can be sure when I figure it out, I’ll let you know…

of course, if you already know the answer, I don’t “need” to struggle… I’ll happily learn from your hard work.  ha ha ha.

Thanks again for reading,

Mike

Web Dynpro – Select-Options – writing the code

Here’s the code to do  SELECT-OPTIONS in ABAP Web Dynpro:

* Adding a block (type Tray) to the select-options
wd_this->go_so_com->add_block(
i_id         = `COM2`
i_block_type = if_wd_select_options=>mc_block_type_tray
i_title      = `Sales Selection` ).

As promised, I’ll talk about what I leaned in doing the actual method to put the select-options together for a full screen.  Everything I talk about deals with the add_selection_fields (notice the plural).  I had a bunch of fields, so I chose to do them all at once.

Here’s the basics, based on the name of the usage component.  I don’t know all the details on this portion…  but trust me, it works.  it came from SAP.  =)

DATA:
* reference to the item table for multiple lines.
lt_fields TYPE IF_WD_SELECT_OPTIONS=>TT_SELECTION_SCREEN_ITEM,
wa_fields TYPE IF_WD_SELECT_OPTIONS=>T_SELECTION_SCREEN_ITEM,
* reference to the select option usage controller
lo_ref_cmp_usage TYPE REF TO if_wd_component_usage.

* instantiate the usage component, if necessary
lo_ref_cmp_usage = wd_this->wd_cpuse_usage_so_comm( ).
IF lo_ref_cmp_usage->has_active_component( ) is INITIAL.
lo_ref_cmp_usage->create_component( ).
ENDIF.

* determine referece to the interface controller
wd_this->go_ic_so_com = wd_this->wd_cpifc_usage_so_comm( ).
* initialize selection screen
wd_this->go_so_com = wd_this->go_ic_so_com->init_selection_screen( ).

If you want to turn off the default buttons that show up for select options.  I wasn’t a fan, but I may change my mind in the future.  Either way, you can turn it off with the following code:

* Hide the standard select-options components.
wd_this->go_so_com->set_global_options(
i_display_btn_cancel = abap_false
i_display_btn_execute   = abap_false
i_display_btn_check  = abap_false
i_display_btn_reset  = abap_false ).

If you want to add a block, here’s the code to do so.  One of the things to note, be sure to capitalize all the letters.  I also found that it worked better being 4 digits.  I tried comsel_1, and it failed, then comsel1, and it also failed.

* Adding a block (type Tray) to the select-options
wd_this->go_so_com->add_block(
i_id         = `COM2`
i_block_type = if_wd_select_options=>mc_block_type_tray
i_title      = `Sales Selection` ).

This little code snippet shows you the basics of adding a field.

*** begin building selection screen
*This is the field name
wa_fields-m_id = ‘SRV_MAT’.
* generate range table for data element.  Be sure to make this equal to the data element.
wa_fields-mt_range_table = wd_this->go_so_com->create_range_table(
i_typename = ‘MATSV’ ).
* if you choose to embed the field inside of a context block (box) you can add it here.
wa_fields-m_within_block = ‘COM1’.
* use this line to turn on the drop down for the field
wa_fields-m_value_help_type = if_wd_value_help_handler=>co_prefix_searchhelp.
* here is the search help to use for the field
wa_fields-m_value_help_id = ‘MAT1’.
append wa_fields to lt_fields.
CLEAR wa_fields.

Finally, once you have all of your fields entered, you can call the method.  If you followed all of the steps in my previous post, you should be able to see your select options showing up on the screen.

* generate field in selection screen
wd_this->go_so_com->add_selection_fields(
it_fields = lt_fields ).

Next up, I’ll talk about adding multiple Select-Options onto the same screen (if you have multiple tabs, this could come in handy).

Thanks for reading,

Mike