SM

Home / SAP / Archive by category "SM" (Page 15)

Service Management – Service Contracts

I recently had a friend of mine ask me about how to deal with a situation that made me instantly think about service contracts.  Like so many thing in SAP, standard service contracts have a lot of possibilities, but can require some work.  That made me think that I should do a post on SAP Service Contracts.  So here goes.

SAP Contracts are a very versatile sales document in ERP.  Some of the things you can do with contracts include:

  • Start and end dates by line item.
  • Ability to connect multiple technical objects to a contract line item.
  • Ability to connect a billing plan to bill at any interval the customer needs.
  • The ability to recognize revenue on a particular line item, either at a time based or milestone basis.
  • The ability to connect to any document in the document flow.  Notifications, repair sales orders and call off orders are the scenarios just to name the most popular.
  • The ability to directly kick off a service order from the contract (given the correct item category).  This allows for easier profitability analysis for a contract due to settlement rules that can settle directly to the contract.  This would work in the same way that the current field service sales order behaves.

Contracts also provide a mechanism to see if the contract is making or losing money.  This is typically accomplished using custom reports.  The custom report is usually required since service orders typically settle to the repair sales order and normally companies will want to do analysis on all contracts for a particular materials/profit center/product hierarchy/etc to determine the contract tends.  Using document flow, you can quickly gather all repair sales orders or direct service orders connected to the contract and sum all the values.

Contracts also have several out of the box reports that can be run at any time:

  • VA45 – Contract List (this will behave like VA05)
  • VA46 – Collective Subsequent Processing of Contracts
  • IW74 – Change of Servicable Item Contract
  • IW75 – Display of Servicable Item Contract
  • V.06 – Display incomplete contracts.
  • SDV1 – Expiring Contracts
  • SDV2 – Expired Contracts
  • SDV3 – Completed Contracts

Maintenance Contracts Items

The maintenance contract is used for general service over a time period.  An example of some things you would use a maintenance contract for:

  • Extended maintenance where all parts and labor are covered for 1 year.
  • Unlimited tech support calls or emails.

The maintenance contract is very useful when you don’t have a limit to the number of times a customer can request service.  You can still follow the standard repair process, field service process, or even just create a notification in order to track the services provided.  Typically, a maintenance contract is invoiced only from the contract, unless the terms and conditions state that all parts must be paid for by the customer or any other variation like that.  In those instances, it may be required to use time and expenses billing on the repair sales order (using the DIP profile) rather than flat rate pricing.

Quantity Contracts Items

The quantity contract is used for any service that you are selling in a limited quantity.  An example of some quantity contracts may include:

  • 3 calibrations to be used any time over the next 3 years
  • Yearly onsite inspection
  • 5 repairs for any of 5 pieces of equipment over the next 3 years.

The quantity contract is useful to keep track of how many service calls a customer has paid for in advance.  It can also be easily tied into revenue recognition (milestone).  Each time a call off order is created with reference to the quantity contract item, it can signal revenue recognition that the item has been used and can now be moved from deferred revenue.  You can also quickly look at the quantity contract and see how many items the customer has outstanding.  Please note, this is a dynamically generated quantity field, so you will not be able to pull this field directly from a table if you are doing any custom reporting.

There’s a lot more about contracts, and if you have specific questions, I’d love to hear from.  Thanks for reading.

Service Management – External Email on Notification Change

This one goes out to my loyal crowd out there.  I’m looking for a better way to do this, and I’m not sure it exists.  I have an open notification, and I want to be able to notify a particular partner type (with an email assigned) upon certain changes.  We’ll keep it simple, and say a status change.  I want to send an email on notification change to this partner, but so far it appears this can only be done with a user exit.

Like so many thing in SAP, I’ve seen a ton things to accomplish this using actions in CRM, but my world is ERP, so it often means I need to do things the hard way =)

Now I know very little about workflow, so perhaps it’s possible, but that seems like a rather large up front cost in comparison to a little bit of ABAP.  But maybe I’m missing something.  If any of y’all might have a good option, I’d love to hear it, or if you’ve had to do this yourself, I’d also like to hear from you.  This hasn’t been a common request in my career, but it does seem to be popping up more and more often.

Thanks for  your advice, and as always thanks for reading.

Service Management – How Many DIEN Materials do you need?

Now, it’s been a while since I’ve talked about SM, so i thought I’d pull one out of the archives.  Well, at least my archives =)  Now when you set up your service business business, one of the questions you always begin with is how many DIEN materials do you need to run your business?  Now there are the obvious ones:
Return and Repair
Field Service
Service ExchangeNow, you can even break this down further by warranty or some other breakdown your organization needs.  My person take is to avoid going any deeper than the level I have above.  The further down you break things at this level will likely lead to confusion/mistakes when entering in the orders/notifications.  I typically encourage any further breakdown to be handled at a level that can change (like the accounting indicator).  If you use warranty as an example, once this is on the sales order, it’s very difficult to reverse.  So I encourage you to keep things like that out of the “rough cut”.
Once you have the main processes defined, you need to take a look at the next level.  Now, this is the  parts where things become more convoluted is if you begin to use resource related billing.  Now the trick with resource related billing (RRB) is knowing what you need to report on.  One of these days I’ll go into more details on RRB, but before you can do that, you need to understand what your goals are.  Now you can go simple, and just say labor and materials.  But what about subcontract costs?  do you need to break out travel costs?  or maybe even certain materials (ROH’s vs. HALB’s).  Keep in mind that much of your design will be based on your customer needs, but some of it should be based on what you plan to track as a business as well.

The short story is to have a plan.  You can add more in the future, but in order to handle Resource Related billing, you really need to figure out this part first.  When I talk more about RRB you’ll understand why.

Thanks for reading.


Service Management – Service Contract Profitability

Today is another pulse question.  By that I mean how do you handle Service Contract profitability.  Service contracts, maintenance contracts, warranties, etc all have a very important fact in common.  They all need to be tracked to figure out if you are making or losing money.  Let’s take the example of an extended warranty contract.  You charge $1000 for a 1 year extended warranty.  But how much does it cost you to live up to the contract?  More importantly, do you actually know exactly what you earned or lost on any particular service contract?  Can you see how many times you performed service on the item?  how much was spent on parts?  labor?  travel time/expenses?

If you don’t the answer, how can you accurately determine what you should charge for your extended warranty?

I’m thinking about adding a new Dashboard report to show the service contract details.  Especially, the cost vs. price, and all of the attached documents, service, serial numbers etc.  But again, I’m always wondering, is this something people want?

So I’m hoping you can help me out.  First, is service contract profitability reporting something you could use?  If so, what would you be looking for?  if not, why not?  do you already have a custom solution?  do you use service contracts?  In either case, I’d love to hear from you.  Any insight you could provide would be greatly appreciated.

Thanks for reading and I look forward to your comments.


Service Management – Equipment Hierarchy

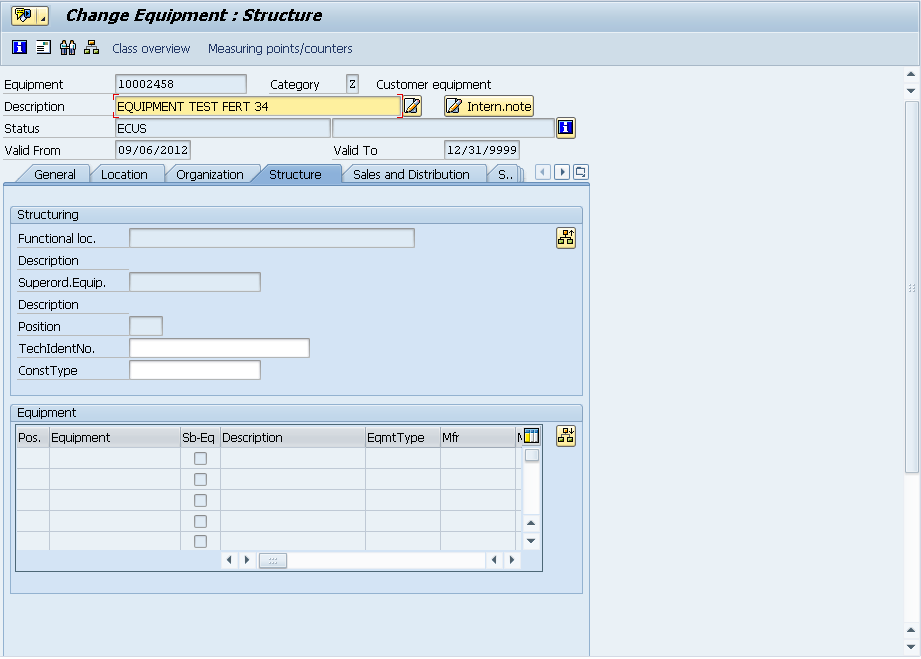
Today I’m heading back into the Service Management realm.  I wanted to talk about something that is relatively simple, yet immensely cumbersome in practice.  That’s right, the equipment hierarchy.  When I say the equipment hierarchy, it may also be known as the equipment structure.  It is the process of linking serial numbers/equipment records into a structure or hierarchy.  The principal is very simple, and I’m going to walk through the process.  After the process, I’ll explain what makes it all so cumbersome (if you haven’t already experienced the pain).

If you go into any equipment record and go to the structure tab.blog-01

in the bottom portion, you’ll find the button:  blog-02 to structure the hierarchy.

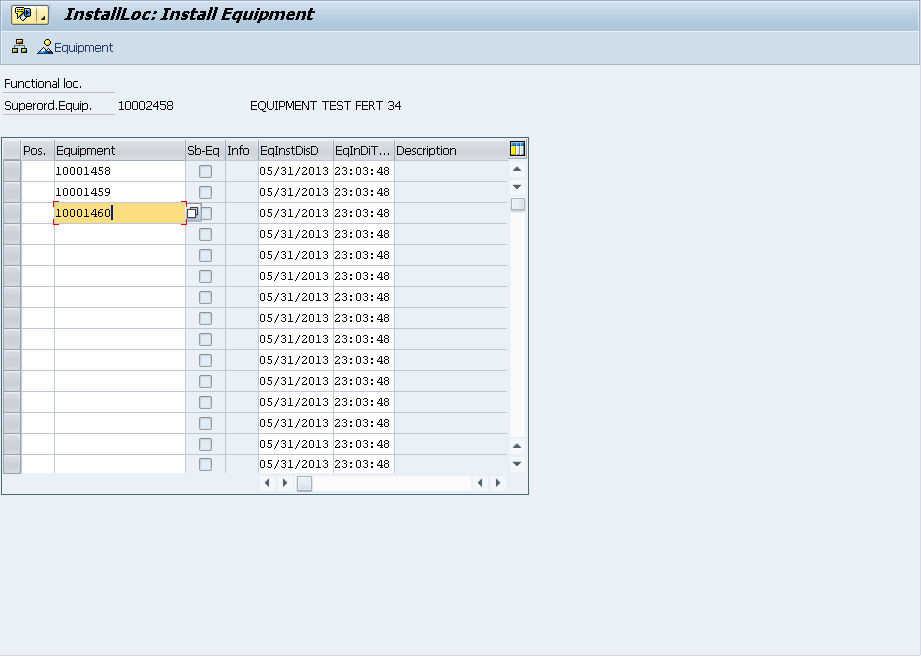
blog-03

On this screen, you simply enter in each equipment record that belongs at this “level”.

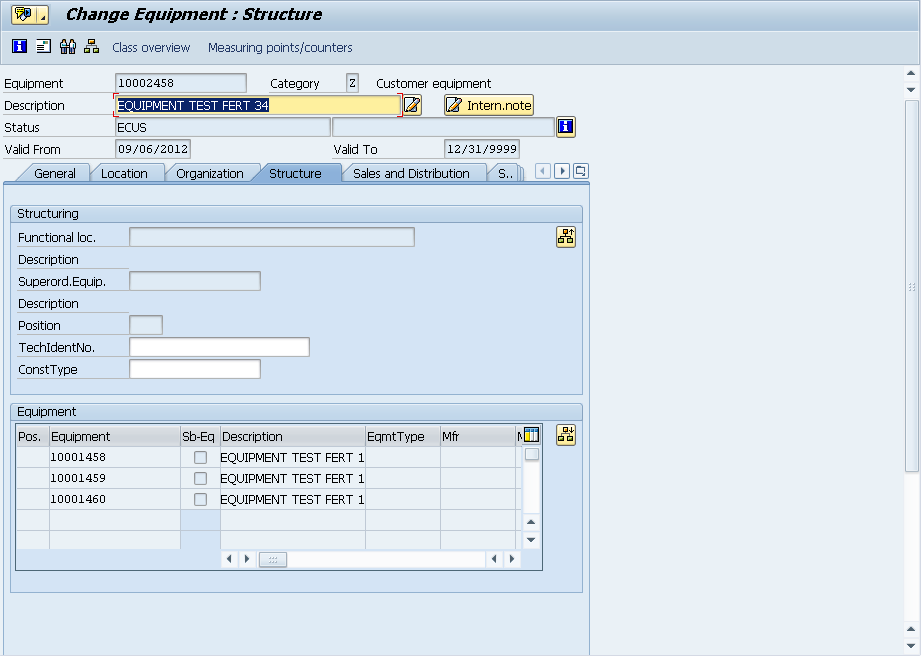
blog-04

Now you can see that a structure exists.  If any of the equipment records in this list had their own equipment hierarchy, you’d see the Sb-Eq box checked.

Now at the top of the page, you’ll see the button:  blog-05  and it will bring up the entire structure report.

blog-06

My example was pretty simple, but it would also show functional locations, and would show the entire explosion.  So, pretty easy, right?

now, the problem comes into maintaining this.  Up to this point, I’m not aware of any automated way to capture the hierarchy.  Say for example, have a production order with the top level material being serialized, and you use several other serialized components to assemble it.  You must now manually create that structure (now make it worse, and say it’s a production order for 50, you have to repeat the process 50 times).  The issue becomes complicated because you may issue 50 serialized components to make 10 finished goods.  Which 5 items went into which finished product???  Without a high amount of diligence, it becomes highly manual and extremely difficult to maintain automatically.  I’ll be talking more in the future about some methods to begin capturing this information.

Thanks for reading,


Service Management – Master Warranty pt 4

This is the last part of the SAP Service Management Master Warranty.  So far we’ve gone over all of the configuration to use the master warranty, and we even created a master warranty, but so far, it still means nothing.  Today we’ll go over how to use all the pieces we’ve created so far.

In this screen shot, I’ve shown an equipment record (transaction IE02).  Keep in mind, your equipment may look different, but the important piece is the customer or vendor warranty section.  If you currently do not have these fields shown, you’ll need to configure the equipment record to include those sections.  Once there, you must enter a begin guarantee date (this is your warranty start date).  From here, you either enter in the warranty end date, which is the most straightforward way to enter in the warranty.  The other option, is our master warranty we created (this is shown in the screenshot).  Now, you may be asking me…  why use the master warranty if it’s just date related?  The biggest reason to use the master warranty is that you don’t need to worry about the exact end date.  You just pick the master warranty, and it figures out the end date.  It makes life easier for any sort of automation you might wish to use, in order automatically assign the correct start and end date.  Of course, if you do anything other than time related, you must use the master warranty to handle this…  now back to the show 🙂

Now, if your master warranty includes anything not time related, you must use measurement documents.  First, press the measurement/counts button and you will then see the screen shown above.  I’ve shown you the populated version.  Notice that WTY_USAGE_HOURS is the characteristic name.  The rest, I’ll save for another day to go into all the details of the measurement docs.  Be sure to save this and then we can move to the next step.

Now, we move to transaction IK11.  This creates the first counter or measurement.  In the example shown above, you can see that on 5/7/2013, the reading was 5.  As long as it’s less than 1000, it’s still under warranty.  Normally, you collect the measurements on a regular basis, weekly, monthly, etc…

Now, once you enter in the measurement/counter, you can go back to IE02/IE03, and see the status of of warranty.  Notice, the little check mark which means it’s still under warranty.  You can even see the complete details by pressing the puzzle piece next to the status.

The last 2 shots show the the full details of the warranty.  You can see the difference between line 1 which is date dependent, and line 2 which is counter related.  All of this same information can be seen if you enter this piece of equipment on a service notification.  I hope these lessons have enlightened you on using the master warranty.  Watch for another series in the future on some more advanced topics related to warranties, measure documents, etc…  and just as a teaser…  Rapier now includes the ability for your customer to see their customer or vendor warranty and the full status for each piece of equipment they have registered.  Thanks for reading and if you want more great tips like these, check out my Service Management E-Course.


Service Management – Master Warranty pt 3

In the last post, I finished the configuration portion of the SAP Service Management – master warranty series.  Now, that leaves us with the “important” part.  Setting up the master data and using it.  That’s what the next 2 lessons will cover. Today I’m going to talk about creating a master warranty.

TXN: BGM1 (like always, 2 is change, 3 is display)

Unless you choose to use the external number range, you can leave this field blank and simply hit enter.  The system will come up with the next available number for you.

Now you’re looking at the initial screen (after I filled in the basics).  Let me just touch on these fields.  If we look at the header section, you’ll notice there are several fields filled in.  Like everything, a description is needed.  Next you choose if this will be a customer or a vendor warranty (if you have any concerns or other options, see my previous posts on the configuration).  I also checked the pass on warranty box.  This simply says that I want to pass this warranty onto any sub-equipment records below this one.  It goes back to the inheritance of the warranty.  The remaining fields are sort and text type fields.  They aren’t required, and may never be needed.

Now we get to the heart of things.  When you look at the Services tab, you must enter at least one service.  Think of an entry in this section as a warranty “grouping”.  Each enter you post here is a service material, so you will need a DIEN or similar material master to exist.  In a master warranty, you can add as many materials as you like here, and can assign characteristics for each material.  This comes in handy for example if all service “time” is covered under warranty, but only certain materials are covered under warranty, you could list those out individually.  Once you enter you material(s), you will need to highlight each one, and select the count tab.

The count tab is truly where the magic happens.  In my example above, the warranty1 material will be true if it is inside of 24 months (characteristic 1) or the Usage Hours is less than or equal to 1000 hours.  The first line is purely time dependent (remember the flag we set in config for time).  The 2nd characteristic will be based on measurement documents since this is the only way we can know this value.

At this point, we can save or repeat the count tab for each remaining material we entered in the first tab.  Next time, we’ll show you how to add the master warranty to an equipment record.  Thanks for reading.


Service Management – Master Warranty Pt 2

Today I want to continue with the Master Warranty configuration I started yesterday.  This time around we will get into more details…  more of the nitty gritty.  If you missed part one of this post, check it out here.

The important piece is to make sure the customer and vendor warranty are assigned to a number range.

Next we move onto the Initial Transactions: Default Values.  This is rarely anything you need to change, but I like to be thorough 🙂  It simply sets the defaults for the transactions.  By default, it’s set for the customer warranty, which is the most common master warranty, so unless you do more with Vendor warranties, you can leave this alone.

Now we get to the fun part.  In order to complete the configuration for the master warranty you need to create some master data.  Now, I’ll be honest, I hate the way this works, because you must create master data in your configuration client…  but it is what it is…  Now, is where you need to do a little planning.  You must create some characteristics (I’ll get that shortly).  Now the characteristics need to be the same in all clients (at least the name).  How many characteristics you need to create is based on what you need to track in the warranty.  In my coming example, I needed to track 2 things.  Straight time (in months) and the number of hours the widget was used…  so I created 2 characteristics.  I’m going to cover the creation of those now…

TXN: CT04 – this to create the time based characteristics.  Be careful with your naming convention, because you may go down the road and need one for years, one for weeks, who knows…  so be specific in your naming.

Nothing fancy in the setup…  but it is a good idea to include a Unit of Measure.

Once your characteristics exist, you head to the last step of configuration.  Define Warranty Counters.

You’ll notice that I added 2 characteristics.  Keep building this list for all the things you want to track.  Now for things that are purely time dependent, make sure you set that flag.  That tells the warranty that it is based on time not on measurement documents (we’ll cover those in the upcoming posts).

Ok…  the configuration is done.  Next up, we’ll talk about the master data to use that configuration.  As always, thanks for reading.


Service Management – Master Warranty pt 1

I know much of my blog has been consumed with the new Solution Sales Configuration, but happily I started to add some new functionality to Rapier, so it gave me the chance to get back into Service Management again =)  For those of you that don’t care about VC or ABAP, thanks for your patience.

Today will be part one of my series on Master Warranties, or even Warranties in general.  The Master Warranty is SAP’s solution for an easy, reusable way to attach a rule based warranty to your equipment records.

So to start this off, you first need to make sure the master warranty functionality is setup.  So, moving down the list, we first look at Check Warranty Categories.

You’ll see by default there are 2 standard versions.  Customer & Vendor.  I can’t think of another option for warranty, but SAP does give you the option to add new entries 🙂  Just make sure the master warranties you want available are checked.  By default, both are checked and normally, you want change this, unless you want to turn off Vendor Warranties for example.

Next up, we’ll look at Define Warranty Types

This is the biggest piece of configuration in the whole master warranty area.  Again, you have the 2 options Customer & Vendor.  Now there are a bunch of fields you can setup (but you don’t need to)…

D.Box.Not – If the indicator is set, a dialog box is displayed when you create a service notification that gives you the warranty status.
D.Box.Ord – If the indicator is set, a dialog box is displayed when you create a service order that gives you the warranty status.
D.Box.Inv – If the indicator is set, a dialog box is displayed when you create a service invoice that gives you the warranty status.
Status Profile – allows you set status profile (a group of status’ that apply) to a particular warranty type.
Partner Determination Procedure – just like everywhere else in SAP.  Figures out your partners.
Usage of the Condition Table & Application & Procedure – You can set this to work according to the condition tables like Pricing, listing/exclusion, etc…  This is actually new to me.  I didn’t realize this could be done, and after a little more digging, it does nothing…  these are fields for future use…  so they do nothing.  So much for my excitement.

Well, this seems like a good place to stop for today.  I’ll pick this up again in the next post and talk further about configuring the master warranty.


Service Management – Serial Numbers vs Equipment Records

This is one of those posts I’ve been meaning to write for a long time, but I needed to actually take a few minutes and play in the system to verify what I “thought” was the difference 🙂  I get this a lot from different customers, “What is an Equipment Records?”.  Normally, my answer is always the same.  It’s equivalent to the serial number.  After spending a few minutes playing with the configuration and looking at the output, I realize that my answer isn’t completely accurate.  So that’s why I wanted to talk a little about this on the blog.

First, let’s take a look at the serial number.

Now, the biggest thing to take into consideration is the category.  Based on the configuration behind the category, will impact if there are other tabs that show up.  For example, if you chose a different category that included Configuration, you would also get the configuration tab (for Variant Config info).  But in general, you won’t get a lot more than what you see right here.

Now, let’s contrast this with the equipment record:

Notice all of the extra tabs and buttons you get by default.  Some of these views are configurable and can be turned on/off if you choose.  While much of this information is manually populated, you still have it all available, and with some of my upcoming tools, I plan to provide functionality that will allow for some automatic generation of things like serial number structure, equipment (as-built/as-maintained) BOMs, etc…

So there you have it…  why equipment is more than just a serial number.  My personal feeling is to always use an equipment, and let the serial number profile drive it automatically, but if you truly have no need for any additional data, just stick with the simple serial number structure.  I hope this helped you…  it’s actually helped clarify it in my own head…

Thanks for reading..  and my apologies for such a long stretch with no SM posts.  I’m about to embark on the Field Service Engineer application, so that means there should be a lot more SM on my mind…  🙂