SAP

Home / Archive by category "SAP" (Page 34)

Variant Configuration – SSC Syntax for Classification

Alright, now I’m starting to get the hang of this, and I have to confess, I like it.  If you’ve ever worked with me, you probably recognize that I was kinda old school when it came to the VC, and model creation.  I tended to always the old transactions rather than the cool new tools like PMEVC.  However, the SSC (Solution Sales Configurator if you forgot) has given me a cool new way to do things that really speeds things up.  Now, I’ll have to see if there’s anyway to import back into ECC easily, but for now, I’m just playing in the Eclipse tool.  Today I’m going to talk about the SSC syntax of classification.

If you haven’t checked out the previous posts, they will help you catch up:

Variant Configuration – SSC Stand Alone Installation
Variant Configuration SSC – tricks to installing the local database

Variant Configuration SSC – using the Modeling Environment

Now, here’s what I did to give myself a baseline.  I took an old presentation about advanced mode modeling from the CWG:  Advanced_Mode_Tutorial.pdf.  Hank Meeter wrote this nearly 10 years ago, but when it comes to what you can do with the SSC, it all still applies.  And since I really hadn’t done anything with advanced mode in well, I think I might have played around in a sandbox 9 years ago…  I figured I needed a refresher.  So I pulled up my own system, and I went through did all the exercises.  Now the part that sucks is that I can’t get the IPC on my systems (apparently all the money I pay SAP, and the fact that I’d use it to help them sell the stuff when I consult doesn’t warrant me getting the install files, but I”m not bitter 🙂 ).  So I could write all the rules in ECC, but I couldn’t test any of it.

Next, I did all the same exercises in Eclipse, and what’s really cool is that I could execute it there and see the instantiation, the rules firing, and even a bit of the debug functionality.  So, I’m going to break this into a few posts, and talk about the syntax in Eclipse and how to make it all work.

Now, the first thing you need is a project, so I made myself a new SSC project (see my previous posts if you need help installing).  And since this was a simple one, I got rid of a bunch of folders and just kept:
Classes
Knowledge-Bases.

I created a file under each of these.  Under Classes, I created the file Library.ssc (because the example is about a library and books and bookcases).  Then I created a file under Knowledge-Bases called…  knowledgebases.ssc (original, I know)…

so great.  I have 2 empty files…  what the heck do I do with them.  One of the nice things about the Eclipse is that it has the helper functionality built into it.  so if you press <cntrl>-<space>, you’ll get the list of options.  Still, it’s daunting, so I cheated and used some of the starter projects I got to get me started.  So that’s what I’ll do for you 🙂

Now the building blocks of everything Variant Configuration related is Classification, so it’s the obvious place to start.

Characteristics:

/* here’s a few examples that should get you started */
/*Here’s  numeric cstic with a defined value range */

characteristic AM_THICKNESS {
name “Thickness” numericLength 4 decimalPlaces 2 restrictable unit “cm”
values
0.25, 0.50, 0.75, 1.00, 1.25, 1.50, 1.75, 2.00,
2.25, 2.50, 2.75, 3.00, 3.25, 3.50, 3.75, 4.00,
4.25, 4.50, 4.75, 5.00, 5.25, 5.50, 5.75, 6.00,
6.25, 6.50, 6.75, 7.00, 7.25, 7.50, 7.75, 8.00,
8.50, 9.00, 9.50, 10.00
}
/* here’s your char based */
characteristic AM_MATERIAL {
name “Material” textLength 6 restrictable
values
“CHIP” name “Chipboard”,
“PLY”  name “Plywood”,
“WOOD” name “Solid wood”,
“STEEL” name “Steel”
}
/* a numeric interval */
characteristic AM_WEIGHT {
name “Weight” numericLength 4 restrictable unit “g”
intervals 1-9999
}
/* my first Abstract Data type */
characteristic AM_HOLDS_BOOKS {
name “Holds Books” classType AM_BOOK multiValue
}
/* an aggregating characteristic */
characteristic AM_WIDTH_TOTAL {
name “Total Width” numericLength 6 decimalPlaces 2 unit “cm”
specialFunction aggregating
}

Next up, gotta do something with those characteristics.

Classes:
class AM_SHELF {
name “Shelf”
characteristics
AM_HEIGHT required,
AM_WIDTH required,
AM_DEPTH required,
AM_THICKNESS required,
AM_MATERIAL required,
AM_WEIGHTSUPPORT required,
AM_HOLDS_BOOKS required noinput,
AM_WIDTH_TOTAL noinput,
AM_GEOMETRIC_TYPE invisible,
AM_WEIGHT_TOTAL noinput
}

One of the big things to notice is that you don’t set the characteristic attributes like invisible or required at the cstic level.  You have to define it at the class.

Gotta keep you reading…  and I like to keep some ideas of what to write about next, so I’ll start the next round like materials and bills of materials tomorrow.  Hope you find this interesting.


Variant Configuration – Using the SSC Modeling Environment – Eclipse

As promised, I started playing with the SSC modeling environment today.  It’s an incredible hassle to get installed, but after playing with it for an hour, I have to say I love it.  The SSC Modeling Environment, Eclipse, is very different than the standard ECC method of maintaining a model, but it is pretty slick.

If you haven’t checked out the previous posts, they will help you catch up:

Variant Configuration – SSC Stand Alone Installation
Variant Configuration SSC – tricks to installing the local database

Now, the first thing I recommend (if you can) is to get a sample project.  It really helps.  I’ll start going over some of the things I’ve learned, like syntax, but let’s not get ahead of myself.  First, how the hell do you use the tool.

Now, once you have a project created, the first question I had was “How do I play with this thing?”  That being said, it was the first thing I sought to figure out.  I apologize for everyone without a ground zero, but be patient, the next thing I’m going to do is start building a simple project, and I’ll share all that info with you so you can build your own.

So, first you need to make sure you’re looking at the model view “Perspective.  You can tell which perspective you’re at by looking in the upper right corner.  If you don’t see the SAP Model, then you need to click the little button (arrows pointing above) to select the SAP Model.

Once there, double click into the knowledge base.

now right click and select Open Knowledge Base.

Now select the lower level item, and double click.  You’ll see the simulation characteristics shown on the right.  Now you can start playing with it like a CU50 type simulation.

Finally, you may or may not want to see the invisible characteristics, so you can use the menu shown above to turn on or off the invisible characteristics or localized names.

So that’s the first round of using the SSC Modeling environment.  There will be more to come as I learn more.  Thanks for reading.


Variant Configuration – SSC Modeling Environment – Installing the local database

As promised, I wanted to talk talk about some of the challenges of installing the MS SQL Server local database for the Eclipse SSC modeling envirmonment (I know, I know…  it really is a mouthful).  I got so spoiled using Variant Configuration this whole time.  Everything was already there, aside for an OSS note or two for fine tuning.  Anyway, I ran into 2 glitches when installing the SQL database, and of course, it couldn’t connect to Eclipse.  If you haven’t checked out my previous post on installing the SSC modeling environment, check out my previous post.  So, after some online research, I figured out what I messed up.  there were 2 main things that needed to be done.  The first was the authentication.  I accepted the default of windows authentication…  mistake # 1.  If you fell for the same thing, here’s how to fix it…

Step on is to change the authentication of the server.  go to properties.

Make sure SQL Server is selected under authentication.

After you restart the database, then you can go to the user “sa” and activate it.

Set the password to whatever you like, then select the status section.

Be sure you have the user enabled.

Next up, you need to make sure the TCP/IP settings are working…  Go to the Sql Server Configuration Manager.

Navigate to the Protocols for MSSQLSERVER, and be sure to set the TCP/IP to enabled.

Then restart the server using services application.

Find the SQL Server service, shut it down, and the start it…

now if you go into Eclipse, it should connect to your db…

Best of luck…  I’ll be back again soon as I learn how to use modeling environment =)


Variant Configuration – SSC Stand Alone Installation

As promised, I finally figured out how to get the Solution Sales Configurator modeling environment installed (how’s that for a mouthful).  First off, I recommend getting the following document from Service.SAP.com.  IG_Soln_Sales_Config_102.pdf.  The SSC Stand alone installation can be a bit overwhelming at first, but if you follow the steps, it’s not too bad.  Of course, operating systems may cause issues (one of my colleagues using windows 8 had a lot of headaches)

this guide will help, but I’ll give you some inside scoops on how to get everything to work together.  So, you’ll need to download some stuff in order to make it all work.

Eclipse:  http://www.eclipse.org/downloads/I downloaded 4.2.2 Classic

SQL Server Express
http://www.microsoft.com/en-us/sqlserver/get-sql-server/try-it.aspx
I downloaded the Microsoft SQL Server2008 R2 RTM – Express with Advanced Services (but pretty much any version should work).

Next up, you’ll need the patches for Eclipse to turn it into the modeling environment.  Here’s what you looking for:  com.sap.custdev.projects.fbs.slc.updatesite-1.2.4.201304111120-assembly (SME patch for locked changes) .  I believe it can be found on Service.SAP.Com.  Also, don’t forget to following the installation guide.  It gives you several other websites to add into the update path.  These include:
http://download.eclipse.org/modeling/tmf/updates/ (TMF Project Update Site),
which is required for Eclipse releases newer than version 3.6
http://download.eclipse.org/modeling/emf/updates/
Various emft sites (…/modeling/emft…), for example,
http://download.eclipse.org/modeling/emft/mwe/updates/ and
http://download.eclipse.org/modeling/emft/updates/
o Main update site of your Eclipse release (for example,
http://download.eclipse.org/releases/helios or
http://download.eclipse.org/releases/indigo)
o http://download.eclipse.org/eclipse/updates/3.7 (The Eclipse Project Updates)

Finally, you’ll need a Java SDK.  Go to website:  http://www.oracle.com/technetwork/java/javase/downloads/index.html
I downloaded the  Java SE Development Kit 7u21

So, start simple, install the Java SDK.

Next install sql server.  For the most part, it’s pretty straightforward, but remember when it comes to authentication, select SQL Server Authentication.  If not, you’ll never be able to connect.  Tomorrow’s post will talk more about the SQL installation and configuration steps you need to make it work.

Then install eclipse.  I use this term lightly, since all you need to do is unzip the downloaded file and extract it to whatever location you like.  Next open eclipse.exe.

Once it opens, you’ll need to install the SAP extensions.  To do this, use the menu:  help–>install new software
Add in the location of wherever you put the SAP Eclipse modeling environment. (remember, if it’s zipped, you’ll need to unpack it).  Select the resulting SAP extensions shown and install.

Finally, connect Eclipse to the your newly created database.  Use the menu window–>preferences, then expand SAP Solution Sales Configurator and select connections.  Add a new entry, be sure to select database, and set the client to 000 since this is for a local installation.

Finally, copy the SSC tables to the database by using the menu:  SAP Modeling –> Create Tables.  If you don’t see the menu, be sure to open the perspective for SAP Modeling (it’s the button in the upper right next to Java).

And Voila…  you have the SSC modeling environment.  If you’re lucky enough to have a sample SSC configuration (like from the CWG), you can import it into the modeling environment using File–>Import.  Then select General–>Existing Project into Workspace.

And I just found one more step.  Be sure to Download the KB (SAP Modeling –> Download).  This will move the imported models into your database so that you can actually execute them.

More tomorrow, but I’ve rambled enough for one post =)


Service Management – Serial Numbers vs Equipment Records

This is one of those posts I’ve been meaning to write for a long time, but I needed to actually take a few minutes and play in the system to verify what I “thought” was the difference 🙂  I get this a lot from different customers, “What is an Equipment Records?”.  Normally, my answer is always the same.  It’s equivalent to the serial number.  After spending a few minutes playing with the configuration and looking at the output, I realize that my answer isn’t completely accurate.  So that’s why I wanted to talk a little about this on the blog.

First, let’s take a look at the serial number.

Now, the biggest thing to take into consideration is the category.  Based on the configuration behind the category, will impact if there are other tabs that show up.  For example, if you chose a different category that included Configuration, you would also get the configuration tab (for Variant Config info).  But in general, you won’t get a lot more than what you see right here.

Now, let’s contrast this with the equipment record:

Notice all of the extra tabs and buttons you get by default.  Some of these views are configurable and can be turned on/off if you choose.  While much of this information is manually populated, you still have it all available, and with some of my upcoming tools, I plan to provide functionality that will allow for some automatic generation of things like serial number structure, equipment (as-built/as-maintained) BOMs, etc…

So there you have it…  why equipment is more than just a serial number.  My personal feeling is to always use an equipment, and let the serial number profile drive it automatically, but if you truly have no need for any additional data, just stick with the simple serial number structure.  I hope this helped you…  it’s actually helped clarify it in my own head…

Thanks for reading..  and my apologies for such a long stretch with no SM posts.  I’m about to embark on the Field Service Engineer application, so that means there should be a lot more SM on my mind…  🙂

Variant Configuration – The New Solution Sales Configurator

My new gig is actually going to be pretty cool.  It looks like I’m going to get a chance to learn the new SAP SSC, which is the new Solution Sales Configurator.  Now for those of you that have been doing VC for a while or have ever attended a CWG, I’m sure you’ve heard of the SCE advanced mode.  Now, you can bet there will be more posts coming soon as I start to get into this, but I wanted to start with a quick intro on what the SSC is.

Now, for you VC experts, this might all seem obvious, but stick with me, I’ll be getting into more details soon.  The first thing to understand about the SSC (or even the advanced mode of the SCE) is that it allows you the ability to configure in a “bottom up” fashion, vs. the standard VC top down.  Let me explain more what that means.  The easiest way to do this is with an example.  So I’m going to go back to my roots, and talk about a Frame product.  Let’s say you have a product like this:

1-Frame
2-Module
3-Cable
3-Cable
2-Module
3-Cable
3-Cable
3-Cable
3-Cable
2-Module
3-Cable
2-Module
3-<empty>

Now, in a product like this, if you use VC, you must first configure the Frame, then determine how many modules, and for each module, determine how many cable connections you need.  Each of these level is configurable.  Now this may work for you (but it will have a lot of potential iterated characteristics).  Now, often the customer doesn’t really care about what frame is chosen, or even how many modules are involved.  The customer knows that they need 350 cable connections of certain types.  To use standard VC to model that behavior would be extremely complex and cumbersome.  This is where the SSC comes into play.  The SSC allows you to write logic that can build the structure from the top down, even though the items don’t exist within a single model.  So you could start with the number of connections, and build logic into the SSC that says if I choose at least 48 connections of this connector type, then you need at least 2 modules, and then you can say to select a certain frame based on the size and qty of modules.

I hope this makes sense.  The concept is difficult to explain, but it might start making more sense when I get deeper into this.  The short story is that SSC lets you give the customer a guided selling or at least a simpler method to method a complex product.  I have to say, I’m pretty excited.

Stay tuned for more SSC details 🙂


ABAP – Screen Design with Too Many Elements

I recently ran into this while designing a configuration screen for our Proximity application.  This is something that I didn’t find anything about online, so either I looked in the wrong place, or maybe I’m the only one crazy enough to try this :).  Anyway, in the course of screen design I have a rather large subscreen, that contains a lot of radio buttons, a couple table controls and bunch of input fields.  You get the idea.  Well, as I was nearing the end of the screen, I start seeing some strange behavior, so that’s what I wanted to talk about today.  So if you’re designing a large screen and you see anything strange, keep this post in mind.  Now, keep in mind, this is my SAP ERP 6.0 SR3 system and I don’t have the latest basis release, so this might be something I could fix through basis, but who knows.

1.  RUNT_ILLEGAL_SWITCH short dump.  It’s interesting because the screen compiles just fine, but as soon as you go to execute the screen you see this dump.

2.  Radio button groups start asking strangely.  What I started seeing is that my radio button group that was set to include 2 or 4 buttons, suddenly is grouped around another set of radio buttons, 20 lines above this one (that’s how I can tell it wasn’t just my fat fingers) ha ha ha.

3.  Really long compile times.  If your subscreen starts taking around a minute or longer to compile, this might be another clue that your screen is getting too big.

4.  Your elements just start behaving strangely.  I ran into my table controls suddenly stopped scrolling.  It was populated, but I could only get to the first page.  This one drove me nuts for a couple hours last night.

If you see any of these suddenly start happening, go ahead and just remove a chunk of elements.  The trick that I use is that I “Cut” them out of the screen (leave them in memory) and then compile.  If things start working again, you have too many elements.  So then I paste the elements back in and narrow down how many elements are driving it over the edge.  You really have 2 options, 1 just strip out enough fields that everything will compile properly again or you will have to create another tab/screen/subscreen to handle a chunk of the elements so that you can simplify.

if anyone else has seen this, let me know, I’d be curious, and also if you found any other ways to correct the issue.  As always, I hope this helps.


ABAP – Call transaction and skip first screen tricks

Well, in my current development tasks, I’m really pushing to reuse code in more and more of my applications.  You know, that whole object oriented approach that should be standard for everything =)  Well, one of the tricks I discovered lately is that if you can do a  call transaction and skip first screen from within an application.

It’s great, SAP even provides a statement that allows you to do this.  However, what I found is that there are limitations, as well as some “unforeseen” behaviors that result from using this statement.  So here’s what you need to know.
If you are using a custom transaction, in the “first” screen, you need to make sure that the “Next Screen” on the attributes tab points to another screen number.  Sounds easy enough, but what I discovered is that using this next screen has some weird impacts on running the transaction normally.  For example, my custom transaction has all of the controls in the PAI/PBO code to tell it what to do next.  When I manually pointed to another screen, suddenly my PAI behavior changed.  When I hit enter it moved to the next screen.  My original coding required pressing execute.  While this isn’t the end of world, when I was green arrowed out of the results screen it now left my transaction, instead of returning to the first screen.  This behavior was certainly unacceptable for the flow I wanted.

OK…  how do you get past this.  I took a very easy approach, and let me know out there if there is a better way to handle it.  I created a new screen (a copy of my first screen, and this time I changed the “Next Screen”)  I didn’t change anything else.  Then I created a new transaction code that started from the new screen.  So now I have 2 different transactions.  1 for on-line users, 1 to be called from a program.  This worked perfect for me, but of course it is extra data, that to me seems unneeded.

Thanks for reading, and I hope this can help you…


ABAP – SELECT Statement with a variable table name

I just figured out a cool trick last night, and this may be old hat to a lot of you.  I was working on the latest piece of Proximity, and I wanted to be able to re-use my code, but each place would call it’s own custom transparent table.  The structures were the same, so it was an easy change.  Well, turns out it was a pretty easy trick.  You can create a Select statement with a variable table name.  Check it out the specific details below.

DATA: L_TABNAME TYPE DD02L-TABNAME.
L_TABNAME = ‘Z_TABLE’.

        select single * from (L_TABNAME) into z_wa
where field  = field.

That’s it.  Again, a trick I could’ve used a long time ago, but finally did the research last night to implement it.  Hope you find this handy.


Web Dynpro – Challenges with Centering an Embedded View

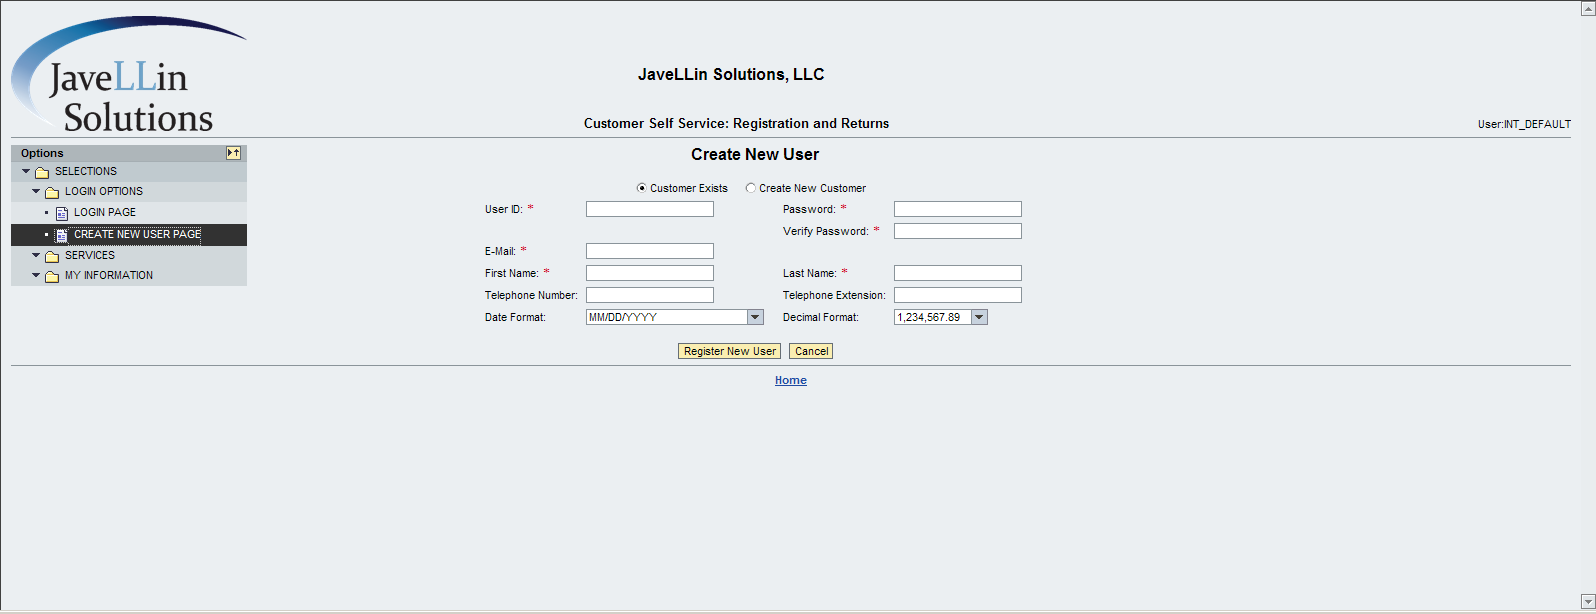
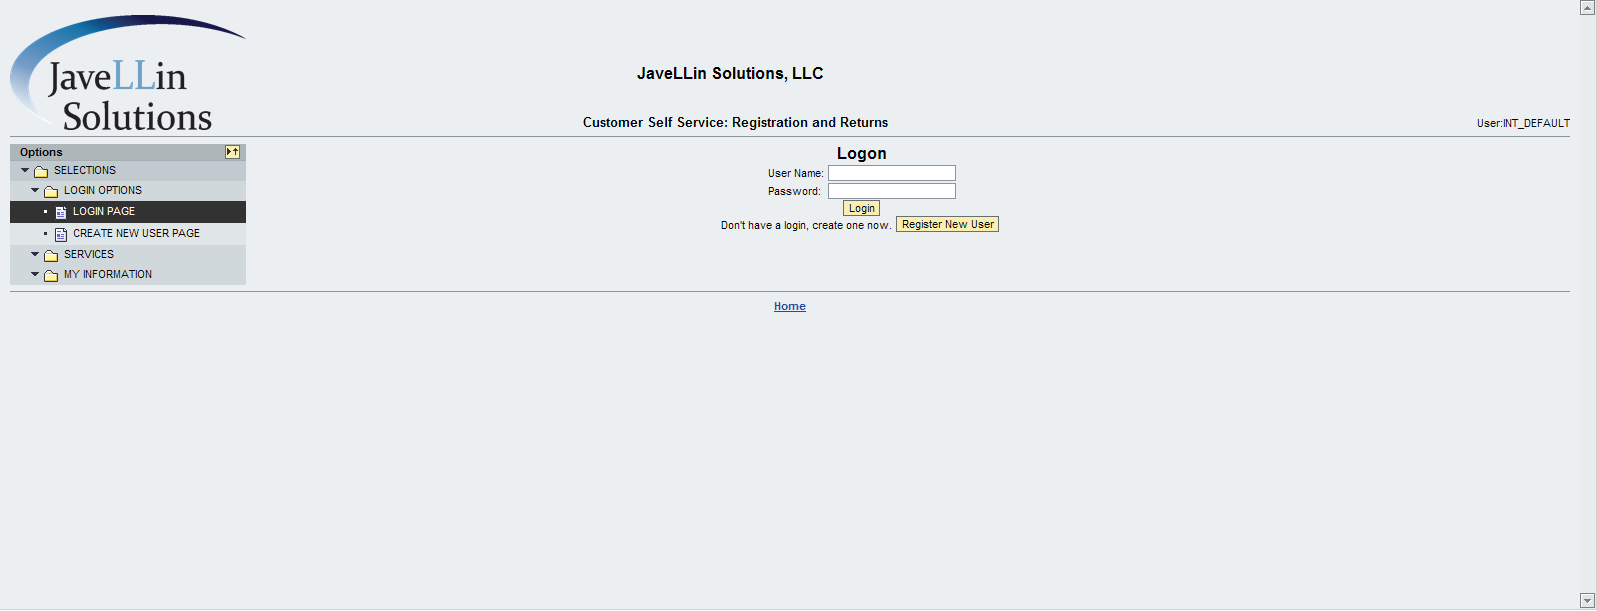
Well, I spent way too much time trying to get this working just right, and I finally had to set it aside.  Maybe one of my great readers might be able to shed some clues on what I’m doing wrong, or perhaps you have the same issue 🙂  Anyway, I have redone my Rapier Application into ABAP Web Dynpro, and I really like the results.  The only problem is that when my browser is maximized, I can see that my embedded view isn’t centered properly on the screen.  It’s not a huge amount that it’s off, but enough to be noticeable.  What makes it even more maddening is that is seems to be related to whether the embedded view has one or 2 columns of data.  I can see a much greater shift if there’s only a single column…  Take a look…

blog-awdp layout-01

Now, I’m dynamically creating the elements in 2 columns.  The 2 columns will always be there.  I’m just generating what items show up and where in each column.  I mention that because the columns themselves are not dynamic…


blog-awdp layout-02

Now this one isn’t being generated dynamically, and it only has a single column of data to enter.  Not sure if either of these factors have to do with my issue, but you can see how the Login page is shifted further right than the create new user page.

Now, here’s some of the things I’ve tried… (and using this combination is what got me the closest to what I want…  but still room for improvement)

Main View (contains embedded views)
I have a transparent container with 2 subitems.  1 tree,1 view container.  It uses the gridlayout, and has 2 columns, I’m stretching it horizontally.  Layout-halign = beginofline.

Next, my view container underneath it spans 1 column and has the h-align = beginofline.

Next, the views.  I’ve made a point to set them all up the same way (especially these 2 that I’ve been using as my test case to get them both centered in the same spot).
In the RootUIElementContainer, is set to a single column and is NOT stretched horizontally.
For each of the elements below, I have both the element and layout for horizontal to be centered.  When I look at the screen, it looks exactly how I want it.  so it seems like the views are fine.  I just want this view to be centered on the open area in my screen.

So…  after all of that…  any ideas out there that I should try to see if I can get these centered?  or is this a limitation of AWDP?  I appreciate any help you might be able to lend me here 🙂