SAP

Home / Archive by category "SAP" (Page 11)

User Variants for SAP reports

I recently got a question about how to have user specific variants for reports.  And more importantly, how can you avoid having to select it every time.

It’s rather easy.

Create a variant within a report.  When you save it, be sure to use the naming convention U_<username>.  For my systems, it’s usually U_MPIEHL

if you name your variant this way, every time you open the report, it will open with this variant without having to do anything.

Thanks for reading,

Warranty Claims – Creating a Notification directly from a Claim

Well, since I began my adventure into claims again, I’ve been struggling with it allowing me to create a notification, or even edit it directly within the warranty claim.  I know I had done it in the past, but couldn’t get past several silly error messages.

The first error message I received was:

Action Control

Error within action control (Customizing, data)

Well, needless to say, there is no documentation out there for this error.  After a lot of trial and error, I finally found the issue.  If you go into  OWTY -> Control Data -> Process Control -> Define Actions

Action T205 (and T206) need to have a function assigned.  I set up the following:

T205 – WTY04_NOTIFICATION_CREATE

T206 – WTY04_NOTIFICATION_CHANGE

Within in my procedure, I already had entries for T* as valid options, so I didn’t need to do any additional work there.  If you copy from the standard options, you will likely have these entries as well.  This got me closer, but I still had issue.  I ran into message:  WTY 119.

QM/CS/PM Message
Only message types with previous number assignment-Customizing mess.type

After scratching my head a bit, I experimented with different notification types.  Turns out, the notification must assign numbers in advance in order to be used within a claim.  My custom notification type had this turned off.  I selected the standard S1 notification type, and voila…  it works.  Now, I need to do more experimenting to get my credit memo request working, but at least I know where to start.

Thanks for reading,


Warranty Claims – Activating a validation or substitution (VSR)

I had to spend some time to figure out this portion actually worked.  I figured out how to make a validation, but no matter what I did, I couldn’t get it to execute.  Well, turns out, you need to go to an additional transaction to turn this stuff on.

WTY_VSR_ACTIVE – Activate validation and substitutions

Once you know it, it’s pretty straightforward.

blog-vsr-001

Company Code: enter in the company code this should be activated in.  Note, you will need an entry for each company code.

Area: WY

Timepoint:  this will be particular area within the validation and substitutions areas.  1 – 21.

Bool Class:  this will be determined by entering in the Area and Timepoint.

Validation: enter in the validation name.

Valid From: valid from date

Valid to: valid to date

Sequence: sequence of the rules

Active: active or inactive.

it’s really that simple.

thanks for reading,

Warranty Claims – Creating a Validation

This is something within claims that I’ve always wanted to figure out, but until recently, I just didn’t spend the time to do it.  turns out, it’s a very cool feature.  The idea behind a validation is that you can create your own custom rules without any development.  The rules will then check fields based on your requirements.  If they are blank, or incorrect, you can flag a message to correct the field.

Here are the basics of creating a validation.

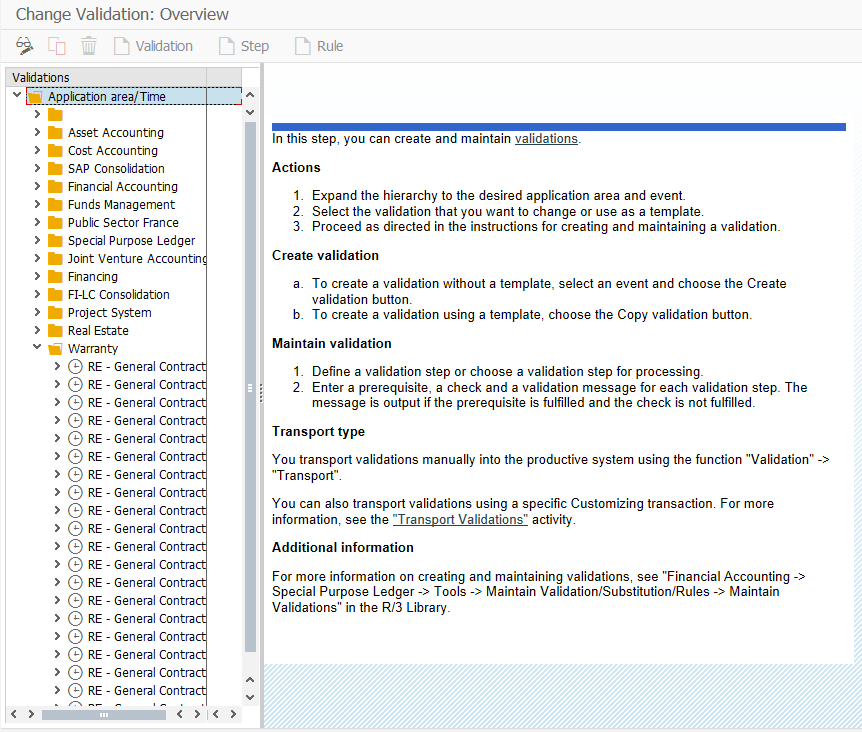
using transaction OWTY, go to the following portion of configuration:

Warranty Claim Processing -> Control Data -> VSR Checks -> Specify Validations

Once you enter the transaction, you will need to drill down to the warranty section.  You will notice there are 21 different branches under warranty.  Although they are not labeled, these correspond to the boolean classes.
blog-vsr-01

Highlight the folder you wish to add a rule to and press the Validation Button
blog-vsr-02

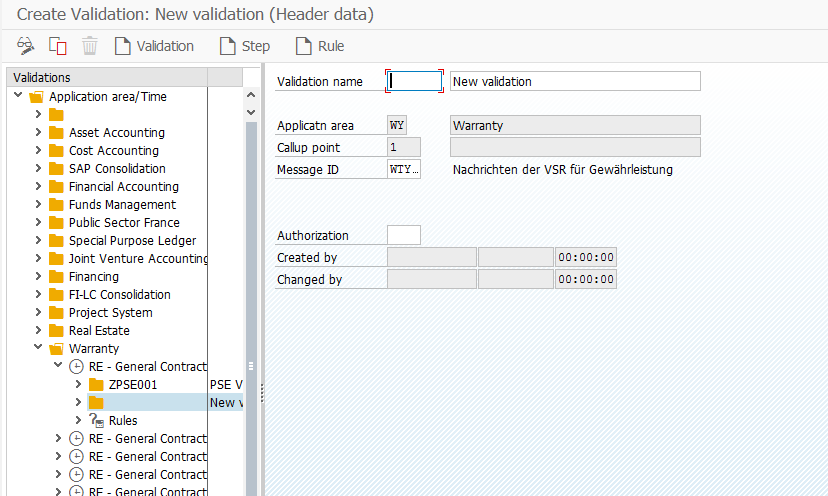
Enter in the following information:

Validation Name: the key for the validation.

Description:  description of the validation

Message ID: the message class that will be used.  By default, WTY_VS.  However, you can assign your own message class to get the errors you want.

Authorization: The authorization group allows extended authorization protection for particular objects. The authorization groups are freely definable. The authorization groups usually occur in authorization objects together with an activity.

After populating this information,  press the create step  button .
blog-vsr-03

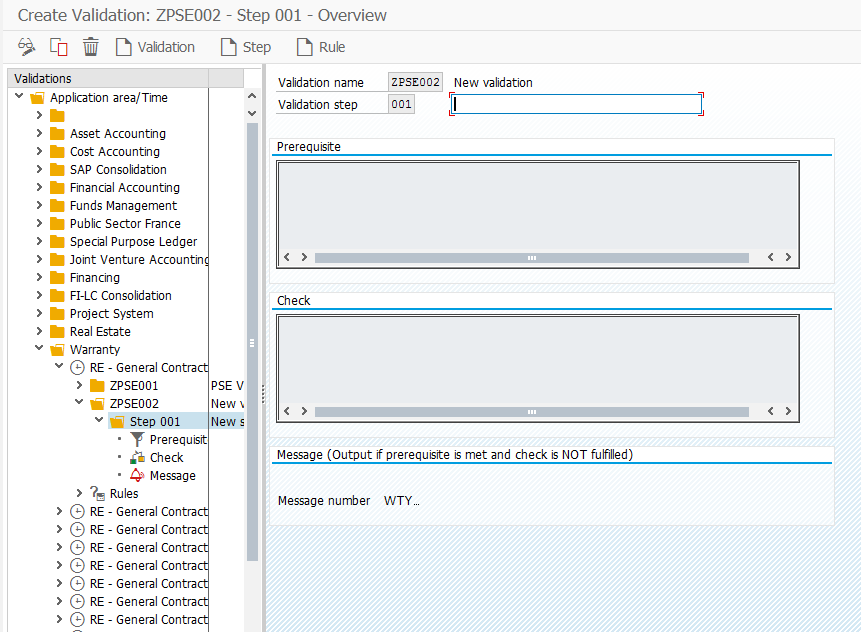
Now we get to the real work.  Within the step, there are 3 pieces.

Prerequisite: here you enter in the conditions that must be met.

Check: this is the actual validation that is occurring.

Message:  this is the message that is displayed if the VSR check is false.

The best way to understand this is with a demonstration.  So I will show you a simple validation that checks if the reference date has been populated, but only when the claim type is Z005.

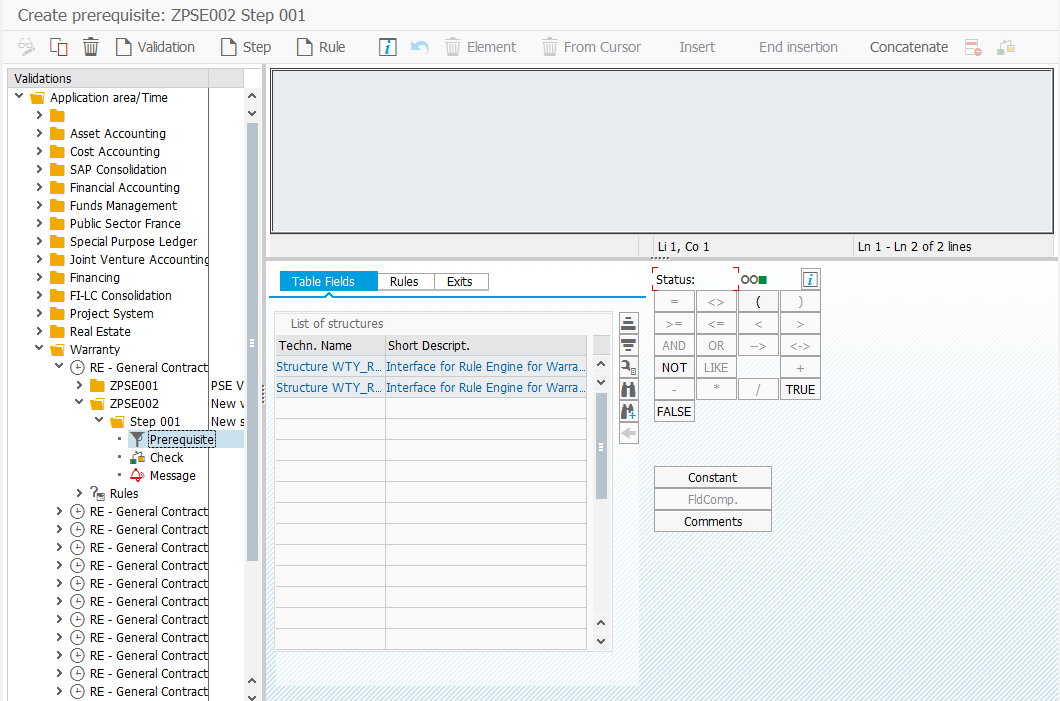
Select the prerequisite from the menu.
blog-vsr-03

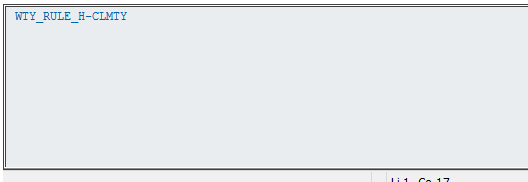
First, from the list of structures, select the second table:  WTY_RULE_H and double click to bring up the field list.  Scroll down to WTY_RULE_H-CLMTY and double click.  The table and field name will now be shown in the top window.
blog-vsr-05

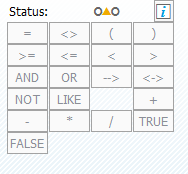
Next, from the Status section, double click =.
blog-vsr-06

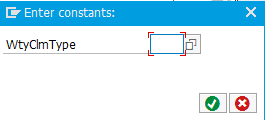
Next, press the Constant button.

blog-vsr-07

Select or type Z005 and press enter.  Now you will see the completed the formula.

blog-vsr-08

Next, select the check.

Repeat the steps above to build the formula:  WTY_RULE_H-REFDT > ’01/01/1900′

Note:  I had trouble making WTY_RULE_H-REFDT <> ” work properly, so I adapted the formula.

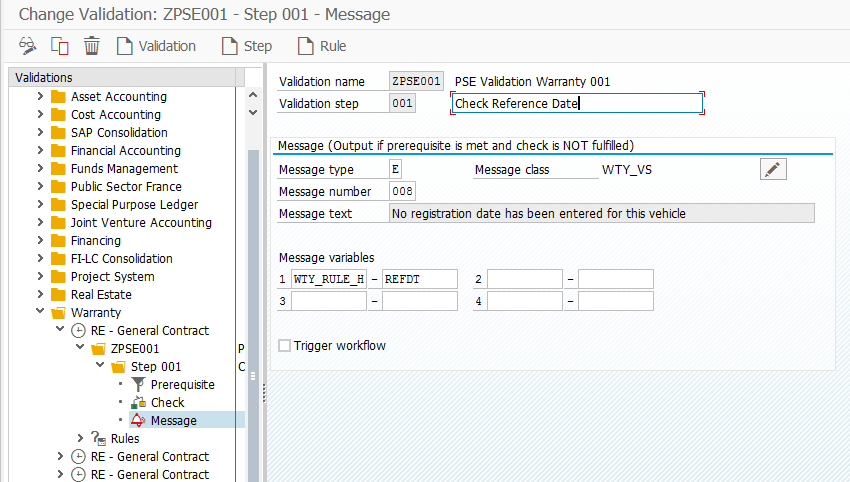
Finally, press the message.
blog-vsr-09

Description:  Enter in a description.

Message type: E or W or I

Message number: Do the pull down here to see the messages available.

Message variables: If the message has variables, enter them bottom section.

Save the validation.

Use Transaction: WTY_VSR_ACTIVE to activate the VSR checks. I’ll talk more about this in a future post.

Thanks for reading,

Personas vs. Custom Development

After experimenting with Personas for a while, I realized that I had a huge misconception about Personas.  As I listened to companies talk about Personas and upcoming projects, I assumed they picked Personas because it  didn’t require any development.  Being an application developer, it scared me a bit.  I was afraid that with a bit of work, Personas could replace all the effort I’ve put into my applications.  After playing with it for a bit, I now understand that it absolutely is not the case.

So that led me to the question of why you would pick Personas over just doing your own custom development.  I wanted to share some of the things that will require custom development, even if you pick Personas.

  1. If you can’t do something in the standard transaction,you won’t be able to do it with Personas.  For example, I wanted to add a button on the notification screen that would allow me to create an equipment record and then return back to the notification screen.  It’s not possible to this.  The only way you could do it is if you create an RFC to create an equipment record.
  2. If you want additional data within a table or a grid, Personas can’t do it.  Personas can only hide columns, never add a new one.  You will need to create your own table/grid to accomplish this.
  3. If you want to pull data from multiple sources, your run time could be ugly.  In this event, you don’t NEED to do custom code, but most likely you will want to in order to keep your end users happy.

I’m sure there are other things, but I just wanted to put this out there.  Don’t expect that just using Personas will be a magic bullet.  So if your goal is avoid programming, custom code, custom transactions, etc, don’t expect Personas to do it all for you.  On the flip side, I personally recommend doing a combination.  I think you can make any transaction look better with Personas.  For the first time, you can make SAP screens look like a web screen, without doing a full UI5 or Web Dynpro application (translated to LOTS of TIME and MONEY).  But remember, Personas can only fix what already exists.  So expect to do both to really get to the ultimate user experience.

thanks for reading,

Service Management – Checking the Responsible Cost Center

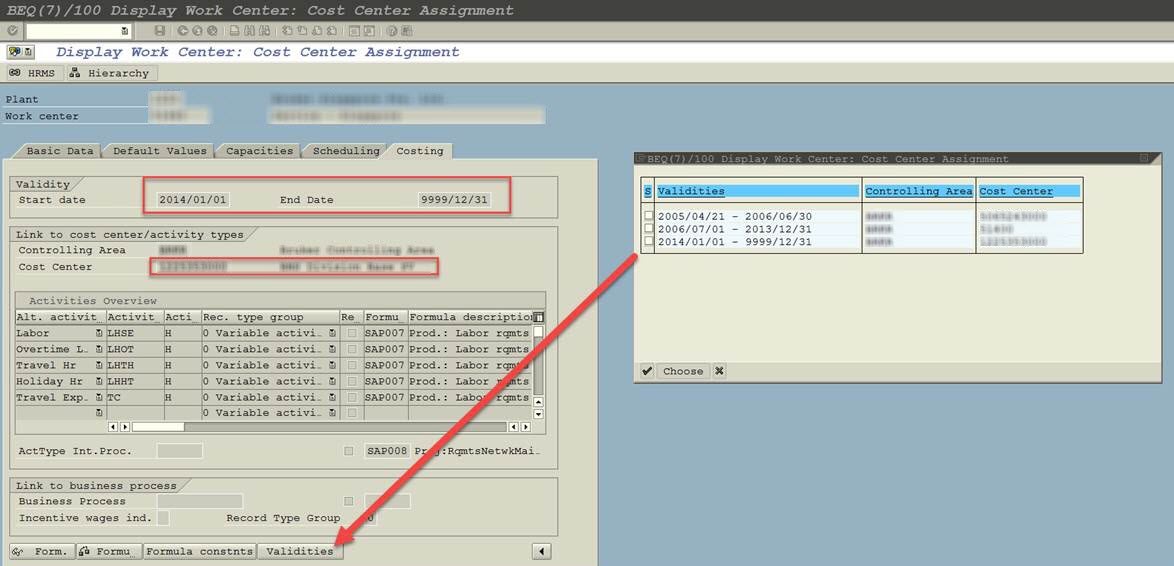
I recently had a question about why cost was going to a particular area from the service order.  I initially thought, no problem.  I’ll just check the work center, the equipment, etc…  but everything was pointing to a value that didn’t match where the cost was going to.  A friend of mine finally figured out what I was missing.

blog-workcenter

I totally forgot about the validities within the work center to see the changes in the cost center.  So, thank you Craig.  I wanted to share this with anyone else out there and to make sure I will remember this next time.

thanks for reading,

Personas – Performance Considerations

When dealing with Personas, performance is sure to be a huge topic of concern.  Here is are some of the big lessons to keep in mind when trying to get the most out of personas.

  1. If you deal with tables or grids, minimize the number of columns using screen variants BEFORE creating your flavor.  The idea is that if you hide all the columns you know you won’t need even before adding a flavor, then less data needs to be sent.  This will improve your tables and grid performance.
  2. Minimize fields with drop downs imbedded in the field of a table or grid.  A perfect example in my world is the billing or delivery block on a sales order.  As soon as touch the field, it drops down a list.  With Personas, it appears to replicate the list every time the field shows up.  So if you have a table/grid with that field in 100 rows, it will send 100 lists.  I’m a little fuzzy on this so maybe I misunderstood.  But SAP encourages you to avoid those type of fields in a table/grid, and whenever possible minimize the number of values.
  3. When combining tabs, be aware of how much data is moving from one tab to another.  In the screen painting process, Personas will go from tab to tab and manually grab the element, then move it, then move to the next tab and move that.  If you system is fast enough, you might not notice this, but if you look closely enough, you might see some elements showing up ahead of others.  In addition, moving tables/grids is expensive in personas due to the increased amount of data.  It all works, but be cognizant of how much stuff you are moving around and if it’s making your end users wait a lot longer than normal.
  4. An obvious on… smaller images are better.  If you can avoid it, don’t use high resolution graphics as these will need to be sent to the browser.  Instead, go smaller, or if you have a complex layering image, find a way to make it a single graphic.  This will cut down on the amount of data the browser has to wait for.
  5. Use RFC’s to pull in data whenever possible.  Again, this is more of a common sense suggestion.  Why visit a screen to pull data, when you can run a simple function and pull back the data.  I think of it in terms of a BDC vs. a function in terms of performance.

I’m sure there will be more, but it’s what I’ve found so far.

thanks for reading,

Dealing with Packaging Materials

I recently ran into an issue when I attempted to configure packaging materials to come in a line item on the delivery (so it can be PGI’d).  I haven’t spent a lot of time with packaging, so it is always a learning experience for me 🙂  My issue came in because I was getting error:  VL 449, telling me Different billing type for intercompany billing.  Well, this confused the hell out of me.  Since when does the delivery line item have any billing configuration associated with it.

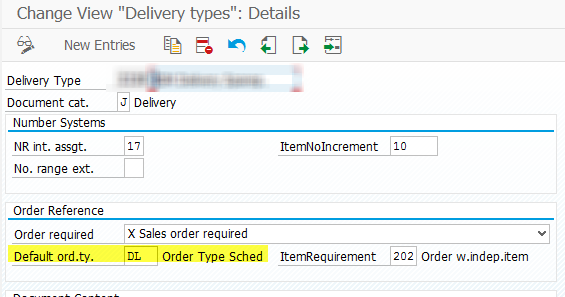
I made my rounds through configuration (delivery item categories, delivery header, copy control, material master).  I finally found an old post that talked about this (thanks SAP Fans).  It turns out, you get this error when you add a line item to a delivery that wasn’t on the sales order.  If this happens, it looks at transaction OVLK, for a delivery you will see something like this:

blog-pack

Notice the default ord.ty field.  This field only has an impact if you add items to a delivery that weren’t on the sales order.  In that event, it looks at the sales order type listed here and checks the billing types assigned.  Personally, I’ve never seen order type DL, but it is the out of the box default.  As soon as I changed to my “default” order type, everything started working normally.

Thanks for reading,
Service Management – Service Orders – Refurbishment Processing

Next, we’ll talk about configuring the service order to be allowed for refurbishment processing.  This is ultimately what allows the service order to work in our in-house scenario.  The refurbishment processing is simply the act that takes in a material and allows you to perform a repair, a fix, an upgrade or whatever, and then deliver the product back out again.

This piece will copy setting if you perform a copy from service order.

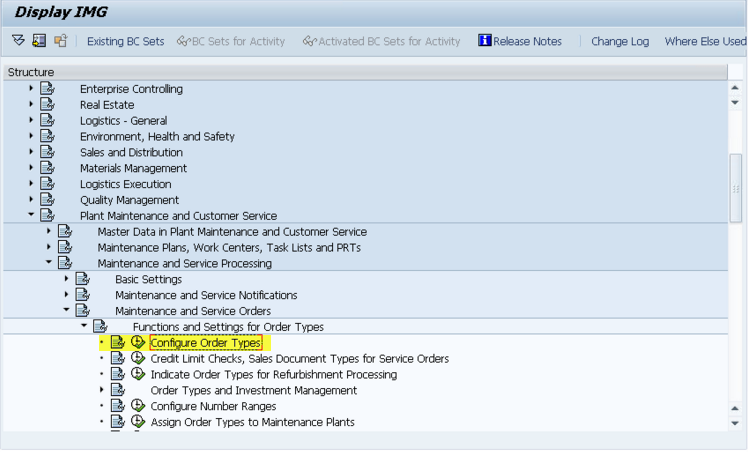
blog-srv-ord-01

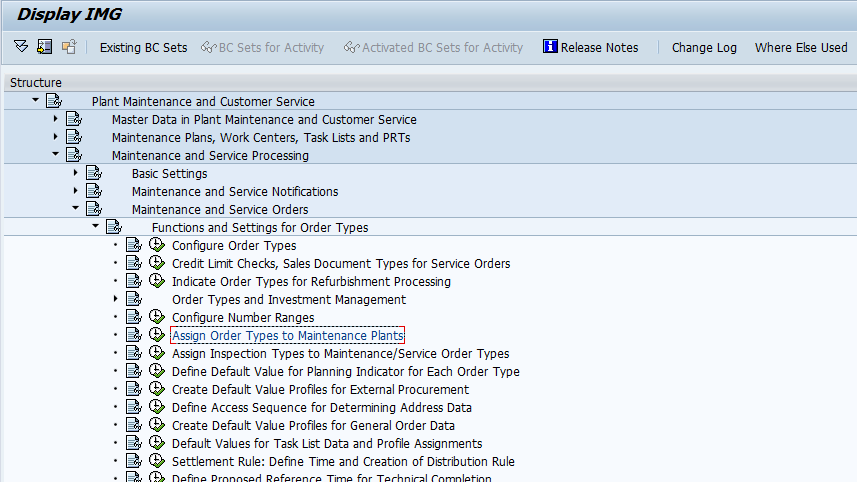
IMG->Plant Maintenance and Customer Service->Maintenance and Service Processing->Maintenance and Service Orders->Functions and Settings for Order Types->Indicate Order Types for Refurbishment Processing

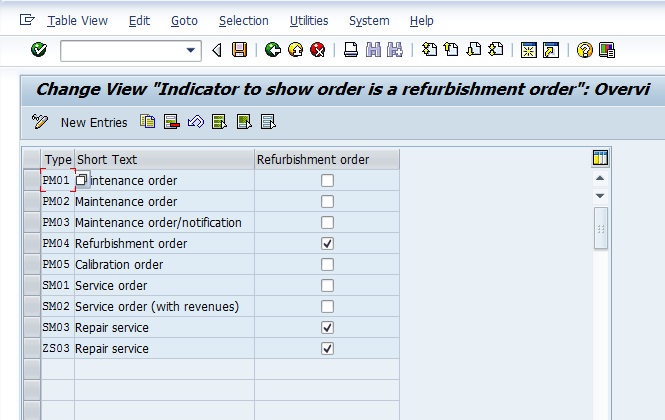
blog-srv-ord-02

From here, if you want to use refurbishment, just check the box.  If you copied an existing order type like SM03, this field will already be checked.

Thanks for reading,

Service Management – Service Order – Configure Number Range

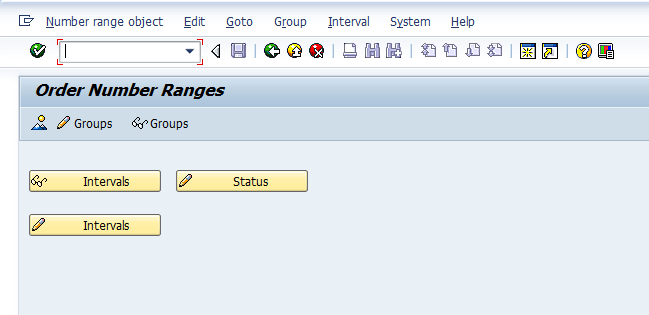
Now that you are familiar with creating an order type, the next most important piece of configuration is the number range.  Without the number range, your order type is pretty much useless.  So in this lesson I’m going to over the transaction OION, which the service order numbers range in configuration.

blog-srv-ord-01

IMG->Plant Maintenance and Customer Service->Maintenance and Service Processing->Maintenance and Service Orders->Functions and Settings for Order Types->Configure Number Ranges

blog-srv-ord-02

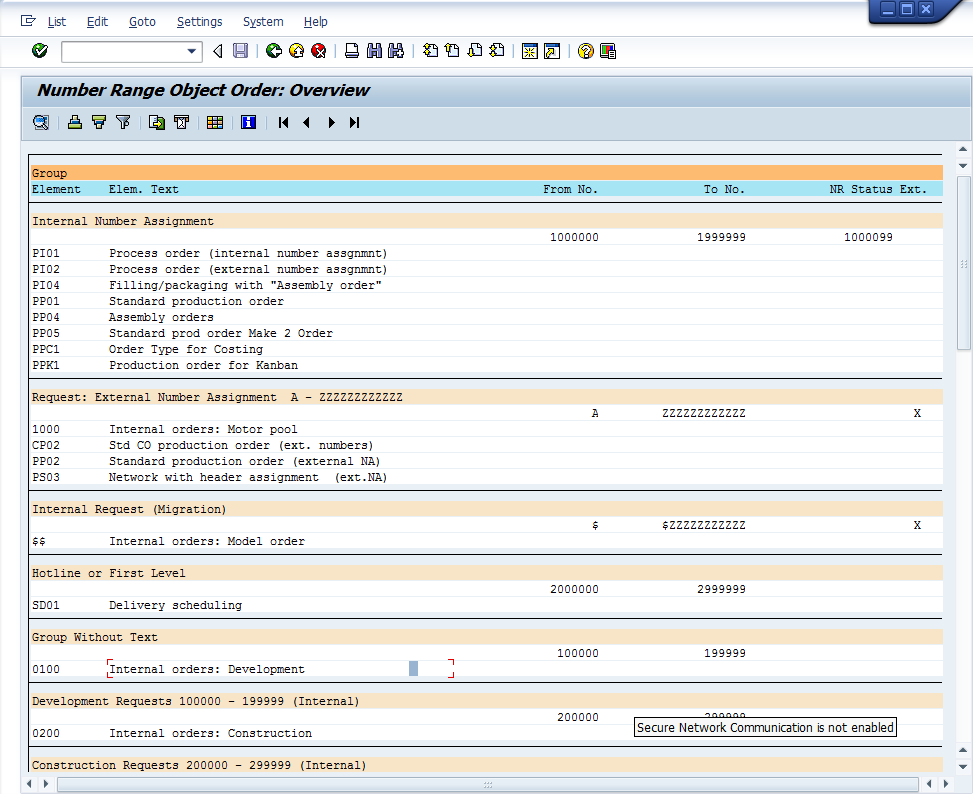
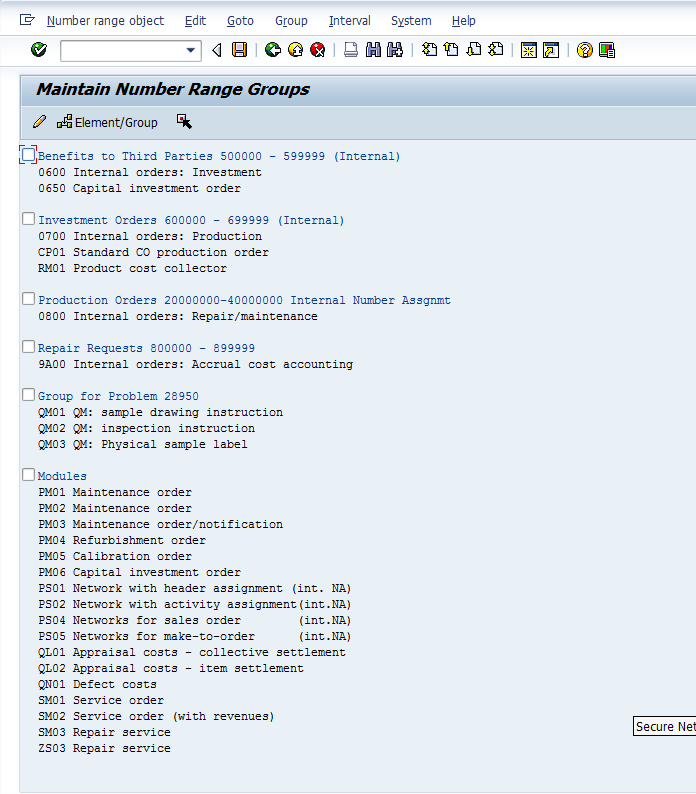
Now once you enter the transaction, there are several key areas to visit.  Since I’m a fan of going backwards in configuration, why change tradition 🙂  The first thing I recommend is pressing the mountain button (Overview).  This will show you what number ranges are assigned to each group.  It’s rare that you will create a new group or a new number range, but if you need it, have at it.  This will show what’s been used where.

blog-srv-ord-03

For example, the standard service orders get connected to Modules.  If you didn’t know that, you could quickly find out here because you can see that the standard SM01, SM02 & SM03 along with the PM and QM order types are all part of this number range.

blog-srv-ord-04

Now that you know what range you’d like to assign your service order to, you come into the maintain groups.

If you scroll all the way to the bottom, you will find any order types that haven’t been assigned to a number range.  Take special note, even if you copy from an existing service order type, the number range is NOT assigned to the order type.  This must occur every time (and in every system, since transporting a number range is usually a big no-no, unless it’s a new implementation with no data in it).

So in that case, find your order type.  Click on it, and press the select element button blog-srv-ord-05.  Then scroll up until you find the group you want to assign it to.  Check the box in front of the group name and press the Assign Element/Group button blog-srv-ord-06 and save.

Now, in the event you need a new group, you can use the menu group–>insert.  But, make sure the number range exists before you do this (since it will be required to create the new group).

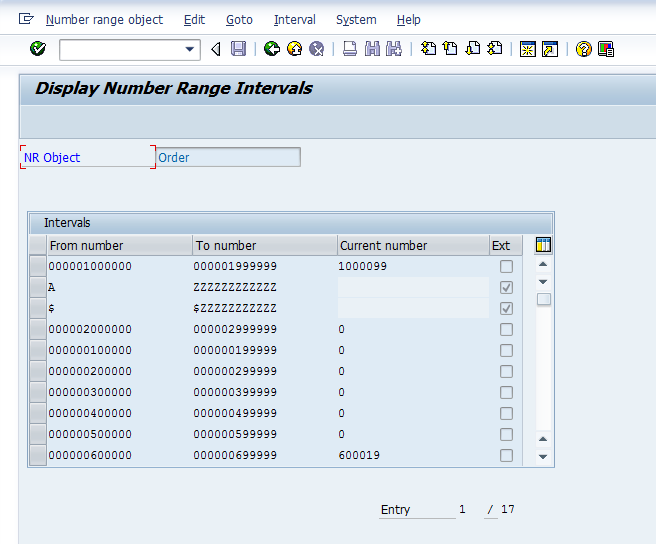
So for giggles, here’s the number range screen if you haven’t seen it before:

blog-srv-ord-07

You would just need to go into edit interval to create a new number range interval.  Remember, it can’t overlap with any existing ranges, so in this screen, it could be challenging since there are so many different number ranges already.  Regardless, this is all there is to setting the number range for your service order.

Thanks for reading,