Blog

Home / Archive by category "Blog" (Page 19)

SAP ST03N – Finding everything a user did

Now, I recently ran into a situation where I was trying to figure out a background program that was causing me issues.  I knew the user, but my normal methods were not helping me figure out.  so I found a post that put me on the right track.  So, here’s the quick and dirty version:

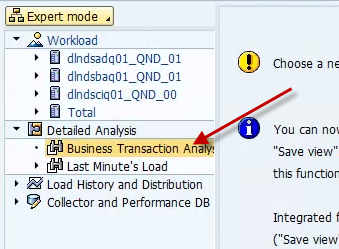
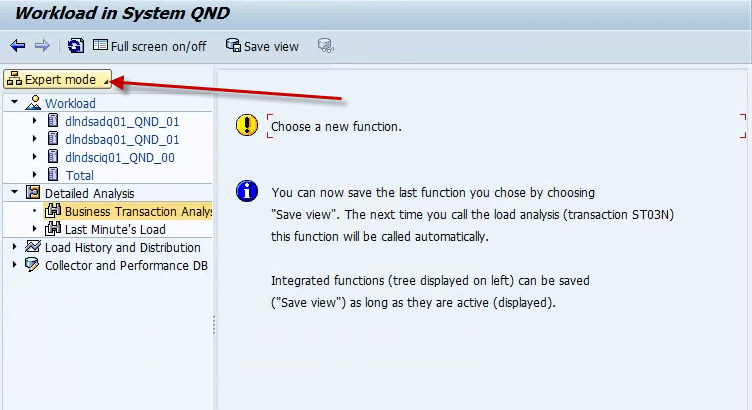
If your screen doesn’t look like this to start with:

blog-01

Click above and select expert mode:

Next, double click on business transaction analysis:

blog-02

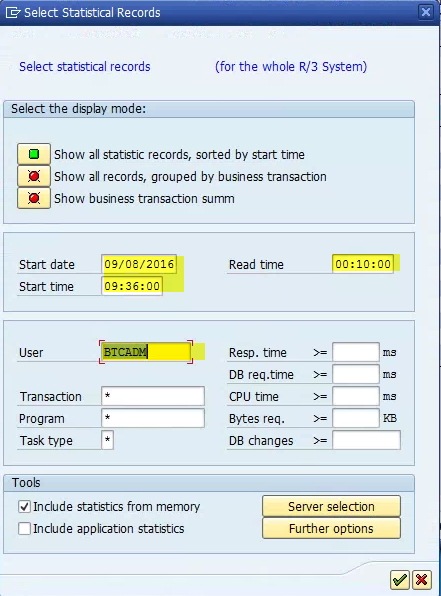
Next, update the defaults:

blog-03

User:

Start date

Start time:  00:00:00

Read time:  23:59:59


Hit the green check.  This will give me everything that your selected user did yesterday.

Thanks for reading,

Service management – Workflow – Testing

Today we talk about the last piece of workflow series, Testing.

Step 6. Test the Workflow

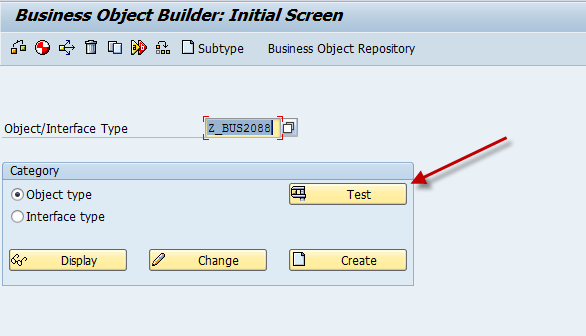
Your last step is to verify that your workflow method works. First, trigger the method manually. Execute transaction code SW01. In the screen that appears, select the object type from the list of options in the Object/Interface Type field (Figure 22). Select the Object type radio button in the Category section and click the Test button.

wf-22

Figure 22 Test the workflow

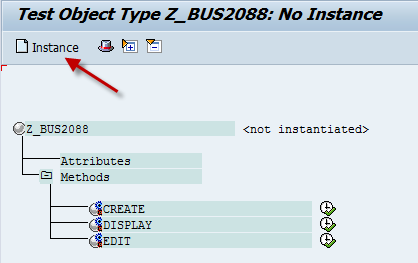
In the next screen, click the Instance button (Figure 23). In this case the order number becomes the instance.

wf-23

Figure 23 Create an instance

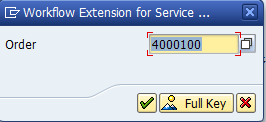
In the next screen, manually execute your method by selecting your order number from the list of options in the Order field and clicking the enter icon (Figure 24).

wf-24

Figure 24 Enter an instance for testing

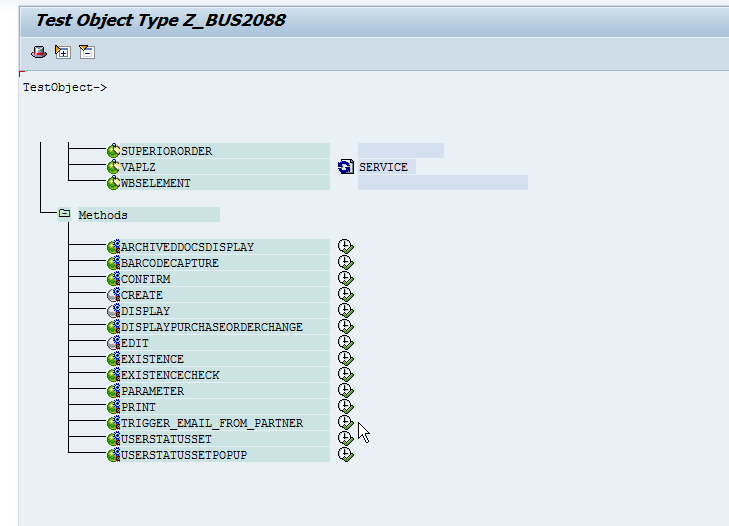
In the next screen, find the method created named Trigger_Email_From_Partner and click the Execute button to the right of the method name (Figure 25).

wf-25

Figure 25 Execute the method manually

If everything is working, you should see a pop-up window resulting from the sample code inserted.

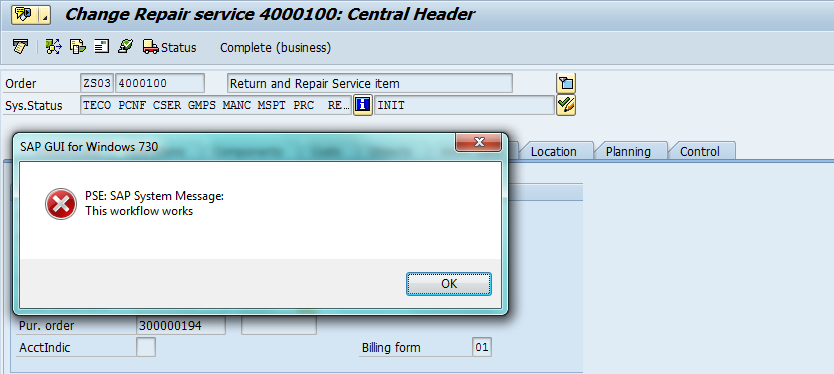
Finally, run a real test. Go to a service order and technically complete it. Execute transaction code IW32. In the screen that appears, enter in the service order number, press enter.  This will take you to Figure 27.  Click the checkered flag icon to technically complete the service order (Figure 26). A pop-up screen appears with a message that the workflow works (Figure 27).

wf-26

Figure 26 Make your order technically complete

wf-27

Figure 27 The workflow pop-up screen

You have created your first workflow. To finish the job, you would return back to step 3, and add the actual code for what you want to accomplish. The typical method would be to create a function or a method and then call it within the method.

I hope you enjoyed this series.  Thanks for reading,

Service Management – Workflow – Creating a Task

On to step 5.

Step 5. Create a Workflow Task [Heading 2]

Because this is a simple workflow, you don’t need a whole workflow template. You just need the single task. Your event is the change in status that triggers the workflow task. That in turn triggers the method to make the change.

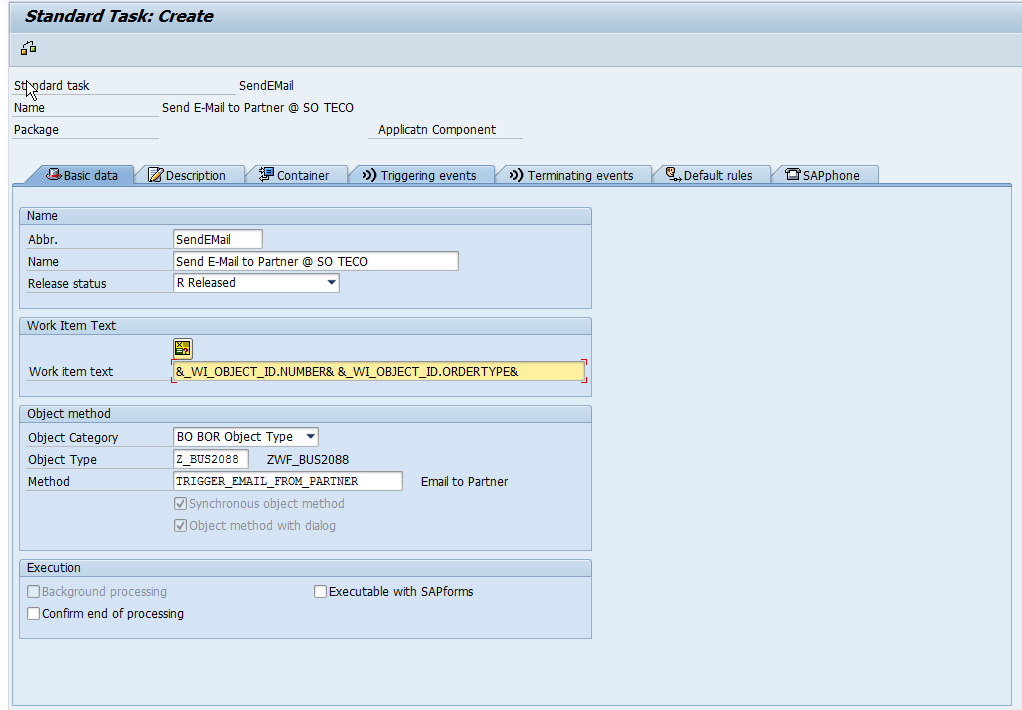
To create your task, execute transaction code PFTC_INS. In the screen that appears, select TS Standard task and click the create icon (Figure 18).

wf-18

Figure 18 Create a task type

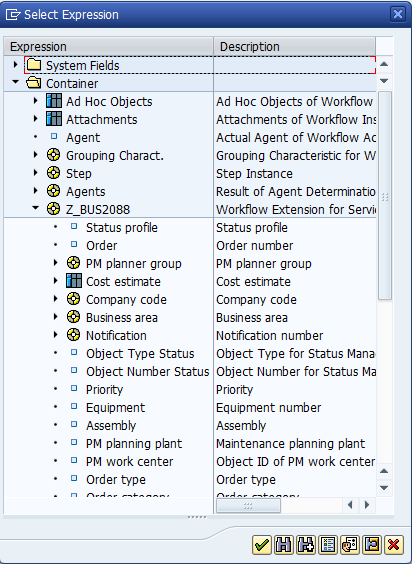
The basic data for the workflow is prepopulated. The work item text can be determined by clicking the insert variables icon wf-bt04 shown in Figure 20 and selecting the appropriate objects. This puts the text into the workflow task that is created for the event. This text allows you to see at a glance which orders have been executed within the workflow list. Figure 19 shows some of the fields that can be used to determine the text.

wf-19

Figure 19 A sample of available variables to use in the text

You have many options to choose from to create any description that provides a unique text string to identify a particular workflow at a glance. Simply double click or highlight your selection and press the green checkmark.  In Figure 20, the Number (order number) and the Order type are shown.

wf-20

Figure 20 Create a task fully populated

Next, you enter the triggering event by clicking the Triggering events tab (Figure 21).

wf-21

Figure 21 The Triggering events tab

You need to bind the event to the object. This transfers the values from the workflow object to the BOR Object Type. Enter in the Object Category of BO BOR Object Type, an object type equal to the new object created, Z_BUS2088. The Event is the new event created, STATUS_CHANGE_TECO. Press enter to finalize your choices.  After you press enter the event creator icon will be shown in the first column, click the event creator icon wf-bt05 to bind the line.

If you wanted different binding rules, you can maintain these by clicking the call binding editor icon.wf-bt06 . Typically you need to do this only if you add special or custom parameters to the business object that you transfer from the ABAP method into an object container for the next workflow task. That’s beyond the scope of this article, but it is one more area for you to be aware of when you begin using this functionality.

Once you see the status active icon wf-bt07, the new event has been bound to the object. Click the save icon wf-bt08.

When the workflow binding is saved, the workflow trigger is active.

Next time, we will talk about testing this new workflow.  thanks for reading,

Service Management – Workflow – Setting up the Trigger

Part 4 of the workflow series.

Step 4. Set Up the Workflow Trigger

In this step, you link the business object type event to the actual status. Execute transaction code BSVZ. In the screen that appears, load in the custom business object for the object (Figure 16). Choose the appropriate schema, which in this case is the status profile because I am using the system status as my trigger. In the Event column, select the previously created event from the drop-down menu.

If you view the drop-down menu in the StatusOT (S…) column, you see many options. I chose ORI (maintenance order) for my example, but the list may give you some interesting ideas of things to use as a trigger for your workflow.

wf-16

Figure 16 Add the workflow trigger

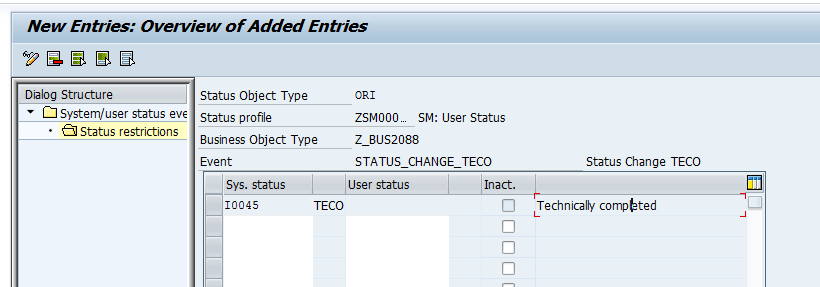
Set the restriction. Select the new line that you created in Figure 16, and double-click Status restrictions in the left window (Figure 17). You now can view the specific statuses to use to trigger the method. I use TECO for my example.

wf-17

Figure 17 Set the status restriction for the trigger

If you wanted this to trigger off a user status instead, you configure the User status column instead of the Sys. status column.

Next up we will cover creating the workflow task.  Thanks for reading,

Service Management – Workflow – Creating the methods and events

Continuing on with our workflow series 🙂

Step 3. Create the Methods and Events [Heading 2]

This step provides you with the power of workflow. This action requires the use of methods and events. Think of an event as the trigger, in this case the change in the status of the service order. Methods are code that is executed when someone pulls the trigger.

Now, you could use the existing event teccompleted, as you can see below in Figure 7, but for demonstration purposes, I walk you through creating a custom event. First, you create an event in BO Z_BUS2088 for the status change.

Using transaction code SWO1, enter Object/Interface Type: Z_BUS2088, if it isn’t already populated. Click the Change button wf-bt01

In the next screen select the event line and click the create iconwf-bt02.  In the pop-up dialog box enter the event name, as shown in Figure 7.
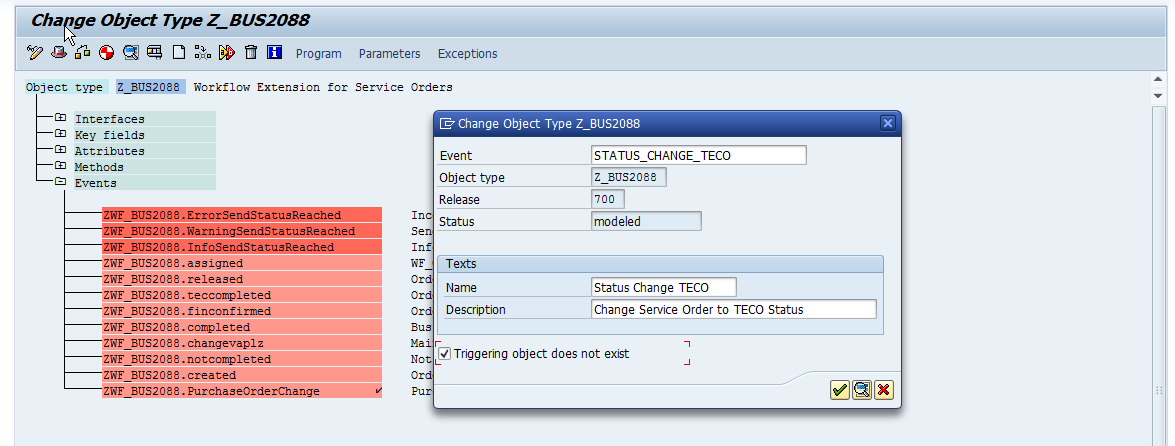
wf-07

Figure 7 Create a new event

This action adds a new event to the bottom of the list as shown in Figure 8.

wf-08

Figure 8 Event added

To activate the new event, remain in the Change Object screen (Figure 7) and follow menu path Edit > Change Release Status > Object Type Component > To implemented.

Then follow menu path Edit > Change Release Status > Object Type Component > To released.

Your next step is to create a method, which is where the code resides. Keep in mind that you still need some development to perform the task. Depending on authorization, this may require assistance from an ABAP developer. This time, select the Method line, as shown on Figure 9 and click the create iconwf-bt02 .

wf-09

Figure 9 Create a method without reference

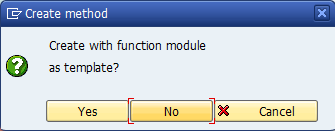
You can either choose to create a method with a function module or as an ABAP method or routine within the program. Figure 10 appears after you click the create icon. If you click the Yes button, you can enter an existing function module to be used as a template. If you click the No button, you can create the method manually. In this example, I create the method manually.
wf-bt03

Figure 10 The Create method pop-up window

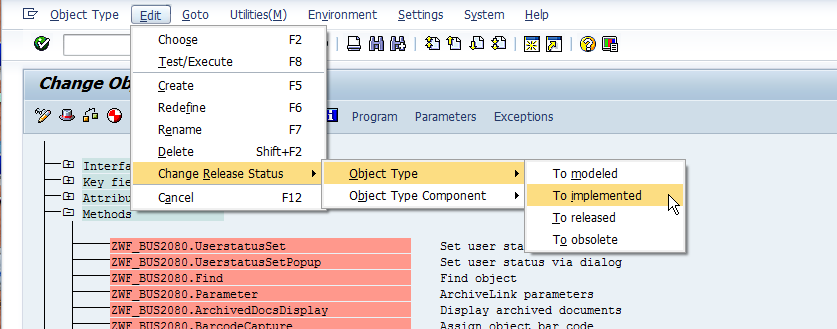
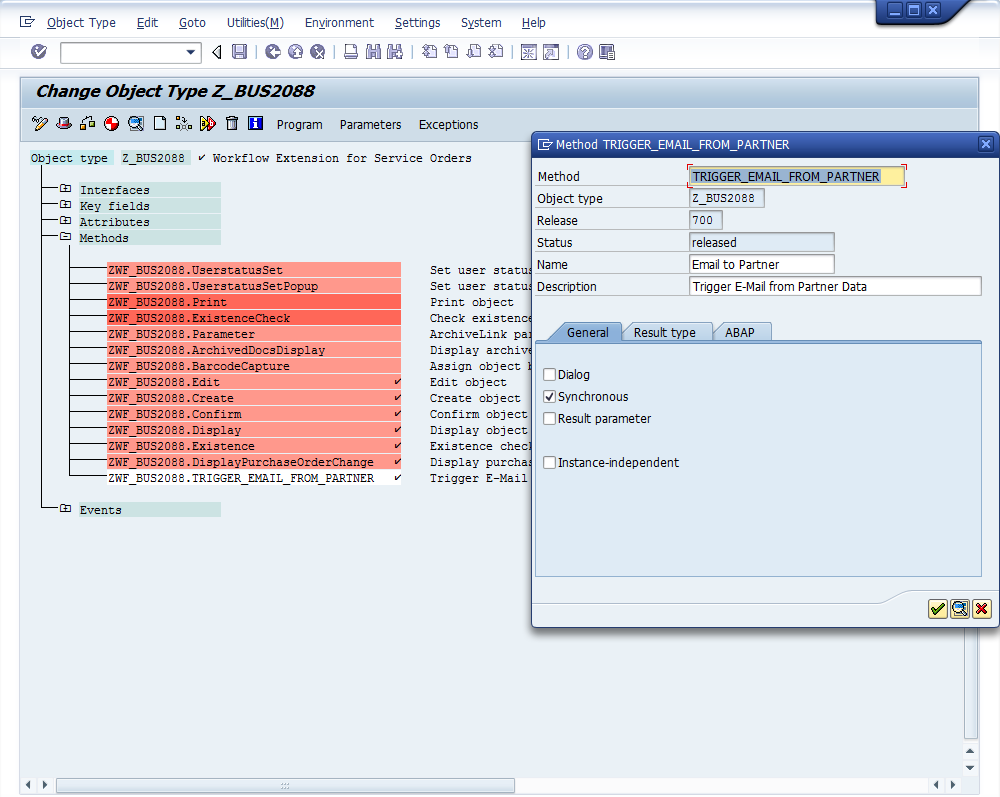
The next step is to implement the method we just created.  Scroll down the screen until you find ZWF_BUS_2088.TRIGGER_EMAIL_FROM_PARTNER.   Follow menu path Edit > Change Release Status > Object Type > To implemented (the system warns you through error messages if you forget this step) as shown in Figure 11.
wf-11

Figure 11 Implement the new method

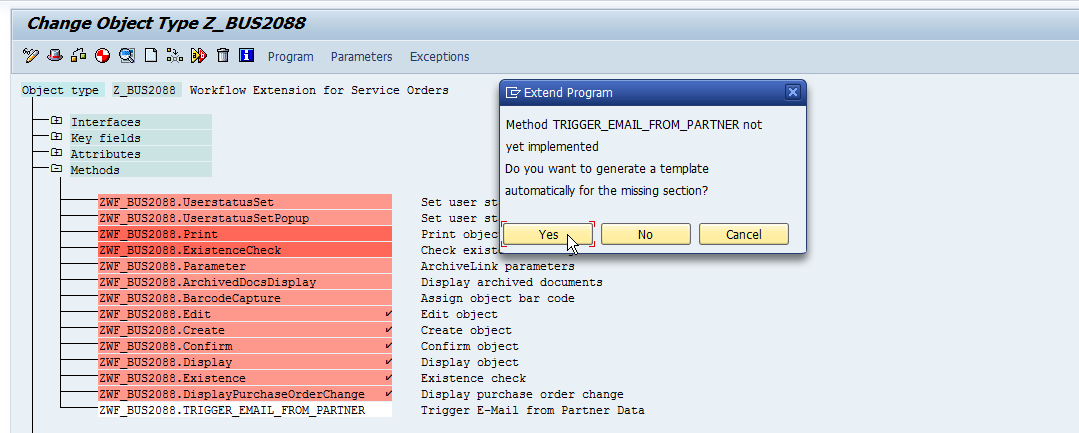
Implementing the method allows you to put code into the method. To do this, place the cursor on the method ZWF_BUS2088.TRIGGER_EMAIL_FROM_PARTNER and click the Program button shown in Figure 12. The first time you click the Program button for this method you need to generate the template. When the pop-up screen appears, click the Yes button.
wf-12

Figure 12 Add code to the method

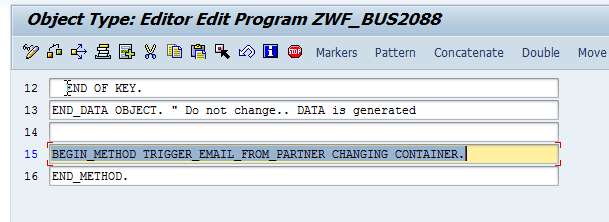
Generating the template for the method sets up the initial code to work within the method. Generating the template also displays the ABAP editor (Figure 13). Enter your code after line 15. Be sure to end your code with the END_METHOD statement, shown currently in line 16.
wf-13

Figure 13 Enter the code within the method

To help you test that it is working, I encourage you to add the code shown in Figure 14 after line 15 (Figure 13):

CALL FUNCTION ‘TH_POPUP’
EXPORTING
CLIENT = SY-MANDT
USER   = ‘USERID’
MESSAGE = ‘This workflow works’
EXCEPTIONS
USER_NOT_FOUND = 1.

Figure 14 Sample code

You should now be able to release your method by following menu Edit > Change Release Status > Object Type Component > To released. Releasing the method adds a check mark at the end of the name of the method to show that it is released (Figure 15).

wf-15

Figure 15 The released method

Next up, we will cover setting up the workflow trigger.  Thanks for reading,
Service management – Workflow – Extending the Business Object

Picking up where I left off from yesterday.

Step 2. Extend the Business Object

Each SAP object is assigned to a business object (BO)/interface. Don’t confuse this object with the Business Objects associated with Business Warehouse (BW) or Business Intelligence (BI). For service orders, the appropriate BO is BUS2088. In this step I create a new business object called Z_BUS2088 as an extension of the original BUS2088.

Execute transaction code SWO1. In the screen that appears, enter the business object (BUS2088) in the Object/Interface Type field. Click the Subtype button (Figure 4). In the pop-up screen, enter the appropriate information to create your objects and press the green check mark.

wf-04

Figure 4 Create a new object type

Your BusinessObjects object is now created. The next step is to implement your object. From the main screen after you execute transaction code SWO1, follow menu path Object Type > Change release status to > Implemented. You now need to release your object. From the same screen after you execute transaction code SWO1 (the Business Object Builder Initial Screen), follow menu path Object type > Change release status to > Released.

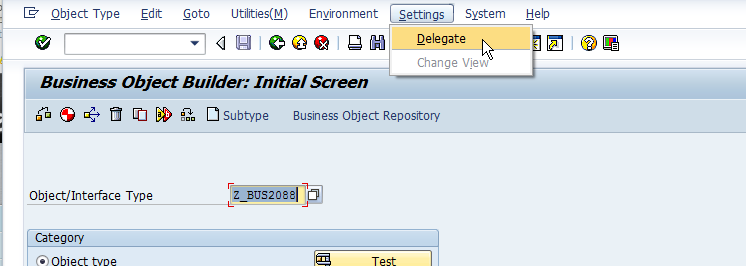
Next, you need to delegate the new object. This means you link the Z_BUS2088 to replace the original BO (BUS2088) in my example. Remain in the screen that appears after you execute transaction code SWO1 (the Business Object Builder Initial Screen) and select the new business object that you created (e.g., Z_BUS2088) from the list of options in the Object/Interface Type field. Follow menu path Settings > Delegate to execute this function (Figure 5)

wf-05

Figure 5 Delegate the Business Object Type

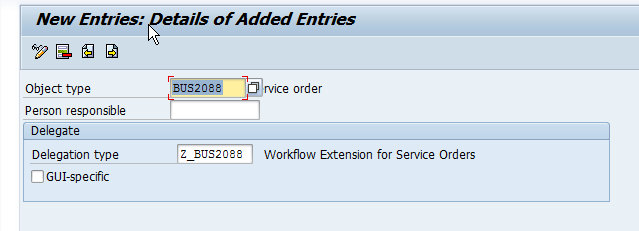
In the next screen, enter names in the Object type and the Delegation type fields (Figure 6). This step gives power to the new object to allow it to execute instead of the BUS2088, without changing the SAP standard version.

wf-06

Figure 6 Delegate object type details

You now have created the framework you need to extend the service order object. The extension enables you to add additional functionality to the existing business object.

tomorrow I’ll show you how to create the methods and events.  Thanks for reading,
Service Management – Using SAP Workflow – Initial Customizing

A while back, a good friend of mine showed me that workflow really isn’t that tough.  Some of the things I assumed about SAP Workflow included:

  • You can’t do it without implementing a lot of HR configuration
  • You have to do everything in the SAP Inbox
  • It would take months to get a workflow up and running
  • The workflow always becomes lost in “limbo”

While all of these things may be true in some instances, it doesn’t have to be the case. This next series of blog posts is going to prove it. Now, if you need to set up a multiple step process involving several groups with delegates if someone is on vacation and complicated logic depending on the values set in the document, this process won’t be enough for you. The goal is to expand your toolbox for simple tasks.

Why use SAP Workflow when I can use a user exit or an enhancement spot? That’s an excellent question, and in many situations, user exits are the best approach. The biggest difference between workflow and the more standard user exit/enhancement spot approach is how and when it executes. Let’s look at two Service Management examples.

Example 1. You need the system to verify data that was entered into the document every time you save. The service order needs to have an accounting indicator set based upon custom logic. It does not have to be complicated, but to make sure the downstream processes work, you need a correct value entered. A user exit is perfect for this approach because you want to force users to enter a correct value before they can save the document.

Example 2. You need to kick off an email to customer service representatives as soon as a particular status is set so they can generate a quotation to the customer. For this purpose, SAP Workflow is a much better option. You don’t need the code to execute every time you save the service order. You only want it to happen when the particular status is set. You could write code to do a quick check of the status to see if it should execute, or write a background program to check every service order every five minutes, but why write that logic when it already exists in the SAP system and doesn’t cost you anything?

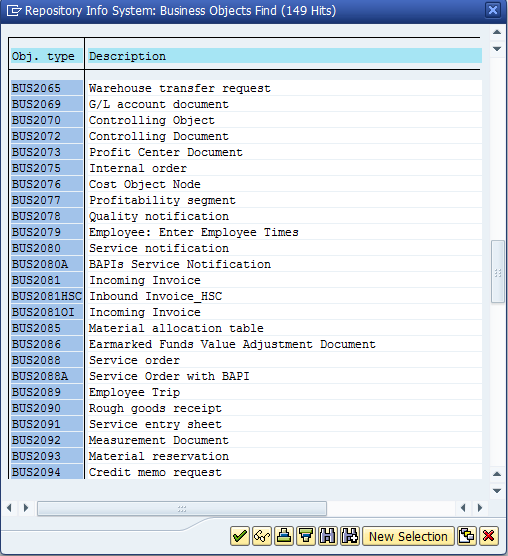
The example I’ll start today illustrates how to send an email as soon as the service order is assigned a status of TECO (technically complete). This functionality exists in nearly every SAP module. Often you just need to find the correct business object to complete this process. Figure 1 lists a very small sampling of the available business objects. Once you determine the appropriate object, you can follow the step-by-step instructions to activate your own workflow.

wf-01

Figure 1 A sample of available business objects in standard ERP

Step 1. Initial Customizing for Workflow

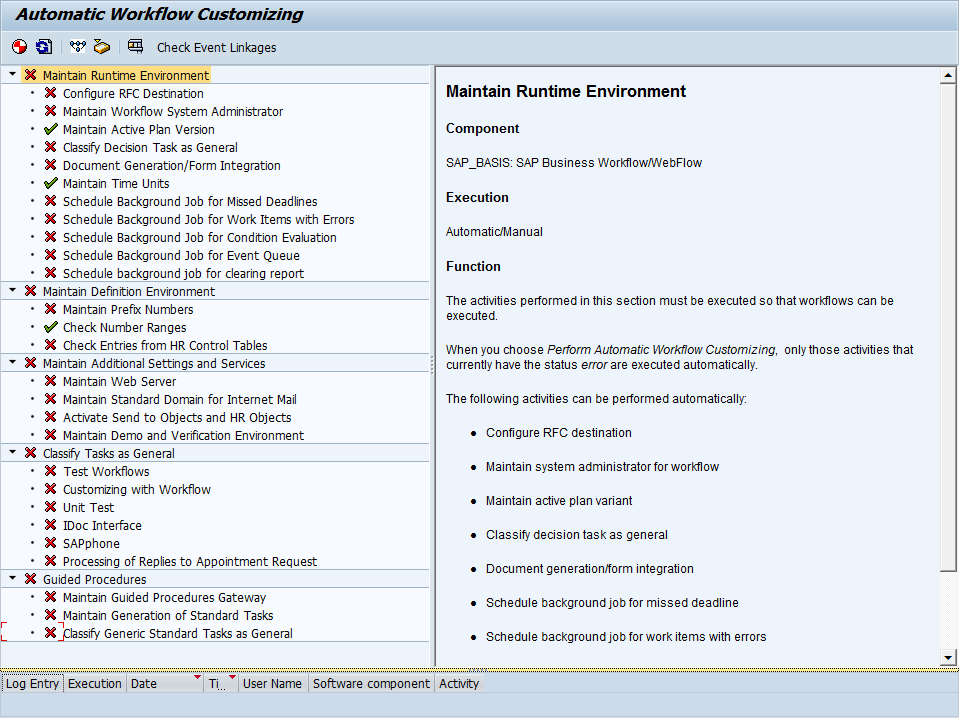
Transaction code SWU3 is the standard transaction for automatic workflow customizing. This is a single transaction that allows you to set up the configuration needed to start using SAP workflow. This is a one-time setup for each system. This configuration step must be done in every system needing workflow. This transaction sets up all the remote function calls (RFCs) and background jobs to manage tasks. In a system that has not used any workflow, the SWU3 transaction initially looks like the screen shown in Figure 2.

wf-02

Figure 2 The initial screen for automatic workflow customizing

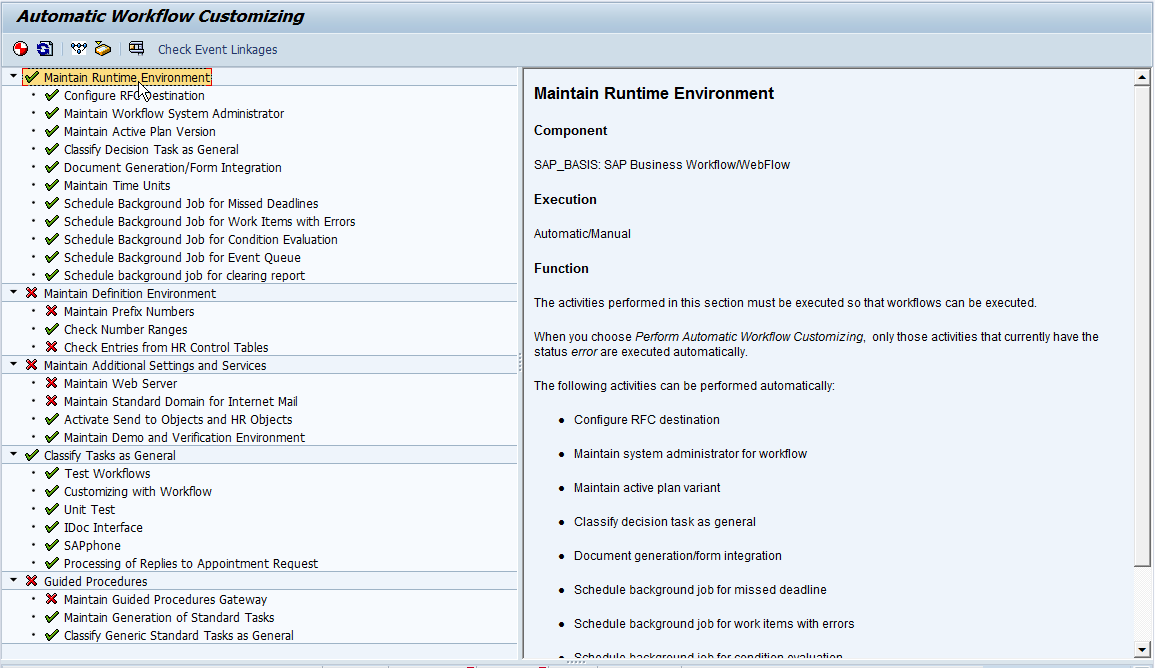
You need to go through each line item in Figure 1 that shows a red X and click the perform automatic workflow customizing icon . Pressing this icon activates each function you need using the default settings. The default configuration suffices for the majority of simple workflows. Note that the icons to the left of each task change from a red X to a green check mark. When your customizing is complete, the list looks like the screen in Figure 3. Note that not every line needs to have a green check mark. Certain lines on the screen would require additional configuration; however, those steps are not required for the type of workflow I demonstrate.

wf-03

Figure 3 The Automatic Workflow Customizing screen after customizing is complete

Note

The action Maintain Workflow System Admin creates the user WF-BATCH. This is the user against which all the workflow functions run. You need to work with your security team to ensure this user has all the authorizations needed to execute any workflows.


Don’t want these to get too long, so I’ll pick up tomorrow with the next steps.  Thanks for reading,

UI5 – displaying many columns in sap.m.table

Here was the next challenge I ran into with UI5.  I decided to make the sap.m.table work for my model.  The problem was that my table was “wide”.  So it contained a lot of columns, and all the columns cannot fit into a single screen.  So that meant one of two things, either, all my columns were very narrow, or it went off the screen with no way of seeing the other columns.  I finally spent some time googling to find a solution.  The post that finally got me on the right track was here.

Happily, the solution was pretty easy.  It involved adding an element to put the table into:

var oScrollContainer = new sap.m.ScrollContainer({
height: “90%”,
vertical: true,
focusable: true,
content: [oNotTab]
});
oTableHdr.placeAt(selPage);
oScrollContainer.placeAt(selPage);

A couple of words of advise.  If you attempt to use multiple select, using the header table will cause issues, since it presents a check all box, that checks nothing.  Also, make the header blank for the table contents causes some strange column widths that did not match the width of the column in the header.  So, this means you would need to manually set the width for both column in both places to ensure it is identical.  I have currently opted to avoid this, and only have the toolbar outside of the scrollcontainer.  If you have a different experience, I’d love to hear about it.

thanks for reading,

UI5 – Cleaning off Leading Zeros

Well, I’m back in UI5 world lately, and my hurdle today was to get rid of a bunch of leading zeros from my table worklist.  I wanted a way to clean all my text records within the table.  With a little help from google, here’s what I found.

I created a formatter function:

leadZero : function (sValue) {
sValue = sValue.replace(/^0+/, “”);
return sValue;
}

I’m no expert, but the code inside of the replace statement works great 🙂

then, I called it within my addcell method.

var txtNAME = new sap.m.Text(Field, {
text: {
path: Field,
formatter: formatter.leadZero
}
});
colItems.addCell(txtNAME);

Notice, in my example: path does NOT have the curly brackets {}

Hope this might help,

UI5 – Calling methods within a function

Well, I’ve been trying to spend a little free time working in UI5 again.  I recently ran into an issue that stumped me for a while.  I created a worklist application using the template and everything worked great, it connected to my service, I could even add some buttons and features.  Then comes the fun part.  I wanted to add the dynamic features into my table.  Well, for some reason when you code up a table in the xml view everything works great, but when you create it within the controller, you can’t just call the method.  Special thanks to SCN and this blog post to finally get me over the hump.

I defined a button and originally it looked like this:

var oButtRefresh = new sap.m.Button({
id: “BtRefresh”,
type: “Transparent”,
press: “onRefresh”,
icon: “sap-icon://refresh”
});

However, when I would push the button, I’d get errors.  I tried with quotes, without quotes, with (), without ().  All to no avail.  The trick that I needed to do, was first:  at the top of the onInit method, I added the following line:

self = this;

then I changed my button to look like this:

var oButtRefresh = new sap.m.Button({
id: “BtRefresh”,
type: “Transparent”,
press: function() {
self.onRefresh();
},
icon: “sap-icon://refresh”
});

What I came to realize is that “this” inside of a function no longer sees the original controller.  Even though it works fine from the XML version, when you build it in the controller, you need to be very aware of your “context”.  In this case, I needed to give it a specific variable that wouldn’t change based on where it was called from.    Hope this can save you some time in your UI5 adventure.

Thanks for reading,