I did a post, long ago, that I haven’t talked about in a while is the repair procedure. I thought I’d revisit it again.
One of the key pieces of the in-house repair scenario is the repair procedure. The repair procedure simply put is the roadmap of actions that need to happen when you perform a service process. I’m going to talk about how you can set this up and use it to fit your business process.
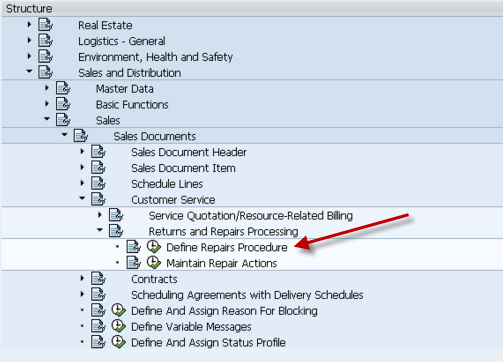
First thing is show you where in configuration you define the repair procedure. The following screen shot shows you where to go in SPRO to configure the repair procedure.
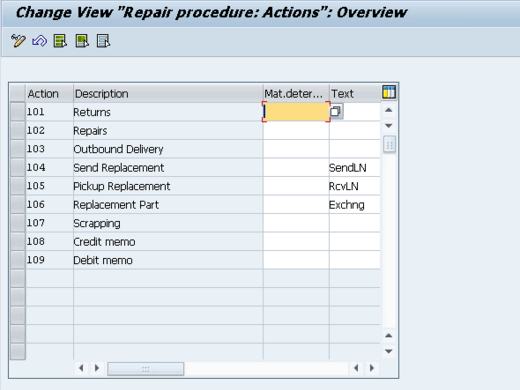
Initially, select the Maintain Repair Actions. This screen will give you the translation of what each action means. The actions are the key in the actual repair procedure, so I wanted to show you what they look like. Normally, this screen doesn’t need to change unless you want to add better text to the action (this will show up in the repair screen). Some of the important terminology in this screen:
- Send/Pickup Replacement refers to loaned equipment. Simply put, you send the customer a unit to use while the repair happens, then they send it back after they receive their repaired unit.
- Replacement Part – this is an exchange. It means the customer will keep this unit (and typically return the unit they currently have to you. then you can repair it and add it to your refurbished/spares inventory).
Alright, now on to the real work. Next we will pull up the repair procedures. I’m going to walk through the example of an in-house repair that allows loaners. the next screen will show you how to get into the repair procedure.
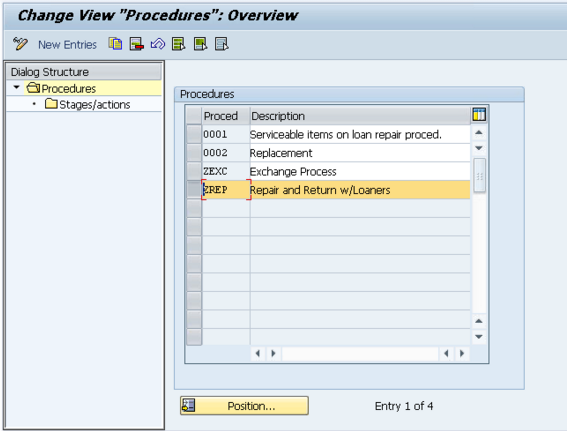
Select the procedure you want to view (or copy in the event of creating a new one).
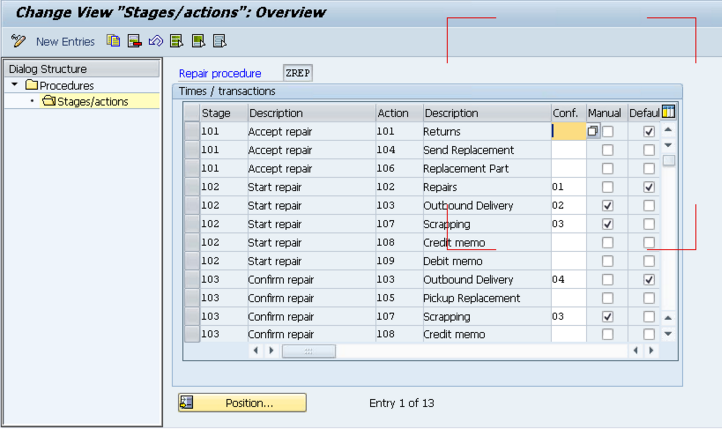
Now, you’re looking at the SAP logic of the repair procedure. What you’ll notice is that everything is broken up by stages. Remember, for each stage you can only define a single Default. The stages are as follows:
- 101 Accept repair: this is the actual receiving of the item
- 102 Start repair: this is the repair of the item, or the processing
- 103 Confirm repair: this is what happens after the service order is confirmed.
Now, if you look at the first stage(101) in the procedure below, you’ll see the following steps. These are the steps you are allowed to do as soon as you enter in the material to repair.
- 101 Returns – this is flagged at Default, so that means this will automatically be placed into the sales order as soon as the repair procedure is selected.
- 104 Send Replacement – this allows you to send a loaned piece of equipment to the customer
- 106 Replacement Part – allows you to send an exchange to the customer.
Looking at stage 102, you’ll see the addition of Manual and Conf. populated. Before I move on, the options for confirmation (conf.):
- 01 Repair: fix me
- 02 Do not repair/can be delivered: don’t fix me, but send me back
- 03 Can be scrapped: scrap me
- 04 Repaired/for delivery: I’m repaired, send me back to the customer.
Also note, if something is set as manual, even if 01 -> 04 above are selected, the item will not be automatically added to the sales order. It will have to be manually entered.
Now looking at the actual data for stage 2 you’ll see that the numbers make a little more sense:
- 102 Repairs 01 : since this is 01, it means repair me, thus generate a service order.
- 103 Outbound Delivery 02 Manual: this is the scenario where the item cannot be repaired, so just send it back to the customer. This is a manual step.
- 107 Scrapping 03 Manual: Similar to 103, but this time we won’t even send the item back to the customer.
- 108 Credit memo : Create a Credit Memo Request for the customer, with reference this line item.
- 109 Debit memo : Create a Debit Memo Request for the customer, with reference this line item.
I hope this makes sense of how to structure your repair procedure. If you’d like more detail, please comment below. Now for the next piece, how do I attach this repair procedure.
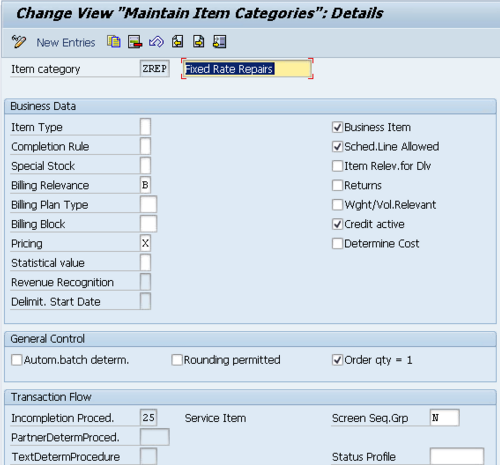

In the item category configuration, scroll to the bottom of the item category, and enter the Repair Procedure. I’m not going into the details of how to select this item category (I’ll save that for another post).
Thanks for reading,

