Service Management – Equipment Structure

I wanted to talk about something that is relatively simple, yet immensely cumbersome in practice.  That’s right, the equipment hierarchy.  When I say the equipment hierarchy, it may also be known as the equipment structure.  It is the process of linking serial numbers/equipment records into a structure or hierarchy.  The principal is very simple, and I’m going to walk through the process.  After the process, I’ll explain what makes it all so cumbersome (if you haven’t already experienced the pain).

If you go into any equipment record and go to the structure tab.

in the bottom portion, you’ll find the button:  blog-02 to structure the hierarchy.

blog-03

On this screen, you simply enter in each equipment record that belongs at this “level”.

blog-04

Now you can see that a structure exists.  If any of the equipment records in this list had their own equipment hierarchy, you’d see the Sb-Eq box checked.

Now at the top of the page, you’ll see the button:  blog-05  and it will bring up the entire structure report.

blog-06

My example was pretty simple, but it would also show functional locations, and would show the entire explosion.  So, pretty easy, right?

now, the problem comes into maintaining this.  Up to this point, I’m not aware of any automated way to capture the hierarchy.  Say for example, have a production order with the top level material being serialized, and you use several other serialized components to assemble it.  You must now manually create that structure (now make it worse, and say it’s a production order for 50, you have to repeat the process 50 times).  The issue becomes complicated because you may issue 50 serialized components to make 10 finished goods.  Which 5 items went into which finished product???  Without a high amount of diligence, it becomes highly manual and extremely difficult to maintain automatically.  I’ll be talking more in the future about some methods to begin capturing this information.

Thanks for reading,

Service Management – Equipment vs. Serial Numbers

I get this a lot from customers, “What is an Equipment Records?”.  Normally, my answer is always the same.  It’s equivalent to the serial number.  After spending a few minutes playing with the configuration and looking at the output, I realize that my answer isn’t completely accurate.  So that’s why I wanted to talk a little about this on the blog.

First, let’s take a look at the serial number.

Now, the biggest thing to take into consideration is the category.  Based on the configuration behind the category, will impact if there are other tabs that show up.  For example, if you chose a different category that included Configuration, you would also get the configuration tab (for Variant Config info).  But in general, you won’t get a lot more than what you see right here.

Now, let’s contrast this with the equipment record:

Notice all of the extra tabs and buttons you get by default.  Some of these views are configurable and can be turned on/off if you choose.  While much of this information is manually populated, you still have it all available, and with some of my upcoming tools, I plan to provide functionality that will allow for some automatic generation of things like serial number structure, equipment (as-built/as-maintained) BOMs, etc…

So there you have it…  why equipment is more than just a serial number.  My personal feeling is to always use an equipment, and let the serial number profile drive it automatically, but if you truly have no need for any additional data, just stick with the simple serial number structure.  I hope this helped you…  it’s actually helped clarify it in my own head…

Service Management – Reset Equipment Status

The equipment status can be very powerful, but at times, it’s very painful.  I have run into issues the status doesn’t get set or reset properly after certain transactions.  In addition, you may also need to manually reset it for certain scenarios, like inter company repairs.  Today I want to talk about how to reset equipment status.

blog2-01

Once inside of the equipment record, edit–>special serial number functions –>manual transaction.  The manual transaction is the equivalent of the equipment status reset.  It allows you to force the status (remember, this won’t impact the stock)

blog2-02

that will bring up this nice pop-up window that presents you with the following options:

To stock: ESTO
From Stock: add AVLBTo Customer: ECUS
From Customer: ESTO
Delete Assign to HU: Clears the handling unit
Delete Inv. Assign: clears inventory connection

Save, and should be able to continue with your transactions.
Good luck and thanks for reading.


Service Management – Equipment Records vs. Functional Locations

I often get the question about the difference between Equipment Records & Functional Locations.  So I figured, what better way to answer it than to post it on the blog so everyone can see it :).

So, onto the question.  An Equipment Record and a Functional Location are very similar as far as SAP functionality.  They can both do pretty much all the same things, hold the same data etc.  The difference between these items is really more fundamental in terms of what they represent.

Equipment:  this is typically any piece of equipment, say an Iphone, a printer, a laptop.  They can be anywhere, with anyone etc.  Typically serialized, etc.

Functional Location: This is typically more of a permanent structure.  For example, this may be a punch press machine, a central office for your cable company etc.  A functional location is just that, a fixed location.  It can often contain equipment records (especially in the case of a central office, there may be racks, switching devices, fiber optic routers, etc.).  In my experience, I tend to see FL’s used much more in plant maintenance for items that are fixed in the plant.

Thanks for reading,

Service Management – Service Order Release Strategy

Here’s a post that I did a long time ago, but is still valid today, so I thought I’d bring this one back.

One of the decisions I often see customers struggle with is when to release the service order.  So I thought I’d give you my opinion on the service order release strategy that I’ve seen and give you some good information to consider before you make your final judgement.

Now, the biggest dilemma I hear is do I release it automatically, or do I wait.  My answer, like any good consultant, is it depends.  The biggest factor that anyone needs to consider in this choice is, do you care when the requirements move to MRP.  What happens is when a service order is released, any planned components will show as a demand in MRP.  Well, if you’re not ready to work on this order for another 2 months, in my opinion, you don’t want the demand going out for the parts as soon as it’s created.  Now, if you’re using all of your dates correctly, and have outstanding capacity planning figured out, you can probably avoid this.  Most places I’ve worked at are not that sophisticated, and don’t have the resources to maintain that level of planning for service.  In those instances, I encourage you NOT to release the service order automatically.  You can control that setting in the service order type configuration:

simply make sure this box is unchecked.  The other cool thing is that you can decide on an order type basis.  So perhaps for your field service or plant maintenance orders you do want them released automatically, but perhaps for your service exchange or even in-house repair orders, you want to manually control this.

As a rule of thumb, I generally set it to be NOT released immediately, unless it is for a Field Service Order Type.  This allows the service planner to review the order, set the dates properly, make sure the correct components have been called out, and decide if it should be added into the queue…  or this one should wait because there is already a backlog of more important service orders to attend to.

Using the system status, it is easy to see what is not released.  Simply look for CRTD to see the unreleased orders.  If it is REL, it has been released.

I hope you found this interesting.

As always, if you need more help in service management or variant configuration please use the contact us button above and let us know how we can help.

I’m also on the lookout for new topics to blog about.  if you have suggestions, please comment on any of my post,

Thanks for reading,

Service Management – The repair procedure

I did a post, long ago, that I haven’t talked about in a while is the repair procedure.  I thought I’d revisit it again.

One of the key pieces of the in-house repair scenario is the repair procedure.  The repair procedure simply put is the roadmap of actions that need to happen when you perform a service process.  I’m going to talk about how you can set this up and use it to fit your business process.

First thing is show you where in configuration you define the repair procedure.  The following screen shot shows you where to go in SPRO to configure the repair procedure.

Initially, select the Maintain Repair Actions.  This screen will give you the translation of what each action means.  The actions are the key in the actual repair procedure, so I wanted to show you what they look like.  Normally, this screen doesn’t need to change unless you want to add better text to the action (this will show up in the repair screen).  Some of the important terminology in this screen:

  • Send/Pickup Replacement refers to loaned equipment.   Simply put, you send the customer a unit to use while the repair happens, then they send it back after they receive their repaired unit.
  • Replacement Part – this is an exchange.  It means the customer will keep this unit (and typically return the unit they currently have to you.  then you can repair it and add it to your refurbished/spares inventory).

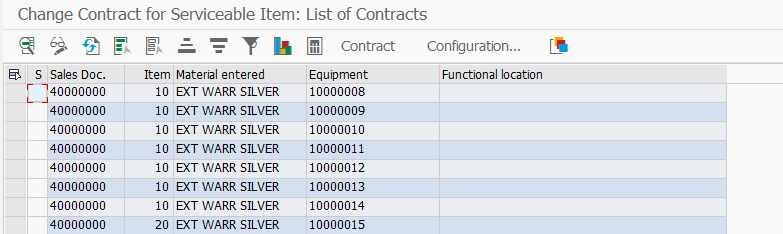
Alright, now on to the real work.  Next we will pull up the repair procedures.  I’m going to walk through the example of an in-house repair that allows loaners.  the next screen will show you how to get into the repair procedure.

Select the procedure you want to view (or copy in the event of creating a new one).

Now, you’re looking at the SAP logic of the repair procedure.  What you’ll notice is that everything is broken up by stages.    Remember, for each stage you can only define a single Default.  The stages are as follows:

  • 101         Accept repair: this is the actual receiving of the item
  • 102         Start repair: this is the repair of the item, or the processing
  • 103         Confirm repair: this is what happens after the service order is confirmed.

Now, if you look at the first stage(101) in the procedure below, you’ll see the following steps.  These are the steps you are allowed to do as soon as you enter in the material to repair.

  • 101         Returns                – this is flagged at Default, so that means this will automatically be placed into the sales order as soon as the repair procedure is selected.
  • 104         Send Replacement – this allows you to send a loaned piece of equipment to the customer
  • 106         Replacement Part – allows you to send an exchange to the customer.

Looking at stage 102, you’ll see the addition of Manual and Conf. populated.  Before I move on, the options for confirmation (conf.):

  • 01           Repair: fix me
  • 02           Do not repair/can be delivered: don’t fix me, but send me back
  • 03           Can be scrapped: scrap me
  • 04           Repaired/for delivery: I’m repaired, send me back to the customer.

Also note, if something is set as manual, even if 01 -> 04 above are selected, the item will not be automatically added to the sales order.  It will have to be manually entered.

Now looking at the actual data for stage 2 you’ll see that the numbers make a little more sense:

  • 102         Repairs                                 01                           : since this is 01, it means repair me, thus generate a service order.
  • 103         Outbound Delivery         02           Manual: this is the scenario  where the item cannot be repaired, so just send it back to the customer.  This is a manual step.
  • 107         Scrapping                            03           Manual:  Similar to 103, but this time we won’t even send the item back to the customer.
  • 108         Credit memo                                                     :  Create a Credit Memo Request for the customer, with reference this line item.
  • 109         Debit memo                                                       : Create a Debit Memo Request for the customer, with reference this line item.

I hope this makes sense of how to structure your repair procedure.  If you’d like more detail, please comment below.  Now for the next piece, how do I attach this repair procedure.


In the item category configuration, scroll to the bottom of the item category, and enter the Repair Procedure.  I’m not going into the details of how to select this item category (I’ll save that for another post).

Thanks for reading,

Primary Interests

Since I’ve been big into learning more about myself lately, another interesting thing about people I learned is that everyone has a primary interest, and a secondary interest.  The idea is that everyone has a favorite interest that they are mostly likely to talk about, mostly likely to be with or do, or in general, it’s what they prefer.  There are 5 interests:

  1. People
  2. Places
  3. Things
  4. Activities
  5. Information

Now, if you think about your life, and what you find most interesting is people, you will be happiest when you are talking about people, going to meet people, planning on seeing people, etc.  And often, there is a 2nd interest that also gets you excited, but maybe not quite as much.  For example, it might people and places.  If this is you, you might often find yourself talking about someone and where they where, what vacation they are going on, where you met them, or where they are going to dinner.  The idea is that everyone has a primary interest.

Looking at myself, I think I tend to be information and activities.  When looking at my life, it is a constant pursuit of knowledge.  Whether it be finding new skills to better myself or my business, new ways to talk my kids, or just some new piece of technology that fascinates me.  The 2nd interest for me is activities.  My favorite things to do revolve around cool activities.  Maybe traveling to a new place, visiting a new city, going on some sort of extreme adventure (like skydiving or rafting), or maybe just playing football.  But if you analyze this close enough, you can see that places tend to pop up a lot for me as well.  So maybe I’m more split in the secondary interest.  But in general, when I talk about things, I most enjoy talking about something new I learned or want to learn.

Now, what the hell does this get you knowing this information?  Not a huge benefit.  The benefit comes when you start looking at the people in your life or people you want to spend time with.  If you can determine their primary and secondary interest, it will be far easier to find activities or conversations to keep both of your interested.  Even if it means stretching a bit of your comfort zone.  At least you can recognize why you enjoy doing certain things with certain people.

Where do you fit in???

Thanks for reading,

The Learning Styles

I was recently listening to an audio program that introduced me to something new.  It was the breakdown of the different learning styles we all fall into.

How:  This style is characterized by checklists.  Give me the steps to perform this task, then and only then will it make sense in my brain.  I think I tend to fall into this category.  I retain information much better once I see something done in a step by step method.

What:  This style is all about facts and figures.  Just give me all the possible data you have and then I can do with it whatever I want.

Why:  This is a little more big picture.  This method needs to know what the outcome will be if I learn something.  This sort of person will often get stuck if they don’t understand what they will get out of this information.

What if:  This is the entrepreneurial learning style.  They look at the information and the data and ponder “what if” I did it this way.  What if I applied this to something else.  How do I apply this information and put it into action.

It’s an interesting concept, first off to figure out where you fall.  But even more importantly, if you  are trying to impart information to a friend, lover, or a class full of people, you need to know what style your audience is.  If it’s a big audience, be sure to incorporate all 4 styles into your presentation.

Thanks for reading,

New book – Warranty Claims

I’m really excited.  I just finished my latest book, and this one talks about warranty claims.  I’ve had this book sitting in the back of my brain for a couple years now.  Even after all this time, I was looking for good books or resources to understand warranty claims, and I couldn’t find anything.  So I spent some time and finally put together a comprehensive e-book that talk about what warranty claims are, how to configure them and even some end to end examples.

SAP Service Management – Warranty Claims

If this is a subject that interests you, I encourage you to check it out.  Currently, the book is still waiting for the cover and approval into the “premium catalog”, but I was just so excited to have this finished, that I really wanted to toot my own horn a bit.

Thanks for reading,

SAP reporting variants

Yesterday, I talked about the user variant that you can give to your users.  The drawback to this is that perhaps you want everyone to work off the same variant.

So, let’s walk through an example.  I’ve recently been playing with IW74, so I’ll use that as my example.  I’m going to focus on the ALV results.  So, lets look at the results.

blog-var-02

Start by pressing:  blog-var-01

blog-var-03

From here, add/remove the columns you want and get them into the correct sequence.  You can also touch any of the tabs to add sorting, filters, etc.  When you have all the settings the way you want it, press save:  blog-var-04

blog-var-05

Give it a name, a description and check the box:  Default setting

Also note, you can make it default only for your user by checking the box User-specific.

Hit the Green Check twice and you will see the report variant.

Now, every time you execute the report, this variant will be pulled up for you.

Thanks for reading,

Posts navigation

1 2 3 12 13 14 15 16 17 18 97 98 99
Scroll to top