SAP

Home / Archive by category "SAP" (Page 12)

Service Management – Service Orders – Configure Order Type

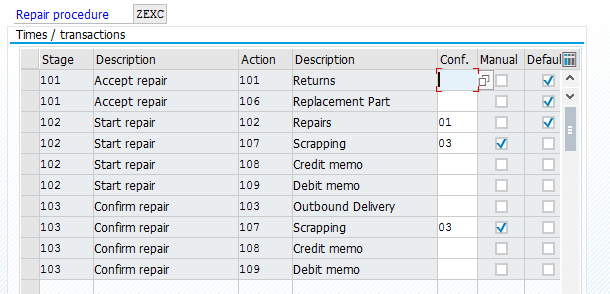
This first piece is the most vital to everything. It is creating the service order type.
Like many areas of SAP, I encourage you to copy from an order type that is close to
what you want. In our case, the SM03 order type is the standard order type provided
by SAP for in-house repairs. So it’s the perfect place to start.

blog-sm-ord-01
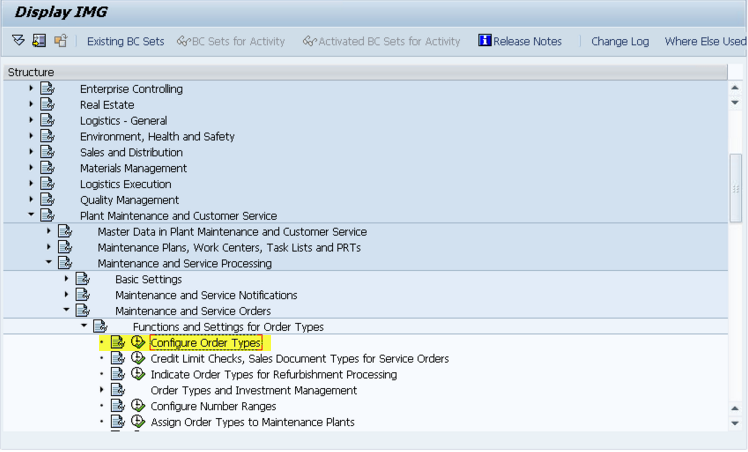
IMG->Plant Maintenance and Customer Service->Maintenance and Service Processing-
>Maintenance and Service Orders->Functions and Settings for Order Types->Configure
Order Types

blog-sm-ord-02
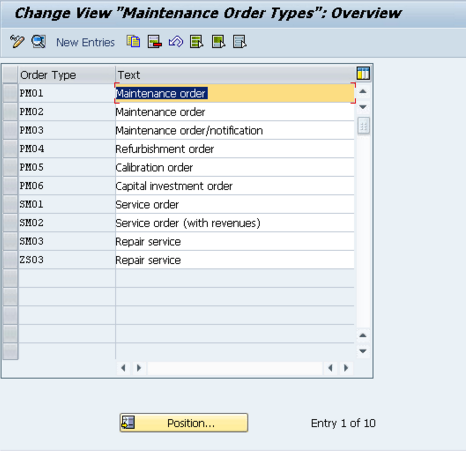
Here we see the available order types. I’ve already created a copy of SM03, called
ZS03, but for this example, we’ll look at the original SM03.

blog-sm-ord-03
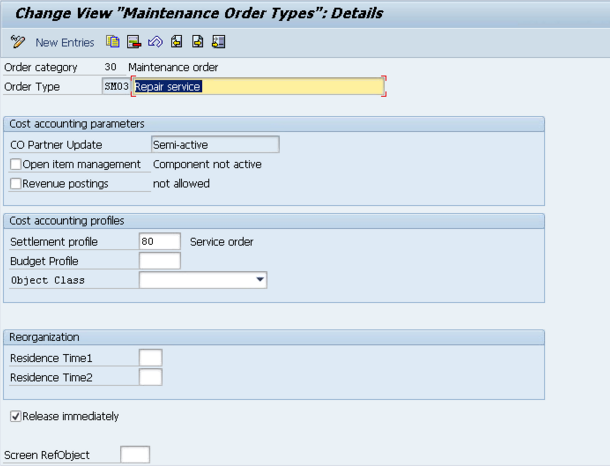
Now, most of these fields are pretty obscure to me, so I’ll do my best to explain them,
and most importantly what you need to worry about.

  • Open Item Management : is used for commitment management. This is used
    when you use budget functionality directly for Maintenance orders or when you
    want to have budget functionality through PS. If that is flagged then
    commitments like Purchase Requisitions which are generated from Maintenance
    Orders are checked when budget availability control is active
  • Revenue Postings : this is important because if you are using Repair sales
    orders, all of the revenue is captured at that level, and you cannot capture
    revenue at the service order level. So for in-house repairs, this must remain
    unchecked.
  • Settlement Profile : this is a financial setting, so I always defer to my FICO
    experts. Initially, just leave it as 80.
  • Budget Profile : The budget profile enables you to define budgets for individual
    orders. You should also activate the funds availability check. This allows you to
    monitor order-related budgets without using the project system. I have not
    personally used this function.
  • Object Class : You can set the object class of Investment, Overhead Cost,
    Production or Profitability Analysis.
  • Residence Time1 & 2 : Residence time 1 determines the time interval (in
    calendar months) that must elapse between setting the delete flag (step 1) and
    setting the deletion indicator (step 2).
  • Release immediately : This determines if the service order is immediately
    released upon creation. I prefer to leave this unchecked so that planning can
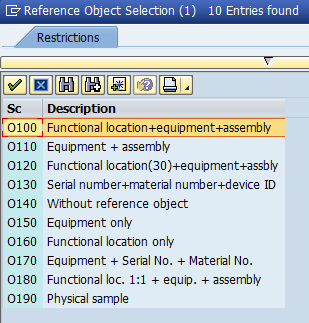
    occur before release.
  • Screen RefObject : This defines what type of object will be associated with the
    service order. Typically, this is left blank, but you can define the object type.
    It’s the same screen that allows you to enter the object type into the
    notification.

blog-sm-ord-04
I haven’t used the budget aspects of the service order. If you are looking to
implement simple in-house service, the important fields you must be concerned with
are Revenue posting = blank, settlement = 80 (unless you are told otherwise by your
FICO group), and release immediately.

Thanks for reading,

Personas – First Impressions

I have been going through the OpenSAP course to see exactly what Personas can do.  After watching the videos, seeing some demos and playing with some of it myself, I wanted to share some of the highlights I’ve found so far.

  • One of the coolest things I found in Personas is that once you configure it for the webgui, it also applies to the Windows GUI.  This really opens the door, because you aren’t locked into using the web GUI.
  • Having control over the screen look and feel, making buttons into tiles, decent backgrounds, a web look and feel.  As  or my friend Jeff would probably say, it makes SAP not look like crap 🙂
  • Combining tabs within a screen is relatively easy.  It’s a bit clunky because it’s essentially do one step, save, exit, change tabs, move elements, and repeat.
  • Tables and Grids can move or hide columns, but you cannot add new columns.
  • Scripting is very powerful.  It can jump you around screens, tabs, etc.  It can pull data and populate dynamic fields, or even call RFC’s (this makes my creation of the RFC’s for services even more valuable).  Turns out, services are the key to everything going forward with SAP.
  • Installation and meeting the pre-requisites is manageable.  The differences in versions can be a pain.  Between kernels, versions, SAP Notes etc.

I have yet to try transporting my flavors or some of the more complicated scripting, but as I try them, I’ll be sure to post my thoughts.

Thanks for reading,

Installing Persona’s 3.0 lessons Learned

Well, like so many things in SAP, nothing is as straightforward as expected.  In order to finally get Persona’s up and running I had to go through a few iterations of updates.

Step 1.  Update the kernel.  Even this is more challenging than I expected, of course, a lot of it was user error.  ha ha ha.  I learned  I have to pay a lot of attention to make sure that the files I download are in the correct release as well in Unicode, the correct DB, etc.  I got very used to downloading files in the old version of Service.SAP.com.  The new UI5 version certainly looks nicer, but navigating it was a new adventure.

Step 2.  Install personas.  This part was easy 🙂  using SAINT, it was very straightforward.

Step 3.  Perform minor configuration.  Most of this was activating the new services.  For the list, check the oss note:  2222773.  Also, assign your user one of the new Persona authorization roles.  Admin is probably the likely one 🙂

I thought I was good to go here.  Unfortunately, I got nothing.  So I dug deeper into the OSS message, and it referenced a guide.  The guide directed me toward a host of OSS notes that I needed to apply.  Every version is different, so I won’t bother to include all the notes (and of course prerequisites).

Again…  thought I was done after this.  But it turns out if you upgrade your kernel to 742 – 401, then it’s too new for Persona’s, unless you upgrade to SP02 or SP03.  So my final step was to update to SP03.  Finally, I hit paydirt.  I may try this on my old EHP4 system, just to see what happens, but it might be more trouble than it’s worth.

Thanks for reading,

Repair Outbound Delivery and the Complete Delivery Flag

I recently encountered an issue that had me baffled for longer than I care to admit.  I would run through the RAS service process, get all the way to the outbound delivery, but the delivery would always issue a warning about the complete delivery flag.  So I quickly went to my own system, did an example and couldn’t replicate the same issue.  So I started checking configuration

  • requirements type
  • schedule lines
  • item categories
  • order types
  • deliveries
  • delivery item category
  • etc…

Every place I looked was set up the same.  Finally, I had no choice to but to go into Debug.  So after spending a while in there, finally found a reference to a flag LIPS-UPFLU.  I didn’t recognize this field, when to look at it and found it was talking about update the document flow.  Lightbulb!!!  I finally decided to look at copy control to the delivery.  It turned out for the newly created item category, the update document flow check box was blank.  As soon as I updated this to X, the delivery created without the message.  Even after all these years, I still run into things I haven’t seen before.  Hard to believe what a big difference one little checkbox can make 🙂

Thanks for reading,

Using DP80 and the Material Direct Flag

I just discovered a requirement for DP80 (perhaps DP90 as well).  If you wish to have your actual materials pulled into the quote, rather than a generic material that sums up everything, you must have the Material Origin flag set to X in the material master.  This field exists in the Costing 1 screen.  MBEW-HKMAT is the technical field.

Not being a FICO expert, I’m not sure what other implications this field has, but I do know that if you don’t check this, your materials will not be pulled onto a Resource Related quote.

Thanks for reading,

IW42 – Customizing Not Maintained – Error SE729

Well, I was recently helping out on a new service implementation, and ran into the the error SE729, customizing not maintained.  It’s surprising, but I haven’t run into this before.  It happened anytime I went into IW42.  I checked my confirmation configuration, and everything seemed fine.  So I finally went over to OSS and found the following note:

2051088 – IW42 – Customizing incorrectly maintained

The basics are that table T162V contains entries that correspond to a table control on transaction ML81N.  I’m a bit confused how this impacts IW42, but they must share some screen elements.  Regardless, you need to go into T162V in SM31 and update the table entries to match what the table control shows.  For all the details, check out the note.

Thanks for reading,

Personas – The latest experiment

Well, my friend Adeel recently turned me onto Persona’s.  Up until now, I plead ignorance.  I really thought it was just simple screens view-able as web pages.  So, for this reason, I’d pretty much ignored them until now.  After seeing some of the power they have, it’s really left me wondering why anyone would spend all the time doing UI5 (unless you were doing an application that would work 100% remotely).  Even in the short demo I saw, I was able to re-imagine a lot of what I’ve already done with my products…  not to mention easy changes from a consulting standpoint.  Short story, expect to see more about persona’s in the near future.  I’m currently in the process of installing Persona’s 3.0 on my system, and I’m running through an OpenSAP course to give me the basics as well.

If any of your are familiar with Persona’s and could shed some light on the pro’s and con’s, I’d love to hear about it.  I’ll be doing my own experiment soon now that Renovation is converted to the standard Dynpro screen, it will make for the perfect project to convert to Persona’s.

Hey, no matter what, I can add yet another buzz word to my list of skills 🙂

Thanks for reading,

ABAP – Refresh ALV GRID and keep position and current cell

Since I’ve been rebuilding my Renovation product into the old school Dynpro, it’s meant relearning a few tricks.  Today, my trick was to keep the position, selections and current cell after refreshing the data with new data or updated date.  First off, I need to thank this post for the great info.

Here’s the basics.  Before you refresh the table, you will need to perform the following on your ALV grid.

  dataes_row_no  type lvc_s_roid.
  dataes_row_info  type lvc_s_row.
  dataes_col_info  type lvc_s_col.
  datafes_row_no  type lvc_s_roid.
  datafes_row_id  type lvc_s_row.
  datafes_col_id  type lvc_s_col.
  datamt_cells type lvc_t_ceno.
  datamt_rows type lvc_t_row.

  grid->get_scroll_info_via_id(
  importing
    es_row_no   es_row_no
es_row_info 
es_row_info
es_col_info 
es_col_info
).

  grid->get_current_cell(
    importing
*        e_row     = e_row
*        e_value   = e_value
*        e_col     = e_col
      es_row_id fes_row_id
es_col_id 
fes_col_id
es_row_no 
fes_row_no
).

  grid->get_selected_rows(
  importing
    et_index_rows mt_rows
*            et_row_no     = et_row_no
    ).
  if mt_rows[] is initial.
    grid->get_selected_cells_id(
    importing  et_cells mt_cells ).
  endif.

Now, there are multiple ways to refresh the table, I use set_table_for_first_display, but the post example uses refresh_table_display.  Either way, after you do your refresh, then run the following to set the position and selections.

    if mt_cells[] is not initial.
      grid->set_selected_cells_idit_cells mt_cells   ).
    else.
      grid->set_selected_rows(
      it_index_rows            mt_rows
*        it_row_no                = it_row_no
*        is_keep_other_selections = is_keep_other_selections
      ).
    endif.

  grid->set_scroll_info_via_id(
  is_row_info es_row_info
is_col_info 
es_col_info
is_row_no   
es_row_no
).

    grid->set_current_cell_via_idis_row_id fes_row_id
is_column_id 
fes_col_id
is_row_no 
fes_row_no ).
  refreshmt_rows[]mt_cells[].

Thanks for reading,

Service Management – Notification Long Text Windows

Service Management – Notification Long Text Windows

Something I recently discovered that was very interesting to me is the impact of running the BAPI:  BAPI_SERVNOT_CREATE on the long text.

I followed all the rules and made sure to enter in the text table with all the appropriate keys.  What I didn’t find,anywhere is that depending on which long text you pick it will display differently in the notification.  In the configuration for the notification, you can select from 3 different versions of the long text.  Each of them behaves differently with the BAPI loaded text.  Take a look at this for example:

if you select the “standard” longtext – 030

blog030

this is what you will see.

Next, take a look at the windows 32bit version – 031

blog031

Notice it shows as blank, but if you press the long text button next to it, you will see the following:

blog031-1

Finally, if you pick the webgui version – 033

blog033

You will see this version.  All of them contain the text that I typed in, but for some version I had to jump through hoops to see it.  So before you spend a lot of time checking your long text code to figure out why you can’t see it, make sure to check which long text is in your notification.

thanks for reading,

Service Management – Configuring the Exchange Process

I recently got an email from an old friend.  He started to describe a process that his current client wanted to do, and as soon as I read it, I knew he was talking about the Exchange (advanced exchange, etc.) process.  So I thought I’d go over the basics of how to set this up:

1. Define Repairs Procedure – you will need a new repair procedure that includes
action 106 in stage 101, as a default. This will place the exchange line on the
sales order upon creation.  See the sample below.

blog01

2. Define Item Categories * – you will need a new item category for the top level
to point to your new repair procedure.

3. Define Item Category Groups * – you’ll want a new item category group to
assign to the correct material to kick off the exchange process

4. Assign Item Categories *

5. Transfer of Requirements * – be sure to go through all 3 pieces of configuration
in this section. This is how you link your service order to your sales item
categories.

6. Create your Service Material with the newly created item category group.

7. Create/Process Service Products – this will link your service material to a
plant/work center/task list.

I do want to mention, that in addition to this, you’ll need to test the movement type
of 411-E. Since the customer’s equipment will still be processed and brought into
customer stock, you will need to perform this movement on the equipment to bring it
back into your rotable stock so it can be shipped to the next customer as an
exchange.

If you need more in-depth, check out my book.  It goes into the details of how to configure all the pieces in service management.

thanks for reading,