Business

Home / Archive by category "Business" (Page 12)

Service Reporting – Repair Sales Orders

If you’re familiar with SAP service management, you realize the challenge of seeing the full picture of the in-house repair process.  If you don’t know what I’m talking about, you’ve never tried to see the end to end service process in a single place.  Because SAP Service Management is a combination of plant maintenance and sales and distribution, this means that you have to try to get your reporting from multiple different places.  If you want to see the time it took from creating the repair sales orders to the time the customer sent you their item for repair, how do you do that?  Worse yet, how do you find out how long it takes between receiving the customer’s item and the time your service order is released?  Because you are often crossing modules, there is nothing out of the box to give you this information.

Now you may have a great SM person, who has spent countless hours working with your BW person to create this cube, so you can get some of these metrics.  In many of the places I’ve been, that never happens.  Often service is the forgotten department, always at the bottom of the development queue.  What if you could get all the information you could ever want or need on your repair sales orders?

blog

What if you could all of this out of the box?  Well, you’re looking at it.  Our Service Management dashboard pulls together all of the information on repairs orders, including associated documents, status’ and when they were set, built in metrics to quickly see at a glance how many orders are open, received, in repair, and so much more.  If you use Service Management, your organization needs this kind of information.

If you’d like to learn more, check out demo of the Service Management Dashboard.

Thanks for reading,

Service Management – Third Party Service – Account Assignment

When you deal with third party items, you usually need to control where the dollars are supposed to flow to the purchasing side of things.  Well, with a little digging, I figured out the configuration steps required to do it. This could get long, so I’ll probably break this into a couple of pieces.  This first piece is the Account Assignment Category.  if you are like me, you’ve seen this field in the schedule lines, but never really paid any attention to it.  Well, now I understand the value.

book-3rd-09

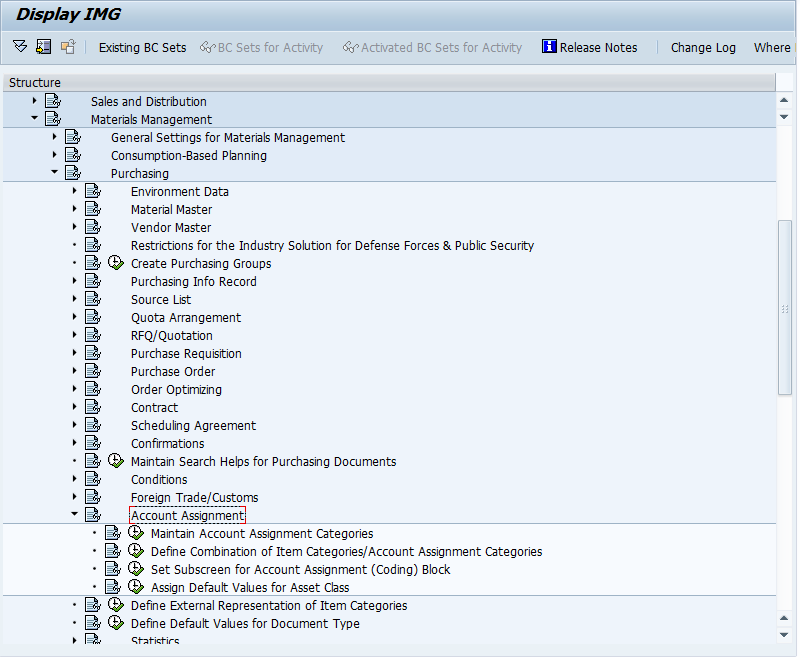
First, here is where you go to in configuration.

book-3rd-10

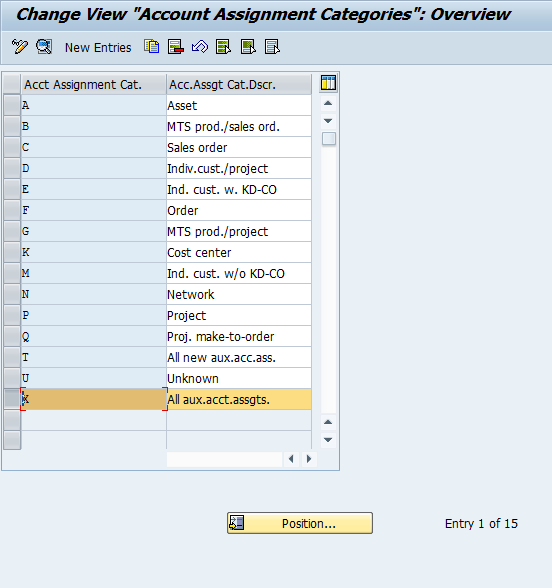
From here, you can see the different out of the box account assignment types.  In my example, X was the default.  I was having trouble getting the correct account until I came to look at the next piece of configuration.

book-3rd-11

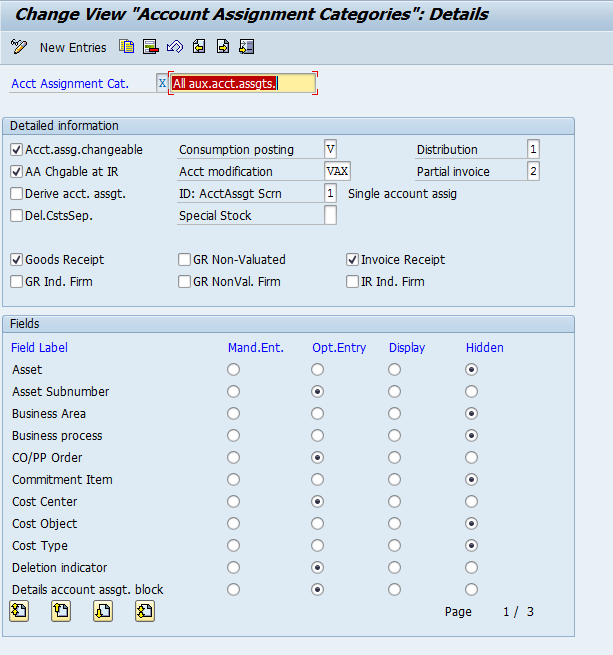
Then like magic, I found the field I’d been looking for.

Acct Modification – this field VAX is the missing key I needed to assign the accounts.  It’s also the way to make new keys, so if you want one item category to point to warranty, and one to be billed, this is the start of how to configure that.

in addition, you can determine if you want to perform a goods receipt into inventory, or if the item is purely service related.

book-3rd-12

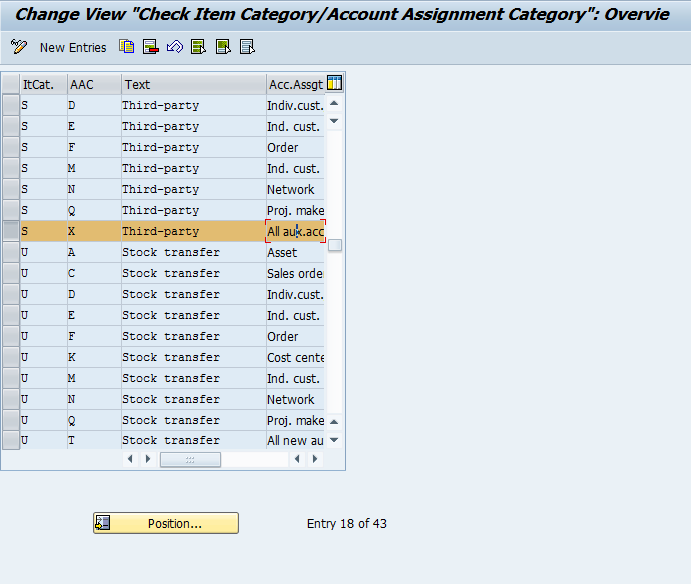
One more step for today…  and that’s the next step in configuration.  And this one simply needs an entry for S and your account assignment category. If you don’t make a new category, you don’t even need to perform this step.

I’m not going to go into a super amount of detail here because I’m no MM expert, and I’ll cover this in more depth in my upcoming e-book.  If all goes according to plan, I hope to publish this by mid-November.

Thanks for reading,

Service Management – Serial Number Number Scheme

One of the things I’ve run into a lot of issues is serialization.  For some reason, serial numbers seems to hold a special place of confusion for many customer.  Today I want to talk about the serial number number scheme.  I’ve picked this as my starting point for serialization because many of my recent projects have had a lot of trouble coming to decisions on this topic.
Serial numbers have a great starting point when it comes to numbering.  As of ERP 5.0 or 6.0 (not sure exactly when), SAP added a field called SerializLevel.

This field allows you to make the serial number number scheme unique at a global level or unique at a material level.  This subtle difference has huge implications on the number scheme.  If SerializLevel is blank, then serial number is only unique at a material master level.  To put things simply, the combination of serial number and material number is unique, but the same serial number can show up for any material number.  If SerializLevel is set to 1, then the serial number is unique across the SAP instance.  This means that no serial number will ever show up  for any other material.  SAP accomplishes this by linking the serial number to the equipment record number.  I’ll have a future post that goes into the details of serial numbers vs. equipment records.  Since every business is different, and you can often become locked into a particular numbering scheme.  The number one decision to make is if the serial number is unique across the organization, or if it can be reused for materials.

There are some things to beware of when using this functionality.  The SerializLevel field is plant dependent.  This means that you do have the ability to set this value differently across different plants.  I discourage setting this differently for the same material.  If you were to set the value to be unique across the organization in one plant, but unique by material in another, you’ll see some very inconsistent results in the history.  I’ll go into the serial number history in a future post, but when it comes to serialization, consistency is key.

The final issue to cover when it comes to serial numbers is what I’ve heard called “intelligent” serial numbers.  When I say intelligent serial numbers, I use the term loosely.  This can be anything from adding a prefix by product to each number, adding in a manufacture date, or it could be a combination of alphanumeric characteristic that have a decoder ring to explain them.  In my humble opinion, this is a very slippery slope and should be avoided at all costs.  When you move down the path of “intelligent” number schemes, you must introduce ABAP code to accomplish this.  I believe the user exit is IEQM0003 (don’t remember for sure if this is the correct exit).  Regardless, if you start creating an “intelligent” number scheme, you must have multiple number ranges available, you need code to possibly shift from one range to the next.  For anyone that’s been doing SAP for a while, you know that every time you introduce code, you introduce risk, and you introduce additional time to implement.

The most important question to ask is “Why do you need an “intelligent” serial number?”  A serial number should be nothing more than a tracking mechanism for a product.  Requiring the serial number to mean something is a not something that add value to a product, but it does increase the cost.  Anyway, I’ll get off my soap box now.  You get the idea that I think intelligent number schemes are costly, risky and unnecessary.

I hope you found this useful.  I hope to hear your comments, thoughts, or let me know things I missed.

Thanks for reading,

Master Warranties – part 4

This is the last part of the SAP Service Management Master Warranty.  So far we’ve gone over all of the configuration to use the master warranty, and we even created a master warranty, but so far, it still means nothing.  Today we’ll go over how to use all the pieces we’ve created so far.

In this screen shot, I’ve shown an equipment record (transaction IE02).  Keep in mind, your equipment may look different, but the important piece is the customer or vendor warranty section.  If you currently do not have these fields shown, you’ll need to configure the equipment record to include those sections.  Once there, you must enter a begin guarantee date (this is your warranty start date).  From here, you either enter in the warranty end date, which is the most straightforward way to enter in the warranty.  The other option, is our master warranty we created (this is shown in the screenshot).  Now, you may be asking me…  why use the master warranty if it’s just date related?  The biggest reason to use the master warranty is that you don’t need to worry about the exact end date.  You just pick the master warranty, and it figures out the end date.  It makes life easier for any sort of automation you might wish to use, in order automatically assign the correct start and end date.  Of course, if you do anything other than time related, you must use the master warranty to handle this…  now back to the show :)

Now, if your master warranty includes anything not time related, you must use measurement documents.  First, press the measurement/counts button and you will then see the screen shown above.  I’ve shown you the populated version.  Notice that WTY_USAGE_HOURS is the characteristic name.  The rest, I’ll save for another day to go into all the details of the measurement docs.  Be sure to save this and then we can move to the next step.

Now, we move to transaction IK11.  This creates the first counter or measurement.  In the example shown above, you can see that on 5/7/2013, the reading was 5.  As long as it’s less than 1000, it’s still under warranty.  Normally, you collect the measurements on a regular basis, weekly, monthly, etc…

Now, once you enter in the measurement/counter, you can go back to IE02/IE03, and see the status of of warranty.  Notice, the little check mark which means it’s still under warranty.  You can even see the complete details by pressing the puzzle piece next to the status.

The last 2 shots show the the full details of the warranty.  You can see the difference between line 1 which is date dependent, and line 2 which is counter related.  All of this same information can be seen if you enter this piece of equipment on a service notification.  I hope these lessons have enlightened you on using the master warranty.

Thanks for reading,

Master Warranties – part 3

In the last post, I finished the configuration portion of the SAP Service Management – master warranty series.  Now, that leaves us with the “important” part.  Setting up the master data and using it.  That’s what the next 2 lessons will cover. Today I’m going to talk about creating a master warranty.

TXN: BGM1 (like always, 2 is change, 3 is display)

Unless you choose to use the external number range, you can leave this field blank and simply hit enter.  The system will come up with the next available number for you.

Now you’re looking at the initial screen (after I filled in the basics).  Let me just touch on these fields.  If we look at the header section, you’ll notice there are several fields filled in.  Like everything, a description is needed.  Next you choose if this will be a customer or a vendor warranty (if you have any concerns or other options, see my previous posts on the configuration).  I also checked the pass on warranty box.  This simply says that I want to pass this warranty onto any sub-equipment records below this one.  It goes back to the inheritance of the warranty.  The remaining fields are sort and text type fields.  They aren’t required, and may never be needed.

Now we get to the heart of things.  When you look at the Services tab, you must enter at least one service.  Think of an entry in this section as a warranty “grouping”.  Each enter you post here is a service material, so you will need a DIEN or similar material master to exist.  In a master warranty, you can add as many materials as you like here, and can assign characteristics for each material.  This comes in handy for example if all service “time” is covered under warranty, but only certain materials are covered under warranty, you could list those out individually.  Once you enter you material(s), you will need to highlight each one, and select the count tab.

The count tab is truly where the magic happens.  In my example above, the warranty1 material will be true if it is inside of 24 months (characteristic 1) or the Usage Hours is less than or equal to 1000 hours.  The first line is purely time dependent (remember the flag we set in config for time).  The 2nd characteristic will be based on measurement documents since this is the only way we can know this value.

At this point, we can save or repeat the count tab for each remaining material we entered in the first tab.  Next time, we’ll show you how to add the master warranty to an equipment record.  Thanks for reading.

Master Warranties – part 2

Today I want to continue with the Master Warranty configuration I started yesterday.  This time around we will get into more details…  more of the nitty gritty.  If you missed part one of this post, check it out here.

The important piece is to make sure the customer and vendor warranty are assigned to a number range.

Next we move onto the Initial Transactions: Default Values.  This is rarely anything you need to change, but I like to be thorough :)  It simply sets the defaults for the transactions.  By default, it’s set for the customer warranty, which is the most common master warranty, so unless you do more with Vendor warranties, you can leave this alone.

Now we get to the fun part.  In order to complete the configuration for the master warranty you need to create some master data.  Now, I’ll be honest, I hate the way this works, because you must create master data in your configuration client…  but it is what it is…  Now, is where you need to do a little planning.  You must create some characteristics (I’ll get that shortly).  Now the characteristics need to be the same in all clients (at least the name).  How many characteristics you need to create is based on what you need to track in the warranty.  In my coming example, I needed to track 2 things.  Straight time (in months) and the number of hours the widget was used…  so I created 2 characteristics.  I’m going to cover the creation of those now…

TXN: CT04 – this to create the time based characteristics.  Be careful with your naming convention, because you may go down the road and need one for years, one for weeks, who knows…  so be specific in your naming.

Nothing fancy in the setup…  but it is a good idea to include a Unit of Measure.

Once your characteristics exist, you head to the last step of configuration.  Define Warranty Counters.

You’ll notice that I added 2 characteristics.  Keep building this list for all the things you want to track.  Now for things that are purely time dependent, make sure you set that flag.  That tells the warranty that it is based on time not on measurement documents (we’ll cover those in the upcoming posts).

Ok…  the configuration is done.  Next up, we’ll talk about the master data to use that configuration.

As always, thanks for reading.

Master Warranty – part 1

With many new readers, I thought I’d go back into the archives and revive some older posts.  This week, I want to talk about the Master Warranty.  There will be 4 parts, talking about the configuration, master data, and even using them.

Today will be part one of my series on Master Warranties, or even Warranties in general.  The Master Warranty is SAP’s solution for an easy, reusable way to attach a rule based warranty to your equipment records.

So to start this off, you first need to make sure the master warranty functionality is setup.  So, moving down the list, we first look at Check Warranty Categories.

You’ll see by default there are 2 standard versions.  Customer & Vendor.  I can’t think of another option for warranty, but SAP does give you the option to add new entries :)  Just make sure the master warranties you want available are checked.  By default, both are checked and normally, you want change this, unless you want to turn off Vendor Warranties for example.

Next up, we’ll look at Define Warranty Types

This is the biggest piece of configuration in the whole master warranty area.  Again, you have the 2 options Customer & Vendor.  Now there are a bunch of fields you can setup (but you don’t need to)…

D.Box.Not – If the indicator is set, a dialog box is displayed when you create a service notification that gives you the warranty status.
D.Box.Ord – If the indicator is set, a dialog box is displayed when you create a service order that gives you the warranty status.
D.Box.Inv – If the indicator is set, a dialog box is displayed when you create a service invoice that gives you the warranty status.
Status Profile – allows you set status profile (a group of status’ that apply) to a particular warranty type.
Partner Determination Procedure – just like everywhere else in SAP.  Figures out your partners.
Usage of the Condition Table & Application & Procedure – You can set this to work according to the condition tables like Pricing, listing/exclusion, etc…  This is actually new to me.  I didn’t realize this could be done, and after a little more digging, it does nothing…  these are fields for future use…  so they do nothing.  So much for my excitement.

Well, this seems like a good place to stop for today.  I’ll pick this up again in the next post and talk further about configuring the master warranty.

As always, thanks for reading,

Using RPR_ABAP_SOURCE_SCAN

I know I’ve talked about this report before, but it’s become especially valuable to me lately.  I’ve worked in a few environments that are highly customized.  I’ve done the old school diggings of starting in a spot and either looking for Z programs, or spending hours in debug.  Well, this program has quite literally saved me hours in the past weeks.  This standard program allows you to type in a variable, a phrase, whatever that you are looking for, and it will search everything you request and show you where it has been used.

My most recent example was trying to find an EXPORT to MEMORY phrase.  I found the import, but I needed to see what was being sent in the export.  Well, I dug for an hour or so, with no luck.  So I decided to give this a try.  I set the program off, and a few hours later, I found exactly what I was looking for.  This allowed me to focus on some other issues, while the program did the tedious digging for me.  It was awesome.

If you have never tried: RPR_ABAP_SOURCE_SCAN and you are either a programmer or functional person that can debug, then like me you probably wasted a lot of hours in digging.  Give it a try.  It’s awesome, and I can’t believe that SAP doesn’t make it more widely known.

Thanks for reading,

Service Master Data – What are you doing with it?

Now, SAP is a great system.  It is incredibly powerful, and can provide more possibilities than any business could ever implement.  But no matter what system you use, SAP, AS400, Oracle, or Quick books, it’s all about the data.  I don’t care what system you use to run your business.  If you don’t have your master data in place, your system is an expensive word processor.  Service management is no different.  Depending on your business, there is the potential for a lot of data.  So what do you need to do business?  what do you need to do your service business really well?  Only you can answer that question, because every business is different.  I can say, that it is truly in your best interest to capture as much data as you can…  within reason of course.  Now, there is a lot of data that SAP can help you capture.

The first and most vital, in my opinion, is the serial number.  This is building block for everything service related.  If you want to opportunity to track equipment, this is where it all starts.  SAP provides you with some great functionality, including letting you decide just what gets tracked for a serial number.  Do you want it available or required for material movements, production orders, sales orders, deliveries, etc…  you can do all of that out of the box in SAP.  Now some industries are required to track serial numbers, but many of them do it for trace-ability.  An alternative to the serial number is the batch.  It’s not quite as exact, but it still buys you a quite a bit of functionality.

Now, you can take your serialization to the next level, but it comes with a price.  These next methods I’ll discuss lose the automation benefits.  You’ll need to invest some effort into building and maintaining these next pieces.  Now there are three ways to take things to the next level of grouping serial numbers together.

First is a the serial number hierarchy.  This method is very useful when you need to track serial numbers within serial numbers.  I often see this method when building up something larger, like say an engine.  There are special components that may need to be tracked within a larger unit that is also tracked.

The next method is building a hierarchy using the functional location.  Within SAP, the functional location is often associated with the plant or plant maintenance. The idea behind the functional location is exactly what the name suggests, it’s a location.  Within the location, you can build up the serialized units within that location.  The functional location can often be associated with large machines that don’t move, but may need maintenance, service, etc…  A functional location works like a serial number as far as SAP is concerned.

The last method is the installed base.  Now the installed base is like the functional location, only a lot more functional.  The installed base can hold materials, serial numbers, documents, and even other install bases.  This is is a big step, because it can become an installation within a customer site.  Depending on the size of the customer site, you can break it down as granular as you need to.  This becomes excessively valuable if you provide on-site service.  You can quickly pinpoint and direct your technicians to the exact location of the issue.  Of course, this assumes that you have communication with your equipment…  and that’s a whole other level of data collection…

We’ve talked about enough for today.  What I would like you to take away from this post is that the data building blocks within SAP are just that, building blocks.  We talked about the initial building blocks.  Soon I’ll talk more about why these pieces are so valuable.

Thanks for reading,


Are you giving your customers everything they need?

You know, it may sound cliche, but is very true.  I recently had lunch with a friend of mine, and he reminded me how often this simple fact is forgotten.  It may not be obvious to everyone, but service is money.  I’m talking about your aftermarket business, your spare part business, warranties, extended warranties, service contracts, your customer service helpline and of course your repair depots.  While some companies recognize this as a part of the business, many organizations don’t realize the full potential.  In a climate when the economy is up and down, and everyone is uncertain of the future, it means that more people are interested in extending the life of current products.  If you aren’t providing your customers every opportunity to keep doing business with you, you are throwing away revenue.  And I assure you, someone else is happy to take that business.

Now, the first thing that you really need to analyze is what can you being doing for you customers?  Now there are a lot of potential options, so start simple.  Start with what you already do, but do it better.  So, let’s say that you currently perform repairs for your customer.  Great, but how easy do you make it for your customers?

  • Do you provide them 24/7 access to initiate a service call?
    • if so, do you require them to stay on the phone for minutes (that feel like hours)?
  • Do you give them the option to buy an extended warranty?
  • can they print out their own shipping label or return merchandise paperwork?
  • Do you provide them a loaner or exchange option?
  • Could you provide them a complete history of what they’ve bought?

Get the idea?  All of the ideas that mentioned above make your customer experience easier, faster, better…  this encourages them to continue doing business with you.  And to top it off, many customers are willing to pay extra for some of the bonus features.  For example, the loan or exchange option can be sold at a premium to your customers.  Now all of these options are available right now.  All you need to do is setup some pricing and some processes.  The chances are you, already have refurbished units sitting in your inventory.  Why not use them as a loaner bank to keep your customer rolling along in their business while you repair their unit?

If you’re not already using some of these techniques, and are interested in learning how you can use SAP to deliver a better experience to your customers, please email me at mpiehl@gojavellin.com.  I’ll be happy to have a call to understand what you are currently doing, and how you can easily use SAP to enhance your processes.

Thanks for reading,