SM

Home / SAP / Archive by category "SM" (Page 7)

Service Management – Equipment vs. Serial Numbers

I get this a lot from customers, “What is an Equipment Records?”.  Normally, my answer is always the same.  It’s equivalent to the serial number.  After spending a few minutes playing with the configuration and looking at the output, I realize that my answer isn’t completely accurate.  So that’s why I wanted to talk a little about this on the blog.

First, let’s take a look at the serial number.

Now, the biggest thing to take into consideration is the category.  Based on the configuration behind the category, will impact if there are other tabs that show up.  For example, if you chose a different category that included Configuration, you would also get the configuration tab (for Variant Config info).  But in general, you won’t get a lot more than what you see right here.

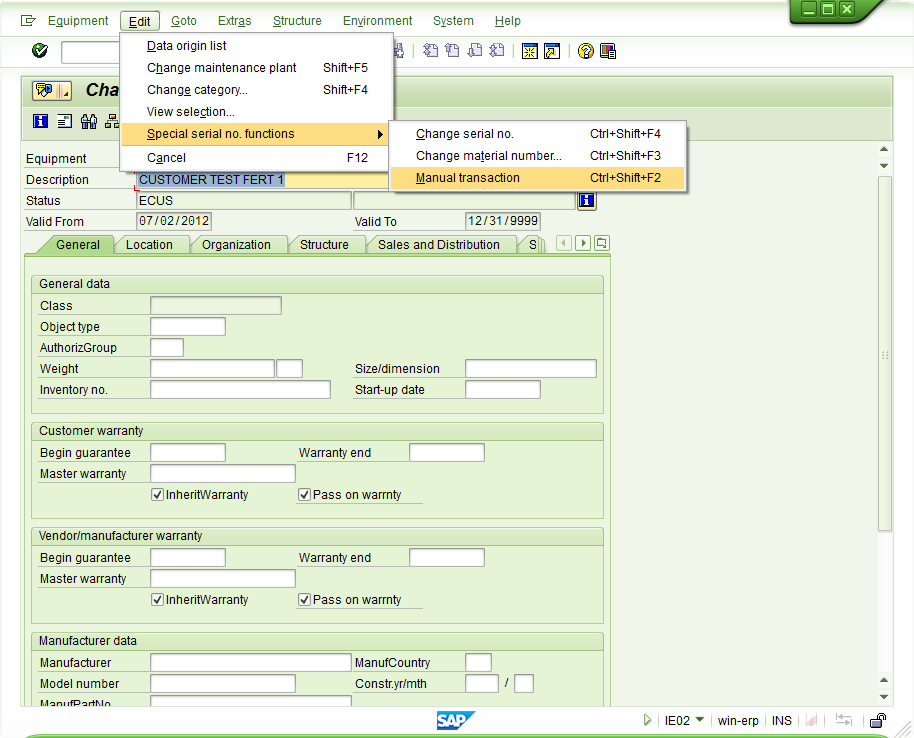
Now, let’s contrast this with the equipment record:

Notice all of the extra tabs and buttons you get by default.  Some of these views are configurable and can be turned on/off if you choose.  While much of this information is manually populated, you still have it all available, and with some of my upcoming tools, I plan to provide functionality that will allow for some automatic generation of things like serial number structure, equipment (as-built/as-maintained) BOMs, etc…

So there you have it…  why equipment is more than just a serial number.  My personal feeling is to always use an equipment, and let the serial number profile drive it automatically, but if you truly have no need for any additional data, just stick with the simple serial number structure.  I hope this helped you…  it’s actually helped clarify it in my own head…

Service Management – Reset Equipment Status

The equipment status can be very powerful, but at times, it’s very painful.  I have run into issues the status doesn’t get set or reset properly after certain transactions.  In addition, you may also need to manually reset it for certain scenarios, like inter company repairs.  Today I want to talk about how to reset equipment status.

blog2-01

Once inside of the equipment record, edit–>special serial number functions –>manual transaction.  The manual transaction is the equivalent of the equipment status reset.  It allows you to force the status (remember, this won’t impact the stock)

blog2-02

that will bring up this nice pop-up window that presents you with the following options:

To stock: ESTO
From Stock: add AVLBTo Customer: ECUS
From Customer: ESTO
Delete Assign to HU: Clears the handling unit
Delete Inv. Assign: clears inventory connection

Save, and should be able to continue with your transactions.
Good luck and thanks for reading.


Service Management – Equipment Records vs. Functional Locations

I often get the question about the difference between Equipment Records & Functional Locations.  So I figured, what better way to answer it than to post it on the blog so everyone can see it :).

So, onto the question.  An Equipment Record and a Functional Location are very similar as far as SAP functionality.  They can both do pretty much all the same things, hold the same data etc.  The difference between these items is really more fundamental in terms of what they represent.

Equipment:  this is typically any piece of equipment, say an Iphone, a printer, a laptop.  They can be anywhere, with anyone etc.  Typically serialized, etc.

Functional Location: This is typically more of a permanent structure.  For example, this may be a punch press machine, a central office for your cable company etc.  A functional location is just that, a fixed location.  It can often contain equipment records (especially in the case of a central office, there may be racks, switching devices, fiber optic routers, etc.).  In my experience, I tend to see FL’s used much more in plant maintenance for items that are fixed in the plant.

Thanks for reading,

Service Management – Service Order Release Strategy

Here’s a post that I did a long time ago, but is still valid today, so I thought I’d bring this one back.

One of the decisions I often see customers struggle with is when to release the service order.  So I thought I’d give you my opinion on the service order release strategy that I’ve seen and give you some good information to consider before you make your final judgement.

Now, the biggest dilemma I hear is do I release it automatically, or do I wait.  My answer, like any good consultant, is it depends.  The biggest factor that anyone needs to consider in this choice is, do you care when the requirements move to MRP.  What happens is when a service order is released, any planned components will show as a demand in MRP.  Well, if you’re not ready to work on this order for another 2 months, in my opinion, you don’t want the demand going out for the parts as soon as it’s created.  Now, if you’re using all of your dates correctly, and have outstanding capacity planning figured out, you can probably avoid this.  Most places I’ve worked at are not that sophisticated, and don’t have the resources to maintain that level of planning for service.  In those instances, I encourage you NOT to release the service order automatically.  You can control that setting in the service order type configuration:

simply make sure this box is unchecked.  The other cool thing is that you can decide on an order type basis.  So perhaps for your field service or plant maintenance orders you do want them released automatically, but perhaps for your service exchange or even in-house repair orders, you want to manually control this.

As a rule of thumb, I generally set it to be NOT released immediately, unless it is for a Field Service Order Type.  This allows the service planner to review the order, set the dates properly, make sure the correct components have been called out, and decide if it should be added into the queue…  or this one should wait because there is already a backlog of more important service orders to attend to.

Using the system status, it is easy to see what is not released.  Simply look for CRTD to see the unreleased orders.  If it is REL, it has been released.

I hope you found this interesting.

As always, if you need more help in service management or variant configuration please use the contact us button above and let us know how we can help.

I’m also on the lookout for new topics to blog about.  if you have suggestions, please comment on any of my post,

Thanks for reading,

Service Management – The repair procedure

I did a post, long ago, that I haven’t talked about in a while is the repair procedure.  I thought I’d revisit it again.

One of the key pieces of the in-house repair scenario is the repair procedure.  The repair procedure simply put is the roadmap of actions that need to happen when you perform a service process.  I’m going to talk about how you can set this up and use it to fit your business process.

First thing is show you where in configuration you define the repair procedure.  The following screen shot shows you where to go in SPRO to configure the repair procedure.

Initially, select the Maintain Repair Actions.  This screen will give you the translation of what each action means.  The actions are the key in the actual repair procedure, so I wanted to show you what they look like.  Normally, this screen doesn’t need to change unless you want to add better text to the action (this will show up in the repair screen).  Some of the important terminology in this screen:

  • Send/Pickup Replacement refers to loaned equipment.   Simply put, you send the customer a unit to use while the repair happens, then they send it back after they receive their repaired unit.
  • Replacement Part – this is an exchange.  It means the customer will keep this unit (and typically return the unit they currently have to you.  then you can repair it and add it to your refurbished/spares inventory).

Alright, now on to the real work.  Next we will pull up the repair procedures.  I’m going to walk through the example of an in-house repair that allows loaners.  the next screen will show you how to get into the repair procedure.

Select the procedure you want to view (or copy in the event of creating a new one).

Now, you’re looking at the SAP logic of the repair procedure.  What you’ll notice is that everything is broken up by stages.    Remember, for each stage you can only define a single Default.  The stages are as follows:

  • 101         Accept repair: this is the actual receiving of the item
  • 102         Start repair: this is the repair of the item, or the processing
  • 103         Confirm repair: this is what happens after the service order is confirmed.

Now, if you look at the first stage(101) in the procedure below, you’ll see the following steps.  These are the steps you are allowed to do as soon as you enter in the material to repair.

  • 101         Returns                – this is flagged at Default, so that means this will automatically be placed into the sales order as soon as the repair procedure is selected.
  • 104         Send Replacement – this allows you to send a loaned piece of equipment to the customer
  • 106         Replacement Part – allows you to send an exchange to the customer.

Looking at stage 102, you’ll see the addition of Manual and Conf. populated.  Before I move on, the options for confirmation (conf.):

  • 01           Repair: fix me
  • 02           Do not repair/can be delivered: don’t fix me, but send me back
  • 03           Can be scrapped: scrap me
  • 04           Repaired/for delivery: I’m repaired, send me back to the customer.

Also note, if something is set as manual, even if 01 -> 04 above are selected, the item will not be automatically added to the sales order.  It will have to be manually entered.

Now looking at the actual data for stage 2 you’ll see that the numbers make a little more sense:

  • 102         Repairs                                 01                           : since this is 01, it means repair me, thus generate a service order.
  • 103         Outbound Delivery         02           Manual: this is the scenario  where the item cannot be repaired, so just send it back to the customer.  This is a manual step.
  • 107         Scrapping                            03           Manual:  Similar to 103, but this time we won’t even send the item back to the customer.
  • 108         Credit memo                                                     :  Create a Credit Memo Request for the customer, with reference this line item.
  • 109         Debit memo                                                       : Create a Debit Memo Request for the customer, with reference this line item.

I hope this makes sense of how to structure your repair procedure.  If you’d like more detail, please comment below.  Now for the next piece, how do I attach this repair procedure.


In the item category configuration, scroll to the bottom of the item category, and enter the Repair Procedure.  I’m not going into the details of how to select this item category (I’ll save that for another post).

Thanks for reading,

New book – Warranty Claims

I’m really excited.  I just finished my latest book, and this one talks about warranty claims.  I’ve had this book sitting in the back of my brain for a couple years now.  Even after all this time, I was looking for good books or resources to understand warranty claims, and I couldn’t find anything.  So I spent some time and finally put together a comprehensive e-book that talk about what warranty claims are, how to configure them and even some end to end examples.

SAP Service Management – Warranty Claims

If this is a subject that interests you, I encourage you to check it out.  Currently, the book is still waiting for the cover and approval into the “premium catalog”, but I was just so excited to have this finished, that I really wanted to toot my own horn a bit.

Thanks for reading,

Warranty Claims – Creating a Notification directly from a Claim

Well, since I began my adventure into claims again, I’ve been struggling with it allowing me to create a notification, or even edit it directly within the warranty claim.  I know I had done it in the past, but couldn’t get past several silly error messages.

The first error message I received was:

Action Control

Error within action control (Customizing, data)

Well, needless to say, there is no documentation out there for this error.  After a lot of trial and error, I finally found the issue.  If you go into  OWTY -> Control Data -> Process Control -> Define Actions

Action T205 (and T206) need to have a function assigned.  I set up the following:

T205 – WTY04_NOTIFICATION_CREATE

T206 – WTY04_NOTIFICATION_CHANGE

Within in my procedure, I already had entries for T* as valid options, so I didn’t need to do any additional work there.  If you copy from the standard options, you will likely have these entries as well.  This got me closer, but I still had issue.  I ran into message:  WTY 119.

QM/CS/PM Message
Only message types with previous number assignment-Customizing mess.type

After scratching my head a bit, I experimented with different notification types.  Turns out, the notification must assign numbers in advance in order to be used within a claim.  My custom notification type had this turned off.  I selected the standard S1 notification type, and voila…  it works.  Now, I need to do more experimenting to get my credit memo request working, but at least I know where to start.

Thanks for reading,


Warranty Claims – Activating a validation or substitution (VSR)

I had to spend some time to figure out this portion actually worked.  I figured out how to make a validation, but no matter what I did, I couldn’t get it to execute.  Well, turns out, you need to go to an additional transaction to turn this stuff on.

WTY_VSR_ACTIVE – Activate validation and substitutions

Once you know it, it’s pretty straightforward.

blog-vsr-001

Company Code: enter in the company code this should be activated in.  Note, you will need an entry for each company code.

Area: WY

Timepoint:  this will be particular area within the validation and substitutions areas.  1 – 21.

Bool Class:  this will be determined by entering in the Area and Timepoint.

Validation: enter in the validation name.

Valid From: valid from date

Valid to: valid to date

Sequence: sequence of the rules

Active: active or inactive.

it’s really that simple.

thanks for reading,

Warranty Claims – Creating a Validation

This is something within claims that I’ve always wanted to figure out, but until recently, I just didn’t spend the time to do it.  turns out, it’s a very cool feature.  The idea behind a validation is that you can create your own custom rules without any development.  The rules will then check fields based on your requirements.  If they are blank, or incorrect, you can flag a message to correct the field.

Here are the basics of creating a validation.

using transaction OWTY, go to the following portion of configuration:

Warranty Claim Processing -> Control Data -> VSR Checks -> Specify Validations

Once you enter the transaction, you will need to drill down to the warranty section.  You will notice there are 21 different branches under warranty.  Although they are not labeled, these correspond to the boolean classes.

blog-vsr-01

Highlight the folder you wish to add a rule to and press the Validation Button

blog-vsr-02

Enter in the following information:

Validation Name: the key for the validation.

Description:  description of the validation

Message ID: the message class that will be used.  By default, WTY_VS.  However, you can assign your own message class to get the errors you want.

Authorization: The authorization group allows extended authorization protection for particular objects. The authorization groups are freely definable. The authorization groups usually occur in authorization objects together with an activity.

After populating this information,  press the create step  button .

blog-vsr-03

Now we get to the real work.  Within the step, there are 3 pieces.

Prerequisite: here you enter in the conditions that must be met.

Check: this is the actual validation that is occurring.

Message:  this is the message that is displayed if the VSR check is false.

The best way to understand this is with a demonstration.  So I will show you a simple validation that checks if the reference date has been populated, but only when the claim type is Z005.

Select the prerequisite from the menu.

blog-vsr-03

First, from the list of structures, select the second table:  WTY_RULE_H and double click to bring up the field list.  Scroll down to WTY_RULE_H-CLMTY and double click.  The table and field name will now be shown in the top window.

blog-vsr-05

Next, from the Status section, double click =.

blog-vsr-06

Next, press the Constant button.

blog-vsr-07

Select or type Z005 and press enter.  Now you will see the completed the formula.

blog-vsr-08

Next, select the check.

Repeat the steps above to build the formula:  WTY_RULE_H-REFDT > ’01/01/1900′

Note:  I had trouble making WTY_RULE_H-REFDT <> ” work properly, so I adapted the formula.

Finally, press the message.

blog-vsr-09

Description:  Enter in a description.

Message type: E or W or I

Message number: Do the pull down here to see the messages available.

Message variables: If the message has variables, enter them bottom section.

Save the validation.

Use Transaction: WTY_VSR_ACTIVE to activate the VSR checks. I’ll talk more about this in a future post.

Thanks for reading,

Service Management – Checking the Responsible Cost Center

I recently had a question about why cost was going to a particular area from the service order.  I initially thought, no problem.  I’ll just check the work center, the equipment, etc…  but everything was pointing to a value that didn’t match where the cost was going to.  A friend of mine finally figured out what I was missing.

blog-workcenter

I totally forgot about the validities within the work center to see the changes in the cost center.  So, thank you Craig.  I wanted to share this with anyone else out there and to make sure I will remember this next time.

thanks for reading,