SM

Home / SAP / Archive by category "SM" (Page 6)

Service Management – Setting up a Quantity Contract Line

When dealing with service contracts, the header of the contract for a quantity and for maintenance can be identical.  In fact, for service I recommend it.  That means you just need both sets item categories.  Today I want to talk about setting up the quantity contract line.  For the quantity lines, there are two main pieces.  The contract line is the first piece, but the call off line is just as important.

The contract line:

The important field is the completion rule.  I recommend C for quantity lines.

Now, in order to consume the quantity items, you need a sales order that will be created with reference to the contract.  (if you use a notification, we will talk about that in a later post).  For this, I recommend a change to the order header of the order type you will use as a call-off.

The important field is the Outline agrmnt mess.  I recommend ‘F’, this will pull up a popup at the item level automatically.  This will give you the opportunity to select a contract to link the line item to.  Please note, this will only work if you create the order in dialog.  In any other situation, the link to the contract will not be created.  In a future post I’ll talk about ways to get past this.  In the meantime, this should give you what need to get started on quantity contracts.

Thanks for reading,


Service Management – Adding custom fields to a notification

I recently had an interest in adding custom fields to a notification.  It’s been a while, so I check with my old friend google, and found a great blog on this already.  I figured I’d share that.

https://blogs.sap.com/2014/04/22/user-fields-in-pmcsqm-notifications-screen-exit-qqma0001/

I’ll be experimenting with this soon.

Thanks for reading,

Service Management: using a batch in a service contract

I recently came across an interest challenge in SAP.  A company has both serialized products and batch managed products.  The catch is that a service contract can cover batch managed products as well as serialized products.  This is something I have never tried before, but upon inspection, standard SAP does not appear to this account.  So, from my perspective, I see 2 clear paths to handle this.

  1. Add a bunch of custom code and fields to the following objects
    1. Service Contracts
    2. Service Notifications
    3. Batch records (for enhanced warranty as well)
    4. Service Orders
    5. Repair Sales orders
  2. Create an equipment record for each batch

Both of these have pro’s and con’s.

Option 1 involves a lot of development work, as well as some creativity to try to leverage the service contract/warranty functionality in the SD and SM transactional data.

Option 2 doubles the amount of master data, but allows you to leverage all the standard functionality in the service realm for batches.

Is there a better way that I’m missing?  has anyone else encountered this requirement?  I would love to hear your take.

Thanks for reading,

Service Management – Maintenance Plans – Configure the Category

Since I’ve recently been doing some work around maintenance plans, I thought this could be a good topic for a few blog post.

First you must setup the category for the maintenance plan.  I recommend creating a new category and then following the remainder of this section to complete all the needed configuration.

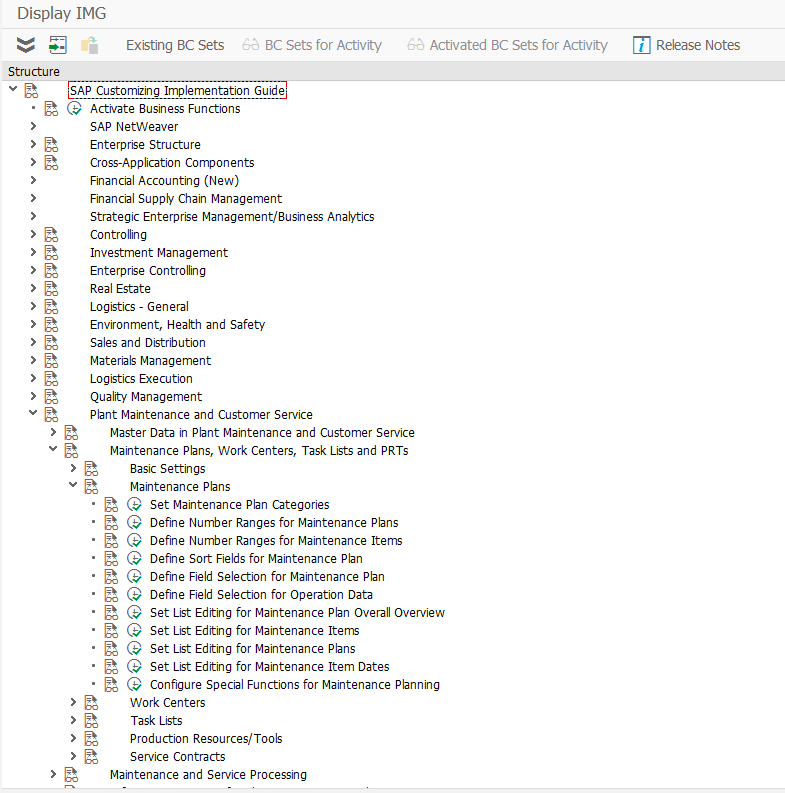
IMG->Plant Maintenance and Customer Service-> Maintenance Plans, Work Centers, Task Lists and PRTs -> Maintenance Plans -> Set Maintenance Plan Categories

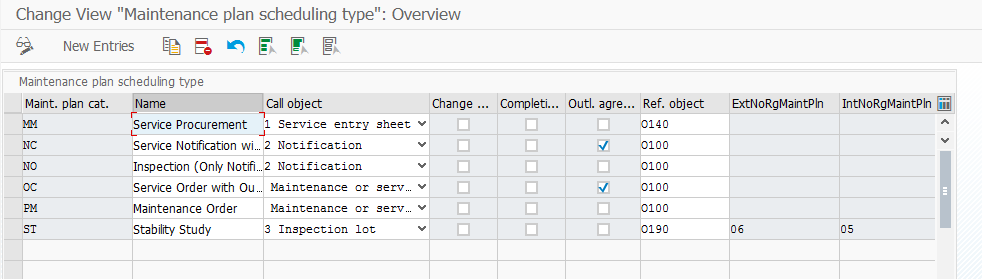
Click on new entries to create your own version.

Maint. Plan cat. : This is the 2 digit category for your maintenance plan type.  It is recommended to create a different category for each major category.

Name : This is just the description of the category.

Call object : This is the type of document that will be generated by the plan.  Keep in mind, depending on your process, you may select a “softer” document like the notification to put a reminder out to the call center to contact a customer to setup an appointment.  Or you may need a “harder” document that say on Nov 15th, a technician must be on-site to perform yearly maintenance.  This will often depend on your agreement with the customer.

Service Entry Sheet

Notification

Inspection Lot

Maintenance or Service Order

In service, the most common selections will be Notification or Service Order.

Change Documents: Do you want to collect change documents for any changes that you  make to the plan.  I’m a big fan of history, so I always encourage this to be checked.  You never know when you might need it.

Completion Data: You can use this indicator to influence the maintenance processing process. For example, you can prevent that every employee who can complete orders and notifications can also influence the scheduling of maintenance plans through the data.

With this indicator you can:

Activate a separate completion for the maintenance plan for the completion of call object notification and order.

Activate a dialog for the completion of notifications and orders using list processing.

Activate additional functionality for completing the call objects notification and order using a BAdI.

If you select the indicator completion date, you can enter a reference time that only applies to the maintenance plan, when you are completing a call object (notification or order) generated from a maintenance plan. To do this, you can also use the maintenance-plan-based fields completion date and completion time when you are completing an order or a notification.

These fields are pre-filled with the original plan date and the current time. If the current system date is displayed, then the original plan date is in the future and is replaced by the system date.

This is functionality I have not used in the past.

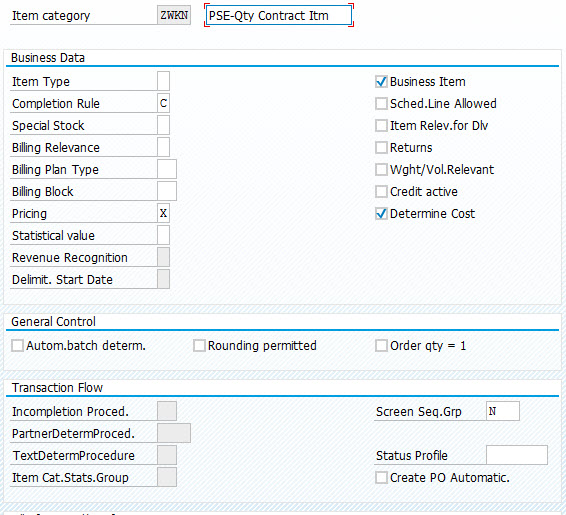
Outline Agreement:  Should this be created with reference to an outline agreement.  If you want to create a plan with reference to a service contract, this must be checked.

Ref Obj: This defines the type of object that the plan will “work” on.

O100   Functional location+equipment+assembly

O110   Equipment + assembly

O120   Functional location(30)+equipment+assbly

O130   Serial number+material number+device ID

O140   Without reference object

O150   Equipment only

O160   Functional location only

O170   Equipment + Serial No. + Material No.

O180   Functional loc. 1:1 + equip. + assembly

O190   Physical sample

You might recognize this list from the notification defaults.  I tend to always select O170.

Something interesting to take note of.  In my ECC 6.0 EHP4 system, in transaction IP50, the last category with the Outline agreement checked does NOT show up.  In my EHP7 system, this doesn’t happen.  I could not find anything in OSS that directly corrects this.  A workaround would be to create an addition plan 00 or ZZ or something with the description of do not use.  Then the previously created plan should show up just fine.

Thanks for reading,

Service Management – Multiple Master Warranties – Part 2

Well, after I did the initial implementation, I found there were a few things missing.  So I wanted to document those right now, to make it clear what needs to happen.

First, in order to make the entry screen function properly, you need to update the transactions allowed with the equipment record.  You can do that by going to transaction: VFBS

Enter in program: SAPMIEQ0

Select Function codes.

Find the entry for ENT1 and copy it.  Change ENT1 to 19 and Save.

Within the same transaction, go to T185 (the second radial button) for the same program.

Find the entry for ENT1 again and copy it.  Change ENT1 to 19 in the first FCode column.  Leave everything else the same.

This will get rid of the error that the function doesn’t exist.

This got me to a working screen, but when I saved it, it never wrote the entries back to BGMKOBJ.  So I did some more digging.

In CMOD for the user exit, you need to change the code to be:

e_subscreen_number ‘1000’.
CALL FUNCTION ‘WTY20_OBJNR_SET’
EXPORTING
IV_OBJNR         i_data_equiobjnr.


Next, in the Badi:  change the code to be:

field-symbols:<bgmkobj_new> TYPE wty_bgmkobj_tab,
<bgmkobj_old> TYPE table.
ASSIGN (‘(SAPLWTY20)gt_bgmkobj_new’TO <bgmkobj_new>.
check sysubrc 0.
ASSIGN (‘(SAPLWTY20)gt_bgmkobj_old2’TO <bgmkobj_old>.
check sysubrc 0.
CALL FUNCTION ‘WTY20_DB_UPDATE_BGMKOBJ2’
EXPORTING
i_data_equi    i_data_equi
it_bgmkobj_new <bgmkobj_new>
it_bgmkobj_old <bgmkobj_old>.
unassign:<bgmkobj_new><bgmkobj_old>.

Once you make these updates, you will have multiple master warranties for a singe equipment record.  Pretty slick.  Now my next mission is to figure out how to make use of these entries within the service notification.  More to come soon.

Thanks for reading,

Assigning Multiple Master Warranties to an Equipment Record

Well, a new friend of mine recently told me about some functionality I had never heard of.  He explained that you could assign multiple master warranties to a single equipment record.  Initially, I wondered why you would ever want to do this.  Well, it turns out that if you do it correctly, it can be a pretty slick method to allow different warranties to apply to a single piece of equipment.  For example, you could have standard warranty, an extended warranty, a warranty that allows diagnostic visits, and they can all have their own start and end dates.

Needless to say, I had to see this for myself.  So, I found a really good post that walked me through, step by step how to implement it.

Check it out here.

Couple things I’ll add to that post.  First, if you need to create a BADI implementation, use transaction SE19.

Second, there is a little gotcha that isn’t mentioned.  You can only assign a warranty type once to a piece of equipment.  So, in the standard system, you have customer and vendor.  But if you need multiple different customer master warranties, the way the backend tables are structured you must define different warranty types in order to assign multiple.  So you might have A = initial warranty period, B = extended warranty, C = Diagnostic, D = replacement, E = On-site visits, etc…

I’m still playing with this, and need to see how the standard warranty check handles this.  Obviously, I’m curious if this might be another place to enhance the JaveLLin products 🙂

Thanks for reading,

Service Management – Quoting with DP80

I was recently helping out in the configuration for DP80, and came to realize some limitation within the quoting mechanism.  First, let me give you the basic scenario.  I was creating a notification, then generating a service order.  The service order is then planned, and DP80 is run to create the quote.  Here are the limitation I found

  1. If you need to make adjustments to the quote, you cannot just run DP80 again and get the “delta”.  The only way to requote is to either manually update the quote in VA22 or delete the existing quote, then run DP80 again (and you must manually refresh the data).  This means that capturing the original quote is impossible.
  2. Upon creating the quote, it must be approved within the service order.  This isn’t a huge issue, however, if your service technicians aren’t dealing directly with the customer, it adds another layer of communication in order to get the quote approved and the allow the service order to be processed.
  3. Upon accepting the quote, a debit memo is automatically created.  If you model is fixed bid, this is generally fine, but in the event that the quote changes upon further inspection, there is no way to re-quote, so it will require manual work to send a new quote to the customer for any changes.  At this point, it means that the debit memo request must be manually updated to match the manual changes in the quote (did you notice a not of manual in that???)
  4. If you want to use DP80 & DP90 for the same order, be aware that you will get 2 separate debit memo requests.  DP90 cannot update the existing debit memo request generated from accepting the quote.  DP90 doesn’t recognize that document, so it generates a new DMR.  This means that you either have to manually delete/reject all line items from the existing DMR generated from the quote, or you will have a duplicate documents, one that will never be processed.  To me this is likely to become confusing if not handled properly every time.

These items are not show stoppers, but they leave room for improvement in my opinion.  Enhancements for Renovation???  Perhaps 🙂

Thanks for reading,

Service Management – Installed Base

I was recently revisiting how the installed base works within in ERP 6.0.  I certainly found some things I liked, and some things that were disappointing.  For any of you experts out there, perhaps you can tell me if I’m missing something in configuration (I looked, and found nothing).  So, let me tell you about my finding…

Transaction: IB51 allows you to create a standard installed base.  you select your type of IB and simply press enter.  Here is a sample screen shot of a quick IB that I put together.

blog01-01

What I like is the ability to add most any type of object into the installed base.  I can add straight materials, equipment, functional locations, Documents, Text or even other Installed Bases.  Very cool, because it can truly be a repository of most anything you might have at a location.

Now, it got even a little more cool, when I looked at transaction IB61, this allows me to copy from a sales order or a production order and bring in the items automatically into the installed based.  A very handy tool.

Now, for the con of the Installed Base.  The number one thing I was missing was the ability to assign partners to the Installed Base.  I have become a big fan of attaching partners to equipment records, functional locations, notification etc…  suddenly not having that option left me feeling a bit naked.  You can assign a single address, and probably work some hokey methods to tie text to a partner number.  But why not just integrate the option.  Oh well.  It could be worse.  In addition, installed base does not fix the issue of having to manually maintain everything when something changes.  So, just like the serial number hierarchy within the equipment record or functional location, if you make any changes, you have to manually do the adjustment in the installed base.  The most common example I run into is that a customer sends back a piece of equipment and for one reason or another, a new unit is sent to the customer and the old number remains at the plant (or gets scrapped).  You must manually go into the installed base and make the swap if you want to keep things accurate.

Overall, it’s not bad functionality, if only I could assign partners to it.  If you know what I’m missing, please comment on this post.  I’d love to know 🙂

Thanks for reading,

Service Management – Status Profiles for the Repair Sales Order

Adding a simple user status profile to an existing order type is a handy trick.  My particular application is to come up with an easy way to determine if a service quote has been accepted or rejected.  There are a lot of potential ways to cover this handle this, but being able to avoid bastardizing any existing fields, or having to deal with straight text brought me to this path.

Let me give you the quick basics on how to do it yourself.

You can find this in SPRO–>Sales and Distribution–>Sales–>Sales Documents–>Define and Assign Status Profile

The first step is to create the status profile.  Check out my SM e-class if you want more details on how to do this.
Next, you need to assign this profile.  You can choose to assign it to the header or the to item.  After you make that call, simply add the profile to the field:  Status Profile

It’s that easy.

Thanks for reading,

Service Management – Equipment Structure

I wanted to talk about something that is relatively simple, yet immensely cumbersome in practice.  That’s right, the equipment hierarchy.  When I say the equipment hierarchy, it may also be known as the equipment structure.  It is the process of linking serial numbers/equipment records into a structure or hierarchy.  The principal is very simple, and I’m going to walk through the process.  After the process, I’ll explain what makes it all so cumbersome (if you haven’t already experienced the pain).

If you go into any equipment record and go to the structure tab.

in the bottom portion, you’ll find the button:  blog-02 to structure the hierarchy.

blog-03

On this screen, you simply enter in each equipment record that belongs at this “level”.

blog-04

Now you can see that a structure exists.  If any of the equipment records in this list had their own equipment hierarchy, you’d see the Sb-Eq box checked.

Now at the top of the page, you’ll see the button:  blog-05  and it will bring up the entire structure report.

blog-06

My example was pretty simple, but it would also show functional locations, and would show the entire explosion.  So, pretty easy, right?

now, the problem comes into maintaining this.  Up to this point, I’m not aware of any automated way to capture the hierarchy.  Say for example, have a production order with the top level material being serialized, and you use several other serialized components to assemble it.  You must now manually create that structure (now make it worse, and say it’s a production order for 50, you have to repeat the process 50 times).  The issue becomes complicated because you may issue 50 serialized components to make 10 finished goods.  Which 5 items went into which finished product???  Without a high amount of diligence, it becomes highly manual and extremely difficult to maintain automatically.  I’ll be talking more in the future about some methods to begin capturing this information.

Thanks for reading,