SAP

Home / Archive by category "SAP" (Page 7)

Service Management – System: Item 002000 for schedule line 001010 is in the work area

Well, I ran into an issue recently where my repair orders worked great if I only had a single line item.  However, if I added an additional line item, I was getting error message:  v1357

System: Item 002000 for schedule line 001010 is in the work area

I did some initial googling, and it was pointing me to some quality transaction, OQ77.  I took a look, but nothing going on there.  Eventually, after some debugging I found that some custom code was resorting an internal table XVBAP.  This took me some time because I was expecting the issue be around VBEP, so eventually I found where the error happened and started to work backwards, and I finally made the connection to XVBAP.  Once I figured this out, it was pretty easy to look through the custom code and see where the issue was occurring.

If you see this error, check to make sure you didn’t accidentally resort an internal table.  The sequence is rather important 🙂

Thanks for reading,

Service Management – Adding technicians to a work center – part 2

Yesterday we made the personnel record.  Today, let’s assign it to our work center.  I already have a work center called Service, so we will use that.

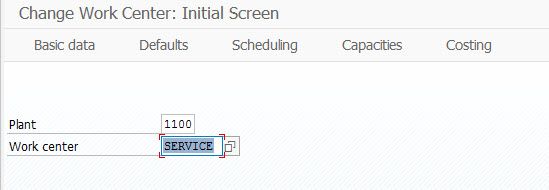
Transactions CR02

Press Enter

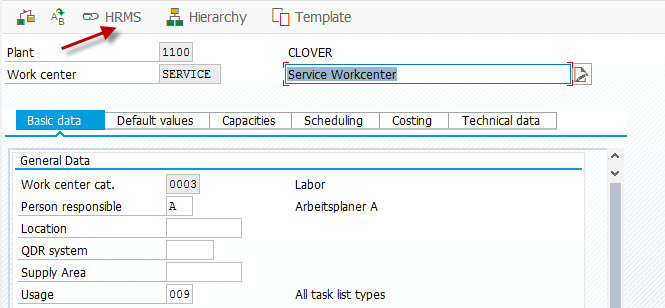
Press the HRMS button.

If this is the first time you have added a personnel record to your work center you will see this screen.

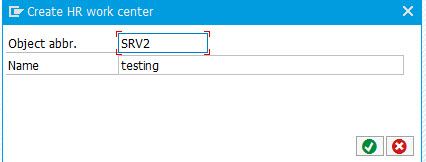
Press Create HR work Center button

Enter in your Work Center name again for Object abbr. and press green check.

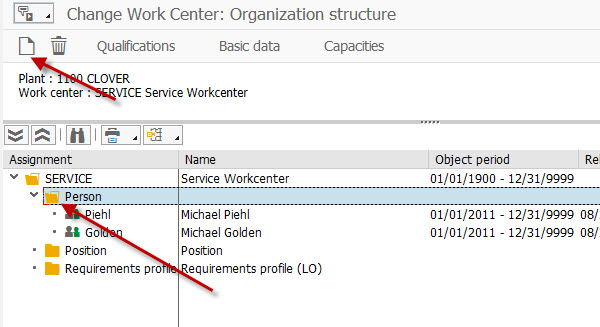
Expand the folder down and highlight person (as shown below)

Then press the Create button.

Enter in your personnel record and press Copy.


Your person is now assigned to the work center.

Just press Save again and your done.

Hope this was helpful.  Thanks for reading,


Service Management – Adding a Person to a Work Center

Recently, I had to reacquaint myself with the HR system to attempt to add some personnel records to my work center.  Now, just to let you know, you don’t need to assign a person to the work center, but if you choose just to create the record, you won’t see the person in the default drop down list.  If you want the person to show up easily, I suggest adding them to the work center.

First, let’s start by creating a personnel record.  Please note, what I demonstrate here is only for service work centers.  If your company using HR to do things like payroll or benefits, you must work with HR to ensure all the correct values are entered.  (or if you are really lucky, you can skip these steps completely).

First, you need to go to PA30 to create a new person.
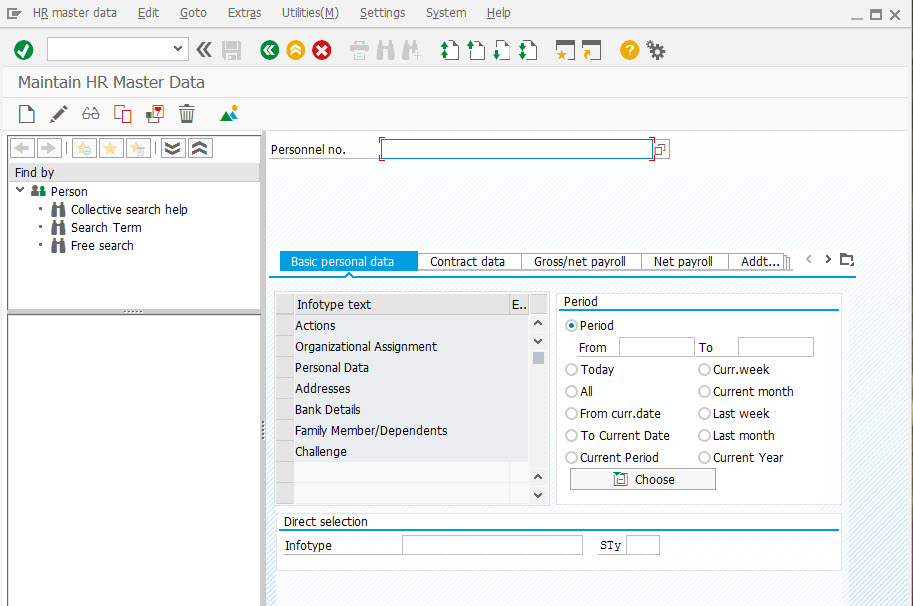
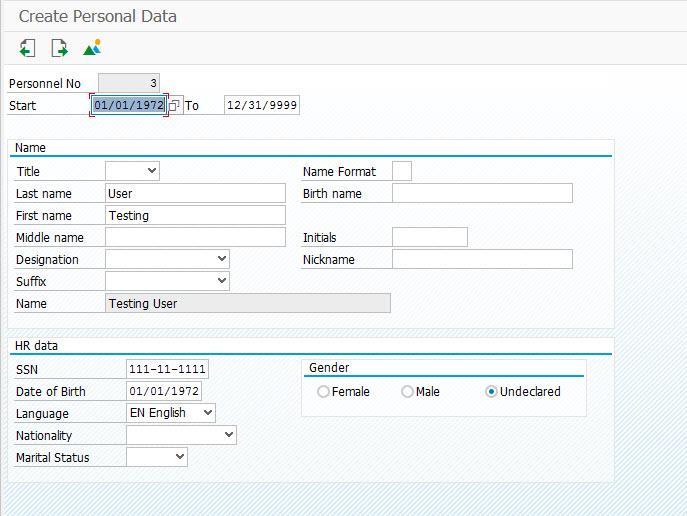
Be sure to select Actions to create the first info-type.  You don’t need to select more than one, everything else will just start popping up as you save one window.  Then press Create.
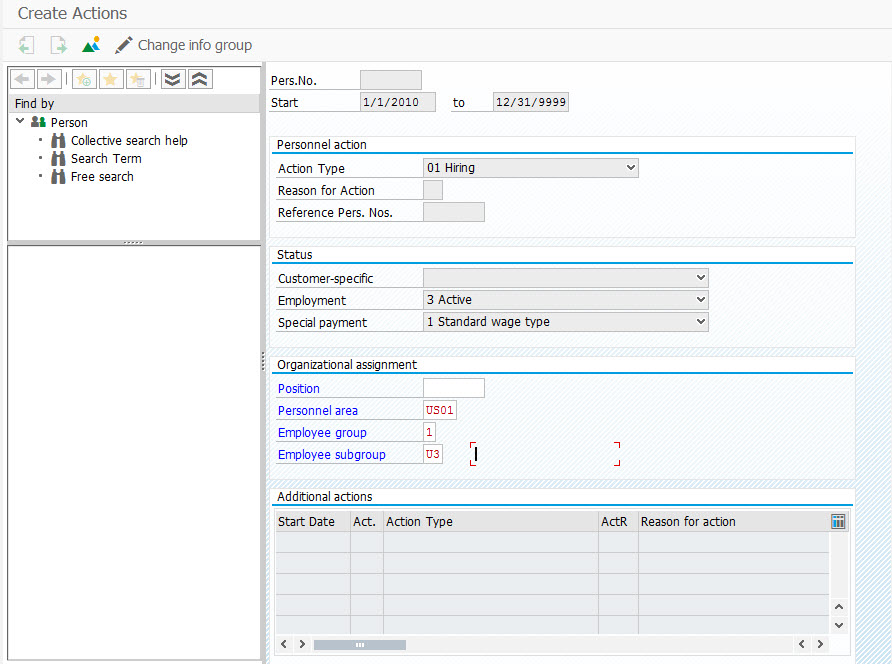
Fill in the required fields:

  • Start date = be sure to backdate this far enough.  I’ll usually go back 5 years to be safe 🙂
  • Personnel area = US01
  • employee Group = 1
  • employee subgroup = U3

Press Save.

Required fields:

  • Last name
  • first name
  • SSN = 123456789
  • Date of Birth = 1/1/1975

Press Save

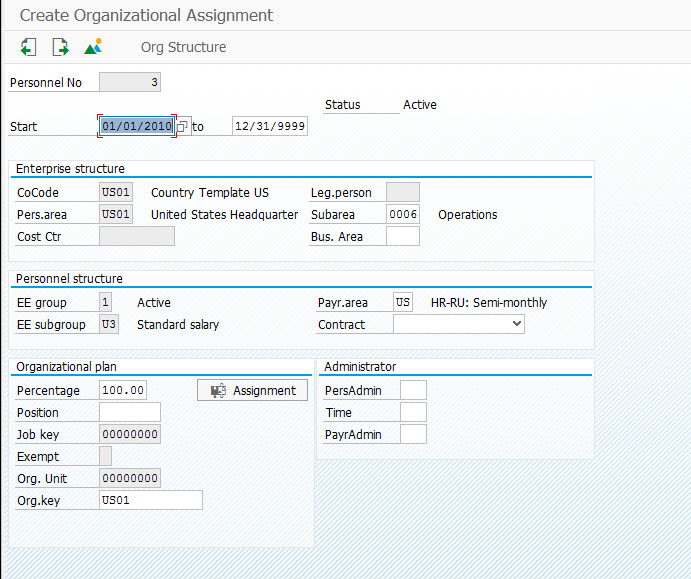
Required Fields:

  • Subarea = 0006

Press Save

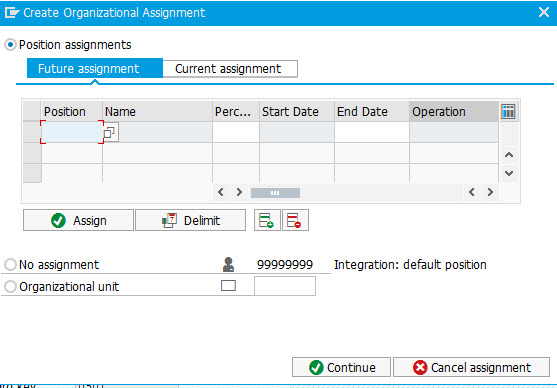
this popup will show up.  If you using an organization structure, you can enter something in here.  If you want quick and dirty, select no assignment.

Press Continue
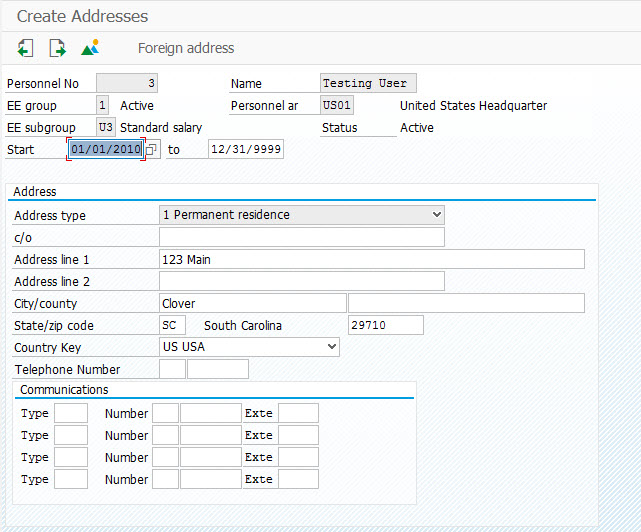
Make up an address

Press Save.

This popup will likely occur.  If you select the state, it will automatically bring in FED.  If select FED, you will need to manually enter in the state as well.

If you select FED, you will see this popup.
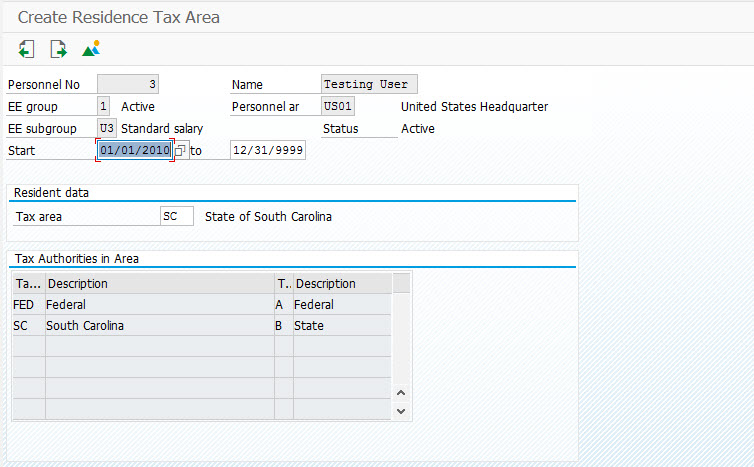
you should see something like this when you are done.

Press Save (twice)  Once for each tax area.
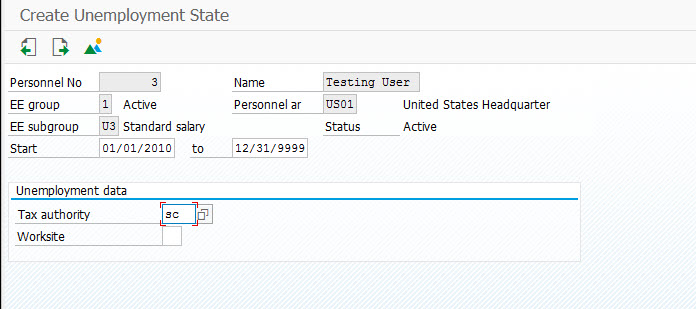
Press Save
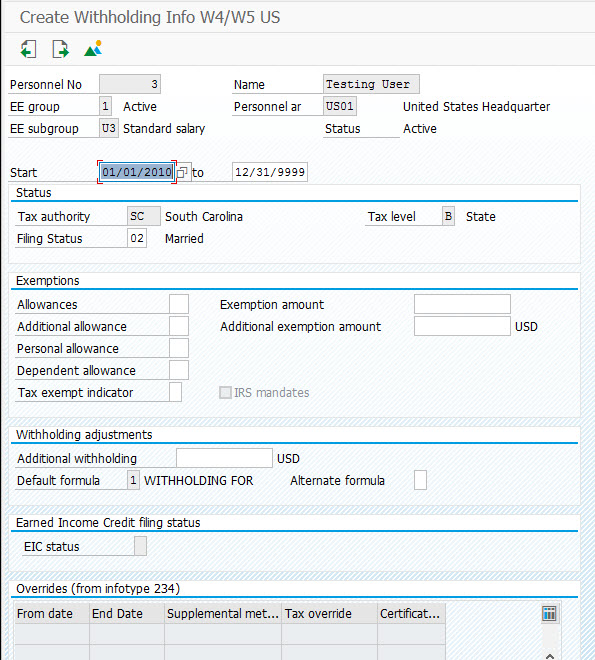
Required Fields:

  • Filing status

enter past the warnings

Press Save

Press Save
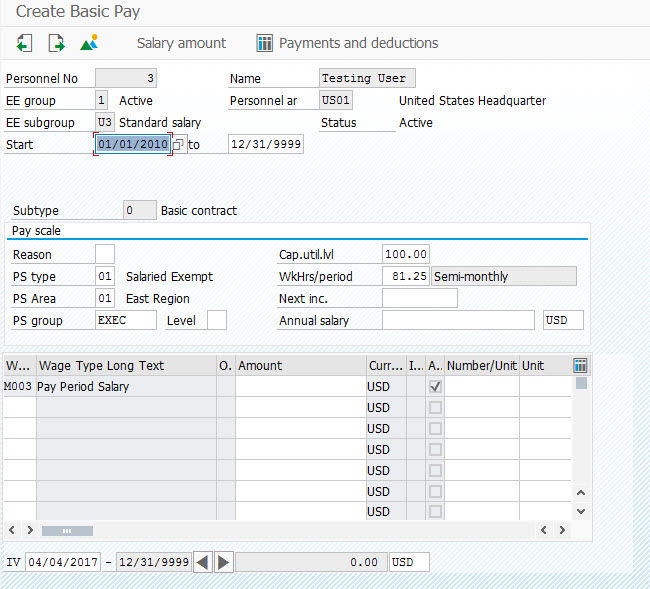
Required field:

  • PS Group
  • Annual Salary (optional)

Press Save

Press Save
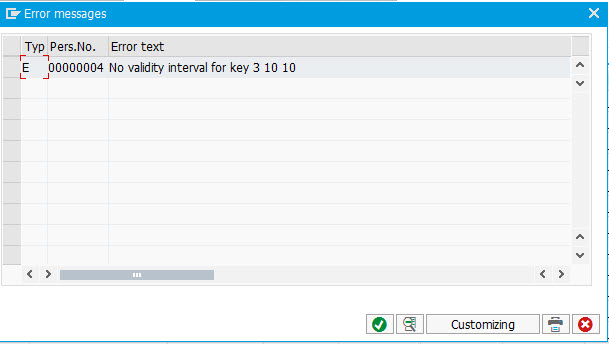
If you receive the following message, just hit the Green Check
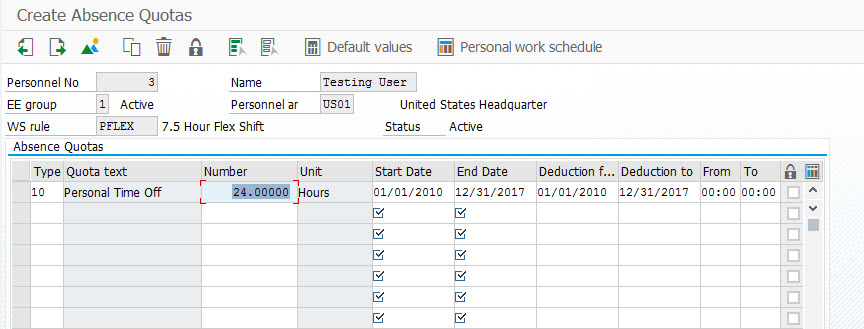
Required Fields:

  • Type = 10
  • Number = 240
  • start date = 1/1/2017
  • end date = 12/31/2017

Press Save

Press Save (twice)
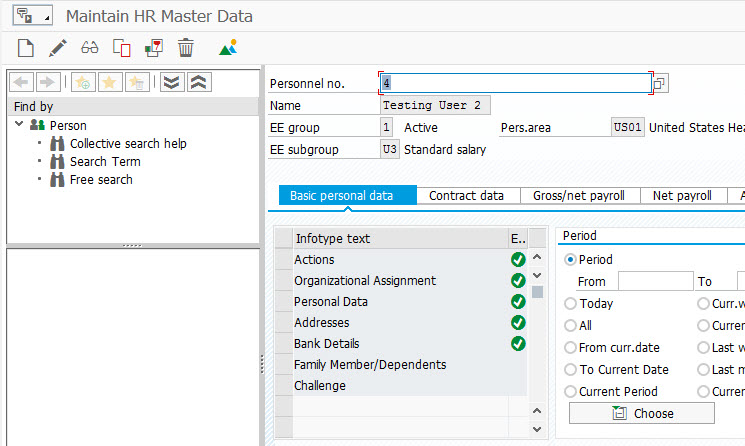
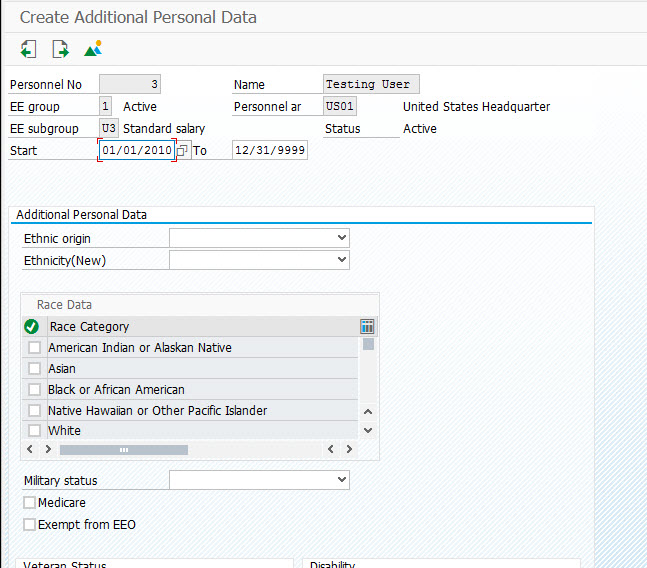
Now you are done.  You have a personnel no.  In this example, it is number 4.  If you notice all the green checks, you will see you ended up filling in 5 different info records, even though you only picked 1.

This is enough for today.  Tomorrow I’ll show you how to assign it to the work center.

Thanks for reading,


SAP – Digging for Answers

A long time ago, one of my friends once told me I was a digger.  I don’t think that really set in for me until I started to look at myself.  When he was talking about that, I had just gone through sifted through a lot of code, some custom tables, and found a solution that we could implement quickly.

Looking back, I finally get exactly what he meant.  One of my biggest skills in SAP is knowing how to dig for information.  So most consultants are really good at getting tables and field names, and even doing some debugging of screens.  What really separates the good from the great consultants is how persistent they are in finding the answer 🙂

I wanted to talk a little about my process, and I’ll give you an example.  A client of mine has some custom code to do lots of stuff within a notification.  Well, like any custom code, somehow a record got corrupted.  It had to do with a task record, and because of the fields that got wiped out, you could no longer make changes to the notification.  So I started digging.  Here’s what I did (not necessarily in this order).

  1.  found the BAPI’s for updating a notification.  I even tried running them in SE38 and doing the commit.  I got no errors, unfortunately no changes to the notification either.
  2. Next, I looked up the table and found it was QMSM.
  3. Then I went to Txn: Se11 and pulled up the where used of that table.  Unfortuantely, it was a rather large list.
  4. So I look that list, and when to SE38 and ran my favoriate report:  RPR_ABAP_SOURCE_SCAN
    1. I entered in the list from the where-used, and looked for anyplace with the term update (since I needed a way to update the record without doing all the standard checks).
  5. Then it was a bit of trial and error to look at each of the results.  Luckily, I even found a different piece of custom code that I could execute.  and happily, everything got fixed.

Now, there is also the alternative of changing fields in debug.  I was in production for this event, so that wasn’t an option, and it’s also something you need to be very careful doing, as you are likely to run into unexpected results 🙂  so try that in development first.

None of this is rocket science, but some days I’m just too persistent to know when to quit.

Thanks for reading,

Service Management – Revisiting the Exchange Process

I’ve been visiting the advanced exchange scenario recently.  One of the challenges I have always struggled with is that if you create a default exchange line as soon as you create the main line and inbound delivery line, that you cannot automatically generate a service order.

So my repair procedure is setup like the following:

101 Accept repair 101 Returns  (default)
101 Accept repair 106 Replacement Part (default)
102 Start repair 102 Repairs 01 (default)
102 Start repair 107 Scrapping 03
102 Start repair 108 Credit memo
102 Start repair 109 Debit memo
103 Confirm repair 103 Outbound Delivery
103 Confirm repair 107 Scrapping 03
103 Confirm repair 108 Credit memo
103 Confirm repair 109 Debit memo

The important part is the 101 & 102 areas.  The repairs line should be able to be added automatically by just visiting the repairs screen.  Unfortunately, this doesn’t work.  What I found out is that it is related to the user status for the main line item.  As soon as you ship out a unit, it sets the status to BDMD (business decision made).  The repair line is looking for BDRQ (business decision required).  With this system status, SAP will ignore this line, assuming that it OK since you shipped a part out already.

My next mission is to see if I can reset this status to be re-opened.  If I can pull that off, it should be possible to have SDREPA01 create the service order in the background.  More to come.

Thanks for reading,

Service Management – Accounting Indicator from DP90

I recently discovered something with DP90 I hadn’t previously discovered.  I was doing DP90, and I had the accounting indicator set as one of my fields.  However, when it added the items to my debit memo request, it wasn’t bringing over the accounting indicator field.  Normally, I might not have noticed this, but I have it as part of my pricing.  So when it wasn’t getting populated, I started scratching my head.

The trick turns out that unless you check the box NoSummarization in the DIP Profile (Transaction ODP1), it won’t copy that field.  I checked the box, and my problems were solved.

Thanks for reading,
Persona’s – Installation

Well, you can’t experiment if you don’t have the software.  So step one was getting Persona’s installed.  Step one, of course, is to go to SAP and download Persona’s 3.0.  Now, being the glutton for punishment that I often am, I tried first to install it on my old system (ERP 6.0, with a 7.20 Kernel).  Well, of course that didn’t work.  Persona’s 3.0 says that it requires Kernel 722.  So I tried a quick experiment to upgrade my kernel, but unfortunately, my old system wasn’t having it. So I went the easy path and installed it on my EHP7 system, which worked very easily.

Step one, make sure you have your webgui turned on.  <server>:<port>/sap/bc/gui/sap/its/webgui/
if this gets you a forbidden error, go to txn: SICF and activate the webgui node.

Next up was trying to use it.  I had the initial exercise from the OpenSAP class, but of course, I missed some configuration.  If you don’t see the “P” on the top of your webgui screen, you don’t have it activated.

You can see more on some of my previous posts on Persona’s.

Thanks for reading,


Service Management – Create a General Task List

Sometimes it’s nice to go through a simple walk-thru.  I’ve been playing a lot with task lists lately, so why not add it to the blog.  A perfect addition to my next book 🙂

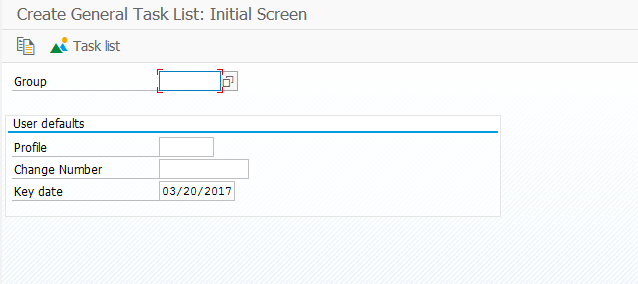
Transaction IA05

Don’t enter anything here.  Just press enter.

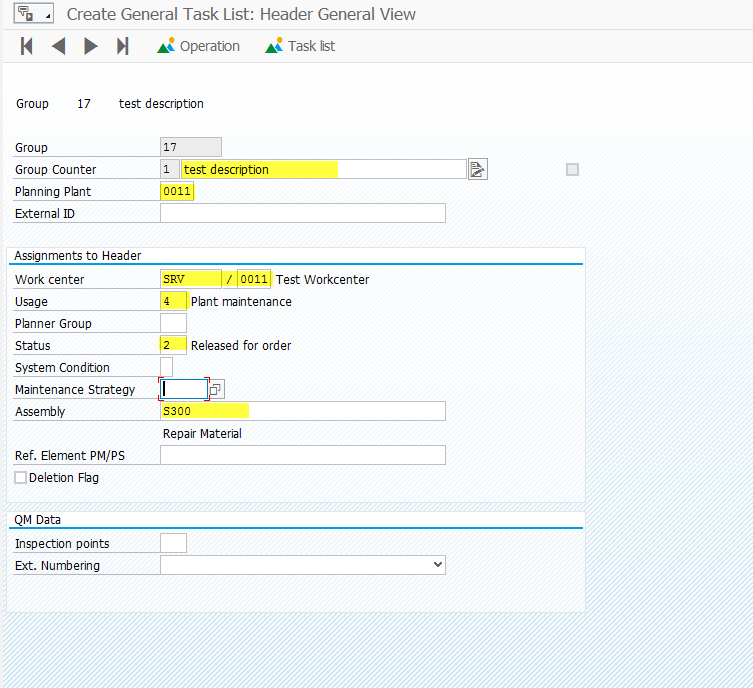
For me, the highlighted fields are typically the ones I care most about.  The assembly part number is critical if you choose to use maintenance BOM’s.

Press the Operation Button 

Enter in the operations you want in the list.

Press the Components button: 

From here, you can press the Component Selection  if you want to insert an entire maintenance BOM, or you can manually enter in the components.

If you enter in a maintenance BOM, it will pull in all the components from the BOM and allow you to select the items you want.  Typically, I will press  to pull in all the items.  Then I press Control and select the main item so it will not be pulled in.

Press:  to select the items you want.

Or you can manually enter in the items and quantities.  Be sure to include storage locations, bulk material flags, backflush flag, etc.

Press the green arrow back: 

Press Save: 

Thanks for reading,
Pricing – Condition Table Limitation

I recently discovered a limitation with creating a pricing condition table.  I never ran into this before, because I typically haven’t run into much automated pricing for service (usually it’s made up on the fly.  ha ha )  Or typically, just time and material with a markup.  Well, I was attempting to create a pricing table with 13 key fields.  YIKES!  But when I attempted to activate it, I kept getting the following error:

ERROR: VK709 Activation was interrupted

Well, it turns out that you can have a maximum of 11 fields when creating a new condition table.  Luckily, I found a way to combine what I needed (or overall, a better approach), but be aware of how complex you choose to go with your pricing.

Thanks for reading,