A little memory goes a long way

Well, in my latest experiment with making a new SAP system, I found out the value of RAM in the system.  Now, I already knew that more was better, but I guess I couldn’t really quantify it until this past week.  I started building my system on my laptop, while I was waiting for the new server to arrive.  No big deal, my laptop had 16GB of memory, so I allocated 6GB to my virtual machine.  I had my system on a USB 3.0 HDD (this part is important later) and I installed a bunch of support packs (probably around 50-60).  I had the job running, and it went for nearly 48 hours.  Not terrible.  The problem came when I left my machine within reach of my newly climbing baby girl.  She managed to pull herself up the small table my laptop was sitting at, and yank on the USB cable.  Ouch…  3 days of work down the drain.

So, having learned the hard way yet again, I moved the system to my new server.  It was finally ready and properly set up.  Since I had a lot more memory available, I bumped this system up to 10GB.  Luckily, I remembered the steps I had done the first time around, so the setup to install went much faster.  When I kicked off the support packs, I was able to finish the job in roughly 18hours.  I then installed another dozen or so, ran SGEN, and the whole process took 48hrs.

So, just a word to anyone out there with their own systems, more memory really makes a huge difference 🙂

Thanks for reading,

Getting that new system ready to roll

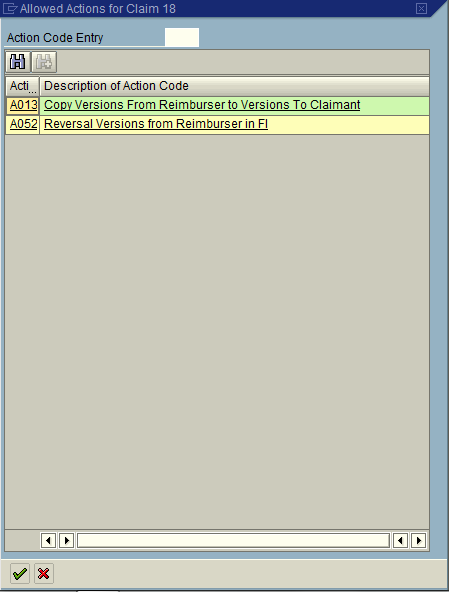
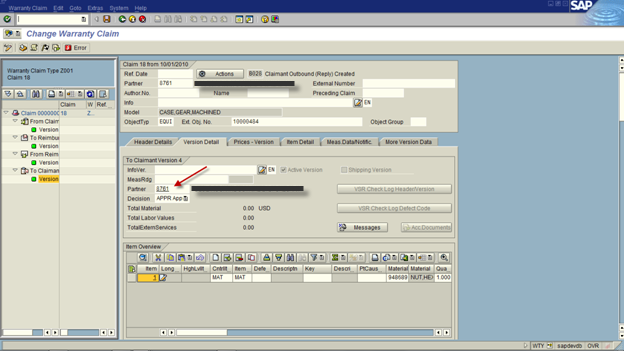
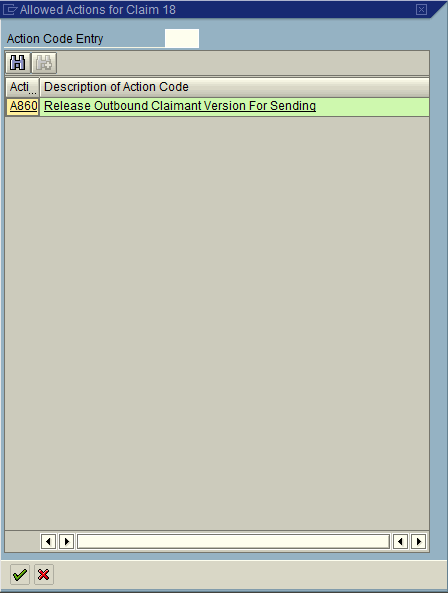
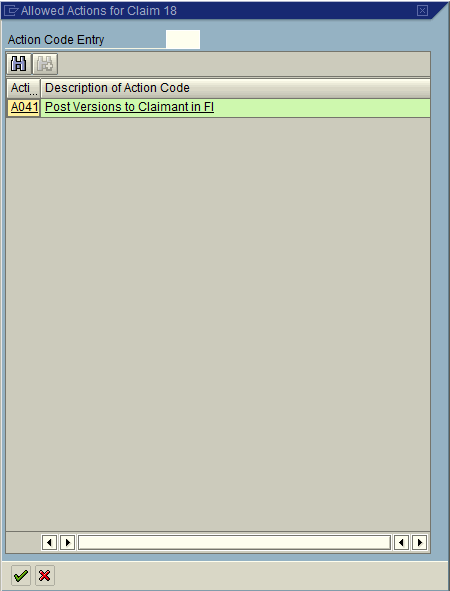
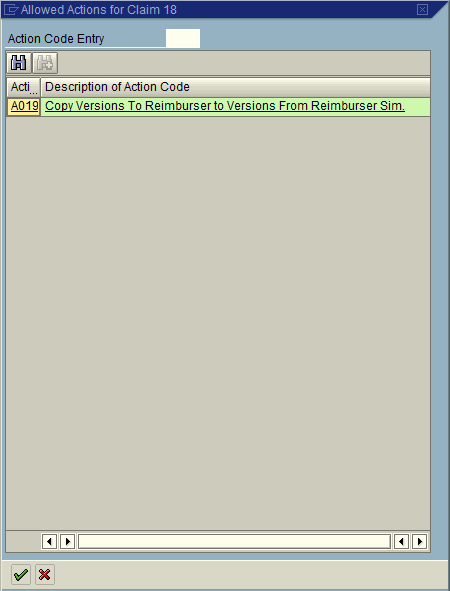
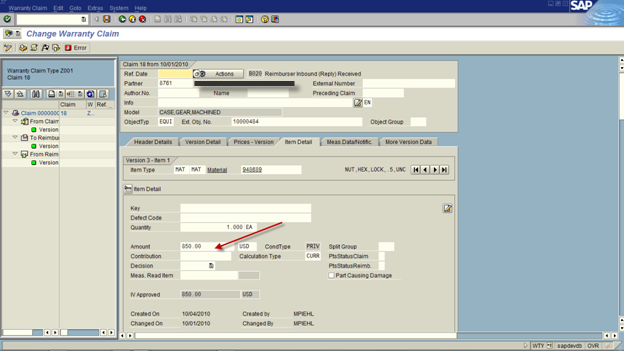
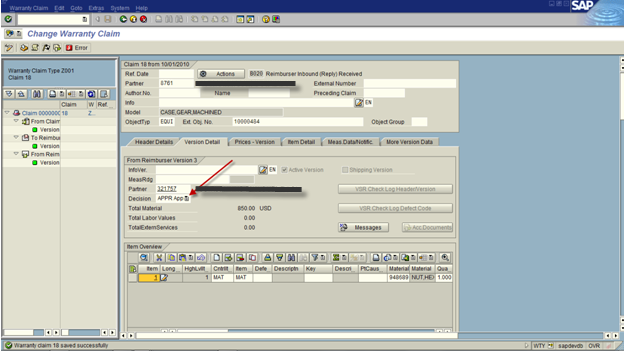
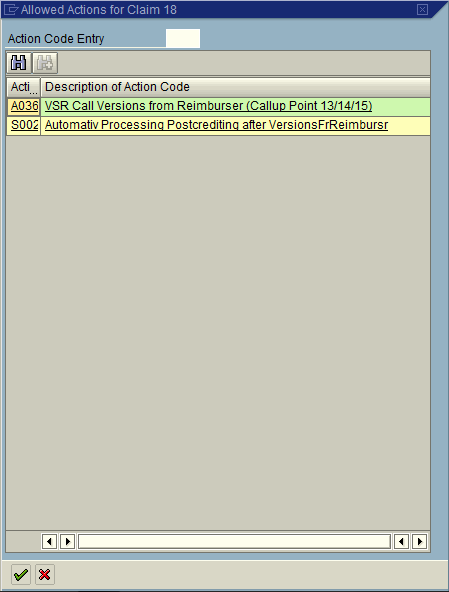
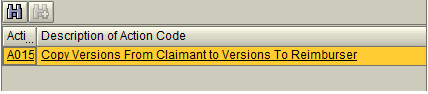
I apologize to all of you out there for not getting back to the warranty claims thing.  I do intend to get back to that line of posts, including more in depth configuration, but my time has been consumed in the infrastructure world of late.  Namely, building myself a new virtual server box that can be used for testing.  This all sounds pretty easy, but believe me, it’s been far more time consuming than I imagined.  My only saving grace is that I blogged a lot tricks a while back that have helped me out of a jam.  So today, I wanted to talk about the high level steps it takes to build a new system, using virtual server.

Now, virtualbox is my virtual server system of choice, and I love it.  It’s been good.  One of the things I love about it is the clone feature.  It allows me to take a previous snapshot or current state and convert that into a brand new system.  That’s what I’m doing now.  I had an ERP 6.0 EHP4 system I’ve been using for development, and now I need one for testing.  I thought I had one…  but that’s a long story 🙂  Anyway, I chose to clone a snapshot of the EHP4 system before any development work was done.  This gave me a good starting point (side note, be careful if you clone a system, then delete it, then try to clone it again.  I had a lot of trouble making that work with virtualbox).

Now, once I had my cloned system, it needed a lot of work.  First and foremost, it was built on a windows platform, so I needed to get all the updates installed.  If you use windows, you know that there are a LOT of updates, especially going back almost 2 years.  ha ha ha.The next thing I needed to do is move all of the configuration transports back onto this box.  Now a huge deal, but had to wait a while for dropbox to re-synch in order to get everything available, and then one by one, import and install each transport.  Next, I need this to be it’s own instance number.  Good thing I did a post on that a while ago to remind me of all the steps to do this.  However, I was running into issues making it work, so I needed to upgrade the kernel first.  Again, good thing I had a post on that too 🙂  Then I thought… well, I should be on Kernel 720, so I upgraded that too.  So far so good, but suffice it to say, none of these steps are quick.  Now, I want to have this system up to date on all the support packs, particularly related to Web Dynpro, to make sure it can run on as many browsers as possible for testing.  I can’t believe how long this takes.  It’s been running for nearly 2 days.  I guess that’s what happens when you’re 9 – 15 levels down.  Oops.  Anyway, once this finally finishes, I can run SGEN to compile all the changes and take a virtualbox snapshot.  Then I’m finally ready.  (of cource… the next mission will be to create another system with Netweaver 7.3.  I’m sure there will be posts on that soon).

As always, thanks for reading,

Blogging for Business

Well, if you’ve been reading me for any length of time, I’m sure you know that I started this whole blog initiative because of some marketing stuff that I listened to and followed for a while.  I learned some good stuff from it, but most of it I’ve since left behind, because a lot of the concepts were geared toward selling things on the web.  If you know anything about SAP, it’s not the sort of things that someone is going to whip out a credit card and buy (unless it’s an e-book).  But the blogging thing I’ve stuck with.  It’s been around 18 months that I’ve been doing it hardcore.  I really didn’t expect it to last this long.  Some days it’s a royal pain trying to figure out what I’m going to write about next.  Other days, I know what I can write about, I just don’t have the time to pull the screen shots and do some real in depth configuration, but to quote one of my little boy’s favorite movies, I “just keep swimming”.

The crossroads I’m at is this.  I was under the impression that blogging good content increases your SEO ranking and helps to promote you in organic search.  I am far from understanding much about SEO, but I have been learning enough to know that if you stick with it long enough, it can be “free” publicity straight from google.  Now, the question comes down to where I want to promote.  Perhaps some one out there can give me some guidance on this…  I have two business, my consulting business that I”m trying to move away from, and my software business that I’m trying to move toward.  Our website is undergoing a major revamp and I hope you’ll all check it out when it’s finished.  My partner and I are in different camps on where to blog.  Do we each keep a separate site and blog in our own ways, and periodically blog at Javellin?  Do we both blog at Javellin exclusively?  or do we copy selected content from our own blogs and post it on Javellin?

Now, I was ready to push everything of mine to the new site, in hopes of generating better SEO for the real business.  My partner is worried about losing our content and thinks it better to just link back to it, or “move” selected blogs to Javellin.  anyone out there know the right answer to this?  Am I worried about nothing?  If content is duplicated, do you get punished by google?  is linking a blog to a website help organic search at all?  Guess I’m wondering if any web guru’s out there might know the answer.

Sorry for not being more informative…  today is a question day to y’all.

Thanks for reading,

Hardware Headaches

Well, like always, my life is full of fun little twists and turns.  We have our upcoming MFG conference in Vegas coming up.  Some of the cool things we are looking to do include a Proximity Web Dynpro Application and a mobile app.  Well, the problem is that we needed a new server to run a couple more systems.  Namely, systems new enough to handle web dynpro on any browser and mobility.  So, as CTO, I needed to get myself a new server.

Well, it’s a nice one, 32GB of memory, 3TB HDD, etc.  Well, I waited for a while and it finally showed up.  I was like a kid at Christmas.  I quickly ran up to my office and started to get it up and running.  Well, things were rolling along, I got dropbox installed, norton, virtual box and the like.  Then spent 3 hours copying 500GB of data to start my new system.  I even created a new clone system and start to get that started.   So after a full day of working, I was feeling pretty good about myself.  I got up the next morning, and suddenly the system wouldn’t fire up.  I tried playing with BIO’s, rebooting, unplugging all the usb drives etc…  still no love.  I come to find that Windows 7 professional has issues with drives bigger than 2TB.  I was a bit perturbed…  especially since the company I bought this from specializing in upgrading systems.

So, after a full day of work, the only choice I had to use the emergency disks and install Windows 8.  Well, learned my lessons…  first, be careful letting your hardware exceed your software, second, don’t believe that a company knows everything.

Thanks for reading,

ABAP Web Dynpro – Setting ALV Column Header

Not that long ago, I discovered the whole world of ALV tables within ABAP Web Dynpro. As is so common for me, I’m still figuring out all the ins and outs of the code. I have done several tables in my first application, and they all went pretty straightforward. Suddenly, I went a little off the norm, and the column text that I was using stopped working. So because of that, I wanted to make sure I shared this little tidbit about setting the ALV Column Headers. I did a post on this stuff, but I missed a key element. If you’re looking for explanation, take a look at this post.

        ls_col_hdr = ls_cols-r_column->get_header( ).         ls_col_hdr->set_ddic_binding_field( if_salv_wd_c_column_settings=>ddic_bind_none ).         ls_col_hdr->set_text( ‘R’ ).

Now, the important thing to notice is the 2nd line I have listed above. In certain instances, no matter what you try, you can’t undo this binding. So, when in doubt, explicitly break the link. it’ll save you a lot of headaches 🙂

Thanks for reading,

Variant Configuration – Adding Values to a Multiple Value Characteristic in use

Now, this is an obscure, so no idea if anyone else has had to do this, but I just had a situation where a multiple value characteristic started off as free text only and the client needed to change it to define the values.  I thought this would be a simple exercise, however I quickly found out a few things.  If your characteristic is in use and you choose not to check the additional values box, then it’s all or nothing before you can save.  That means you need to track down every value that was entered for you multiple value characteristic and give it a value in CT04.
Now, I went through the where used and thought I found every value that I had used.  Well, I was wrong.  So, after spending a little time in debug, I found the following trick.  If you place a breakpoint in the following area, you

Program: SAPLCTMV
Include: LCTMVF2I
Form: CHECK_DEL_OF_VALUE

Function: CTCH_CHECK_CLASSIFICATION

If you place a breakpoint here, and look right after this function, you’ll see a couple of error lines.  If you look at the value of  sy-msgv1, you’ll see the value that is missing in your characteristic.  Now, this is probably an iterative process to get everything, but this will help to prevent you from wasting too much time looking for one specific value to add to your characteristic.

Thanks for reading,

Who are you Selling to?

I recently had a big revelation.  I was talking to a guy that does marketing through Linked-in.  I was already intrigued by the idea, so I met with him.  He spun things in a whole new light for me.  I realized that up til now, everything I’ve done is pretty much bottom up selling.  I try to convince service technicians or maybe managers that they need what I’m offering.  When in reality, I’m pitching to wrong people.

The key things I took away from our talk was that you really have to sell to the people with the money.  While it’s great to be able to convince the end users how great your stuff is and how much easier it will make their lives, in the end of the day, I’d be depending on them to sell it to their management, who in turn would need to keep selling it up the chain.  How could I possibly expect someone 3 layers removed to be able to sell my stuff as well as I can?  When I looked at it, my bottom approach was pretty much expecting someone else to do the work for me…  it’s not going to happen (at least not often).

The people I need to sell to are at the top.  The people with CXX in their title are the best place to start =)  Now, this of course brings up a whole new set of issues for me, including fashioning a new message geared toward the CEO, CTO, CFO etc.  Today’s message to any of you out there just getting started, think carefully about your audience.  I didn’t, so now I have to change my thinking.  The good news is that it isn’t wasted work.  If you can’t convince the people that will use it that it’s good, they’ll push back and you likely won’t get the sale.  The key is to be able to sell your stuff all the way down the line.    My next mission is putting together a new message for the top down selling approach.

thanks for reading,

Service Management – Warranty Claims example – OC

This is the final piece of the post crediting process.  Last time we covered the IV or inbound from the vendor.  This last piece is the OC or outbound to the claimant/customer.  We left off at the B025 status.

Press the action button.  Now you will create the claim version 4, to be sent to the claimant.

blog03-01

Select Action A013: Copy Versions from Reimburser to Versions To Claimant.

*** Note: you could reverse the posting by selection A052: Reversal Version from Reimburser in FI

Status is set to B028: Claimant Outbound (Reply) Created

blog03-02

Version Detail: Be sure to set the partner to be the claimant (customer number).

blog03-03

Be sure to verify the pricing on Item Detail.

After verifying the data, Press the Action Button:

blog03-04

Select Action: A860: Release Outbound Claimant Version for Sending

Status: B030 Claimant Outbound (reply) Sent

Press the Action Button again:

blog03-05

Selection A041: Post Versions to Claimant in FI

this will post the money to the customer account.

Status: B031:Claimant Version Posted

Finally Press the Checkered Flag to mark the claim as complete.

Status: B060: Claim Closed

*** Note, if the claim is rejected you would press the checkered flag as well.

So that’s the entire post crediting process in warranty claims.  I hope this helps shed some light on the full process and some of the things you can do with warranty claims.

Thanks for reading,

Service Management – Warranty Claims example – IV

Last time we talked about the OV or outbound to the vendor.  Now we cover what happens when we get a response from the vendor, or the IV.  We left off at status B010.

When the Vendor approves or rejects the claim, you can hit the action button to create the 3rd version of the claim.

blog02-01

Select A019 to create the 3rd version of the Claim.

The status is now set to B020: Reimburser Inbound (Reply) Received

Be sure to update the Item Detail tab with the amount that the vendor will reimburse.

blog02-02

Be sure to update the Version Detail tab with the Decision (Approve or Reject).

blog02-03

Press the Actions Button:

blog02-04

Select Action A036: VSR Call Version from Reimburser (Callup Point 13/14/15)

Status is now set to B022: Claimant/Reimburser Version checked

When the money is received, press the Action Button:

blog02-05

Select A043: Post Versions from Reimburser in FI

This will set the status: B025: Reimburser Version Posted

blog02-06

Press Save.

To see the accounting docs that were generated, press the document flow button.

blog02-07

Click on the accounting document.

blog02-08

Green arrow back to the claim, and press the action button.

Now, at this point, you’ve received the money from the vendor.  Next time around, we’ll talk about the OC or outbound to the claimant/customer, the end of the warranty claims cycle.

Thanks for reading,

Service Management – Warranty Claims Example OV

This post is the second part of my example in warranty claims.  In my first post, I talked about the IC or the inbound from the claimant/customer.  This next piece is what happen next in the post crediting process, that is sending the information to the vendor.  When we last left off, we set the status to B003, which means the claim has been checked.

Press the Action Button Again:

blog01-01

Select A015:  This will create Version 2 of the claim

blog01-02

If you look on the left side of the screen, you’ll see that a new version was created.  The reason is becomes very important is that each version can have completely different pricing and partners.  Think of it this way, your customer may ask for $100.  You may ask the vendor for $125.  The vendor may give you $75, and ultimately you give the customer $90.  Who knows?  it all depends on your agreements with your customer and your vendor.  Regardless, warranty claims gives you the freedom to do what you need.

Note:  the version 2 of the claim will need a Vendor as it’s partner (this is the partner that will pay the claim).

Verify the pricing on the Item Detail Screen.  Then Press the Action Button again:

blog01-03

Select A870 to release the claim to be sent to the vendor.

The Status is now set to B010: Claim Sent to Reimburser

This next section is optional, but it gives you the opportunity to print or send output.  Depending on your process, this could be IDOC, printed or emailed.

blog01-04

Press the Messages button to print out

blog01-05

This will work just like any other output determination.  One of the biggest things to keep in mind is that there are no printed forms out of the box for warranty claim.  There some IDOCS (I believe), but nothing that you could print or email.  That means, if you need it you will have to design it from scratch.

Next time I’ll talk about the IV or inbound from the vendor.

Thanks for reading,

Posts navigation

1 2 3 62 63 64 65 66 67 68 96 97 98
Scroll to top