Month: February 2014

Home / 2014 / February

Schedules and Scope – Keeping a Balance

Now, if there’s one thing I’ve learned in all of my consulting, it’s that schedules and scope increases just don’t mix.  Have you ever been on a project and heard the phrase, “this is the date, and it can’t change”?  Now, this statement on it’s own isn’t a problem.  If project management did their job, the schedule is reasonable, and the date is achievable.  Now, this statement suddenly becomes a huge risk when you throw in additional work, additional scope, or poor original planning.

So, why am I talking about this?  Call it a cautionary reminder.  There are several key things to get right when you plan any project (even if it’s completely controlled and implemented by yourself :> ).

1. Plan your initial schedule with a reasonable end date.   a. Get sign off from the business on their requirements.
b. Factor in some fudge time to make sure that the inevitable rework can still be done.
c. Keep in mind that if you depend on multiple resources, they may not be as invested in the end date as you are.  Don’t assume they will work 70 hr weeks just because you will.

2. Stick to your scope.  The business will always come back and say “I forgot that I need this too”, or “I can’t do my job unless you give me this”.
a.  you need a process.  Typically, this should involve a trip to the steering committee.  This way, someone else can make the call if the new work will be included in the project.  And of course, they will be aware of what those changes will do to the end date of the project.

In my experience, #2 is the biggest issue most companies encounter.  None of this is rocket science, yet I see the same mistake made over and over again.  So, this post is a little bit of venting, a little bit of advice, and mostly a cautionary tale.  Scheduling matters, and you can’t keep piling 15lbs into a 5 lb bag.  No matter how loud you yell or how hard you push, it either won’t fit, or the bag will break.  Either way, it makes more sense to put the most important 5lbs into the sack instead of waiting for it to burst.

Thanks for reading,

Warranty Claims – Define Processing Status

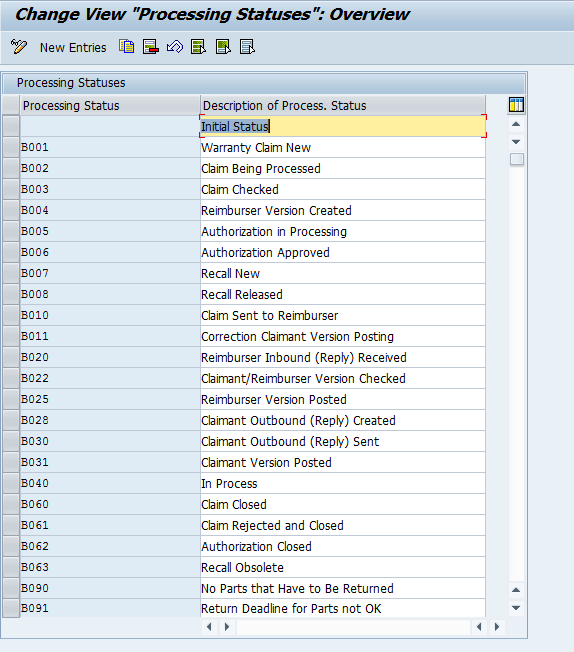
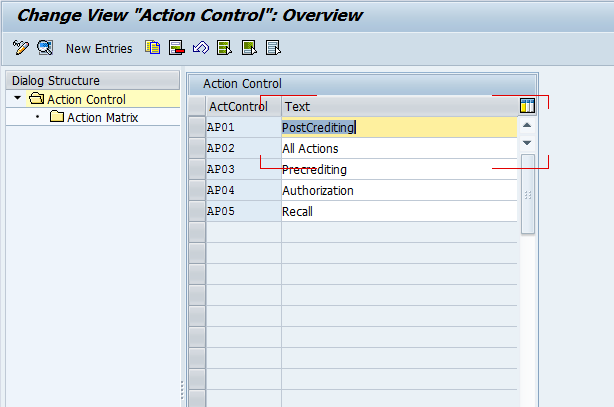
I’m finally getting back to some of the warranty claims stuff again.  Today we’ll talk about a smaller piece of the configuration, but it connects directly to my last post on warranty claims.  This post is also within the Process Control portion of the claim.  The define processing status step allows you to create your own statuses within the claim and give it any description you want.  When you combine it with the define action controls you can connect your processing status with any action you want.  Here’s how you go about creating your own status.

wty01-01

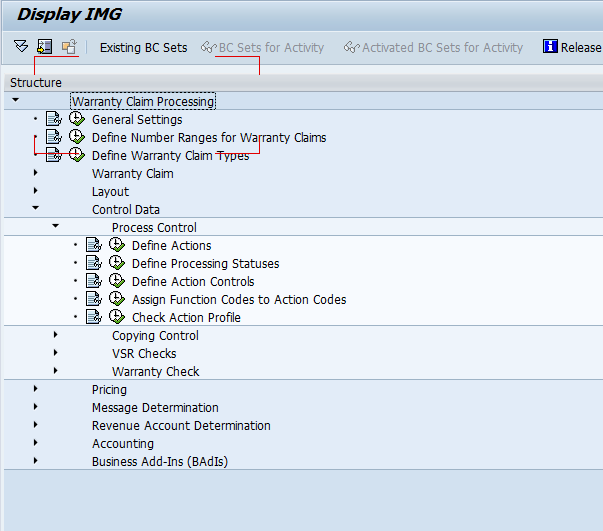
Going back to OWTY, you can find this step in configuration.

wty01-02

Now, this is just a sampling, but you can easily create your own set of statuses.  I’ll get to more in depth claims configuration soon.

Thanks for reading,

Web Dynpro – Activating Services

It occurred to me, this might be rudimentary to most anyone that’s been doing BSP’s or Web Dynpro, for the newbies out there, this might not be obvious.  Since I just put a new Web Dynpro App into my test system, I thought this would be a great chance to document the process and share it with y’all 🙂

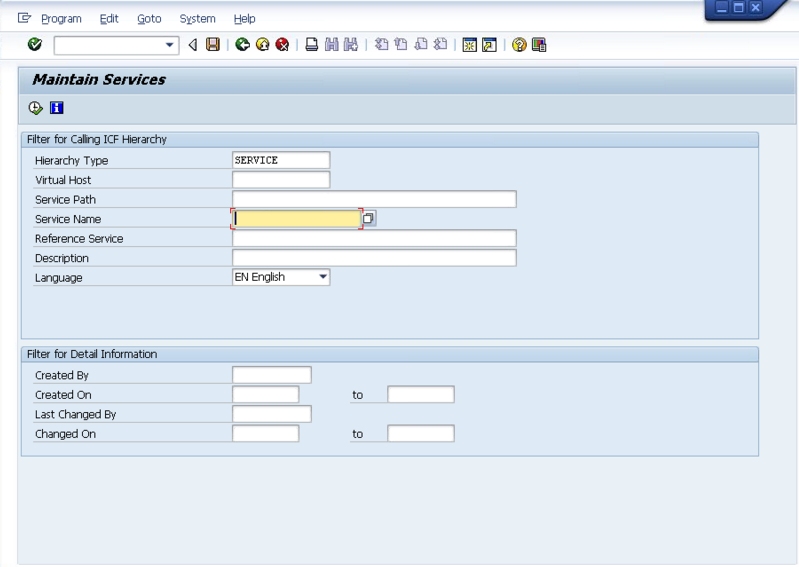
First off, go to transaction SICF.  Depending on your version of SAP this might look a little different (this is ERP 6.0).  But you’ll be able to see what I’m talking about.

blog02-01

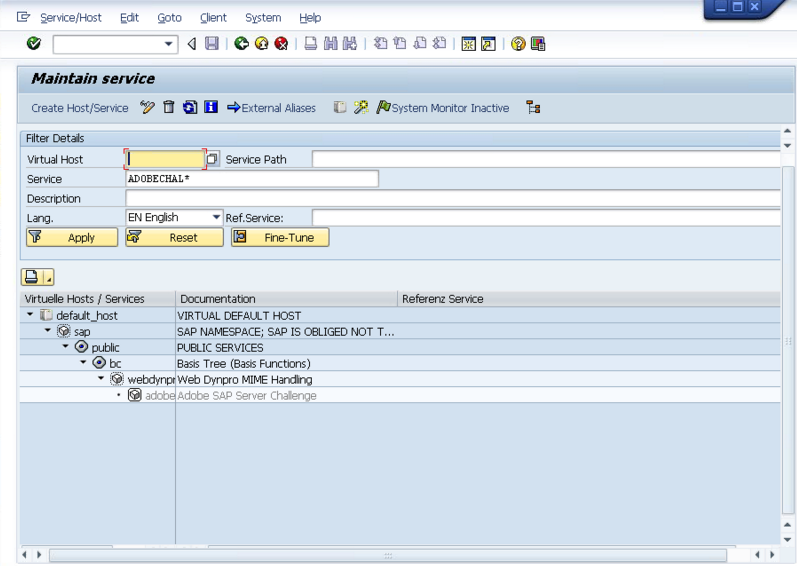
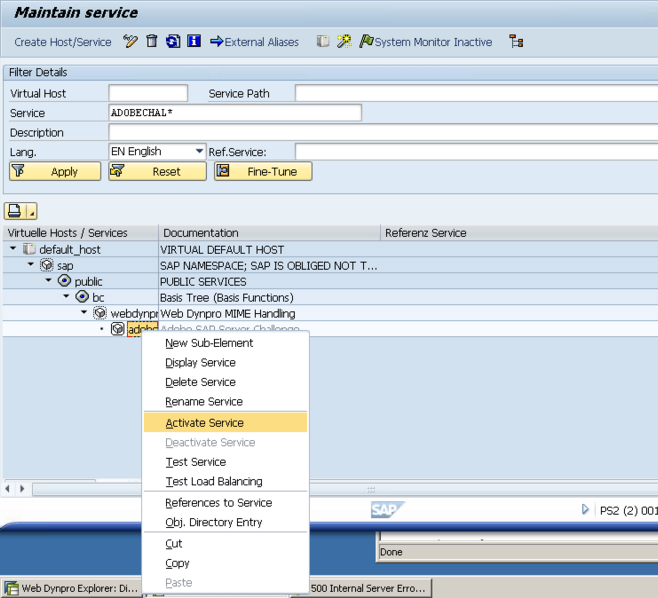
Normally, when you go to use Web Dynpro for the first time, there are a bunch of services that need to be activated.  Your web browser will tell you exactly what they are.  You either navigate the menus manually, or if you enter in the Service Name, SAP will take you directly to the one you want to activate (I like option 2).

blog02-02

Here’s an example service.  You’ll notice that it’s grayed out when it is inactive.  So go ahead and right click on the service.

blog02-03

Select the Activate Service.

blog02-04ow

Now, depending on what you select to activate, if there are other services below the one you selected, you can choose Yes with the hierarchy to activate the service and everything below it.  Or you if select Yes, it will just activate that one service.

That’s it.  Now, keep in mind, there are a lot of other things within the service itself that can be updated, but for now, this is my little tidbit.

Thanks for reading,

Netweaver Gateway – Creating the Entityset

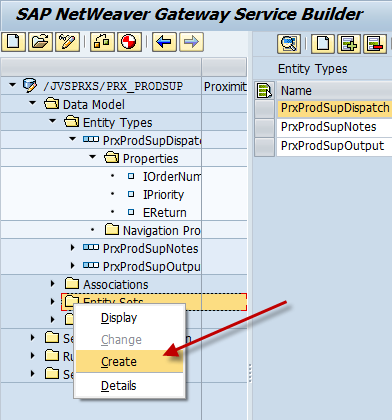
In the last post, we created the entity for our service.  One of the next pieces is the entityset.  This is a really easy piece, but still required in order to complete the service.  We go back to SEGW.

segw2-01

next…

segw2-02

Name your entityset, and pick the entity you want to link to…  Now you’re ready for the next step…  we’ll get there in a future post.

Thanks for reading,
Netweaver Gateway – Creating a Service from RFC

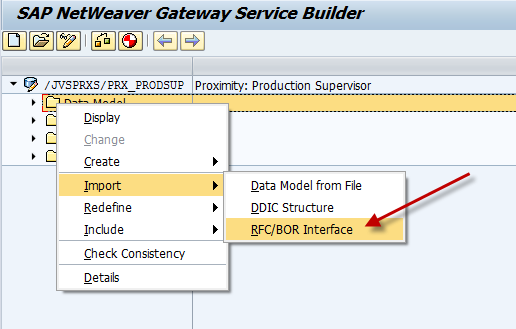
Well, picking up where we left off on Netweaver Gateway.  Last time we created the project, now it’s time to actually create the service.  In my example, I have already created an RFC to feed the information I need to the service.  So, here’s how to do it.  Return to transaction SEGW.

segw03

next…

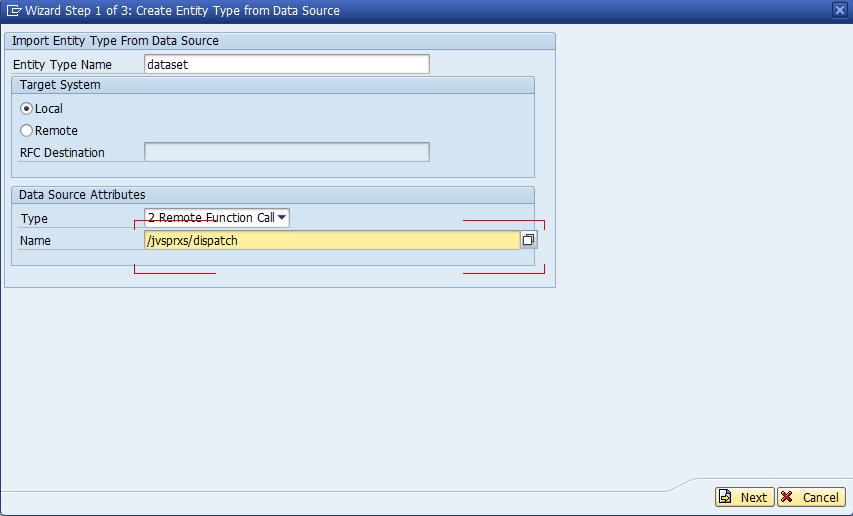
segw04

Here, you need to give it an entity name.  This is what you’ll be using going forward.  Select the type as Remote function call, and then list the name of the function.

segw05

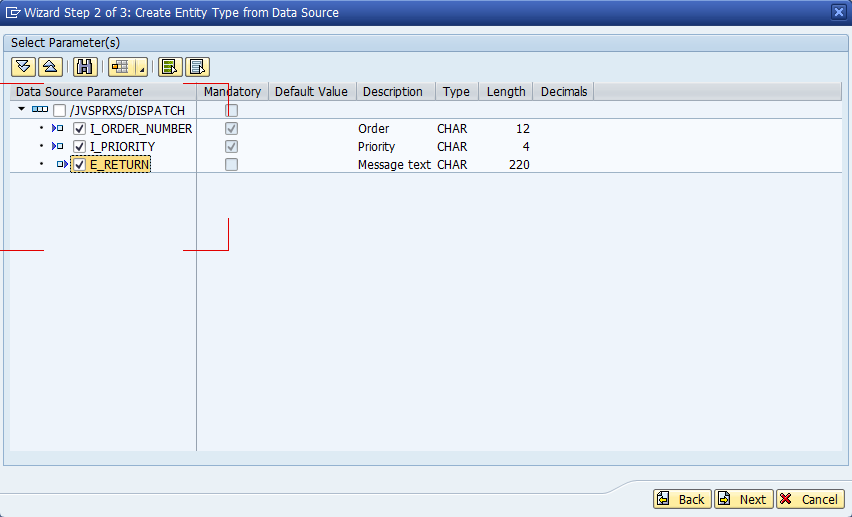
Now we get to the magic.  The RFC has now pulled in all the inputs and outputs from the function.  Now, you check the fields you want to make part of your “entity”.  The entity will contain the fields that you plan to extract or feed into your service.

segw06

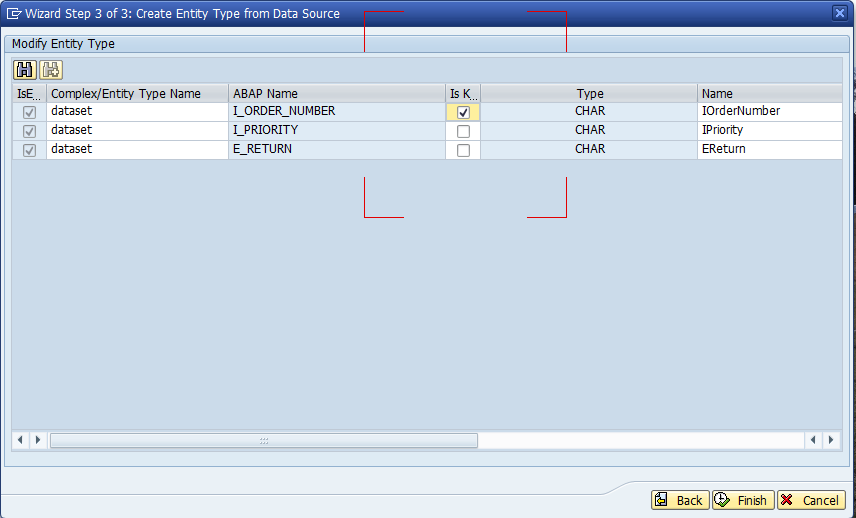
After you select the fields you want, you must define at least one key.

segw07

Now, you have the entity.  With this piece, you’re ready to start doing something with the data.

In a future post, I’ll talk about the next steps for the service.

Thanks for reading,
ABAP – Web Dynpro – Dynamic Cell Variants

Well, in my continued adventure, I found a new component in web dynpro call a cell variant.  The basic idea behind this is that you can change what kind of cell is within a table.  For example, sometimes you may want a field editable, based on the contents, and other times it should just be a text view.  Well, I had something similar in my latest web dynpro experiment.  I needed to do  dynamic cell variants.  By this, I wanted to add the cell variant to an ALV table, so I couldn’t just manually add it to the column.  Well, thanks a cool document I found, I was able to pull this off…  mostly.

http://www.sdn.sap.com/irj/scn/go/portal/prtroot/docs/library/uuid/f0e7461d-5e6c-2b10-dda9-9e99df4d136d?overridelayout=true

Now, I use the term mostly, because of course, I tried branch out on my own.  It’s probably easiest to explain with a little code and my example.  First, I had a column in my ALV table that either listed a single serial number, or should provide a link to another window to show all the serial numbers associated with the document.  This is perfect for the cell variant.  I set it up so that

Here’s where I started, and syntactically, it would fine:

data: l_cv_ser TYPE REF TO cl_salv_wd_cv_standard,
lr_link_ser TYPE REF TO cl_salv_wd_uie_link_to_action,
l_col TYPE REF TO cl_salv_wd_column.

create OBJECT lr_link_ser.
lr_link_ser->set_text_fieldname( EXPORTING value = ‘SERNR’ ).
* create cell variant
create OBJECT l_cv_ser.
  l_cv_ser->set_key( VALUE = ‘MULTIPLE’ ).
* add link to action editor
l_cv_ser->set_editor( lr_link_ser ).
* Get column
l_col = lv_value->if_salv_wd_column_settings~get_column( ‘SERNR’ ).
* add cell variant to column
l_col->add_cell_variant( r_cell_variant = l_cv_ser ).
* assign attribute
  l_col->set_sel_cell_variant_fieldname( ‘SERNR’ ).

Now, if you pay close attention to the bold lines, these were my problem.  See, the data in the column might be MULTIPLE, or it be 1, 2, 3, 800034234, or any serial number.  So in my initial testing, it was all multiple, so it worked great.  suddenly I was getting a short dump when it hit a cell with a value other than MULTIPLE.  It finally hit me…  with a cell variant, you either need to define an editor for each value in the column?  or you need to make a new column with only 1 value or blank.  i ended up going down the second path.

data: l_cv_ser TYPE REF TO cl_salv_wd_cv_standard,
lr_link_ser TYPE REF TO cl_salv_wd_uie_link_to_action,
l_col TYPE REF TO cl_salv_wd_column.

create OBJECT lr_link_ser.
lr_link_ser->set_text_fieldname( EXPORTING value = ‘SERNR’ ).
* create cell variant
create OBJECT l_cv_ser.
l_cv_ser->set_key( VALUE = ‘X’ ).
* add link to action editor
l_cv_ser->set_editor( lr_link_ser ).
* Get column
l_col = lv_value->if_salv_wd_column_settings~get_column( ‘SERNR’ ).
* add cell variant to column
l_col->add_cell_variant( r_cell_variant = l_cv_ser ).
* assign attribute
l_col->set_sel_cell_variant_fieldname( ‘CV_SER’ ).
lv_value->if_salv_wd_column_settings~delete_column( id = ‘CV_SER’ ).

I hope this sheds some light on the cell variant.  it really is a pretty slick tool.
Thanks for reading,
Netweaver Gateway – Creating the Project

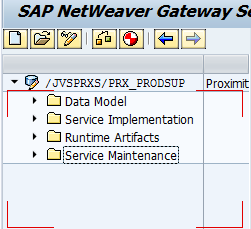
Well, since I recently spoke about using the gateway client, I figured I should talk about creating the service to use the gateway client.  The first step in this process is creating the project.  Like so many things, you must start small in order to build…  so let’s the netweaver gateway project and get this party started.

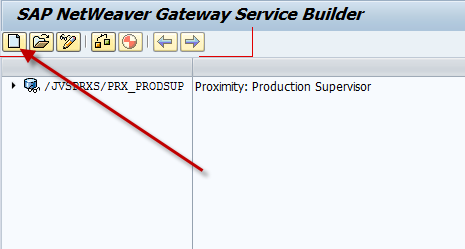
First, go to transaction SEGW

segw01

Press Create.

segw02

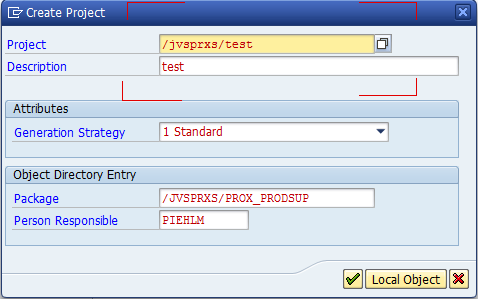
Now, put in the project name, description and package.  For me, I do everything within my own namespace, so notice how both the project and the package must start with the namespace.  Press the green check and you have your project.

segw021

In future posts, I’ll walk you through the next steps.

Thanks for reading,

Warranty Claims – Define Action Controls

Sorry, it’s been a while since I talked about the Warranty Claims configuration.  Time is always working against me, so finding the time is often challenging 🙂  So, on with the show…  This post is going to jump ahead a little bit from where we left off.  The reason being, to me, the sequence of configuration doesn’t really flow with the way you’d set the system up.  So it’s my blog, I can do it my way.  Defining the process is one of the most important pieces of the claims process, in my opinion at least, so I wanted to start with the action controls.

wty01-01

First, go to OWTY, and you this is where you find the configuration.

wty01-02

First, pick your claim type.  You can will often be using a custom claim type, but for simplicity, I’ll start with the AP01, post crediting claims.

wty01-03

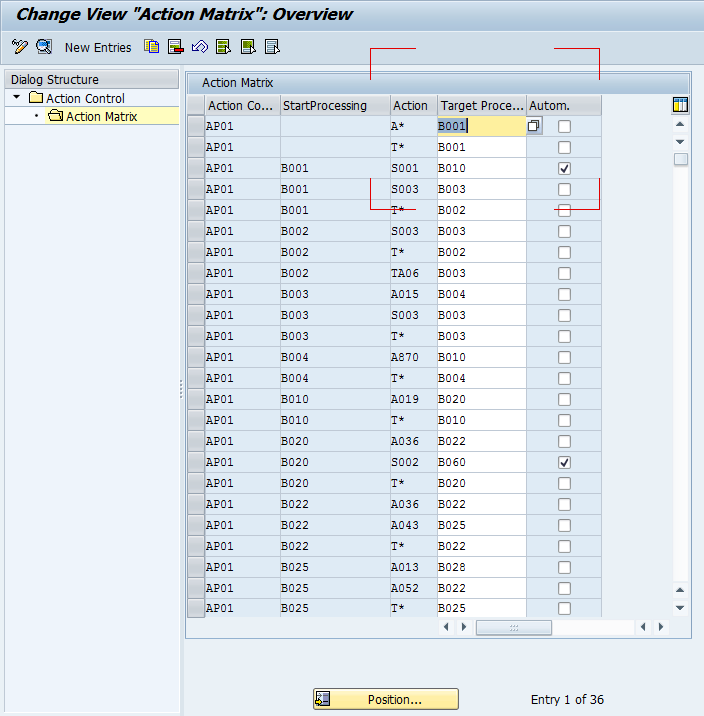
Now, here’s the where things get heavy.  The first column, is our chosen claim type.  The next 4 columns are where the power comes from.  Now, in the start processing, this is the current status your claim is at.  Column 3 is the actions that are allowed to happen at that status, and column 4 is the status that the claim will move to if that action is taken.  Let’s look at an example
when the status is B001 is Warranty Claim New.  When the claim is at this status, you have the following actions you can take:

S001: Automatic Processing Postcrediting after VersionsFrClaimant
S003: Warranty Check (A200) and VSR Call (A006)
T*:  this is all the T actions…  however, you won’t see the TXXX actions in the list (because they are “hidden” actions).  But things like T060, complete claim are available by pressing other buttons, so you want to make sure they are available.

Now, if we pick S001, it will set the claim status to B010: Claim Sent to Reimburser, along with the back end actions that go along with it (we’ll talk more about that later).

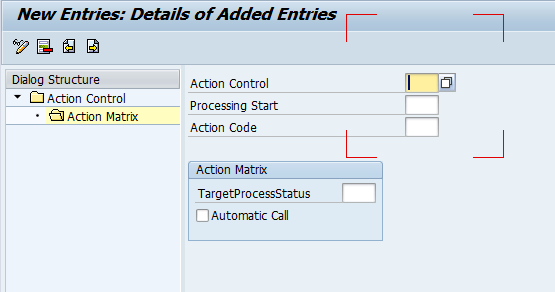
wty01-04

If you want, you have the option to create your own options or change the existing ones.  Once you understand this concept, you can more easily build the “road map” to the process you ultimately need to create.

Thanks for reading,

Netweaver Gateway – Using the Gateway Client

Well, I just found a great document out there in SCN for how to use the Gateway Client.  I was kind of struggling with this, but after finding this trick, it makes it a lot easier.

http://scn.sap.com/docs/DOC-47626

There really isn’t a lot to say about this.  The author did a great job of making it simple.  I’ll be doing more posts in the near future about NW gateway, since I’ve recently learned how to make an RFC and create a service for it in the Gateway.  Don’t want to forget what I learned, and maybe you will find it valuable as well.

Thanks for reading,

Saying Goodbye to a Friend

It’s been a pretty rough couple of days.  Yesterday we said goodbye to Fargo.  For my close friends, I’m sure most of you remember our 12 year old Weimeranier.  Saying goodbye to my buddy was so much harder than I ever expected.  So as I sit here, it’s hard not to be sad…  but at the same time, I’m trying to remember all the good times.

IMG_0008I still remember the first time I met Fargo.  I was one maybe my second or third date with the girl that would later become my wife.  We went skiing for the day at Welch Village in MN, and we went back to her place.  She told me she just needed to let her dog out, and then we’d go inside and have a beer.  I figured, no big deal.  Suddenly, he sneaks right past her.  Takes one look and proceeds to sprint around the neighborhood for the next 10 minutes.  She finally managed to wrangle him back into the house.  Thinking the adventure was over, we sat down on the couch and I went to kiss Julie…  Suddenly, I glance over, and here’s her dog, maybe a foot away from me, just glaring.  To this day, I don’t know if I was in his spot on the couch, or if he was mad I was moving in on his woman 😉

IMG_0058

He just might be one of the craziest dogs I’ve ever met, but by far, he was the best.  A lover to the core.  Great with the kids, he put up with the cat chasing him around, and I loved how fast his tail wiggled whenever I came home from a business trip.  Our home won’t be the same without him…  but will live on forever in our memories.  If you knew Fargo, I’d love to hear your favorite story about him.

Anyway, thanks for reading…