Month: October 2013

Home / 2013 / October

Happy Halloween

I hope you all enjoy a safe and fun Halloween this year.  It’s funny, I remember not that long ago, I looked forward to drunken parties with all my friends in great costumes.  Now, with 2 kids, I’m looking forward to dressing them up so they can wander the neighborhood…  and maybe not have to dress up as Cubby from Jake and Neverland Pirates (if you have kids, you might know the reference).  Funny how times changes.

A year ago, I still didn’t have my first sale…  Proximity was still mostly a dream in my partner’s mind…  and I was working too many hours developing things.  Now today, we are closing in on that second sale, Proximity is certified…  and my Service Management Web Portal is about to release version 2, I’m still working too many hours, but now it’s split between marketing and development.  I also think I’ve acquired a lot of new readers in the past year.  And for that, I really want to thank you.  It’s humbling to know that people are actually reading my ramblings and I hope getting some value out of it.

So, Happy Halloween, enjoy your kids (or your drinks depending on where you are in life.  ha ha ha).  and as always, Thanks for reading (I really mean it).


Web Dynpro – Creating a Table Tree

I have to say, this turned out to be a lot easier than I originally expected.  I recently did a post where I talked about this.  Well, I was about to make things a lot harder than I needed to.  I thought I had to do the NST (nested) version of the table tree, but it turns out, I didn’t need to.  So today, I’ll walk you through just how easy it is to create a table tree for your ABAP Web Dynpro application.

Now, the first really cool thing is that you need a fancy new structure.  You can convert any existing table into a table tree.  It’s just a new column that you add.  This made life much easier (of course I found new ways to complicate it.  ha ha ha).  So now, what do you need to do…

First, you need a context node and some attributes.  Here’s a run down of what you need:

Then we will create attributes required for the tree column. We require 5 attributes

  1. Attribute which contains the current level of the node. Create an attribute called “NODE_LEVEL” of type STRING.
  2. Attribute which contains the parent level of the node. Create an attribute called “PARENT_LEVEL” of type STRING.
  3. Attribute which contains X or Space depending upon the node is expanded or not. Create an attribute called “EXPANDED” of type WDY_BOOLEAN.
  4. Attribute which contains X or Space depending upon the type of the node, whether the node is a branch or a leaf. Create an attribute called “IS_LEAF” of type WDY_BOOLEAN.
  5. Then whatever else you want in your table.  None of these columns need to show up in your table, but you need them in the context.

Now you create a table, and link this context node to it.  I like using the wizard to create all my columns, but create it any way you like.  Now, create a new column, but this time it’s a special column.  Use the menu: Insert Master Column.  This is where all the power is.  The element inside should of type: TreeByKeyTableColumn (use the NST version if you want to calculate the lower nodes as you click on the table).  I was already calculating the full structure, so I didn’t need to go down this path.
Once the column exists, you need to bind several elements:
Expanded -> Expanded
Is_leaf     -> Is_leaf.
Parent_key -> Parent_level
Row_key   -> Node_level

Now, the big thing to remember is that the Parent_Key & Row_key are the direct link to make the tree work.  If you leave parent_key blank, this will be shown as the top level.  In my example, I had multiple values with blank parent.  From there, you just need to make sure that each sub level has a row key, and a parent key that matches one of the levels above it.

From there, just make sure you bind all the table entries into the context, and you magically have a table tree.

I’m pretty excited about this one.  It was easy, and looks very cool.  Now, onto my follow on functionality (there’s always something new).  Who knows, it might even give me an idea for another post :).

Thanks for reading,

Service Management – Adding a User Status to a Sales Document

Now this is something that I never really thought about until recently, but adding a simple user status profile to an existing order type is a handy trick.  My particular application is to come up with an easy way to determine if a service quote has been accepted or rejected.  There are a lot of potential ways to cover this handle this, but being able to avoid bastardizing any existing fields, or having to deal with straight text brought me to this path.

Let me give you the quick basics on how to do it yourself.

You can find this in SPRO–>Sales and Distribution–>Sales–>Sales Documents–>Define and Assign Status Profile

The first step is to create the status profile.  Check out my SM e-class if you want more details on how to do this.
Next, you need to assign this profile.  You can choose to assign it to the header or the to item.  After you make that call, simply add the profile to the field:  Status Profile

It’s that easy.

Thanks for reading,

Variant Configuration – Multiple Classification of the Same Material

In my current project, I’ve become reacquainted with the trials and tribulations of material classification.  Now in the past, I’ve found ways around the situation to simplify my life.  But I’ve found there are always new headaches to contend with.  My latest adventure has to do with multiple classification of the same material.  Now at first glance, sounds pretty standard.  Now my dilemma comes from the fact that the initial design called for different classes, with the same characteristics in the same class type.  Now here’s a couple of lesson’s learned that might help you decide the best course of action if you use BOM classification (that’s the idea for this approach).

1.  Remember, you can only assign one value to a characteristic within a material/class type combination.  This requires a lot of forethought in the event of the same material have multiple classes that share characteristics.
a.  My particular scenario had issues with this because we had multiple modelers.  We were each working on different products.  I was using some automation to load the CL24N, and didn’t even notice that there was overlap in the materials.  This instantly caused issues in some of the other product lines.  b.  Make sure you really need to use the same characteristic.  This was the big thing we found upon closer inspection.  The use of a common characteristic was more for convenience than for specific needs.

2.  Performance can become an issue.  Remember, if you haven’t noticed already the tables AUSP, KSSK and INOB can quickly become large and unwieldy.  This causes major performance issues.  So you may need to index these tables in order to improve performance.

3.  Remember, if you classify too many materials with the same class, your performance can also become impacted.  However, if you keep the number manageable, it works just as well (sometimes better) than standard selection conditions.

There are some of the things I’ve encountered.  In general, I’m a big fan of classification (also called class type 200), as long as you think through your approach carefully.  I just had to spend a few days reworking a bunch of models in order to improve our overall design.  I hope my mistakes can help you be successful.

Thanks for reading,

How Making Chili Gave me Renewed Perspective

About a week ago, I took a Friday afternoon off so that I could make chili for a neighborhood outing.  I literally shut down all my computers, didn’t think about marketing, development or even emails (well, I did check once or twice since we have a big sale in the works.  ha ha ha).  I took off for the local farmers market, grabbed a bunch of my ingredients and spent the rest of the afternoon chopping, stirring, tasting and mentally checking out of all my stress and to-do lists.

Looking back on that afternoon, it was completely freeing.  Rule #32: Enjoy the little things.  Well, Tallahassee certainly had that one right.  If you don’t take time to enjoy life, well, what hell am I working so hard for.  It is amazing what a little perspective can give you.  Just those few hours away were the perfect reminder of why I want to be running my own business rather than just consulting.  See the possibility of being able to one day stop working, and still see my business flourish gives me hope that I can one day truly be my own boss.  It’s not a dream…  just reality that hasn’t come to pass yet.

Anyway, just a simple reminder to follow rule #32.  It can give you the power to jump back into your business with renewed passion.

Thanks for reading.

Variant Configuration – Commenting Dependency Code

Well, for any of you that have been modeling for a while, I’m sure you’ve encountered a constraint that seems like it should be working, but you keep getting a syntax error.  I run into this often enough that I came up with my own method of dealing with it, commenting dependency code.  I comment out almost everything, and see if one of the statements work.  At least this narrows down my issue 🙂

Well, another really nice thing i found when using the PMEVC to edit my dependencies is that I can work with the code in the same way you can within an ABAP program.  So no more selecting one line at a time, or adding cryptic codes in the line numbers to add or delete a line.  You can simply highlight everything you want (like you were in a word document).

My favorite new trick in ABAP or VC dependencies is quickly commenting or un-commenting out a big chunk of code.

The hot key:  <ctrl> < will add a comment.  <ctrl> > will remove the comment.  This is really useful when you have a long dependency.  Now I know you hard core CU02 programmers will remind me that you can do this in the old school editor.  But for my money, the PMEVC really made this cleaner and more user friendly than the original.  Believe me, I held out a long time before I became a convert to the PMEVC, but it really has become my go to place for VC.
Anyway, there’s your trick of the day,  Thanks for reading.

Service Management – Output Determination part 2 – Sales Documents

Today I want to continue to talk about Output Determination, This second piece, we’re talking about is sales documents.  Today, what I’m going to show you is how you can setup output determination for sales orders and quotes based.  It is becoming more common that clients do quoting for the service management.  This can be for in-house quoting or field service.  In order to inform an end user that a quotation is ready you need a way to automatically notify a customer about that quote so they can approve it, reject it or request changes.  Today, I’ll walk you through how to configure this sort of output.

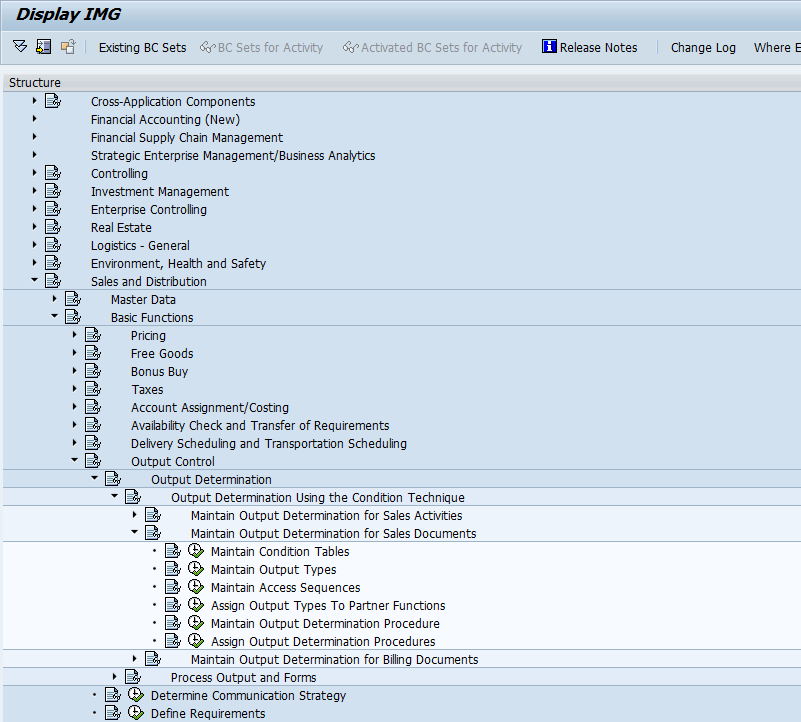
blog01-01

We’ll start with the Output Determination for Outbound Deliveries folder.  We’ll start the Maintain Output Types.

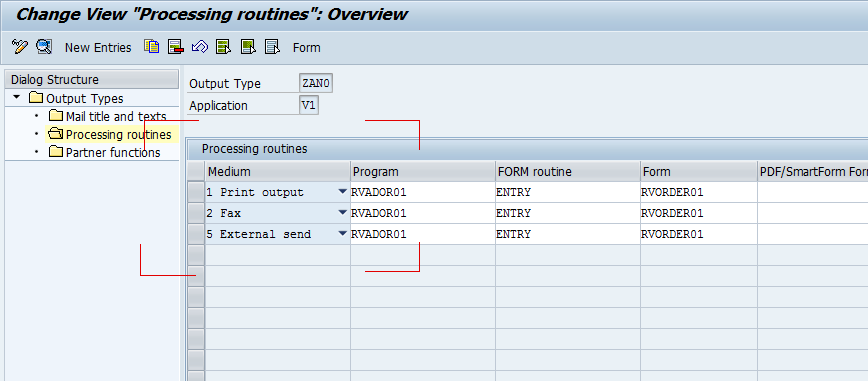
blog01-03

In my example, I made a new output type ZAN0, and made a copy of AN00.  For starters, make sure you have a line for 5-External Send.

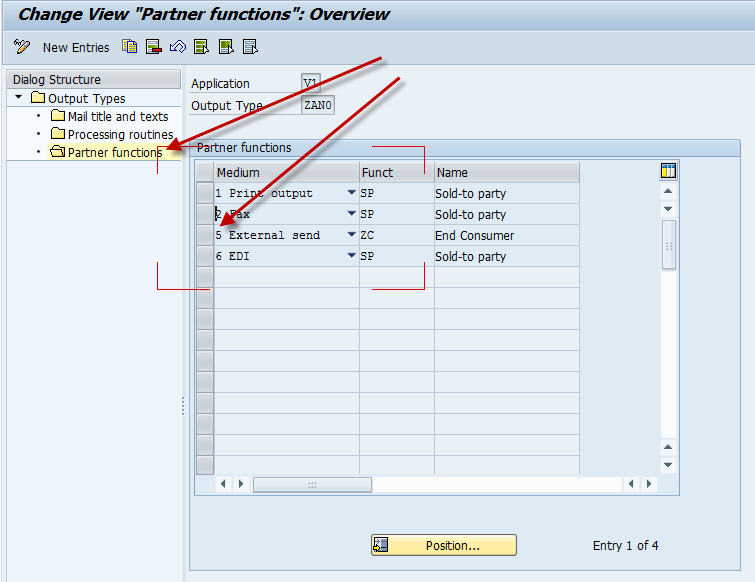
blog01-02

Don’t forget to update the partner tab, and make sure whatever Partner Type you want the email address from is assigned to 5-external send as well. I attached mine to a custom partner type of ZC, but this is whomever should be automatically receiving this notification.

Next up we move to Maintain Output Determination Procedure

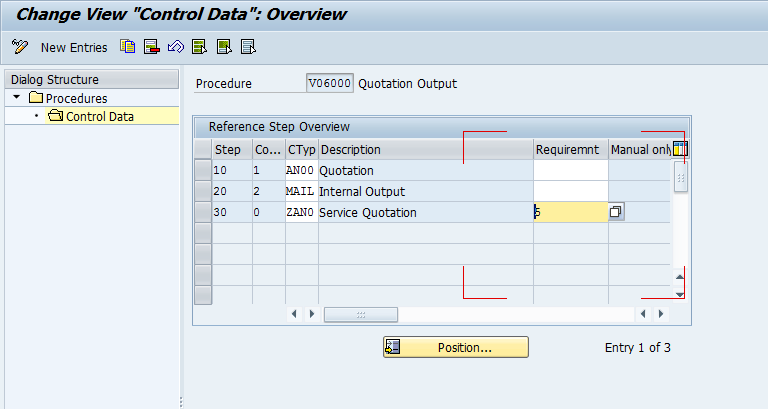
blog01-04

Now you will either need to create a new procedure, or update an existing one.  For simplicity, I just updated the V06000.  I then added step 30 for my output type.  The real key here is the Requirement.  “5″ happens to be the requirement that the document is complete.  There are a bunch of predetermined requirements you can use for Output Determination, but if you can’t find one to fit your needs, you can always write your own.

Next, we move onto Assign Output Determination Procedure

blog01-05

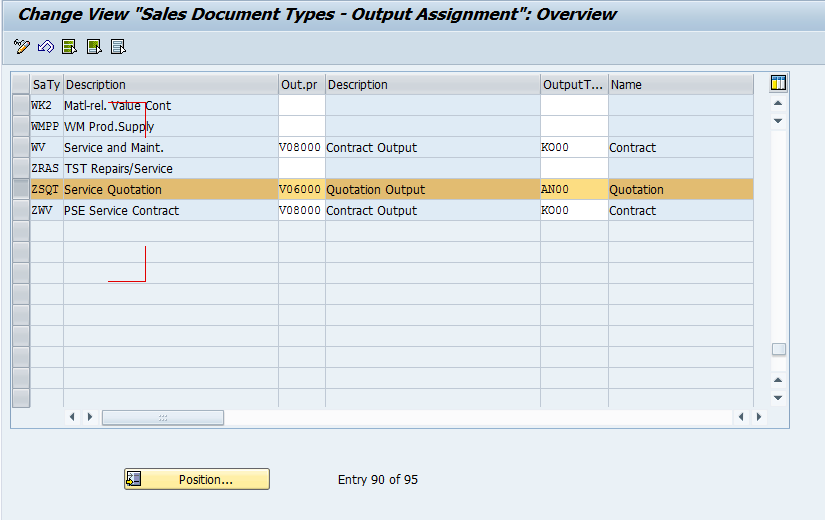
Next, make sure the procedure is assigned to your sales document type.

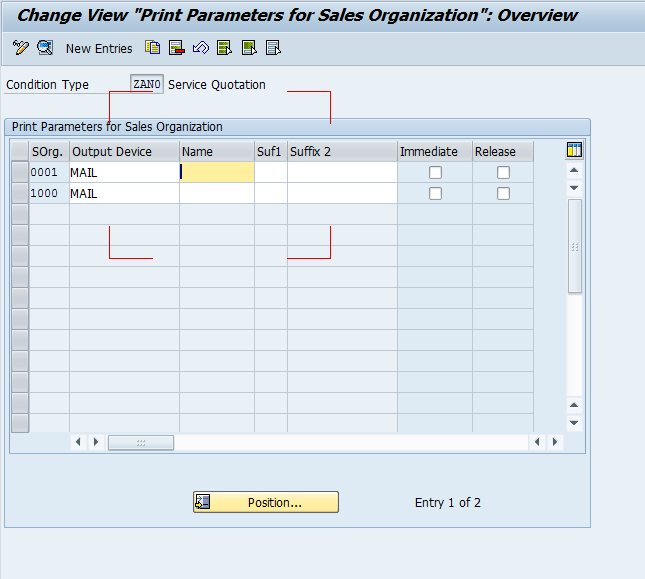
Next, you need to verify that the Print Parameters are set if you create a new condition type.
blog01-06

Alright, with all of that out of the way, the configuration is complete.  But it won’t do anything for you without master data.

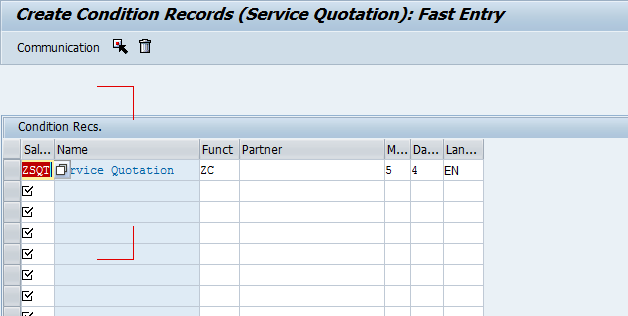
So head to your trust VV11/12 to create condition records.

blog01-07

Keep in mind, that the fields shown will depend on your access sequence you choose for your condition type.  Mine was simply SalesOrder Type.  The partner type and medium are the biggest fields to be concerned with.

As always, thanks for reading.

ABAP – 4.6C code differences

Like I mentioned yesterday, we have a potential sale, if we can make WMigo work in a 4.6C system.  Sounds easy, right?  Well, it’s all part of my latest adventure.  First I had to figure out a way to convert my 6.0 Unicode system transport to go to 4.6C.  Check my post from yesterday if you want to know more about that.  Now, back to my story.  After overcoming the obstacle of getting the 4.6C system to accept my transport then I started to find code issues.  It turns out that a system more than 10 years old doesn’t have all the tools that I”m used to.  Today I want to talk about some of the 4.6C code differences I’m experiencing.

1.  Line length has a max of 72.  sounds simple, but I had about 20 + errors just on this.  When you get the nice word wrap type features, you don’t notice when you get to 75 or 80 chars, but it just rolls onto the next line.  Simple fix, but still a fix.

2.  is not INITIAL doesn’t work in 4.6C.  Instead, you need to change it to NOT <variable> is INITIAL.  it’s subtle, but again, I had a lot of instances that needed to change.

3.  some methods have changed parameters.  on_data_changed for example did not have the parameter e_ucomm.

4.  some methods need to be called “differently”.  for example: cl_gui_cfw=>set_new_ok_code( new_code = ‘OK’ ), needs to be
CALL METHOD cl_gui_cfw=>set_new_ok_code
EXPORTING
new_code = ‘OK’.
subtle, but necessary if you want to run in 4.6C

ABAP – exporttoascii to Move Code from a Unicode ERP 6.0 to 4.6C

Wow…  what an adventure.  I feared I might run into some issues doing this, but being small means we need the sales and we need the references.  So it means we do some things to go the extra mile.  We have a really strong potential with a new client, but they run 4.6C.  I had forgotten just how long ago that 4.6C came out.  I did the math, and realized that its been over 10 years since the last time I worked on a 4.6C system.  Well, today was my first challenge.  I already knew that I couldn’t create a standard package to send for our free trial period, so I had to use standard transports.  Well, we sent the transports, they tried and right off the bat, we get an error that you can’t import from a unicode system into a 4.6C non-unicode system.  DOH!!!

So, I hit the interweb and looked in OSS to find some clues.  The first thing I found was OSS note 330267 that talks about just this issue.  Cool…  Well, it turns out there is an additional parameter you can add to the transport system that outputs the transport in a format readable by 4.6C.  Score!!!  but there’s a catch, you have to be on a late enough kernel.  Guess What?  My kernel version wasn’t recent enough.

So I pulled out my trusty post about upgrading your kernel…  spent way too much time downloading files from OSS, and finally got it upgraded. So then i went to STMS, clicked the system overview button, double clicked on my system, went to the transport tool tab, and added a new parameter:

exporttoascii = yes

Such a little command, with so much power.  Once I exported this transport, I was able to move onto my next set of errors…  but I’ll save that for tomorrow.

Thanks for reading.

Development – How much functionality is too much?

Well, if you’ve been paying attention, I’m working on adding new functionality to Rapier.  While much of what I’m adding is a “no brainer”, I do start to question, how much is too much?  Right now, I’m working (mostly) full steam ahead on Rapier 2.0.  That means new functionality, new screens and new options based on things I’ve heard from potential customers.  Now, the problem comes when I start to over think things myself.  For example, I was working on enhancing the “My Notifications” portion of Rapier.  My original version just showed the notifications, but there was a request to show all of the follow-on documents as well.

Here’s where the analysis paralysis can quickly set in.  I see this functionality and think, cool…  But…  what new columns should I add, just in case a customer wants them?  Should I allow the functionality to be turned on or off?  Should I allow it be turned off for just end users, or for existing customers?  Do I allow the customer to configure the columns?  the sort order?

See where I’m going?  I could think this thing to death.  It’s one thing if I have a specific customer request, but when I’m thinking of everything a customer might want…  well, where does it end?

So I’m trying to reign myself in.  I’m going to continue providing any functionality I’ve provided for other screens, with the realization that customers may ask for more, and I can always add it later.

I’d love to hear your thoughts…  how do you determine where to stop?  do you purely go with what a customer asks for?  do you put it all in there?

Thanks for reading and I look forward to your thoughts.