Month: November 2012

Home / 2012 / November (Page 2)

Finding a New Audience

Well, since I like to be diverse, I’m jumping back to some of my marketing efforts.  Once again, some of my best ideas come from talking to my good friend Justin.  We were recently chatting, and he put the idea in my head of the “guest” blog post.  this is a concept out of the Remarkable marketing Blueprint.  We both signed up for this, and it has been so helpful to have another perspective.  Well, the idea of the guest post I pretty much wrote off.  Who would I guest post on?  I’ve looked, and I can’t even find any other blogs talking about SAP Service Management.

Justin, in his great way of playing devil’s advocate with me brought up the idea that posting on SDN is just like a guest blog post.  it is a new audience, new readers and another place for me to try to jump start my readership.  So…  for that reason, you’ll notice that I’m only going to be posting 4 times a week.  I’m going to start moving one of those posts over to SDN.  If you’re one of my readers, I’d love it if you could follow me out there as well.

Michael Piehl on SDN

Anyway, thanks for reading, and please feel free to forward me onto your friends or colleagues that you think might benefits from some good SAP knowledge =)

Mike

Variant Configuration – $Root, $Parent and $Self

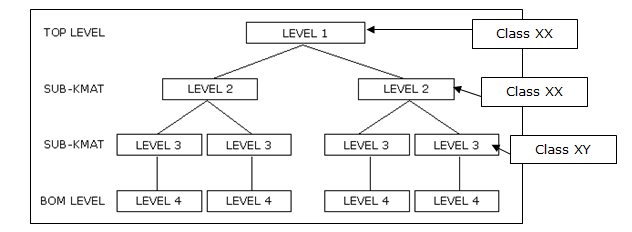
If you didn’t know better, you’d think this was some strange post about psychotherapy.  Well, it’s just one of the underlying concepts you need to understand for variant configuration.  this is one of the concepts that is easier to describe with a picture.  So let’s start with one.  $ROOT, $PARENT and $SELF are the different ways to refer to the characteristics in your model.  Each of them works a little differently.

Now, what you’ll notice is that we have several nested KMATS at multiple different levels.  Now to start this conversation, we’re talking procedures.  Using the picture, let’s do a simple table to show you

Configuration $SELF $PARENT $ROOT
Level 4 Level4 Level 3 Level 1
Level 3 Level 3 Level 2 Level 1
Level 2 Level 2 Level 1 Level 1

Now, if you look at the picture, we only call out the BOM level at the bottom.  In reality, there is a BOM level for each configurable material, but it would be redundant to go through that.  The important things to realize is that $ROOT and $SELF always points to the same place.   Only $PARENT changes.

there is an exception to this rule, and because of that, I suggest avoiding $ROOT.  The exception is when you take a KMAT that was not part of another configuration, and suddenly add it to the BOM.  As soon as you do this, $ROOT suddenly points to a new level.  Personally, it’s not a method I like to use.  Prefer to use $PARENT, and then I make sure to pass the values from level to level if needed.

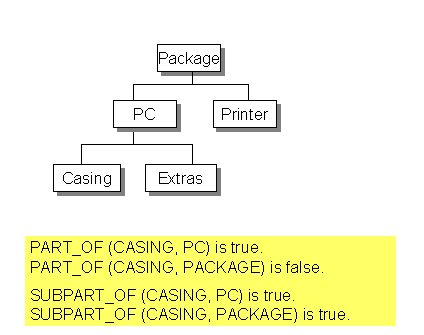
This pic comes straight out of SAP help.  It’s a little bonus for this blog post to help explain how constraints can deal with the separate levels.  In a constraint, the concept of $SELF, $ROOT and $PARENT don’t exist.  Everything is about classes and if they are part of each other.

I hope this make sense,

If you need more help, click the contact button above, and let us know how we can help you,

Mike

Variant Configuration – Passing Values between Nested KMATS

In this age, having a model without nested KMATs (multi-level configuration) is a thing of the past.  Because of that, I wanted to do a quick post about transferring values between the different levels of the bill of material structure.  There are 2 methods to accomplish this (at least using the standard ERP functionality).

1.  Procedure:  $SELF.X = $PARENT.X  or $SELF.X = $ROOT.X

2.  Constraint:
Object:
mod1 is_a(300)  mod,
mod2 is_a(300) mod,
Assy is_a(300) mod_component

Condition:
part_of (Assy, mod1, ‘0100’) or
part_of (Assy, mod2, ‘0100’)

Restricitons:
Assy.X = mod1.X,
Assy.X = mod2.X

Inferences:
mod1.X,
mod2.X

This rule is a very generic way to show you how to pass values down to a lower level cstic.  This variation goes one step further and actually checks to make sure that the nested KMAT is a at certain position in the bill of material.  This is not required, but can be very handy if is the same class exists in multiple positions in the BOM.  Notice, we copied down, but you could just as easily copy back up by reversing the restriction.  While not a common practice, the option is still there.

You’ll notice that the first method is far more simple, and will do the trick.  the constraint is more complicated to write, but has more power.  Personally, I’m a constraint kinda guy, so I tend to use that method.  But you need to use what fits your situation best.

Now, whenever you need to transfer characteristics between levels, you NEED to test early on in the process how it behaves in a sales order, planned order, production order and sales order costing.  Many times the behavior that works great in CU50, doesn’t translate the same way in a production order.  You may have assign the constraint/procedure at a different configurable material in order to get the rules to fire in all scenarios.

Happy configuring.

Remember, if there is anything we can do to help, please click the contact us button at the top of this page.

Mike

Service Management – Adding Multiple repairs on the same repair sales order

Now, if you’ve been doing this for a while, I’m sure you’ve encountered this issue.  The customer sends back multiple repairs for the same order, however, service notifications can only contain a single material/serial number.  Now, I’ve heard rumors that in EHP4 or EHP5 there is something that can be activated to allow for multiple serial numbers, but I haven’t seen this yet, and for most of us, it isn’t an option anyway.  Because of that, we resort to alternate processes 🙂

Adding another repair to the same sales order is pretty easy.  You must need to make sure you fill out 4 key fields.  Material (this is the service material/DIEN), qty, Servicable Material (this is the material you are fixing), Srv Qty (this is the qty of units you are repairing in a single service order).  That’s it.  As long as all your master data is properly setup, you’ll be good to go.

Now a couple of words of warning.  First, your notification will not track to any additional line items you enter on the repair sales order.  By that, I mean that if you do a lot of work/information gathering at the notification level, the document flow may not be reflected accurately.  This is because in SAP, the notification number is at the header level, even though the actual repairs are at a line item level.  Certainly not the end of the world, but it can be confusing, especially if you rely heavily on document flow (like I usually do).  Another point on this is if you are dealing with warranty/service contracts.  Only the material/serial number entered will be checked.  So if there are 5 items, only 1 of them will be checked automatically by the system if you do it all in a single notification.

Second, I always encourage using a quantity of 1 for every repair.  There are exceptions, but often the clients I deal with want their units back as quickly as possible.  If they send you 5, and 1 of them takes 2 weeks extra, they want the 4 that are done.  Well, if you load the qty of 5 in the sales order, that means you only get 1 service order, 1 inbound delivery, etc…  You could get fancy and split things up after the fact, but it will get messy and much harder to trace.  If you were to set up 5 repair line items, you could should them each as they are completed (or you could even do complete delivery).   The important thing is you have the option.  If the group of materials sent back are only useful as the qty 5, then by all means, do a single line.

Those are the quick ins and outs.  We are have an SAP app that does have one approach of connecting multiple notifications to a single repair sales order line item.  The drawback is that the document flow still only works from the notification.  If you are interested in learning more about it, please contact us.

Hope this was useful and as always, if you need additional help, please let us know.

Mike


Variant Configuration – Value Comparison

Now, this topic is related to my last post.  Specifically, when you have a material variant that you need to transfer the stock from a return.  Often there are characteristics that should not be included when you are doing a value comparison of a configuration for a material variant or a serial number.  An example of this is a reference characteristic.

However, there can be other characteristics that are based on a reference characteristic that should also be ignored when you are attaching a serial number or performing type matching.  In order to set any characteristic to be excluded from the check, you can use the following program:

RCU_EXCL_CHARACTERISTICS

Simply enter in the characteristics that should be ignored (You can even make it specific to

just one material)

this is a pretty useful program to determine what should be considered when doing a value comparison, and don’t be surprised if you need to keep running it every time you get a new return for a while.  Just because different cstics will pop up based on what you’re returning.  Either way, this is great for material variants/variant matching, and an absolute requirement for stock transferring.

I encourage you to check it out.

Have fun…

As always, if you are you interested in more help, please contact us and let us know what we can do for you.

Mike

Variant Configuration – Return Configurable Materials

I’ve been a roll with VC for the blogs, so I’m gonna keep going with it (besides, I’ve been pouring all my SM knowledge into the SM E-course).  Today I want to talk about the configuration needed to handle return configurable materials.  I’m also going to talk a little about the processes you’ll need to consider when you decide to accept configurable returns.

First, the easy part.  the configuration is pretty straight forward.  Most of the work is already done for you out of the box.  The item category REC is meant for configurable materials.  The one major change that I encourage is in the item category configuration.  Being a purest, I’ll always encourage you to copy it and make a ZREC, but that’s your call.  The one field that I change is the Special Stock Indicator.  Why you may ask?  If you don’t set this, when you attempt to do your Post Good Receipt on the configurable item if you don’t change this to be E, you won’t get stock back in the system.  Rather, you will get a confirmation of service when you receive this.  Me, I’m a fan of knowing exactly what is coming into my plant.  In addition, I might be able to strip this part down for components, or maybe even resell it.  What this means is that when you receive the item in, it will be sales order stock for your return sales order.

This brings me to the process process portion of the VC return.  Now in order to use this, you will need to do some material movements.  I’m not going into a MIGO lesson here, but you need to know that you must either issue this directly from the sales order ot another sales order, or you might even need to create a material variant and then transfer the stock.  I’ll talk more about the material variant process in another post…  Anyway, returns in VC can be complicated.  Be sure you’re aware of the process cost.  If your product is cheap enough, it could be worth it to leave the settings as they are, and just throw the item away as soon as it arrives.

Anyway, more to come on VC returns, but this will get you started,

Remember, if you need VC or SM help, please contact me and let me know how I can assist you.

Thanks,

Mike

Variant Configuration – Requirement Types

Well, today is a quick lesson that I just relearned.  When you are configuring the sales order/item category for a variant configuration item, one of the big things you have to configure is the requirement types.  Now there are some standard ones, but based on what you need, you’ll probably still tweak.

So let’s start at the beginning… where do you configure this?
Txn: SPRO  Sales and Distribution–>Basic Functions–>Availability Check and Transfer of Requirements–>transfer of requirements

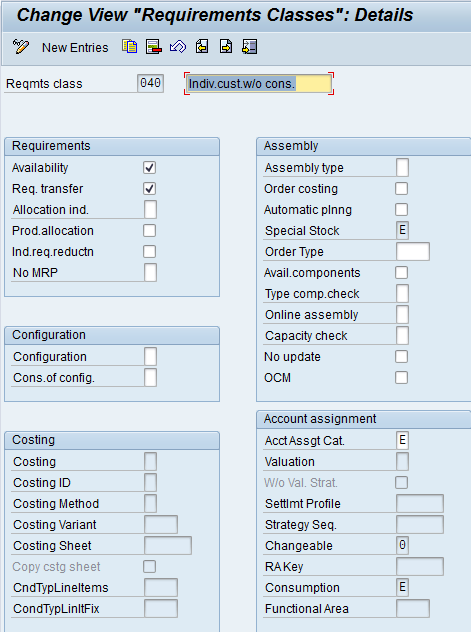
In here, the first 3 pieces are what you generally need to be concerned with.  All the real work happens in the define requirements Classes step.  In here, you can define if the order generates a planned order, a production order, a service order, can it take configuration? the screen shot below shows you the full assortment of items you can control.  Ultimately, you will need to use trial and error to fit your business.  the screen shot is for the standard 040, which works for configurable items.  Certain things like the accounting section will need input from your FICO team, but out of the box, this one will work for you.

Now, once you’ve created or modified your requirement, you’ll need to create the requirement class.  I personally think this step is silly, but you have to do it.  I’ll usually name the class the same as the requirement, but do whatever you like.

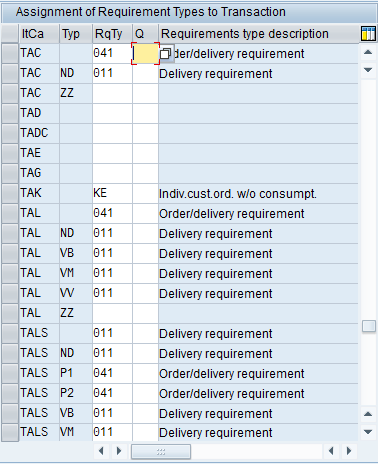
Now for the last step.  Assign the requirement to your item category.  use the configuration:  Determination of Requirements Types using Transaction.

Use the search to find your VC item category.  In the second column enter in your requirements class.  Now, the last and final piece, put a 1 in the third column.  This is a subtle thing, but it tells configuration to follow the requirements settings in your sales order, not in the material master.  If you don’t put the 1 in there, you could spin your wheels for a while (like I just did) trying to figure out why it’s ignoring your Sd settings.  Anyway, that’s your tip of the day…

As always, I’m learning the hard way so you don’t have to =)

If you’re in need of consulting or SAP Add-in applications, please don’t hesitate to contact us.  We’ll soon be releasing several new VC applications, including a history report.

thanks for reading,

Mike