Month: October 2012

Home / 2012 / October

Variant Configuration – BOM Class Nodes

Happy Halloween,

I hope you consider this a treat, and not a trick =)  Today I wanted to talk a little about using class nodes in a variant bill of material.  In the old days, this was using class type 200, however, you are no longer constrained to using just 200, you can use 300 as well.  This is a handy method to dynamically add materials to a variant bill of material.  I’ll start with the how…

First, create yourself a class type 200 or 300, and be sure on the additional data that you check the following fields.
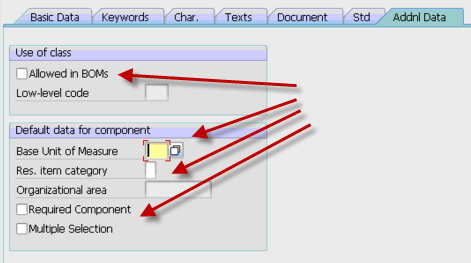
All of the fields are self explanatory, so I’m not going into a lot of details (please comment if you’d like more info).  The really important field is the first check box.  This will allow you to add it to the BOM.  The remaining fields will set some defaults for your and the additional behavior.

Once you have this class add, you need to make sure that the characteristic is either included in the your parent configuration (and is passed to your bom class node ) or is set using an object dependency at the BOM level.

Once you have this, you just need to attach the materials that can be selected using this class.  I prefer transaction CL24N to add the materails, but there are multiple ways to connect the material to the class using the standard classification transactions.  The important thing is that each material you enter needs to have the characteristic values set manually in CL24N.  This is how the system knows which material to replace the class node with.

Hopefully this all makes sense, because the part of the post I really want to talk about is some things to be aware of when using bill of material class nodes.  The first is change management.  If you use ECM to control your variant configuration bill of material, this method completely circumvents that process.  Using the class nodes, you can link and unlink materials with no ECM record.  So you must be aware of the loss of traceability when using this approach.  The second topic is that if you commonly obsolete and superscede materials in your bill of materials, finding where the materials are used can be a challenge as well.  The where-used for class types works, but if you are using CS15, you must remember to check the Class checkmark.  So if whomever is running the where used isn’t familiar that the part is used in VC class nodes, it could be easy to overlook when doing a replacement part.  This could lead to inaccurate BOM’s and confusion on the floor.  THis segways into the whole phasing out of a component on a bill of material.  If for example, you have a component that you will be replacing, but still have 50 pieces in stock that you would like to use up.  Managing the class type and when to change to the new component will be very manual and must be done at the right time by someone monitoring the stock.  it won’t be as simple as the rest of the boms that will be changed automatically using date shifting the of the ECO.

Now, despite this items, it has some very good features.  The first features is the required component.  This is especially useful if  you have order boms.  this is will quickly notify you if the class node failed to find a component (but only if you check the required box, see above).  If you use just selection conditions, you won’t get the easy visibility that component didn’t get picked that you were expecting.  The second cool feature, again related to order boms, is that you can manually find an item for a class node and replace it.  So if there is a component that is close, but normally used, you can manually select it from the list and pull it into your BOM.  this can be especially useful if you have multiple options for a single part, and you manage the part by your stock levels.  Someone can quickly evaluate which part you in stock, and switch the class node to that part (making your promise date look much better => ).

Well, I hope this was a treat for you…  if not, well, I’ll try better for next year,

As always if you need more in depth help, we offer consulting to help you streamline your VC processes,

thanks for reading,

mike

Variant Configuration – Pricing Descriptions of variant conditions using VK30

Just a short one for today =)  here’s a little trick for anyone new to variant configuration pricing.  When you use VA00 (or something similar) for your variant conditions the business sees your cryptic variant condition names.  if you go into transaction VK30, you can give it a a more meaningful name that will show up on the sales orders.  The one drawback is that you cannot have different descriptions by language.  Regardless, this will still allow you to provide a little more meaningful description to your sales order entry group.

Thanks a lot,

Mike

Variant Configuration – Pricing dependency Group

If you’ve been doing VC for a while, you might remember the days when nothing worked without an OSS note, performance was terrible, and it took discipline to build a model that would work for sales and manufacturing.  I remember those days fondly.  Well, pricing was no different.  That’s why I wanted to put this quick tip out there for you.  If you do variant pricing, a way to improve your performance is using the dependency group :  SAP_PRICNG  (no, I didn’t misspell pricing.  ha ha ha).  You simply need to add this into configuration.
SPRO–>Logistics General–>Variant Configuration–>Dependencies–>Define Groups

Once you add this dependency group, be sure to add this to all of your pricing object dependencies.  What this will do is it will only fire the dependency if you call for pricing.  Of course, this will depend on your configuration profile settings as well, but it does give you the opportunity to improve your performance.
Hope you find this useful,

As always, if you need any help in Variant Configuration or you are looking for some great applications to make your SAP life easier, please let me know.

thanks,

Mike

Variant Configuration – CWG – The Group in the know

Since, I recently attended  (and even presented at) the CWG conference in Marco Island, I figured this would be a good time to let you know about the group.  The CWG, or Configurator WorkGroup, is THE group if you do anything with Variant Configuration.  This group focuses on variant configuration, configure to order, engineer to order, and pretty much anything that has to do with being able to dynamically configure a product based on a set of rules.

http://configuration-workgroup.com/

If you’re not part of the CWG, I highly encourage you to get registered.  It’s free, and without a doubt, it has the most complete forum of VC related questions.  If you can’t find an answer here, make a post and it’s likely someone will have an idea that can solve your problem.

About my only complaint with the conference is that it tends to focuses heavily on the IPC (internet pricing and configuration), which is the web based/CRM based version of the variant configurator.  That’s not a bad thing, but there are a lot of us that care about the ERP based engine.  The conference this time around actually was good, because there was nearly a day of ETO/Specials processing in VC.  All of presentations are online from the past 10 years or so.

short story, I encourage you to involved… or check it out if you haven’t been there in a while…

good luck

Variant Configuration – Keep BOM Dependencies Simple

Having just gone to the CWG (configurator workgroup) for the first time in many years, I was reminded of my most famous story.  My friend Barry Scott Walton even told the story in his presentation.  He was nice enough to remove the names, to protect the guilty.  Some of you probably even remember this story…  It’s not the peanut butter piehl story, but perhaps I’ll share that one too someday…  This was the story of how Mike Piehl shut down MRP because I used very complicated BOM dependencies.

This was back when I worked for ADC Telecommunications and there was a mad scramble to get all of our CTO product lines converted onto to SAP before the dreaded Y2K.  Well, I was frantically working on product lines, and of course pushing the envelope, because no one ever said not to.  ha ha ha.  It all started on Wed.  I still remember grumblings of MRP being really slow, and wondering if I had done anything.  At the time, I couldn’t think of anything I did…  thursday came, the same issues were still occurring.  Then Friday, it became critical.  MRP hadn’t finished in 3 days, and no one seemed to know why.  After lots of digging, working with planning, IT, and even calling SAP’s platinum hotline, we narrowed down the issue.  We had created about 30 material variants and added a forecast to them.  In a normal world, this wouldn’t have been an issue.  But in my design, I used every tool I could in the BOM to make things work.  Well, my design was spot on.  The problem, which Barry later explained to me, was that MRP doesn’t read complex dependencies in the Bill of Material well.  And when I had a bunch of material variants, all with these complex rules, and then it read them over and over and over (because of the forecast)…  well, let’s just say, I become famous.

As soon as Barry explained the MRP issue (which in my defense was never documented anywhere in SAP), I quickly found a work around to get me by until I could rework all of the selection conditions.  I moved my variant table to a database table.  Now, I do not recommend this approach because you lose the tracability, but we had to do something quickly, and this gave us back the performance to get MRP running again (and still forecast those 30 parts).

The work took significantly longer, because I pulled all of the complex logic out of the selection condition, and moved it to the configuration profile.  This meant more characteristics at the top level, but the trade-off was well worth it.

To this day, I encourage all of my clients to keep it REALLY simple in the BOM.  SAP has done better in adapting MRP to handle variant configuration rules better.  But, in my opinion, you want the configuration profile to do all of the heavy lifting anyway, so this approach won’t steer you wrong.

Anway, learn from my experience…  Keep your BOM rules simple…  don’t add tables, don’t do complicated calculations…  just do simple assignments.  You’ll thank me later =)

Mike

Service Order Document Flow – Configuration

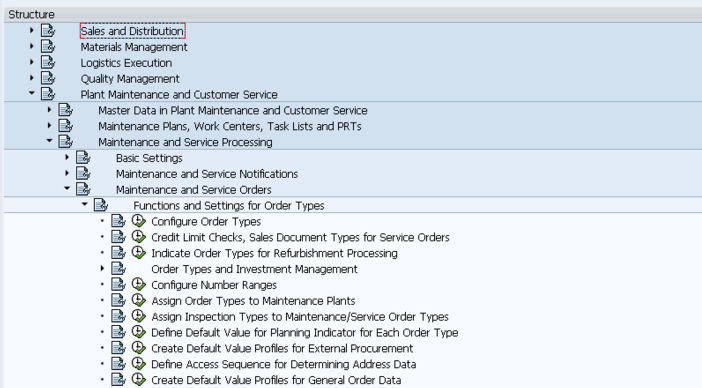
In a recent post, I talked about the document flow functionality.  One of the things I wanted to cover is how to turn on the service order document flow.  In the sales side, all of this information is turned automatically.  In SM, you need to manually turn on the pieces you want.  My recommendation is to turn all of these items.

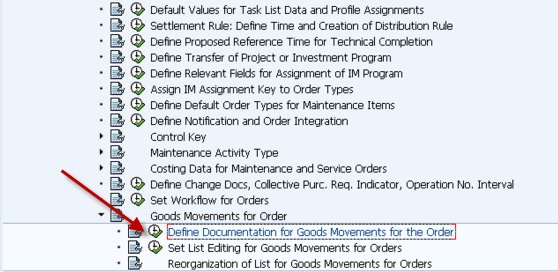
First of all, this is where you go in configuration

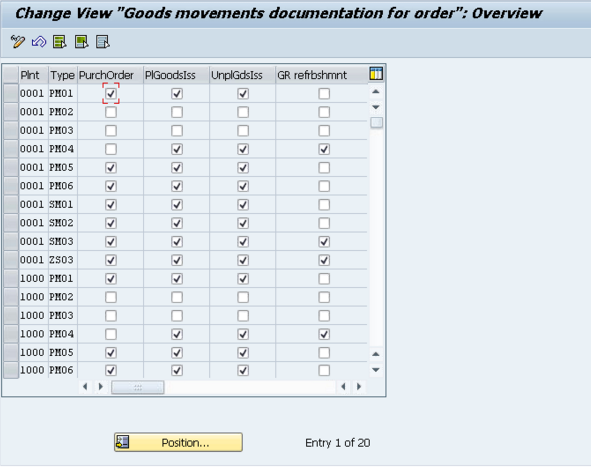
Once inside the transaction, this is what you’ll see.

Now, I encourage you to make sure all the components you use are checked.  that’s all there is to service order document flow.

If you have any SM needs, please press the contact us button at the top of this page,

Thanks for reading,

Mike

Service Order change documents – Make sure this is turned on

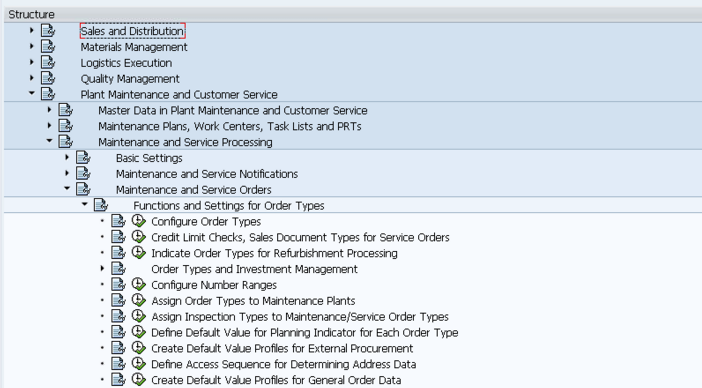
One of the important pieces of tracking your metrics (and more importantly your improvement) in SAP hinges on having data.  In the service order, a lot of the change documents are turned off by default.  So I thought I’d put together a quick post to show you how to activate the Service Order change documents.  So, let’s start with where the configuration exists in SPRO

Now, here’s all things you should be aware of in this transaction.  First, find your order type and plant, then start scrolling across and make sure that you’ve checked everything that makes sense for your business:

Indicator: Status change document active for materials  this will track the status changes in a service order for the materials.  if you do metrics reports, you need this checked.

Increment this is the increment of operation numbers in your task list.

Status change document for header order/network this collects all the header level status changes.  Again, if you collect metrics, you need this checked.

Collective Requisition if you want a single purchase req for the whole order, check this box.  Otherwise you’ll receive a different pur req for each item.

Res/PurReq this determines if the purchase req/component is released as soon as it’s entered, or not until the service order has been released.  I’ll usually recommend (2).

PDC Active exactly what it says, plant data collection is active.

Indicator: Workflow for purchase order change you get the idea.

Indicator: creation of change documents active highly encouraged, so you can see all changes.

Ind.: Copy Net Price from Requisition into Purchase Order you get it.

Indicator: Status change document active for operations another change indicator.

Indicator: Status change document active for PRTs last change indicator

If you’re not sure you have this stuff set, I encourage you to go check.  If you don’t need it now, I’m sure you’ll need it in the future.

As always, if you need any SM assistance, please contact us,

Thanks,

Mike

Variant Configuration – ETO CWG Tips

Here’s some quick ETO tips I got at the CWG that I didn’t want to forget.

If you are dealing with an engineering special or ETO configuration, you could use output determination to send an email to a group of engineers.  The drawback to this approach is that you need to know it’s a special in advance.  Much more difficult to use if it might be std or might be special.

In addition, the functions starting with CAVC allow you to build your own order bom workbench.  If you wanted to build your own CU51 or OEWB, you could use the functions to design your own transaction.


Remember, if you need more in depth VC help, please contact us,

Thanks,

Mike

Service Management – Understanding the Repair Procedure

One of the key pieces of the in-house repair scenario is the repair procedure.  The repair procedure simply put is the roadmap of actions that need to happen when you perform a service process.  I’m going to talk about how you can set this up and use it to fit your business process.

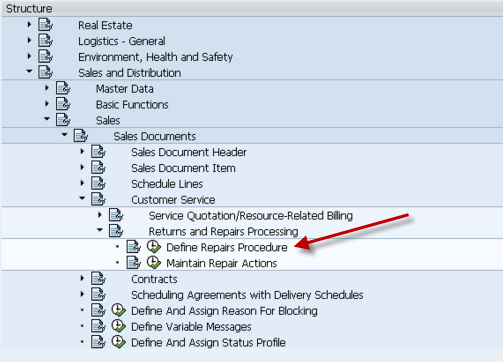
First thing is show you where in configuration you define the repair procedure.  The following screen shot shows you where to go in SPRO to configure the repair procedure.

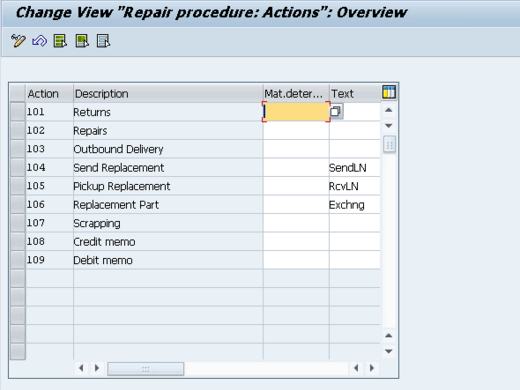
Initially, select the Maintain Repair Actions.  This screen will give you the translation of what each action means.  The actions are the key in the actual repair procedure, so I wanted to show you what they look like.  Normally, this screen doesn’t need to change unless you want to add better text to the action (this will show up in the repair screen).  Some of the important terminology in this screen:

  • Send/Pickup Replacement refers to loaned equipment.   Simply put, you send the customer a unit to use while the repair happens, then they send it back after they receive their repaired unit.
  • Replacement Part – this is an exchange.  It means the customer will keep this unit (and typically return the unit they currently have to you.  then you can repair it and add it to your refurbished/spares inventory).

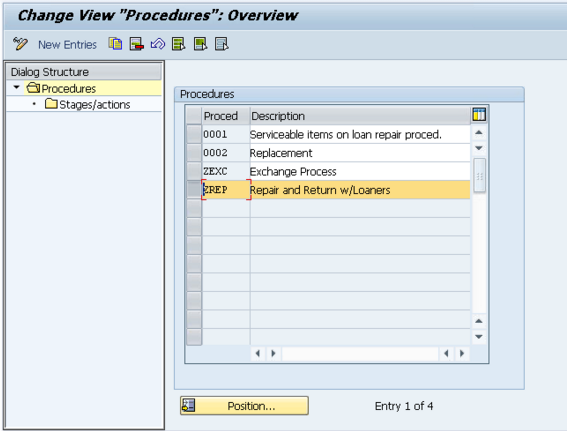
Alright, now on to the real work.  Next we will pull up the repair procedures.  I’m going to walk through the example of an in-house repair that allows loaners.  the next screen will show you how to get into the repair procedure.

Select the procedure you want to view (or copy in the event of creating a new one).

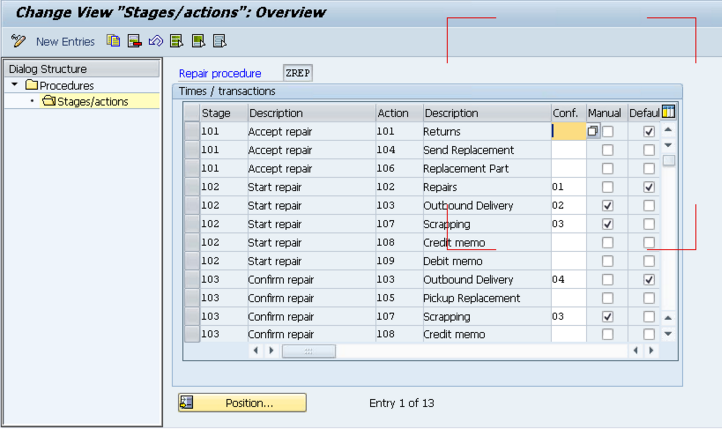
Now, you’re looking at the SAP logic of the repair procedure.  What you’ll notice is that everything is broken up by stages.    Remember, for each stage you can only define a single Default.  The stages are as follows:

  • 101         Accept repair: this is the actual receiving of the item
  • 102         Start repair: this is the repair of the item, or the processing
  • 103         Confirm repair: this is what happens after the service order is confirmed.

Now, if you look at the first stage(101) in the procedure below, you’ll see the following steps.  These are the steps you are allowed to do as soon as you enter in the material to repair.

  • 101         Returns                – this is flagged at Default, so that means this will automatically be placed into the sales order as soon as the repair procedure is selected.
  • 104         Send Replacement – this allows you to send a loaned piece of equipment to the customer
  • 106         Replacement Part – allows you to send an exchange to the customer.

Looking at stage 102, you’ll see the addition of Manual and Conf. populated.  Before I move on, the options for confirmation (conf.):

  • 01           Repair: fix me
  • 02           Do not repair/can be delivered: don’t fix me, but send me back
  • 03           Can be scrapped: scrap me
  • 04           Repaired/for delivery: I’m repaired, send me back to the customer.

Also note, if something is set as manual, even if 01 -> 04 above are selected, the item will not be automatically added to the sales order.  It will have to be manually entered.

Now looking at the actual data for stage 2 you’ll see that the numbers make a little more sense:

  • 102         Repairs                                 01                           : since this is 01, it means repair me, thus generate a service order.
  • 103         Outbound Delivery         02           Manual: this is the scenario  where the item cannot be repaired, so just send it back to the customer.  This is a manual step.
  • 107         Scrapping                            03           Manual:  Similar to 103, but this time we won’t even send the item back to the customer.
  • 108         Credit memo                                                     :  Create a Credit Memo Request for the customer, with reference this line item.
  • 109         Debit memo                                                       : Create a Debit Memo Request for the customer, with reference this line item.

I hope this makes sense of how to structure your repair procedure.  If you’d like more detail, please comment below.  Now for the next piece, how do I attach this repair procedure.

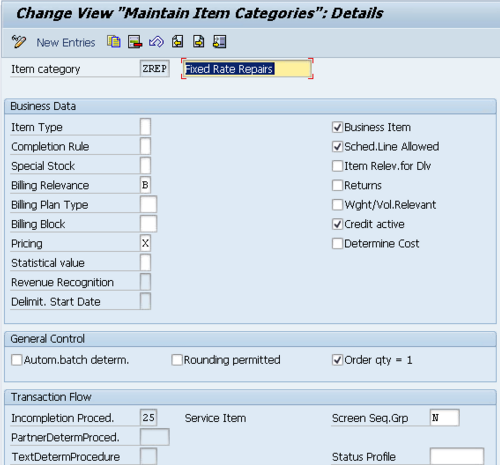
In the item category configuration, scroll to the bottom of the item category, and enter the Repair Procedure.  I’m not going into the details of how to select this item category (I’ll save that for another post).

I look forward to your comments,

If you need more in depth assistance on this, please contact us for additional consulting help,

Thanks,

Mike

Service Order – Using the Document Flow

Now in my opinion, one of the greatest things that SAP has added into the system is document flow.  this is especially true for SM.  If you’re new to SM or SD, you might not be all that familair with using document flow.  If you’ve ever visited an SD or SM document, you’ve most certainly seen this weird little icon:  .  If you plan to do anything in either of these areas of SAP, you’ll quickly realize it is your best friend.

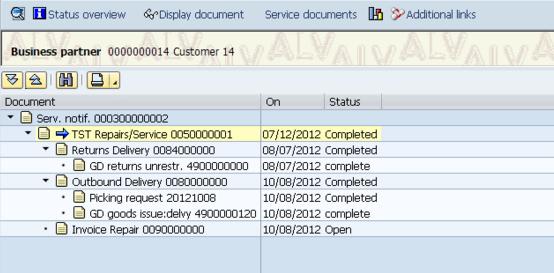
Document flow in SAP is simply the connection to all of the preceding/follow-on documents.  In the in house service scenario, a type document flow may look something like this:

You’ll notice that in this picture I was able to see notification, the repair sales order, the inbound delivery, the outbound delivery, the invoice, and any other SD related documents.  What you also may have noticed is the distinct lack of the service order, but there is a service documents button.

Unfortunately, in the design of document flow and the table structure for capturing this, the service documents were neglected in the initial design, so the Service Documents button I believe was an afterthought.  It’s still better than nothing, and I’ll give you some tips for making the best of it.

The first big thing you need to know is, if you’re starting at an SD document (delivery, sales order etc. ) be sure to click once on the sales order (make sure it’s highlighted, and you’re good).  then press the service documents button.  This will bring up a new screen showing the service order and any of it’s related documentation.

One of the other issues I’ve encountered with document flow is the inability to see sub-service orders in the documentation.  The only way to see if there are sub service orders is to drill into the service order, and look for the structure button

You will then need to click this button to see the sub service orders.  You can then drill into the order and see it’s individual document flow.  As a follow-on to this topic, if you have a complicated doc flow, for example…

Notification

Service Order (for quoting) – Repair Sales Order
     Service order
          Sub Service Order
          Sub Service Order
Inbound Delivery
Outbound Delivery


Now with a structure like this, you again, won’t be able to see everything depending on where in the structure you are at.  For example, if start at the service order (for quoting), you won’t be able to see the actual service order used for repair.  Instead, you’ll have to navigate to the notification, and then you’ll be able to see the structure below the notification, including the repair sales order.  The way the documents are laid out above, shows kind of how SAP structures them.  Since it is a pseudo parallel path, you have to work your way up to a common document before you can see the next path.  In this example, the notification is that common document.

There is a another big thing to remember when dealing with service.  You have to turn on the document flow for many of the items.  For example, purchase reqs, material transfer, etc. must be turned on before they will generate items in the document flow.  I HIGHLY encourage you to make sure these are turned on.  Not seeing the purchase reqs, or materials issued to a service order makes your job as a troubleshooter FAR more challenging.

Now that’s the basics of document flow, and if you’re not already using it, get familiar.  For me, it’s personally one of the best tools offered in the SD/SM module.

Thanks for reading,

Mike